

| Leather book | Thermal binding | Softcover | Spiral binding | |
|---|---|---|---|---|
| Page limit: | 10 – 370 pages | 2 – 450 pages | 20 – 150 pages | 1 – 300 pages |
| Colors | Blue, black, red, green | Blue, red, green, gray, black, yellow, white | Customizable | Blue, red, green, gray, black, yellow, white |
| Upgrades | – Corner protectors – Customized embossing – Ribbon bookmark |
– | – Customized cover design | – |
| Appearance | Matte or slightly glossy finish, sturdy, leather-look cardboard cover | Textured cardboard back cover, clear front cover | Satin matte, printable cover | Textured cardboard back cover, clear front cover |
| Price | From €15.90 | From €9.90 | From €11.90 | From €4.90 |
| More about Leather book binding | More about thermal binding | More about softcover | More about spiral binding |
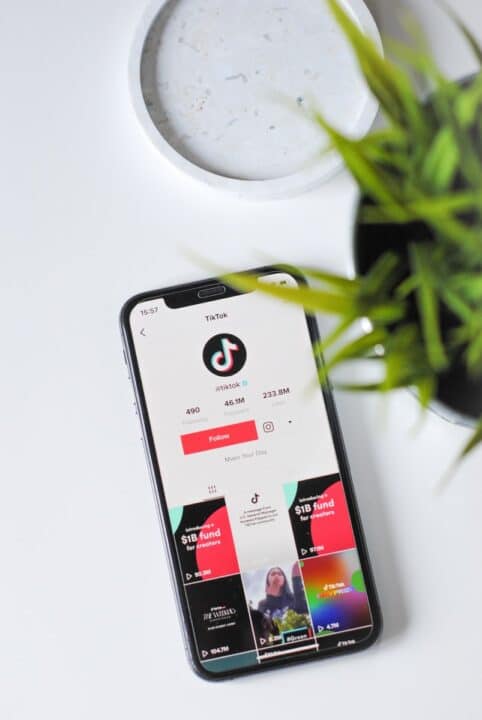
How to Add Subtitles to TikTok Videos and increase engagement!
TikTok is one of the most popular social media applications today, and millions of users are using it daily. If you want to maximize your exposure on TikTok, you need to make sure that your content is appealing and engaging enough to keep viewers interested in it. This means that you need to include subtitles in your TikTok videos so that viewers know what they’re watching. However, not all TikTok users understand how important subtitles are or how to add them to TikTok videos.
So, if you’re interested in learning how to add subtitles to TikTok videos and how having subtitles can help increase engagement, then this article is for you!
What is TikTok?
TikTok (also known as Douyin in China) is a social video platform developed by ByteDance that has over 1 billion users as of September 2021. If you’ve never heard of TikTok, here’s what it is: It’s like Snapchat or Instagram, except it’s for video rather than still images. It lets you create short videos up to ten minutes long and then share them with your followers. You can also follow other users on the platform, who will then be able to follow you back.
TikTok is becoming popular all over the world because it’s easy to use and fun as well as useful for sharing short clips with friends or strangers around the world. You can create an account free and start making videos with all sorts of fun filters and effects. You can also chat with friends who are on TikTok and share your videos with them.
What are Subtitles on TikTok videos?
Subtitles are text overlays that appear over the TikTok videos. They provide translations, descriptions, and other information about the video. You can use them to add clarity to your TikTok videos.
Subtitles are great for people who struggle with hearing or processing audio because they let you read along with the video without having to strain your eyes or ears! They also increase comprehension by providing additional information about what is being said during a video.

How Can Adding Subtitles Increase Engagement on Your TikTok Videos
Makes Your Content Accessible to More People
Using your smartphone to record a video and upload it on TikTok is easy. But, finding a massive audience to watch video on the platform is a little bit more complicated. However, subtitles are one of the most powerful tools you have at your disposal when it comes to increasing engagement on your TikTok videos. Here’s how.
In today’s world, a lot of people want to watch videos with subtitles! Subtitles are a great way to make sure that everyone can get the most out of your content, regardless of their ability to hear or understand what’s being said.
Deaf or hard of heard people can often get a lot out of subtitles because they can’t hear the dialogue as well as others. When you have a video with subtitles, it will be easier for these users to access and enjoy, which will increase engagement in your TikTok videos.
Overcome Language Barriers
Subtitles can be used to overcome language barriers by translating words or phrases into the user’s preferred language. This is especially helpful for content creators who may not have an interest in learning foreign languages but want their content translated into other languages so that it can be viewed by audiences around the world!
Moreover, your audience will appreciate this as well because it shows you care about them and want them to be able to understand everything that’s being said.
Improve User Watch Time:
People who are watching your video will be able to understand the message better and get more out of it. If people who are watching your video are having trouble understanding what’s happening, they may just give up on your video – but if they know exactly what’s going on, they might be more likely to stick around and watch until the end.
In fact, research has shown that subtitles can improve users’ watch time by 40%, and it also increases their chances by 80% of watching your entire clip – which means you’ll have more opportunities for engagement if you include them in your videos!
Transform your audio and
video to text and subtitles
- High accurate, on demand service
- Competitive pricing with the fastest turnaround using AI
- Upload, search edit and export with ease.
Improve SEO and Google Ranking
Subtitles are a great way to improve your SEO because they are indexed by search engines. When someone searches for a specific word or phrase, the search engine will look at the words that it finds in the subtitles of your video and return results for those particular words. This means that if you have subtitles in your videos, users can find them more easily, and this can improve their search engine rankings which means more traffic for you and more views for all of your videos!
User Experience
Adding subtitles to your TikTok videos is a great way to add more depth to your content and make it easier for your audience to understand what they’re watching.
It will also help you create a more inclusive experience for your viewers, as well as make it easier for them to interpret what they’re seeing. Your video will still be engaging even with the sound off, and your viewers won’t have to strain their ears while trying to make out what’s being said.
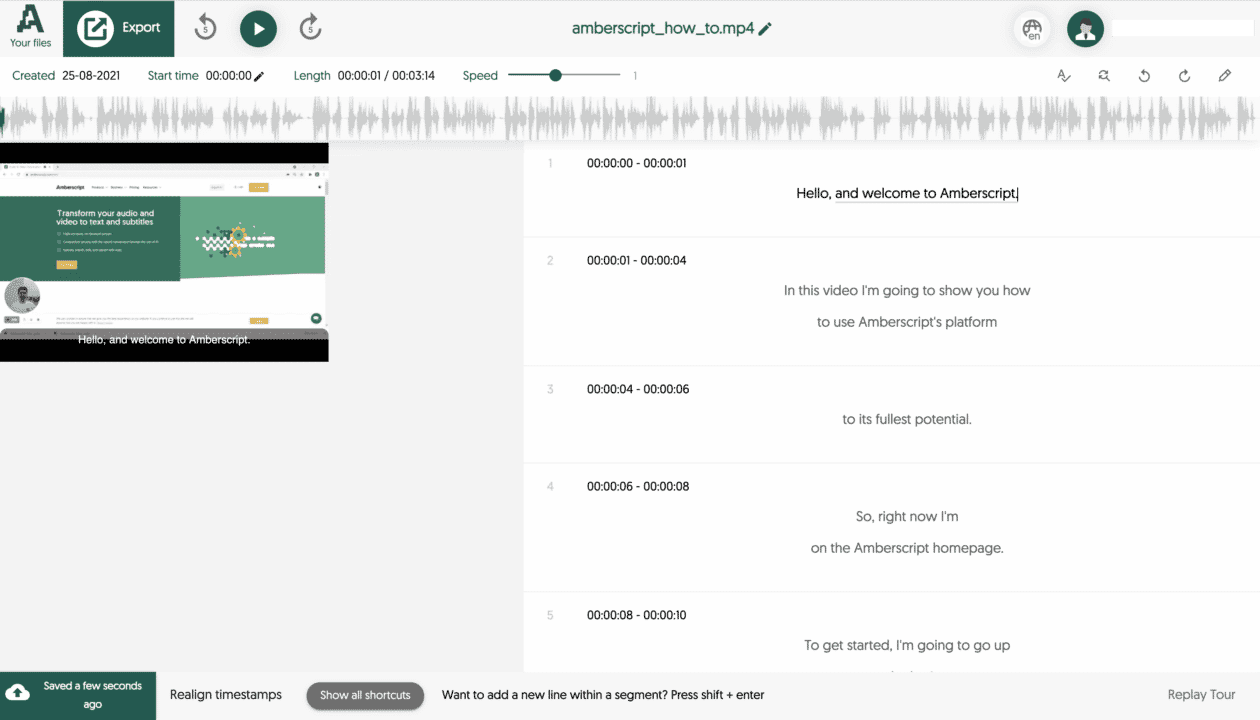
How to Add Subtitles to a TikTok video with Amberscript
Amberscript is a powerful subtitle tool that can help you add subtitles to your TikTok videos. It offers a lot of features, and the best part is that it’s really simple to use. Here’s how to use Amberscript to add subtitles to your TikTok videos:
1. Upload Your Video to Amberscript
Go to the Amberscript, click on upload file, and select the file you want to add subtitles for. The file must be in one of the following formats: MP3, MP4, AAC, M4A, M4V, MOV, WMA, OPUS, FLAC, MPG, and WAV.
2. Generate Captions with Amberscript
Once you’ve uploaded your video to Amberscript, it will automatically detect the audio track and generate captions for your video using advanced speech recognition technology.
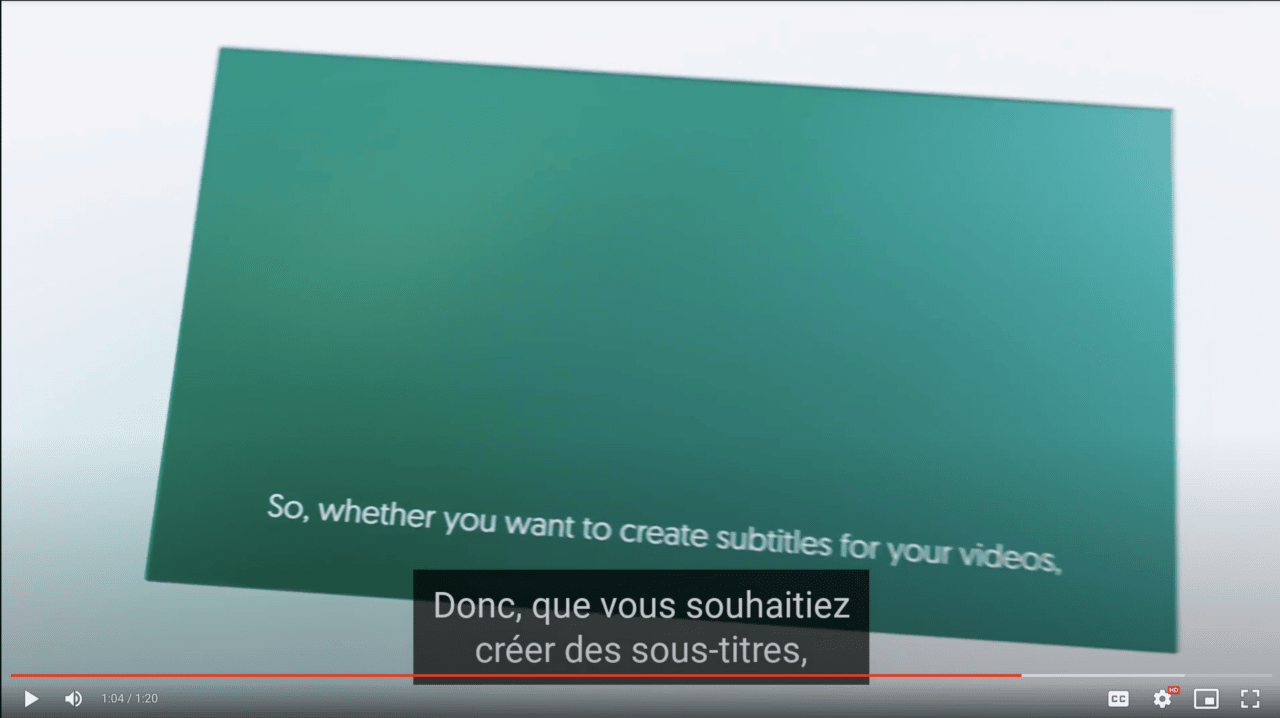
If you prefer a manual approach, there are also professional translation and captions services available. Our language experts will manually translate or create the subtitle into the language of your choice. Please note that automatic subtitles work with 35 different languages, and manual subtitles work with 11 different languages (though you can request a language by contacting our support). You can also manually type or edit the captions in our online text editor if you’d like.
3. Customize the Captions
Sometimes it’s just not enough to just add subtitles. You might want to personalize them, too. Using our online text editor, you can set up your own captioning style. You can customize the captions by selecting a specific font, size, color, and style. Some TikTokers prefer italic or cursive captions, whereas others prefer normal or bold texts. Customizing the captions is a great way to add some value and make your TikTok videos stand out.
4. Download the Finalized Video and Upload It to TikTok
Once you’ve customized your captions, download your subtitle file. You can choose from a variety of subtitle export options, including SRT, VTT, or EBU-STL files. After you’ve got your video ready, embed your subtitles into your video using any decent video editor tool. After that, just upload it back to TikTok!
Conclusion
TikTok has taken the internet by storm and become one of the most popular apps out there. People are filming their day-to-day lives and uploading funny or silly things on TikTok. People are also adding subtitles to those videos to make them funnier and easier to understand for the viewer.
Adding subtitles to your TikTok videos takes just a few minutes, but it’s well worth the time if you have a lot of non-English speakers following you or if you want to make sure that your message gets through on every video. It may seem like a small thing, but subtitles can help you reach more people and grow your audience.
How To Add Captions & Subtitles To A Twitter Video?
What is Twitter?
Twitter is a popular social media platform that makes it easy for individuals and brands to connect with their audiences. Users primarily communicate through short 280-character messages called ‘tweets.’ However, Twitter supports other forms of media such as photos, audio, and video.
Video is one of the best ways for your brand to reach your audience through Twitter. Unlike the text in tweets, there are no limits on the length of videos. While we love short and snappy content, sometimes it’s easier to communicate through longer and more personal media.
How can adding closed captions to your Twitter video increase engagement?
Adding closed captions to your Twitter videos is more than just functional. Captions and subtitles are proven to improve engagement and boost the performance of videos across social media platforms.
Here are some ways you’ll benefit from adding closed captions and subtitles to your videos:
Improves accessibility
Closed captions make your Twitter videos more inclusive. It makes it possible for those who are deaf or hearing impaired to enjoy your content. Inclusivity and accessibility tend to fall to the wayside for many brands. But having accessible content is important and helps you overreach a larger user base! Without captions, you could be missing out on connecting with millions of Twitter users around the world.
When it comes to accessibility make sure your captions are more than just summaries of the audio. You should be captioning every word, so users can enjoy the exact same experience as those watching with audio.
Better user experience
Most social media users tend to watch videos without sound. This is particularly true for a platform like Twitter, where the primary medium is text.
If users are silently browsing their Twitter feeds, they’re more likely to engage if the captions provide some context for the video. Otherwise, the video might make no sense or seem less interesting. As a result, they’ll scroll past your video without a second thought.
80% of consumers say they’re more likely to finish a video if there are captions available. Instead of forcing your audience to turn on their audio, make it easy for them to enjoy the video without it.
Help your videos stand out
Your audiences have never been more stimulated. We’re all being bombarded with content from the moment we wake in the morning. This doesn’t just include Twitter, we’ve got platforms like Tiktok and Instagram making it possible to scroll through endless amounts of videos and information.
On average, you have three seconds to capture the attention of a user. By adding captions, you have more than just the visuals to help generate immediate interest in your Twitter video. Once you’ve captured their interest, they’re more likely to complete and engage with your video.
Easier to understand
From audio to visuals, sometimes there’s a lot going on in a video. Maybe there are several voices talking at once. Perhaps you’re using a lot of technical terms.
Twitter captions provide an alternative way for users to absorb your content. Many users find it easier to understand the information they read versus through audio. Even the simplest of videos can benefit from captions to improve understanding. The more users understand your content, the more likely they are to engage, share, or re-watch.
Not only do captions improve comprehension, they also improve retention. Adults are more likely to remember brand names when videos include subtitles or captions.
Optimize for the algorithm
Many platforms have machine learning that helps the algorithm understand the audio and visual effects of a video. This is how they know who to best show your video to. You can help Twitter (and other platforms) understand your video through captions.
This can also help search engines, like Google, index your content. They’ll crawl your captions for relevant keywords and phrases to display your video to relevant users.
Many social platforms have denied that captions have any impact on results and rankings. However, Twitter video captions are still an effective way to ensure your videos are reaching the right audiences. You can also optimize your titles, descriptions, and title tags to boost your performance.
However, remember that closed captions and subtitles are tools to improve your Twitter videos. You should be using them as intended – to caption your videos. Do not use them to stuff keywords or add irrelevant information. This will create a poor experience for your audience and leave them feeling frustrated.
Transform your audio and
video to text and subtitles
- High accurate, on demand service
- Competitive pricing with the fastest turnaround using AI
- Upload, search edit and export captions and transcripts with ease.
Steps for adding closed captions to a Twitter video
Once you’re ready to upload closed captions to a Twitter video, you’ll first need to generate the captions. Once you have a file with the accurate time stamps and subtitles, you can upload this to Twitter.
Sounds complicated? Adding closed captions to your Twitter videos is actually easier than you might think. Instead of spending hours subtitling your videos, you can get your captions through Amberscript.
Amberscripts does the heavy lifting so you can have accurate subtitles with minimal time and effort. Here’s how you can add captions and subtitles to your Twitter video with the help of Amberscript.
1. Upload your video to Amberscript
Once your video is ready to go, you can upload it to Amberscript in just a few clicks.
2. Generate captions for Twitter with Amberscript
We offer two ways for you to generate captions for your Twitter videos. You can use our Automatic subtitles service or our Manual subtitles service.
Automatic subtitles:
Once you upload your video, our speech recognition engine creates a first version of your captions. This could save you up to 10x the time it would take to caption it yourself.
Automatic subtitles are a quick and budget-friendly way to generate captions for your Twitter videos.
Manual subtitles:
For more serious and technical videos, choose our Manual subtitles service. Manual subtitles take a bit longer but offer up to 100% accuracy. One of our language experts will perfect and quality-check your captions before delivering your files. We can also translate your subtitles to help you reach an even larger audience.
3. Customize the caption
Amberscript’s AI and speech recognition software is extremely accurate. You can expect your captions to be pretty close when it comes to text and time alignment.
However, everyone makes mistakes from time to time (even computers!). When using Amberscript’s automatic subtitle service, you’ll be able to make any necessary edits before downloading your files. This includes fixing any spelling errors for any proper nouns or adjusting the time stamps. You’ll also be able to add custom captions. Our online text editor makes it easy for you to preview your video and make any changes.
Amberscript Manual subtitles go through several quality checks, so there is no need for any detailed editing. However, if you want to polish the final captions, you can still do so using our online editor.
4. Download the finalized video and upload to Twitter
Once you’ve finalized your captions, Amberscript will generate a caption file for you to download. For Twitter, the best file format is SRT.
When uploading your video to a Tweet, you’ll be able to select ‘Upload caption file’ directly below the video. Upload your Amberscript .srt file. Once you’re happy with your text and video, you can publish your Tweet.
Another option for adding captions and subtitles to a Twitter video is to download your video with embedded captions. However, this method means Twitter may not be able to scan for keywords within your videos.
You can find up-to-date information on uploading caption files to a Tweet here.
—
Creating content for your social media channels is time-consuming. Prioritizing captions and subtitles can feel like a challenge. However, closed captions and subtitles are one of the easiest ways to improve the performance of your Twitter videos.
Amberscript makes it easy for you to get accurate captions, quickly and at an affordable price. So you can spend more time engaging with your audience, instead of writing captions.
Easily Transcribe Google Meet Sessions With Amberscript
Have an important Google Meet call coming up? Looking for a way to transcribe it, but don’t know how? We’ve got you covered.
With Amberscript, you can easily get transcripts of your meetings.
Whether you need to have the meeting transcribed by our AI or by a professional transcriber, Amberscript can help you get the job done quickly and accurately.
If you’re interested in discovering how to get your company’s transcription game to the next level—read on!
What is Google Meet?
Conference calls are a proven and effective way to brainstorm ideas, update or train entire divisions, and conduct essential meetings with clients and upper management. Google Meet, one of the many excellent tools offered by Google, helps get the job done.
Google Meet is a video and audio conferencing platform that allows users to connect with each other in real-time. With Google Meet, you can host meetings, share screens, and even collaboratively edit documents with up to 25 participants per meeting.
What is a Transcript
Google Meet meetings are a fantastic way to get everyone in your company on the same page. But what happens when you need to go back and review something that was said?
Maybe you missed an important point due to choppy internet access, or perhaps you wish there was a way to experience the meeting again in order to glean new insights from it.
That’s where transcribing comes in.
Transcribing is the process of taking an audio or video recording and converting it into writing. In other words, a transcript is an exact record of what was said during a meeting or conversation.
It’s a convenient and modern way to capture vital information from meetings, conferences, or interviews—preserving them in clear words and paragraphs that make sense and can be easily read by anyone who needs to know what happened during the meeting.
Whether you use them to help fill in knowledge gaps, train new personnel, or review team performance, transcripts are a great way for everyone in your company to stay on the same page—and make sure nothing is lost in translation.
Transform your audio and
video to text and subtitles
- High accurate, on demand service
- Competitive pricing with the fastest turnaround using AI
- Upload, search edit and export captions and transcripts with ease.
How Transcribing Google Meet Meetings Can Help You
Tools for business transcribing have a number of clear advantages. Knowing there will be exact records to refer to in the future means no more frantically taking notes during meetings, increased attention on calls, and accountability for both staff and clients.
When you can get more out of your online and in-person meetings—and when you can simply refer back to what you covered in them—you can reduce the number of meetings you need to hold.
But the benefits don’t end here! There are many more reasons why having transcripts of all your conference meetings can be a huge benefit. Let’s take a peek at eight more key areas of impact:
1. Meeting Reviews
Given that a Google Meet conference call typically lasts 45 to 60 minutes, listening to recordings in order to uncover specific information might take up a lot of time (not to mention cause unnecessary frustration).
However, finding the precise part of the conversation you need to go back to is simple if you have a transcription of your meeting. You can use the search bar to look for keywords or phrases or the speaker detection feature to sort by who is talking.
This not only saves you valuable company time but also ensures that nothing is missed, especially actionable items and activities that need to be followed up on.
2. Website SEO
Uploading conference transcriptions to your business’ website is a popular and effective technique to strengthen your SEO strategy.
Reading lengthy content like this not only keeps users on your website longer (improving your SEO score), but also gives you the chance to use additional keywords in your website’s content. Additionally, prospective customers will get an inside glimpse of how your business runs.
3. Corporate Transparency
Pulling meeting notes and highlights directly from the transcript makes it simple to share them right away when needed. Customers, shareholders, board members, and other stakeholders will appreciate the ease with which you can share such detailed information.
This not only enhances the standing of your business but also gives your customers a sense of worth and participation in day-to-day activities. With this level of openness, you can avoid misunderstandings or rapidly resolve them.
4. Employee Evaluations
KPIs and call analytics offer crucial information about staff productivity and behavior. But data by itself rarely provides the complete picture. Reviewing meeting transcripts offers a more subjective look at your staff members and reveals information that numbers and stats alone simply cannot.
For instance, a customer care agent may not resolve issues on the first call as frequently as you’d like, but they continually contribute great suggestions and valuable feedback during meetings. Call transcripts are a powerful and original technique to spot company leaders who might otherwise go overlooked.
Additionally, by looking over transcripts, your staff can evaluate their own performances—assessing their own strengths and shortcomings.
5. Industry Regulations & Legal Protection
Depending on the industry you serve, it can be legally mandatory for your business to record all Google Meet sessions and provide transcriptions of them.
This is particularly typical in the legal and financial sectors, as well as on various journalism and reporting platforms. Even if you are not obligated to do so, recording your calls for later review adds a strong layer of legal protection.
6. Accessibility
It is essential in today’s market that your promotional materials, website, video meetings, and other aspects of your business be as easily accessible as feasible. By transcribing your company conversations and conferences, you ensure that people who are deaf or unable to attend meetings due to an impairment can still participate and contribute.
7. Consumer Research
Google Meet transcripts are also great for learning more about your customers. As part of your market and consumer research, you should review transcripts of client conferences or even internal meetings with your market analysis team in order to gain insight into your customers’ needs, desired products or services, and expectations.
These transcripts can also be an excellent resource for learning more about client demographics, trend forecasts, how to improve your sales pitches, and employee training.
8. Record-Keeping
Finally, transcripts of meetings assist you in creating solid corporate archives and documentation. These transcripts will forever be available for inspection by compliance officers, consultants, and top management—and would be especially useful at year-end reviews or during board meetings.
Additionally, uploading transcripts to the cloud or your website will take up considerably less storage space because their file sizes are typically far smaller than those of video files.
How to Transcribe Your Next Google Meet Session
Transcribing a Google Meet meeting is a breeze! For beginners in the world of transcription, here are the four steps to get you started:
- Record Google Meet meeting
- Upload recording to Amberscript
- Specify a language
- Pick human or AI-powered transcription
And voila! We handle the rest
The first step is to record your Google Meet meeting. Then upload your recording file onto Amberscript and select the language of your meeting (multiple languages available, including English, Spanish, and French).
Next, choose whether you want an automated or manual transcript (professional transcribers are more precise, but AI is speedier and more affordable). We’ll then get to work processing your order and have your professional transcription ready to download in no time. It’s really that simple!
Amberscript: Pro Google Meet Transcriptions Made Simple
If you’re searching for a snappy and uncomplicated way to get transcriptions of your Google Meet meetings, Amberscript is the answer.
Whether you’re working with a professional transcriber or using our advanced artificial intelligence, we can provide you with the exact transcripts you need.
To discover more about how you can get the most out of your Google Meet meetings—connect with our team today!
How to Easily Transcribe Your Skype Calls
Need to transcribe Skype calls but don’t know how? If you’re looking for professional, 100% accurate Skype transcripts, Amberscript has you covered. We make it easy to transcribe your calls and quickly get the high-quality documents you need.
In this post, we’ll cover just how easy transcribing your Skype calls can be using Amberscript.
What is Skype?
If you’re not already familiar with Skype, it’s a free video and voice messaging app that enables you to easily connect with family and friends around the world. You can call landlines and mobiles at low rates or chat with people on your contact list.
The service has become increasingly popular over the last decade, especially among students who want to talk to their parents while studying abroad.
Skype also has a number of features that make it favored among businesses: one-on-one video calls, group video conferences, screen sharing, file transfer, and more.
What is a Transcript?
Simply put, a transcript is a written record of what was stated during a conversation or interview. It can be used for many intents, including business meetings, training sessions, academic research, legal proceedings, and more.
Often, it’s necessary to transcribe a recording in order to have it read back in its entirety. This can be especially beneficial if you’re working with someone who does not have access to the recording itself.
Additionally, transcripts are helpful for people who are hard of hearing or don’t speak the language being spoken. It can also assist with time-keeping so that you know which speaker said what and when.
Transform your audio and
video to text and subtitles
- High accurate, on demand service
- Competitive pricing with the fastest turnaround using AI
- Upload, search edit and export captions and transcripts with ease.
What Are the Benefits of Having Skype Calls Transcribed?
When it comes to business, there’s a lot of information that can be lost in translation.
In a meeting, you might have heard something essential and not realized it. An employee may have expressed something that was important for you to know. A customer might have mentioned a problem that needs fixing—but only if you knew how to listen for it.
Fortunately, Skype conversations can be transcribed—and that means all those lost moments are still available for review!
Transcribing company meetings is a great way to improve productivity, raise call quality, and hold employees more accountable, just to name a few of the many advantages of having access to thorough records in the future.
Here are eight more ways that professional transcription can help make life easier:
1. Reviewing Meetings
Transcription services can help you evaluate meeting records to find growth opportunities. It’s easy to miss essential meeting points when they’re talked over one another or spoken too quickly. With expert transcription, you can read Transcription services can make it easy to review meeting recordings and identify areas for improvement and growth in the future. When you’re going through your meeting recordings, it’s easy to miss critical points when they’re spoken over one another or at the same time as someone else. With professional transcription services, however, you’ll be able to go back and read exactly what was said and when—so there will be no more missed opportunities!
2. Increasing Website SEO
Transcriptions can help your SEO by making it easier for search engines to index the content on your website. If your enterprise has an online presence (and who doesn’t these days?), professional transcription services can help keep your readers on the page for longer (which raises your quality score) and also allow you to publish more keywords and phrases. Ultimately, this will help make sure that people who are looking for your business online can find it easily.
3. Fostering Corporate Transparency
Sharing transcripts is a great way to promote corporate transparency. In fact, when companies were asked about the benefits of having their meetings transcribed, nearly 70% of them said that it was because it publicized transparency. If you want to show your customers or stakeholders that you’re a company that values honesty and openness, then having your meetings transcribed is a great way to do so. It will also aid you in developing a more open work environment by encouraging people to speak up and share their ideas during meetings.
4. Personalizing Employee Assessments
When you have your meetings transcribed, you can use the transcripts as part of an employee assessment process. Transcripts allow you to conduct more personal, subjective staff reviews by providing an accurate record of their performance during group meetings or one-on-one interviews. This will allow for more meaningful and productive feedback sessions—the kind that make employees feel valued and heard.
5. Compliance & Legal Precautions
Transcripts improve industry compliance because they provide a complete record of what was said during meetings or interviews, which means there’s no question about what happened (and when). They also offer legal safeguards if something goes wrong later on down the line—you’ll have an accurate word-for-word record of what happened at any point in time, so nothing gets misconstrued or misunderstood!
6. Promoting Workplace Accessibility
Making your company more accessible for those who can’t speak clearly or hear well is vital to accessibility initiatives—and having chats on Skype transcribed by a third party is one way to accomplish this! It allows people with severe disabilities, like deafness or loss of mobility, access to the same crucial information as everyone else. This helps create a more inclusive workplace environment where everyone has equal opportunities at employment regardless of physical disadvantages.
7. Reliable Consumer Research
Skype transcriptions allow you to go back over conversations, identify key points and phrases that resonate with your audience, and then use that information to create content that meets their needs even more effectively. This helps improve sales and customer service because it gives businesses an understanding of what their clients need from them. It also helps businesses grow by providing insight into how they can improve their product or service offerings based on what people have responded best to.
8. Better Record-Keeping
Skype transcriptions help with record-keeping and maintaining efficient company archives. Official transcripts of past conversations with clients or colleagues remain accessible to compliance officers, overseeing counsels, and senior executives and are particularly helpful during important board meetings. Also, conveniently saving transcripts to the cloud or your home server requires far less storage space than video files.
How to Get Your Next Skype Session Transcribed
With Amberscript, transcribing a Skype call or meeting is straightforward. Here are the four steps you’ll need to take to get started:
- Record Your Skype session
- Upload Skype meeting recording to Amberscript
- Select a language
- Choose human or AI-powered transcription
And finito! The rest is on us
To begin, start a Skype meeting and record it by clicking the button that says “More Options,” and then click “Start Recording.” You can stop, start, or pause the recording by using the buttons at the bottom of the screen. When you capture a Skype for Business meeting, you get everything, including sound, video, instant messaging (IM), slides, screen sharing, and whiteboard activity. Twenty-four hours is the maximum recording time. Longer calls may be broken up into more than one file. Your Skype call recording is downloadable for 30 days.
Next, upload your files to your Amberscript dashboard and select your preferred Skype subtitles or transcription style and language. There are many languages to choose from, such as English, Spanish, and French. Because our language specialists are native speakers, they can write with the highest degree of accuracy in either “clean read,” where the text is made more intelligible, or “verbatim,” where every word is transcribed precisely as it was pronounced.
Now simply decide whether you want an automated or manual transcript. Let’s take a look at each one in more detail.
- Automated: Automated transcripts are quick and 90% accurate, thanks to our cutting-edge speech recognition AI. Your transcript will be ready in about 5 minutes, and you can edit it online with our free Transcript Editor.
- Manual: Accomplished by experienced professionals, our manual transcripts are more precise, but they take longer to complete—usually 12 hours from order to delivery. They’re also slightly more expensive than automated transcripts, but if your job requires accuracy above all else, this might be the best option for you.
All done! In no time, you’ll be able to download your professionally transcribed document. That’s how easy it is!
Amberscript: Pro Skype Transcriptions by the Best
At Amberscript, we believe in the power of accurate transcripts. We know that when you’re looking for a reliable and efficient transcription service, it’s essential to work with a company that understands just how important your files are to you. That’s why we’ve created a team committed to delivering accurate, timely, and affordable transcripts.
From processing to project completion, Amberscript is devoted to providing our customers with the best possible transcripts so you can get back to what’s important—your business!
Try Amberscript for free! Sign up today, or get in touch with our team directly to learn more about how to maximize your Skype conversations.
How to Transcribe Your Microsoft Teams Meeting
For many individuals, video conferencing has become an everyday aspect of their lives and work. From corporate meetings to remote training to virtual get-togethers with clients and colleagues, more and more people rely increasingly on tools such as Microsoft Teams.
In this blog, we’ll discuss the importance of Microsoft Teams transcription and how easy it is to transcribe your next MS Teams session with Amberscript.
What is Microsoft Teams?
Microsoft Teams is a free multi-channel corporate communications platform and virtual workspace. It’s designed to help you connect and collaborate more effectively with your coworkers, so you can get more done faster.
Teams offers a range of tools to help you get the most out of your meetings: whiteboards, screen sharing, audio, and video conferencing are just some of the many great features available.
If you have a major team meeting coming up—whether at home or in the office—Microsoft Teams makes it feasible to get up close and personal with your coworkers no matter how far away they are!
What is a Transcript?
Do you need to keep track of what was said during a discussion or interview? Do you want to make sure that everyone who needs to know about the meeting can read it? If so, a transcript is the answer.
A transcript is a word-for-word written record of what was said during a conference or consultation, and it’s used for various purposes. It may be requested for those with a hearing impairment, who don’t speak the language being spoken, or for those unable to attend the meeting in person. In addition, transcripts help keep track of who said what and at what time.
Transform your audio and
video to text and subtitles
- High accurate, on demand service
- Competitive pricing with the fastest turnaround using AI
- Upload, search edit and export captions and transcripts with ease.
Why Transcribe Teams Meetings?
Your employees are busy. They’re working on projects, taking care of clients and customers, and keeping up with the latest news in their industry. So when you call a meeting in Microsoft Teams, it’s not always possible for every employee to be present at the time of your call. But what if that information is important?
That’s where transcription comes into play. A lot of critical information gets lost in translation in the corporate world—and those lost moments could be costing your company money. Luckily, Microsoft Teams meetings may be transcribed so that all those moments are available for review at any time.
There are several benefits to transcribed corporate meetings: boosting productivity, enhancing call quality, and making employees more accountable for their actions, just to name a few!
Let’s go more in-depth with these eight additional advantages of expert Microsoft transcription:
1. More Clarity From Meetings
Transcription services can help you evaluate meeting records to find growth opportunities. It’s easy to miss essential meeting points when they’re talked over one another or spoken too quickly. With expert transcription, you can read exactly what was said and when—no more missed points!
2. Serves As a Pro SEO Hack
Search engines can index your website’s content more efficiently if you upload your Microsoft Teams meeting transcriptions. Transcripts keep your readers on the page longer (which boosts your quality score) and allow you to publish more data-rich keywords and phrases (which improves your page ranking). This enables potential customers to search and locate your company online faster.
3. Boosts Corporate Transparency
Transcripts increase corporate openness and accountability. When asked why corporations transcribe their meetings, over 70% said it promotes honesty and integrity. Thoroughly documenting your Microsoft Teams sessions shows consumers and stakeholders that you respect candor and transparency. It also aids in building a more confident work environment by encouraging individuals to speak out and share their thoughts during meetings.
4. Personalizes Employee Evaluations
Meeting transcripts can be used for staff evaluations. Transcripts provide an accurate record of employee performance during group meetings or one-on-one interviews, allowing for more personal, subjective appraisals. This will ultimately enable more meaningful and effective feedback sessions, making staff feel genuinely appreciated and heard.
5. Meets Legal & Industry Regulations
MS Teams transcripts help maintain industry compliance by providing a comprehensive record of what was said during meetings or interviews (and when). They give legal protections if something goes wrong later on by equipping your firm with a word-for-word record of what transpired, so nothing is misread or misunderstood.
6. Supports Accessible Workplaces
Transcribing Microsoft Teams discussions is one approach to make your firm more accessible to folks who can’t speak or hear properly. It gives those with severe impairments, such as acute deafness or mobility loss, access to vital company information. This creates an inclusive workplace where everyone has equal job opportunities despite physical limitations.
7. Consumer Research You Can Trust
MS Teams transcriptions allow you to review discussions, find significant points and phrases, and generate more compelling content. This greatly improves sales and customer service because companies learn what clients really want. It helps businesses grow by showing them how to enhance their products and services based on real-time customer feedback.
8. Improves Company Archives
Transcriptions of your Microsoft Teams meetings assist in documenting and preserving corporate records. Compliance officers, supervisory counsels, and senior executives often refer to official transcripts of former client or colleague interactions at yearly board meetings. Also, a dedicated Microsoft Teams transcript of meetings folder will take up much less space on your local server than a collection of video files would.
How to Get Your Next Microsoft Teams Session Transcribed
Transcribing a Microsoft Teams meeting is simple using Amberscript. Follow these four steps to get started:
- Record Your Microsoft Teams session
- Upload the recording to Amberscript
- Specify a language
- Choose human or AI-powered transcription
And done! We’ll handle it from here
Recording Teams meetings is simple! First things first: join or initiate a meeting. To record the session, you must be its organizer or a member of the same organization. If you’re wondering how to record a Teams meeting, simply click “Start Recording” under “More Actions” (only one participant may record the session). Press “Stop Recording” when the meeting is finished, then wait for the file to render. The download link will be available in the chat or channel conversation once the recording has been processed. And that’s how to record on Teams!
Next, upload your files to Amberscript’s dashboard and pick the Microsoft Teams transcription style and language that best suit your needs (several languages are available, including English, Spanish, and French). Thanks to our language specialists being native speakers, they can write with the maximum degree of accuracy in “clean read,” where the text is made more understandable, or “verbatim,” where every word is copied precisely as it was uttered.
Now just determine whether you would like an automated or manual transcript. Here’s a closer look at each option in more detail.
Automated: Our highly advanced voice recognition AI makes automated transcripts speedy and 90% accurate. In about 5 minutes, your transcript will be prepared, and you can use our online Transcript Editor to make any necessary changes.
Manual: Our human-powered transcripts, produced by skilled experts, are more accurate but take longer to complete—typically 12 hours from request to delivery. Although they cost more, this can be your best option if accuracy is your top priority.
Mission complete! You’ll be able to download your expertly transcribed text in no time. It’s just that simple!
Amberscript: Top-Notch Microsoft Teams Transcriptions
If you’re looking for the highest-quality Microsoft Teams transcripts, Amberscript is here for you. We know that when a transcription service is done well, it can be a game-changer for your business—enabling you to gain insights into your meetings and make more informed decisions.
That’s why, at Amberscript, we are committed to providing our clients with fast, reliable, and easy-to-read transcripts from top to bottom. Now you can spend your energy where it matters most: your company!
And the best part? Amberscript is free to try! Sign up today if you’re ready to make the most of your MS Teams meetings.
How to Get French Subtitles For TV Shows and Movies
Placing French subtitles in your favorite TV shows and movies is essential if you’re learning French.
In addition, what if you’re watching English movies and French is your native language? Either way, you’ll want subtitles in French.
Thankfully, with the introduction of technology, it’s possible to add French subtitles to any video. In this article, we’ll show you how!
What are Subtitles and Captions?
Many people use the words subtitles and captions together. However, this shouldn’t be the case. Both phrases have different meanings and purposes.
You use subtitles when you can hear the language but don’t fully understand it.
You can use captions when you cannot hear the audio in a video. For example, deaf people and people who struggle to hear audio may use captions.
Let’s look at both words in a deeper context:
Captions
If you’re young, you’re probably used to seeing or using captions. However, media companies have only used captions to help deaf and hard-of-hearing people since the 1970s.
By the 1980s, captions became mandatory in the United States on all broadcast TV. However, you couldn’t initially turn the captions off.
By the 1990s, broadcast TV companies started using closed captions, whereby users could turn the captions on or off.
In 2022, most media companies can provide captions in their videos. These companies include Netflix, Amazon, cable networks, movie theaters, YouTube, etc.
Subtitles
Subtitles have been around much longer than captions. Media companies first started using subtitles in the 1930s.
During the 1930s, silent film moved into spoken audio to help foreign audiences understand the content.
However, subtitles aren’t appropriate for deaf or people who struggle to hear in most cases because they don’t include the aforementioned non-speech sounds required for anyone with hearing difficulties.
Today, subtitles are readily available on many videos, including YouTube videos and some streaming platforms.
However, subtitles aren’t available on all videos, which is why you need a captioning service.
Transform your audio and
video to text and subtitles
- High accurate, on demand service
- Competitive pricing with the fastest turnaround using AI
- Upload, search edit and export with ease.
How French Subtitles Can Help You Learn French
French is a beautiful yet sometimes challenging language to learn. Therefore, you’ll want to speed the learning process up and make it more comfortable.
Using French subtitles on English videos or French movies is one of the best ways to learn French.
Here’s how French subtitles can help you learn French:
1. Expands Your Vocabulary
You may hear slang, idioms, and constructions when listening to people speak French. Often the difference between a fluent speaker and a non-fluent speaker is understanding these phrases in general conversation.
When using subtitles in French, you’ll hear more slang, idioms, and constructions. As a result, you’ll learn and understand these phrases quicker.
In addition, if you watch French movies with subtitles, you can learn more conversational expressions and understand them in context.
2. Increases Your Reading Speed and Listening Comprehension
Is there anything worse than locals talking fast when learning a new language? It makes learning French far more challenging.
If you watch French movies with subtitles, you’ll hear locals often speak the language quickly, but you’ll also have subtitles on the screen.
Therefore, it can boost your reading speed and listening comprehension over time.
3. Helps Pronunciation
When learning a new language, it’s essential to grasp the pronunciation of specific words.
Watching French movies with subtitles allows you to see people speak the language while reading the words through the subtitles. As a result, you’ll improve your understanding and pronunciation of words.
Tips for Finding French Videos with Subtitles
Suppose you’re trying to learn French like millions of people worldwide? The best way is to watch French videos with subtitles.
Still, where do you find such content? With modern technology, there are many ways you can watch videos with French subtitles.
Here are some of the best ways:
YouTube Videos
YouTube has various superb videos and channels for anyone looking to learn French. One of the most popular channels is Cyprien. His videos are often comedy sketches. He has over 10 million subscribers and over 1.5 billion views. Cyprien – School is an excellent French video with subtitles.
His videos typically use conversational French language, including slang and everyday nouns. Most importantly, many of his videos offer captions in French to help you learn.
Natoo is one of France’s top comedic YouTubers and an excellent singer. Natoo uses various common French slang words that are essential for grasping the modern French language.
Many of this channel’s videos provide subtitles in English and French. Therefore, you can learn to read French words specific to the bathroom and hygiene.
Kevin Tran 陈科伟 is one of France’s top YouTube comedy channels built by two brothers of Asian descent. It’s one of the best YouTube channels for learning French slang and grasping Parisian culture. However, their channel is more suited to advanced learners.
Unlike the other channels mentioned, the subtitles are only available in French. Still, it’s an excellent way to learn conversational French.
Nota Bene is a terrific channel with French subtitles. Suppose you want to learn about French history and the French language at the same time? Then this is the perfect channel for you.
Unfortunately, not all YouTube videos have subtitles to help you learn French. However, you can filter out videos that don’t have subtitles during your search.
For example, find the small ‘filters’ box near the top left of the search results’ Click features, and then select ‘subtitles.’
In addition, you can switch on the subtitles by clicking the “CC” box if you’ve already started watching a video. Some videos may have additional subtitles that are not in French or English.
Streaming Services
Do you use streaming services to watch your favorite movies and TV shows? Millions of people do. The phrase ‘Netflix and Chill’ has become commonplace in Western culture.
Did you know it’s possible to watch French movies with subtitles through a VPN? It allows you to use subtitles on Netflix for French TV shows and movies.
However, Amazon Prime is another superb option. They offer a similar streaming service to Netflix and allow you to use French subtitles.
Using a VPN is illegal in some countries; it also goes against the terms of use of many streaming companies. Therefore, take note of this before using a VPN service.
TV5Monde
One of the best ways to learn French is through the TV channel TV5Monde. You can watch completely free movies or TV shows with French subtitled content from levels A1 to B2 on the CERF.
Initially, the TV5Monde website was text and video only. However, all video series now come with interactive quizzes and notes on culture to boost your language skills.
There are even hilarious and free subtitled music videos on the website. Therefore, you can use the French subtitles to enjoy French karaoke.
FluentU
If you’re looking for a vast resource of French movies and TV shows, FluentU is an excellent website. Their website also includes news segments, blogs, and music videos with subtitles to help you learn French.
In addition, if you want to remember specific French words, place them on the flashcard decks in the video player. You can then resume watching the video and come back later.
Steps for Creating Your Own French Subtitles
It’s challenging to find French subtitles on many videos despite growing options for French subtitles. However, you can now create your French subtitles without relying on YouTube or streaming services.
At Amberscript, we can automatically convert any audio and video to text. Our service is available in 39 languages—including French. Therefore, you’ll never have to worry about finding French subtitles again. You can also put English subtitles on French videos.
Here’s how you do it:
Upload Video Into Amberscript
Upload any video into Amberscript. If you find videos on YouTube that don’t provide subtitles, download them and upload them to Amberscript. Our speech engine recognition builds the first draft from your audio.
Let Our AI Create Your Subtitles
Is there anything worse than waiting ages for your subtitles? When you use Amberscript, we use our super-fast AI service for a fast turnaround. In addition, you can edit the text in our online editor—which allows you to revise, highlight, and scroll through the text with ease.
Export Into Multiple File Formats
Once our AI has created your subtitles, we can export your transcript into Word, JSON, Text, and various other formats. We can even add speaker distinction and optional timestamps.
How to Get German Subtitles For TV Shows and Movies
Including German subtitles on your favorite movies and TV shows is vital if you’re a German speaker or want to learn German.
After all, it’s more straightforward to understand a language if you can see and read the words as the characters talk.
Thankfully, there are ways you can place German subtitles on your favorite movies and TV shows. In this article, we’ll show you how to use subtitles on German videos.
What are Subtitles and Captions?
You may have heard of the terms subtitles and captions. Many people use them interchangeably; however, both terms have different meanings and purposes.
You can use captions when you cannot hear the audio in a video.
You can use subtitles when you can hear but don’t understand the audio in a video.
Let’s take a deeper look at the two words:
Subtitles
Media companies first introduced subtitles in the 1930s. During this period, silent film transitioned into spoken audio to accommodate foreign audiences that didn’t understand the local language.
Today, the primary goal of subtitles is still to translate spoken audio into words that a foreign audience will understand.
In most cases, subtitles are not appropriate for deaf or hard-of-hearing viewers.
That’s because subtitles don’t include the aforementioned non-speech sounds that provide a viewing experience for those who can’t hear audio.
Captions
Until the 1970s, deaf and hard-of-hearing people struggled to understand TV shows and movies. However, media companies introduced captions in the 1970s to accommodate them.
By the 1980s, captions became mandatory in the United States for broadcast TV. Initially, you could not turn off captions; they were always part of the video.
However, media companies developed closed captions to allow users to control whether captions were on or off.
Today, most media companies offer captions to their viewers—including movie theaters, cable networks, YouTube, streaming services, Vimeo, and Brightcove.

How German Subtitles Can Help You While You Learn German?
So you’re learning or want to learn German? It’s a fantastic language that can be challenging to learn.
Still, you can speed up the learning process by using subtitles in German. Here’s how:
1. Builds Your Vocabulary
The main advantage of using German subtitles on your favorite movies and TV shows is building your German vocabulary.
Whenever you hear slang words and constructions, you’ll see them translated into German on-screen. Therefore, you’ll understand the phrases quicker.
If you watch German movies with subtitles, you’ll build efficiency with various colloquialisms and conversational expressions. However, you’ll also encounter them in context.
If you don’t understand the expressions, you can replay the video as much as you want.
2. Advances Your Reading Speed and Listening Comprehension
The most challenging part about learning another dialect is listening to native speakers talk fast.
When a local speaker talks, the sound units connect rapidly. As a result, it can be difficult for the untrained ear to understand.
Thankfully, German movies with subtitles play at the same speed as a general German conversation.
Although this may feel quick for you, it will increase your reading speed and listening cognizance over time.
3. Improves Your Pronunciation
A visual connection to a new dialect is vital when learning a new language.
When you watch German movies with subtitles, you’ll witness the characters speak the words as you read them on-screen.
Therefore, you’ll improve how you pronounce words and understand the terms in a greater context.
Transform your audio and
video to text and subtitles
- High accurate, on demand service
- Competitive pricing with the fastest turnaround using AI
- Upload, search edit and export with ease.
Tips for Finding German Videos with Subtitles
If you’re looking to learn German, there’s no better way than watching German videos with subtitles.
However, where do you find them? Since the introduction of modern technology, there are many options:
1. YouTube Videos
YouTube has many excellent videos geared toward learning German. Some videos even offer closed captions and subtitles, which you can switch on and off.
BookBox is a popular YouTube channel featuring speakers reading German children’s stories. The speakers read the stories slowly to help kids learn the language.
BookBox is also superb because its videos are under seven minutes long. As a result, you can effortlessly fit them into your daily schedule.
EasyGerman is an excellent YouTube channel if you’re an intermediate to advanced learner. Their videos tackle cultural topics, specific grammar, and everyday street talk.
Learn German with Herr Antrim is another terrific YouTube channel for learning German. Many of his videos include subtitles in German to help you understand the language. He has aimed much of his content at beginners, so it’s excellent if you’re just starting.
Germany’s public broadcaster—Deutsche Welle—has an excellent YouTube channel for learning German with subtitles. Their topics are shopping, grammar, and daily life in Germany.
WALULIS STORY – SWR3 is another superb YouTube channel with subtitles. It covers everything from politics to popular culture.
However, not all YouTube videos have subtitles. When you search for videos on YouTube, use the filter to show only videos with subtitles; this can save you time and effort.
For example, find the small box near the top left of the search results saying ‘filters.’ Click features and then select ‘subtitles.’
You can switch on the subtitles by clicking the “CC” box at the bottom of the video window. Some videos may have additional subtitles that are not in German or English, which is excellent for learning other languages.
2. Streaming Sites
Streaming sites can be an excellent resource for finding German movies with subtitles.
Using a virtual private network—commonly called a VPN—can be excellent for using streaming services. They offer a selection of German TV shows and movies. You can often use German movie subtitles on Netflix for German films and TV shows.
Another option is Amazon Prime. They offer a similar steaming service to Netflix. They even allow you to access German movie subtitles, which can help you learn German.
However, using a VPN is illegal in some countries, and it’s also against Netflix’s terms of use. So keep that in mind before you use a VPN.
3. FluentU
FluentU is an excellent resource for watching native German movies and TV shows. Their website has various videos in German—such as music videos, news segments, and blogs.
Many of the videos offer interactive subtitles to help you learn the language.
If you want to remember specific German words, you can place them on your flashcard decks in the video player, resume watching the video and come back later to revise.
4. Public Broadcasting Channels
Another superb option is WDR Mediathek (WDR Media Center). It’s one of the top public TV networks in Germany, and they produce a vast range of content.
However, WDR creates its content for the German market instead of German learners. That doesn’t mean you can’t use it to your advantage. The website can still provide subtitles to help you learn German.
ARD Mediathek (ARD Media Center) is also an excellent option. Unlike WDR, they focus their content on intermediate to advanced learners with made-for-TV movies. Ensure you watch videos marked in the search results with UT.
ZDF Mediathek (ZDF Media Center) is another outstanding choice for learning German. However, you may need a VPN to access their content because it’s limited to specific areas.
The videos on ZDF are mostly TV shows, news shows, and documentaries for the German market. However, you can learn German subtitles on many of their videos.

Steps for Creating Your Own German Subtitles
It can be tricky to find German subtitles on many videos despite increasing options for German subtitles on the internet.
However, you can now make your own subtitles in German without relying on streaming services, public broadcasters, or popular YouTube channels.
We can automatically convert any audio and video to text at Amberscript. Our service is available in German and 38 other languages. As a result, you won’t have to worry about finding German subtitles ever again!
Here’s how you do it:
1. Upload Video Into Amberscript
Upload any video from your computer or mobile device into Amberscript. Our speech engine recognition builds the first draft from your audio.
2. Let Our AI Create Your Subtitles
At Amberscript, our super-fast AI service ensures a rapid turnaround. In addition, you can edit the text in our online editor—which allows you to scroll through the text, revise, and edit.
3. Export Into Multiple File Formats
Once our AI has created your subtitles, we can export your transcript into Word, JSON, Text, and various other formats. We can even add speaker distinction and optional timestamps.
How to transcribe a Google Hangouts meeting like a pro
Looking for a way to transcribe a Google Hangouts meeting but don’t know how or where to start? You’re not alone!
When running a company, time is money: you need to get the most out of every minute. If you’re spending your time doing the work that somebody else could do for you, that’s a huge waste of resources. That’s why we’ve created Amberscript: a platform that allows you to get transcripts from your meetings and calls quickly and easily.
Amberscript helps millions of people and organizations to effortlessly obtain transcripts. Whether it’s by using our cutting-edge AI or by working with an experienced human transcriber, we’ll get the job done quickly and accurately.
Want to learn how to improve the quality of your company’s transcriptions? Keep reading!
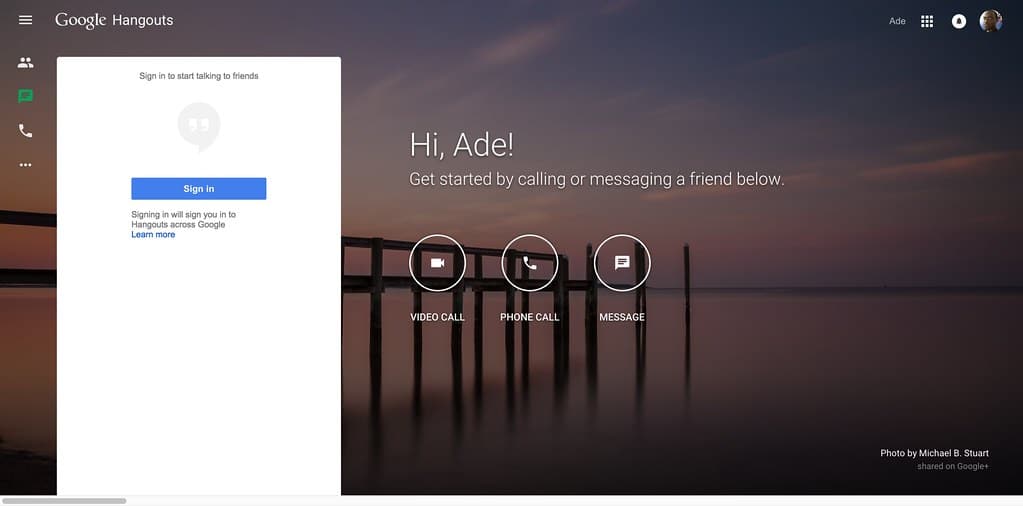
What is Google Hangouts?
Whether you’re looking for a cost-effective collaboration platform for your business or just want to connect with family and friends, Google Hangouts is a great choice.
Set up is simple, and it comes with free call minutes, so you can use it to conduct unrestricted calls worldwide. In addition to real-time text, phone, and video chats, Hangouts also allows participants to share screens, whiteboard tools, Google Docs, and more.
What is a Transcript?
Transcripts are a fantastic way to ensure that everyone on your team is on the same page—figuratively and literally!
With Hangouts, getting all of your employees together for a Google video conference call is easy. But what if there’s someone who missed the meeting? Or what if you want a way to review everything that was said to gain a better understanding?
That’s where transcription comes in. With transcripts, you won’t have to worry about miscommunication—you’ll be able to look back at what was said in your recordings and see exactly who said what, and when.
Transcribing involves the process of translating an audio or video recording into writing. Simply put, it’s a clear record of what was said during a meeting or conversation.
You can use your hangouts transcript for all sorts of things: training sessions, product demos, board meetings, sales calls, employee reviews—the possibilities are endless!
Transform your audio and
video to text and subtitles
- High accurate, on demand service
- Competitive pricing with the fastest turnaround using AI
- Upload, search edit and export captions and transcripts with ease.
The Benefits of Transcribing Google Hangouts
There are tons of obvious benefits to using business transcription software: no more hastily taking notes throughout meetings, increased call attentiveness, and employee accountability are just a few advantages of Knowing there will be detailed records to review in the future.
Imagine the number of meetings you could reduce when you’re able to squeeze more out of the ones you currently hold. But the positive perks don’t stop there! Having your Hangouts transcribed can offer many additional advantages.
Here are eight more occasions where professional transcription makes a difference:
1. Reviewing Meetings
Playing back recordings to extract specific information can take a substantial amount of time, not to mention create undue annoyance, given that Google Hangouts chats often last more than an hour.
But if you have a written record of your session, it’s easy to find the exact part of the conversation you need to go back to. In addition to searching for keywords or phrases, you can also utilize the speaker identification tool to sort by who is speaking.
While saving you crucial business time, this approach also guarantees that nothing is overlooked, especially when it comes to things that require immediate attention.
2. Boosting Website SEO
Content is king. It’s a phrase you’ve probably heard before, and it’s easy to understand why. The more data-rich content you can provide on your website, the better it will perform in search engines and the more traffic you’ll get.
But what if there was another way to boost your content marketing and search engine optimization game?
If you’re uploading conference transcriptions on your website, you’re already doing something right! Not only does this practice keep readers on your web pages for longer (which improves your SEO score), but it also provides you with the opportunity to include more keywords in your website’s text.
3. Promoting Corporate Transparency
As a business, you want to be transparent. You want your customers, shareholders, board members, and other stakeholders to know that you are open and honest with them.
One way to foster a sense of corporate transparency is by making your transcriptions available to the public. When meeting notes and highlights are pulled straight from the transcript, they are easy to share instantly if needed.
This not only enhances your reputation but also gives your audience a sense of worth and involvement. With this much transparency, you can avoid misunderstandings or quickly clear them up if they happen.
4. Employee Assessments
Employees do better when they know what’s expected of them, and reviewing transcripts is a great way to get that information across.
For example, if you’re looking for someone who can solve problems quickly and thoroughly, transcripts can show you who those people are. If you need someone who’s able to understand clients’ needs and give them the information they require, transcripts will help you find that person too.
A transcript gives you a personal look at your employees and shows you things that numbers and statistics alone can’t. As a result, call transcripts are a great way to find leaders in your company who might be overlooked otherwise.
5. Industry Compliance & Legal Safeguards
If you’re in the legal or financial industries, it’s likely that your business is required to record and transcribe all Google Hangouts sessions. This is because of the sensitive nature of what’s being discussed and the need to preserve accurate records.
Even if you’re not lawfully bound to do so, transcribing your online chats so you can have them on hand to read later is a solid way to safeguard yourself against any conceivable legal situation.
6. Encouraging Accessibility
In today’s market, your business’s promotional materials, website, video meetings, and other parts should be as accessible as possible. Transcripts are one of the best tools for ensuring your company is genuinely accessible to everyone.
By having your company’s meetings and conversations typed up, you make sure that people who are deaf or can’t make it to meetings because of a disability can still take part.
This means they get the same information as everyone else and can make decisions based on what they’ve learned. It also enables them to sufficiently understand the context of discussions and guarantees they’re not left out of any decisions.
7. More In-depth Consumer Research
You can also discover a lot about your customers from the transcripts of their Google Hangouts. As part of your market and consumer research, you should read the transcripts of client conferences and internal team meetings. This will give you a clear notion of what your customers need, what they want, and what they expect.
These transcripts are also a great way to learn more about the types of clients you have, how to improve your sales pitches, and how to train your employees to better serve them.
8. Better Record-Keeping
As a final benefit, when it comes to corporate archives and recordkeeping, meeting transcripts are an excellent resource. Compliance officials, advisors, and upper executives will always be able to reference these transcripts, which prove especially useful during board meetings.
In addition, publishing transcripts to the cloud or your personal server will require far less storage space since their file sizes are often significantly smaller than video files.
How to transcribe your Google Hangouts meeting with Amberscript
With Amberscript, it’s easy to transcribe a Google Hangouts meeting. Here are the four steps you’ll need to take to get started:
- Record Your Google Hangouts meeting
- Upload Google Hangouts recording to Amberscript
- Select a language
- Choose human or AI-powered transcription
And presto! We’ll take care of the rest
To begin, start a Google Hangouts meeting and record it. Next, upload your recorded file to Amberscript and choose your meeting’s language.
Next, decide if you want an automated or manual transcript (experienced transcribers are more meticulous, but AI is quicker and more affordable).
That’s it! Your professional transcription will be ready for you to download in no time. It really is that easy!
Amberscript: Expert Google Hangouts Transcriptions
At Amberscript, we’re committed to ensuring that every one of our customers gets the 100% accurate transcripts they deserve, from start to finish. We’ll work closely with your files to ensure that everything goes smoothly so that you can focus your energy on what’s most important: getting results.
Connect with our friendly team today to discover more about making the most of your Google Hangouts sessions.
How to Easily Transcribe a Zoom Meeting
Table of Contents
- What is Zoom?
- How to Transcribe a Zoom Meeting?
- What is a transcript?
- How transcribing Zoom meetings can have multiple benefits?
- Steps to transcribing a Zoom meeting
- About Amberscript
What is Zoom?
Zoom is a name you’ve probably heard before, even if you don’t work from home. In a market with nearly 200 different video conferencing software products, Zoom has become the leading tech solution for online meetings, webinars, and conference calls.
With the coronavirus outbreak, videoconferencing apps like Zoom have become a way to establish face-to-face connections virtually in both professional and social contexts.
The Videoconferencing giant is a great way to stay connected with friends, family, and colleagues no matter where they are in the world. You don’t necessarily have to set up an account to join Zoom meetings, and it’s easy to get started with popular features like Gallery View, which lets you see everyone on the call at once.
More so, you can also share your screen, transfer files, and text chat with other meeting participants. To join a Zoom meeting, you need the Zoom app and either the meeting URL or a Meeting ID and password. The easy-to-use software integrates with Android, iOS, Linux, Windows, and MAC, so everyone can use it.
How to Transcribe a Zoom Meeting?
The year is 2022, and working remotely has become the new norm. In the modern workplace, we conduct all-important discussions via virtual conferencing over apps like Zoom and then move on to the next meeting or task.
As a result, much of the information presented at each meeting vanishes into thin air, meaning you most likely lose all crucial ideas, thoughts, and decisions reached for good.
We discovered that having a Zoom transcription from every session is the greatest way to preserve any discussion’s ideas and comments. A Zoom recording transcript makes it simpler to follow along for participants with different backgrounds, abilities, and learning styles.
Think you would like to start transcribing your Zoom meetings? Amberscript is the best software for converting audio and video to text. It’s quick, easy, and affordable.
But before we get into Amberscript, let’s start with the basics.
Jump right in!

What is a transcript?
Transcription is the process of turning voice or audio into a written representation. The outcome is an audio file converted into text for reading and closer examination.
This system is an excellent means to make meeting material available to deaf or hard-of-hearing persons, but this is far from its only advantage. It is also widely used to produce written papers for:
- Meetings for business
- Hearings in court
- Interviews
- Academic presentations
- Speeches \Seminars
- Medical records
The list is endless. We’re willing to bet that the more you think about it, the more examples you’ll uncover. However, before we get too far ahead of ourselves, let’s consider how a Zoom audio transcript can be beneficial.
How transcribing Zoom meetings can have multiple benefits?
Do you replay the entire meeting session in your head after it’s finished, or do you try to recall the significant points raised during a call?
According to polls, 45 percent of teams are faced with many meetings they must attend, which can be a problem in remembering every detail. Being able to transcribe Zoom recording offers many significant advantages in performance and reduces the need for multitasking.
The Go-To Source for Valuable Information
Meetings take place at all levels of a company. It is a discussion, brainstorming, and goal-setting session. However, because most meetings take 45-60 minutes, going through the whole meeting minutes, notes, or tape to get a single piece of information becomes chaotic and frustrating. Transcriptions allow you to quickly find the information you need by going through the whole transcript for terms such as dates/times, deadlines, tasks, metrics, queries, etc.
Better Levels of Transparency
The fundamental driver for any organization’s success is trust. Approximately more than 65% of individuals say they choose a brand based on its openness. Sharing is a great way to enhance transparency.
Transcripts serve to build trust among stakeholders, board members, customers, and employees. It helps to reinforce and creates the firm’s public image and reduce the potential for misunderstanding.
Legal Usefulness
Transcripts are essential if your business is mandated by law or must meet specific compliance standards. Even if your company is not legally required to do so, transcribe your meetings to avoid complications.
Where a disagreement ensues with a client regarding specific contractual obligations or a defect in service, transcripts of meeting calls and such may help resolve the problem.
Be sure to follow your region’s call recording legislation before recording talks with third parties.
Performance Assessment and Training
Transcripts enable supervisors to make an arbitrary assessment of an employee’s performance. Marketers, for example, may have a low outreach but often exchange fresh ideas during meetings. These qualities might serve as a reference point for managers to motivate employees.
Get a customized offer
Request a quote for your transcription needs
Accessibility to New Information
A meeting transcript is a thorough record. It is critical in the current day to make critical information available to all who matter. Meeting transcripts guarantee that important meeting insights do not slip through the cracks due to bad internet access.
Some people learn better by listening, while others learn better by reading. As a result, sharing Zoom transcripts with employees allows them to comprehend in their chosen manner.
Keep Comprehensive Records and Documentation
Keeping thorough documentation is made more accessible by automating your meeting transcribing process. Companies’ archives can be read by higher management at review meetings.
Decision-makers may identify strengths and shortcomings and implement better plans. Additionally, since transcripts are text-based, they will require less storage space when uploaded to the cloud than video recordings.
Search Engine Optimization (SEO)
The problem with audio and video material is that search engine crawlers cannot access it. That implies that no matter how great your content is, it will be challenging to rank in search results.
As a result, including a transcript with your video is an excellent method to make your material accessible and easy to locate. This is especially true for a podcast produced by your company.

Steps to transcribing a Zoom meeting
Do you seek to use a high accuracy, on-demand service that transcribes your zoom recordings to text files that are perfected by you or by our language experts and professional subtitlers?
With our automated service, you can transcribe your research interviews and lectures and add captions or subtitles to make your video content SEO friendly.
To begin, simply follow these steps.
- Record the Zoom meeting: Use a recorder to have your zoom meeting recorded.
- Upload the meeting recording to Amberscript: Simply upload your audio or video clip to our secure network. You may submit audio clips, taped phone conversations, audiobooks, or anything else that can be saved as a digital file.
- Select the language of the meeting: Specify the language in which you wish your text to be written. Our language specialists are native speakers who produce documents with the utmost accuracy in material that has been made more legible or words typed verbatim.
- Choose whether you want an automated or manual transcript: Pick your preference of transcription style and go through our transcriber’s magic. Our human-made transcription service allows our language experts to transcribe with up to 100% accuracy. Our machine-made transcription service automatically converts your audio and video to text with our AI recognition, which saves hours of transcription time.
- Receive your file: We’ll handle all the transcribing, editing, and file formats. You can now receive your file as a document ready to be exported in SRT, VTT, and many other formats, with optional timestamps and speaker distinction.
About Amberscript
Amberscript is an interdisciplinary company with a mission to protect users from information loss and promote social inclusion. We employ automation to make your audio transcription activities more accessible and affordable than ever.
We also deliver accurate and quick professional transcripts of audio and video files using the best transcribers who guarantee clear and authentic transcripts, while doing comprehensive quality checks.
Frequently asked questions
-
What subtitle file formats are supported?
Our software allows you to export the transcript from the video or audio file as an SRT, EBU-STL or VTT file.
-
How do I order translated subtitles?
To order translated subtitles, you can upload your file like you would normally do. You can then select manual subtitling. Once you have selected this, an option will appear where you will be able to select the language the subtitles need to be translated to. If the language that you want is not one of the options you can contact us through our contact form.
-
What is the price?
For our prices, please refer to our pricing page.
-
Can I change the position of the subtitles?
That needs to be done using a video editor like VLC. Go to Tools > Preferences [CTRL + P]. Under Show settings, select the option that says All to switch to the advanced preferences. Navigate to Input/Codecs > Subtitle codecs > Subtitles. Under Text subtitle decoder set, the Subtitle justification to left, right or center.
-
How do I add subtitles to a YouTube video?
To add subtitles to your Youtube video, simply add the file you have created using Amberscript to your video in the Youtube Studio. Click on “subtitles”, then “add” and finally “upload file” and select the SRT file.
-
How do I export my subtitles?
Once your file is ready and available in your account, you can simply click on the file name and then select the “export file” button at the top left of the page. You can then select the file format, style of sutitles (between BBC and Netflix) and alignment. Please note that you can only export a file if you have validated your email address when creating an account.
-
How do I generate subtitles?
You can generate subtitles automatically using Amberscript. Our software allows you to convert your video file to text and then export the transcripts as SRT, EBU-STL or VTT files, which can easily be inserted into a video-editor.
Learn how to easily Transcribe a Lecture in 3 steps
Imagine being in a packed auditorium, eagerly taking notes as your professor lectures on your favorite topic. But at the end of the class, you realize that you’re missing a few key points. What do you do to ensure you don’t keep missing vital details?
One option you should consider is to record and transcribe lectures. Lecture transcription can be a helpful way to fill in the gaps in your notes and review complex material.
But how do you transcribe lectures to text? While the process can be daunting and time-consuming, you can do a few things to make it easier.
This post will tell you everything you need to know about lecture transcripts. We will walk you through the steps of transcribing a lecture and how to use automatic tools like Amberscript.
What is a Transcript?
A transcript is a written record of spoken dialogue or sounds. It could be a record of what someone said during a lecture, class, or meeting.
For example, you can have a lecture transcript and use it in various ways. You can use the transcript script to preserve a dialogue for later review. You can make a transcript of an audio or video file by transcribing it yourself or using a transcription service.
Most of the time, transcripts are verbatim, which means they contain all the “ums,” “ers,” and false starts. However, you can also create a condensed transcript that only includes the main points.
Some tools will allow you to transcribe lectures to text for free. So, you can try out a few options before you decide on the transcript with the best quality.
How Recording and Transcribing Your Lecture Can Help with Your Learning?
Transcribing lecture to text will help you improve your grades in several ways. First, it’ll help you follow along with the lecture material better. If you can’t understand what your professor is saying or if you miss a key point, you can always refer back to the transcript.
You’ll have a written record to review later. This is especially useful if you struggle to process verbal information. The increased flexibility in information access can increase your comprehension of the lecture material.
A lecture transcript will come in handy if you have a short attention span. On average, adults have an attention span of between 15 and 20 minutes.
If you struggle to focus during long lectures, transcription can help. You can use the transcript to catch up on all the points you might have missed when your mind started to wander.
Learning how to transcribe a lecture can also help you become a better note-taker. With verbatim transcripts of classes, you can go back and fill in any gaps in your notes. This is a great way to catch up on lectures you may have missed or to review complex concepts.
Lecture transcripts will also increase your learning accessibility. If you’re a hard-of-hearing student, you can use transcripts to follow along with lectures. Some professors will make their lecture transcripts available to students, but you can also create your own.
Transform your audio and
video to text and subtitles
- High accurate, on demand service
- Competitive pricing with the fastest turnaround using AI
- Upload, search edit and export captions and transcripts with ease.
Steps of Transcribing a Lecture
Transcribing lectures to text doesn’t have to be a long or daunting task. Following these simple steps will help you transcribe lectures with ease.
1.Get Permission to Record the Lecture
Some professors are against students recording lectures, and you don’t want to get in trouble. In most cases, they intend to protect their intellectual property. So, before you start recording, get permission from your professor.
They may have specific requirements for how you can use the recordings or transcripts. For example, they may only allow you to use the recordings for your personal use. Or, they may specify that you can only use the recordings for a certain amount of time.
Some professors might not be comfortable with being recorded. Others may object to specific recording devices.
If you’re unsure about your professor’s policy on recording, it’s best to err on the side of caution and ask for clarification. Some professors will gladly give you a transcript if you explain that you need it for accommodation purposes.
You should also let your classmates know you’ll be recording the lecture. Some people are uncomfortable with being recorded and have the right to opt-out.
2.Record the Lecture
Once you have permission to record the lecture, you need to choose a recording device. If you’re allowed to use your cell phone, that’s usually the easiest option. You can also use a digital recorder or a laptop with a microphone.
If you’re using a digital recorder, remember to test the microphone before the lecture begins. You don’t want to waste time fiddling with the recorder when the class is in progress.
If you’re using a laptop, open the recording software and test the microphone. Once you’ve confirmed that the recording is working, put the laptop in airplane mode and close all other programs.
The goal is to minimize distractions from notifications during the lecture. It’s good practice to avoid such distractions even when you have a classroom meeting via Zoom.
Once you have your recording device ready, find a seat where you’ll be able to hear the lecture clearly. Sitting close to the speaker will ensure that the microphone picks up their voice. Start recording a few minutes before the lecture begins so you can capture any important announcements.
Bonus tip: if you only have your phone to hand, you can use the Amberscript app to record your lecture.
3.Upload the Recording to Amberscript
Transcribing lectures by hand can be time-consuming and tedious. Amberscript is an excellent transcription tool that can save you hours of work.
To transcribe your lecture with Amberscript, first, create an account and log in. Then, upload your lecture recording. Amberscript accepts the most common audio and video file formats, including MP3, M4A, WAV, and MP4.
When you finish uploading your file, Amberscript will start transcribing the lecture. You can follow along with the transcription in real-time. You can also wait for the software to finish transcribing the entire lecture.
How Automatic Transcription Works at Amberscript
Amberscript is software that automatically converts video and audio to text through speech recognition. It saves you the stress you would otherwise undergo if you decided to transcribe lectures to text manually.
Once you upload your audio or video file to Amberscript, you’ll need to select and open it. It’s vital to note that Amberscript works best with shorter files that don’t exceed 120 minutes.
If you have a longer file, you can break it into smaller sections. Before clicking on the “proceed” button, you should choose your preferred transcription language.
To transcribe your file, Amberscript will start by queuing it and convert the audio to text.
When the transcription process begins, this will take about ten minutes. However, this time can vary depending on the length of your file.
Amberscript is powered speech recognition technology. This is similar to the technology that powers Google’s live captioning feature that you’ll see on YouTube videos. Amberscript is constantly learning and improving to enhance its transcription accuracy.
Amberscript uses speech recognition technology to create a rough draft of your transcript. Once the transcription process is done, you’ll be sent a link to your file via email. You’ll also be given access to an online text editor that allows you to improve the text or make any changes you’d like. The whole process is done in a safe and secure environment, so you’ll be the only one who will have access to your transcript.
Start Using Amberscript to Transcribe a Lecture to Text
Learning how to transcribe lecture to text will save you time and effort. You’ll enjoy the transcription process because it’s simple, especially when you use Amberscript.
All you’ll need to do is upload your recorded lectures to our software. This automatic transcription tool will do the rest of the work and leave you room to make improvements. If you’re worried about the tedious transcription process, try using Amberscript today.
Audio & Video Content: Data best practices checklist
When coordinating transcription or subtitling services, it’s crucial that the audio and video files you share and the transcripts that are made are in safe hands. Here’s a checklist of what to take into account when planning that 3rd parties support you with transcription and captioning services.
How to keep audio and video data safe:
Awareness: Analyze your content and think carefully about which media files contain sensitive information before sharing them with third parties.
Content with sensitive information needs to be treated accordingly:
✔️ Do require your partners to sign a Non-Disclosure Agreement (NDA) for an additional layer of protection.
✔️ Limit the information you collect of people being recorded. E.g. if the content displays their name, an address or any information that can be led back to the participant. Even better try to obscure it completely.
✔️ Do always get consent if you do need to share any personal information.
✔️ Don’t save your file name as the name of the person that’s starting in the video E.g Phoebe Smith 121022.mp4
✔️ Don’t share files directly with service providers that download your files to their local computers. Before you know it, there are copies of your sensitive data on all sorts of computers, local networks and insecure environments.
✔️ Do share your files through cloud based apps so you keep full control.
✔️ Do cover your bases and make sure that all information you keep is GDPR compliant – so keeping a record of the data of clients or those you work with.
✔️ Do consider working with a GDPR consultant. Regulations are complex so it’s good to have all your bases covered.
✔️ Do let people know if you think that you’ve shared information without their consent or if someone else may have gotten hold of it.
Transform your audio and
video to text and subtitles
- High accurate, on demand service
- Competitive pricing with the fastest turnaround using AI
- Upload, search edit and export captions and transcripts with ease.
How Amberscript keeps data safe:
✔️ All professional captioners sign an NDA before each project. We’ll also sign one from you.
✔️ At Amberscript, users upload their data into a highly secured data environment (ISO 27001 certified).
✔️ Professional Captioners can’t access a file after project completion.
✔️ Cloud-based editor and platform means only you can access files.
✔️ Your files never leave the highly secured environment
✔️ Data security training for everyone at Amberscript, including our professional captioners and transcribers.
✔️ Data centers based in Germany
Easy ways to add subtitles in Adobe After Effects
Developed by Adobe Inc., Adobe After Effects is a digital visual effects and motion graphics program used for video editing. If you are not extremely familiar with the use of the program, you might be wondering if it is possible to add subtitles to your videos in Adobe. The short answer is yes. Keep reading our guide of you would like to know how.
Table of contents
- How to Add Subtitles in Adobe After Effects
- How to create subtitles with Amberscript
- Creating Subtitles in Adobe After Effects
- Adding Your Subtitles into Adobe After Effects
How to Add Subtitles in Adobe After Effects
Whether you’re creating videos for local or international audiences, you need to ensure that they’re getting and understanding your message.
This is where subtitles may come in handy for you. Creating and adding subtitles to your videos increases their visibility and engagement rate.
If you’re a seasoned artist or a content creator, you would already be using Adobe After Effects. It is an app that helps professionals create visually-appealing content for TV, videos, and movies.
As easy-to-use app as After Effects is, adding subtitles to the videos might be a little hard or time-consuming. Unfortunately, it doesn’t offer a separate screen for inserting subtitles, so you have to use text layers to create and add them to your videos. However, you can also use ready-made scripts from Amberscript and import them to After Effects.
How to create subtitles with Amberscript
With Amberscript, adding subtitles to your video content is easy and effortless. Our service is an expert in subtitle creation, offering both machine-made, human-made and translated subtitles by our skilled subtitlers. Using our automatic subtitle software, the process of creating subtitles is streamlined and efficient.
1. Upload your file to the Amberscript platform
With Amberscript, the process of adding subtitles to your video content is simple and fast. After creating your video, simply upload it to our platform using drag and drop, a link, or by manually uploading from your desktop. Then, select the language of the audio in your video and use our automatic subtitle service option. Our AI will quickly generate a first draft of the subtitles for you to review. Sit back and relax while the process is completed.
2. Edit your subtitles in our intuitive subtitle editor
With Amberscript, editing the AI-generated subtitles is easy and user-friendly. Utilize the integrated online text editor to make any desired adjustments. First, review and edit the AI transcript, then align and format the subtitles in the editor. Get familiar with the editor by watching the demo video and use the key combinations in the bottom left corner to speed up the editing process.
How to use the online editor?
3. Export your subtitles
When you’re finished editing your subtitles, you can easily download them in a variety of file formats. This process is quick and only takes a few seconds. Be sure to research which file format is best for your specific use case. The most popular file format for subtitles is SRT, but other common formats like VTT and EBU-STL are also available. Choose the format that best suits your needs and download it to your laptop or computer for easy access later.
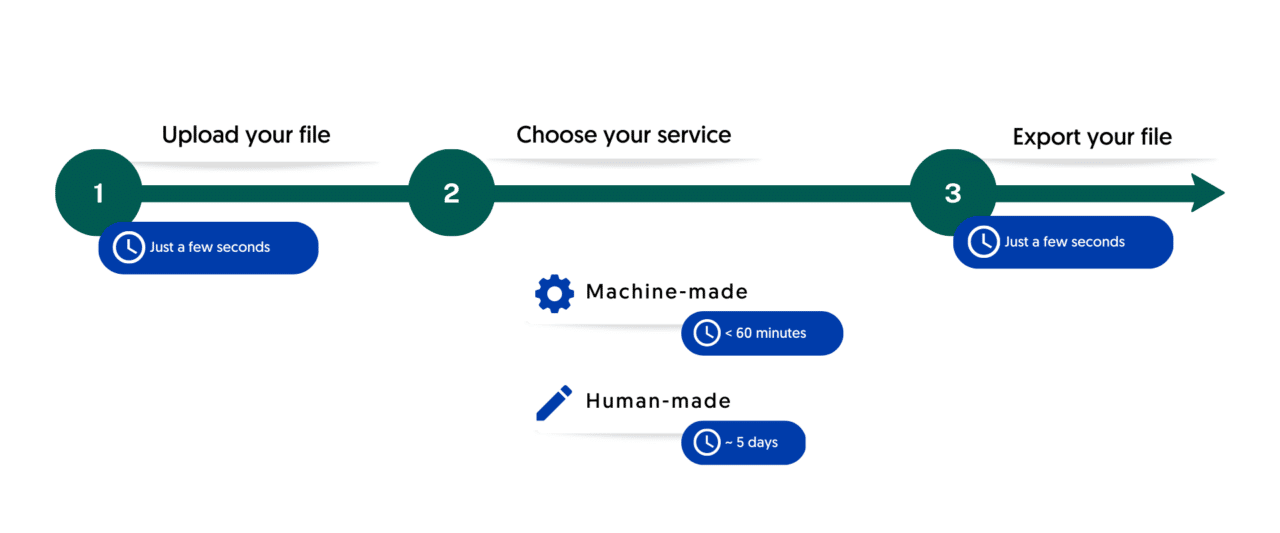
Now that you know how to use Amberscript, let’s learn how to add subtitles in After Effects.
Creating Subtitles in Adobe After Effects
To get started with Adobe After Effects, you need to first create certain template graphics and then duplicate those layers. However, you’d still have to take care of the perfect trimming and timing of the subtitles.
Let’s go through this step-by-guide to learn how to create and add subtitles to Adobe After Effects after creating them with the help of a speech-to-text software.
1. Generate Markers
- Once your text document is prepared, you can paste the content in a text layer and drop the audio in a similar composition in After Effects.
- Then, preview the audio (“.” on the keypad) and adjust the preview’s frame rate to twice the normal speed, i.e., 2x of original. Listen to the whole video half the time.
- While listening to the audio, keep generating markers in the text layer for each line break by using “*” on the keypad. When you’re done, you’ll see that the subtitles are ready to be rendered.
2. Expressions to Separate the Text
The entire process of separating the text and adjusting it on the appropriate time frames is performed by “expressions.” If you’re generating the subtitles entirely on your own, you can use the following expressions:
Split ()
It is the most useful expression that helps break any text into different parts through any character you want to use. Some people also use it to extract the composition name from After Effects, the title, and subtitles of one lower third.
If you’re using it specifically to break the subtitle’s line, the syntax for it is:
- text.sourceText.split(‘/’)[i]
Translating this computer’s language into human’s gives us:
- Extract the content from this text (text.sourceText) and break it into separate blocks each time “/” appears (split(‘/’). Just show block 4 (you can write any number in place of “i.” Thanks!
3. Counting Markers
By creating an expression to count the number of markers in a layer, you can make each block appear at the right time. For that, you can use the following expression:
- m = thisLayer.marker;
- i = m.nearestKey(time).index;
- if (m.nearestKey(time).time > time){ i–;}
- if (i < 1) { i = 1};
- I–;
Yes, we know it must be pretty hard for you to understand this expression, but let us make it simpler for you.
- The “i” is the reference number of every marker that you will pass through in the entire process. This expression keeps an envelope of this reference number.
- If the third marker is the last one that you pass through, you will replace the “i” with 3. Similarly, if it’s fourth, the “i” will be 4.
- Now, let’s do a quick recap. Every time you pass a marker, the “Split” will analyze the envelope to identify the reference number it holds. This way, it shows us the right text block at the right time.
- But, here is a real problem – the expression might show an error if the counted blocks are less than the markers. So, what will you do in such a situation? The next expression will help you out.
Step-by-step guide
Learn more about subtitles
- What are subtitles?
- Types of subtitles
- The difference between subtitles and captions
- Why you need subtitles: The advantages of subtitles
- How to create subtitles?
4. The Error Code
In After Effects Expressions tutorials on WordPress by Thomas Euvrie, he explained that After Effects CC 2015 (13.5) doesn’t take simple expression issues into account; it simply ignores them without disabling them.
The only way it reminds you of an error is the orange banner that pops up on the screen.
But if you don’t like receiving notifications, you can just use the following expression:
- try {code1} catch(err) {code2}
Translating it into human language, we get:
- Please try code 1. If it doesn’t work, use code 2
Final Code
Now, after collecting all this information together, the final step is to apply the below code into the Source Text of the text box:
- m = thisLayer.marker;
- i = m.nearestKey(time).index;
- if (m.nearestKey(time).time > time){ i–;}
- if (i < 1) { i = 1};
- i–;
- try {text.sourceText.split(‘/’)[i]} catch(err) {”}
And that’s it – you’ve created and added the subtitles in After Effects.
Now, you can just give your video some final touches, like the color and font of the text, to ensure the viewer easily reads and understands them.
Frequently asked questions
-
What is Adobe After Effects?
Adobe After Effects is a digital app that offers visual effects and motion graphics used in the post-production of video games, films, and TV series. Generally, After Effects is used to enhance recorded videos and for keying, compositing, and animations.
-
Can I import SRT Files into Adobe After Effects?
It allows you to import subtitles, customize them, and add graphics to them. The downloaded SRT file from Amberscript has a text layer with markers and keyframes that you can copy/paste into the text layer.
-
How do I add subtitles to Adobe After Effects?
Unlike Adobe Premiere Pro, After Effects doesn’t offer a separate screen for inserting subtitles and captions. So, you have to use several text layers to create subtitles via writing the text from the audio, creating markers, and using expressions, like split, counting markers, and the error code.
However, you can get automatic subtitles from software like Amberscript and insert them in After Effects.
-
Can I import VTT Files into Adobe After Effects?
Yes, you can. Just use a subtitle Importer or a Plugin to do so.
How To Add Subtitles In ShotCut
If you’re a pro content creator and editor, you may already be familiar with ShotCut. It is a free, open-source, and cross-platform especially designed for editing video on Linux, macOS, Windows, and FreeBSD. You may be wondering how to add subtitles in the program. The easiest way is manually entering the transcript in the input box. But how to do it properly? Let’s find out in this guide.
Table of Contents
- Subtitles vs. Captions: What Do You Actually Want to Add?
- Amberscript’s Subtitling Services
- Generating Subtitles for ShotCut
- Burning Closed Captions in ShotCut
- Adding Subtitles in ShotCut
Subtitles vs. Captions: What Do You Actually Want to Add?
Before moving further, you have to find out whether you want to add subtitles to the video or the captions.If you think they both might be the same, allow us to burst your bubble and tell you the difference between subtitles and captions.
Although both appear in the same position and help you understand the audio much better, they actually have contrasting goals.
Subtitles intend to translate the dialogues in the written text to help the viewers understand the video’s message. The text appears in the video and is available in a wide range of languages.
Typically, video creators add subtitles, thinking that the person viewing the videos can hear audio but doesn’t know the video’s language.
On the other hand, captions also translate the dialogue of a video into written texts.
However, they are specifically created for people who can’t hear or understand at all. This is why captions also include a detailed description of sound effects, music, exclamations, etc.
This means captions help you understand all the expressions and music genres even if your video’s sound is off.
So, what do you actually want to add in ShotCut? If it’s the subtitles, you have the green signal to move forward to the step-by-step guide for doing so.
Would you like to know more about the difference between Subtitles, Closed Captions, and SDH Subtitles? Read our detailed guideline and learn more.

How are they different?
Subtitles, Closed Captions, and SDH Subtitles
- What are subtitles?
- What are closed captions?
- What are SDH captions?
- How to create subtitles with Amberscript?
Amberscript’s subtitling services
Do you know how much time it takes to transcribe audio manually? In one of our previous posts, we deep dived into how this process can be pretty much time-consuming, and you may end up giving up the entire idea of adding subtitles to your video. So, what’s the easy way out? A subtitle-generation platform like Amberscript!
We offer both machine-made and human-made services for the different needs of our users. Our machine-made services can save up to 70% of your time and are offered in more than 39 languages. On the other hand, if you need subtitles of 100% accuracy, you have the chance to trust our professional subtitles to help you. To reach a wider, international audience, we also offer translated subtitles.
Would you like to try our services? Start your free trial now!
You might be wondering how to generate subtitles that you can later add in ShotCut. If you would like to know the details, we suggest you continue reading for our step-by-step guide on how to do that.
Generating Subtitles for ShotCut
If you want to increase the visibility and upgrade the ranking of your video on the search engine, you should add subtitles to it. Here is how you can create .SRT files easily:
1. Create an SRT File using a subtitling software
You can’t add or import subtitles to ShotCut without having an .SRT file, obviously.
This is a file type containing a time-coded transcript (text form of the audio) for the video so that you can directly import the subtitles into any app without tiring yourself.
If you want to create a transcript manually, you can do so by listening to the audio and noting it down. On the other hand, using an automatic subtitle generator, like Amberscript is so much easier.
- To get started, you need to upload the video in the software and press upload once it gets uploaded.
2. Once done, artificial intelligence (AI) begins to show its magic and create your transcript.
3. As soon as the step completes, you’re now free to edit the .SRT file, add punctuations or adjust the spellings according to your locale. Once you feel satisfied with the end result, you can then finally export it to your device.
Pro tip: Alternatively, if you totally want to sit back and relax, Amberscripts team of professionals can create the subtitles for you in over 15 languages. The text is 99.9% accurate and will be synchronized correctly.
The best part is that you can export the subtitles file in any format you like. For instance, it could be either SRT, VTT, or EBU-STL. Just pick the file format in the software and receive it within minutes.
Burning Closed Captions in ShotCut
- Create a new project in Shotcut and import the video you want to add closed captions to.
- Click on the “Filters” button in the top menu and then click on the “Text” filter.
- In the Text filter window, enter the text for the first caption and customize the font, size, and color as desired. You can also position the caption by dragging it around the preview window.
- Once you’ve created the first caption, click on the “Keyframes” tab in the Text filter window.
- In the Keyframes tab, click on the “+” button to add a new keyframe for the caption.
- Move the playhead to the point in the video where you want the caption to appear and position the caption in the preview window.
- Click on the “Fade” tab in the Text filter window and adjust the “Fade in duration” and “Fade out duration” to your desired settings.
- Repeat steps 3-7 for each caption you want to add to the video.
- Once you’ve added all the captions, click on the “Export” button in the top menu to export the video with closed captions.
- In the Export window, select the desired file format and encoding settings and then click on the “Export File” button.
That’s it! Your video now has closed captions that can be turned on or off by the viewer. Remember to preview your video to ensure that the captions are synced properly with the audio and adjust the timing if necessary.
Adding Subtitles in ShotCut
Now, let’s see how to add subtitles in ShotCut the right way. Until now, you most probably have the .SRT file or transcriptions on your hand, right? If so, you need to follow the below three steps to add subtitles in ShotCut:
Editing Video Frames
Open ShotCut and load the video. You can do so by opening the “File” in the upper left corner of the program. Once the video completes loading, it will appear on the preview screen.
You can put the previewed video on the timeline by either dragging it and dropping it on the timeline or clicking the down arrow on the top.
On the other hand, if you have already generated a video clip in the timeline, you have to edit the video frames or cuts.
However, this step might be a little exhausting as you may feel trouble finding the shortcuts for the crop feature. This is because they are usually different for different programs.
In ShotCut, you can most easily find the crop function by right-clicking on the video clip.
You’ll see that the ShotCut is “Cut at the playhead position.” Select this to cut the video or simply press the shortcut key “S” on your keyboard to edit the video.
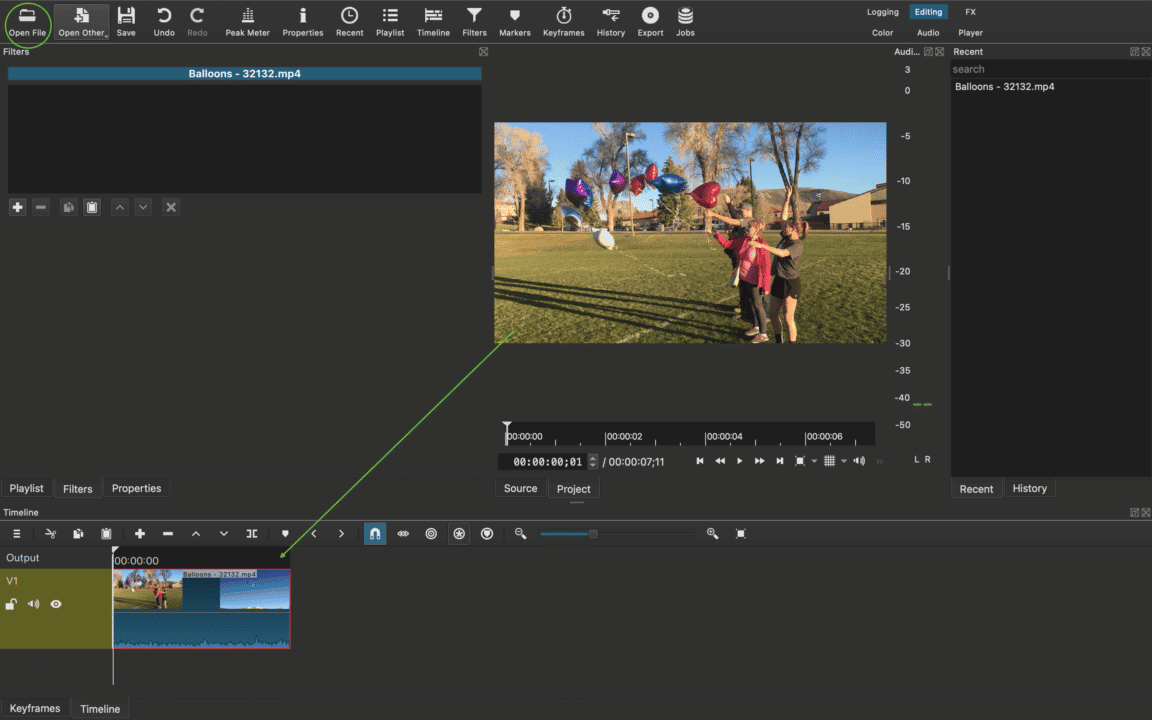
Adding Subtitles
After editing the cut, you can add subtitles. But for that, you need to first add a track by right-clicking the V1 section. It will give you several options for the track. You can add a track by “adding a video track” or “inserting a track.”

Once you add a track, go to the “More” option on the top left to add a text. Now, select the text, and it will open the input window. Then, all you have to do is enter the subtitle in the input window and click OK.
The process doesn’t end here; you need to ensure that the video and the subtitles appear in sync. Typically, when subtitles are loaded in ShotCut, they appear on a black, plain background. To solve that, you need to add the timeline.
Select the subtitle, drag, and drop it on the added track. The video clip will start appearing in the background.
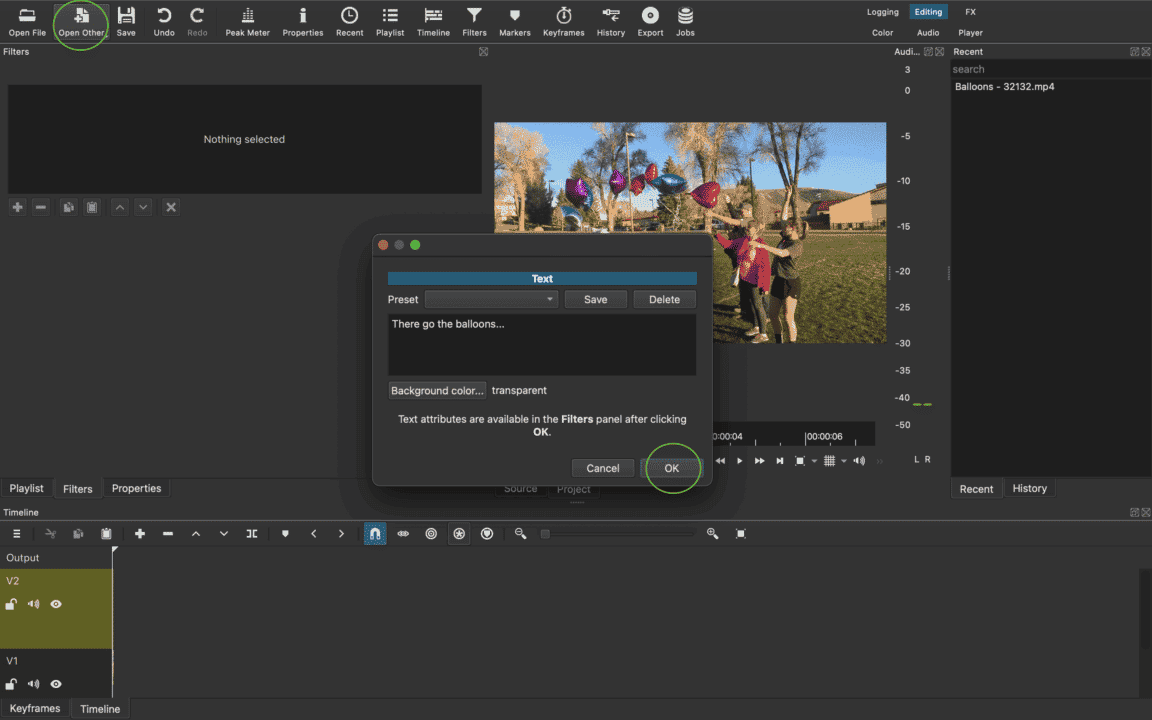
Editing Subtitles
In the subtitles option, you’ll come across a field called “Insertion.” It includes a hash sign, frame, timecode, and file date, allowing you to edit the subtitles as you like.
You can change the font, set the outline, adjust the thickness and background color, and the alignment of the subtitles.
Keep in mind that the sizes in ShotCut are quite different from other programs in resolution. Thus, you may not know it at first; however, you can adjust the resolution or size directly on the preview screen if you aren’t comfortable with the default size.
To relocate the subtitles, you can click on the transparent circle icon in the center.
And you’re done!
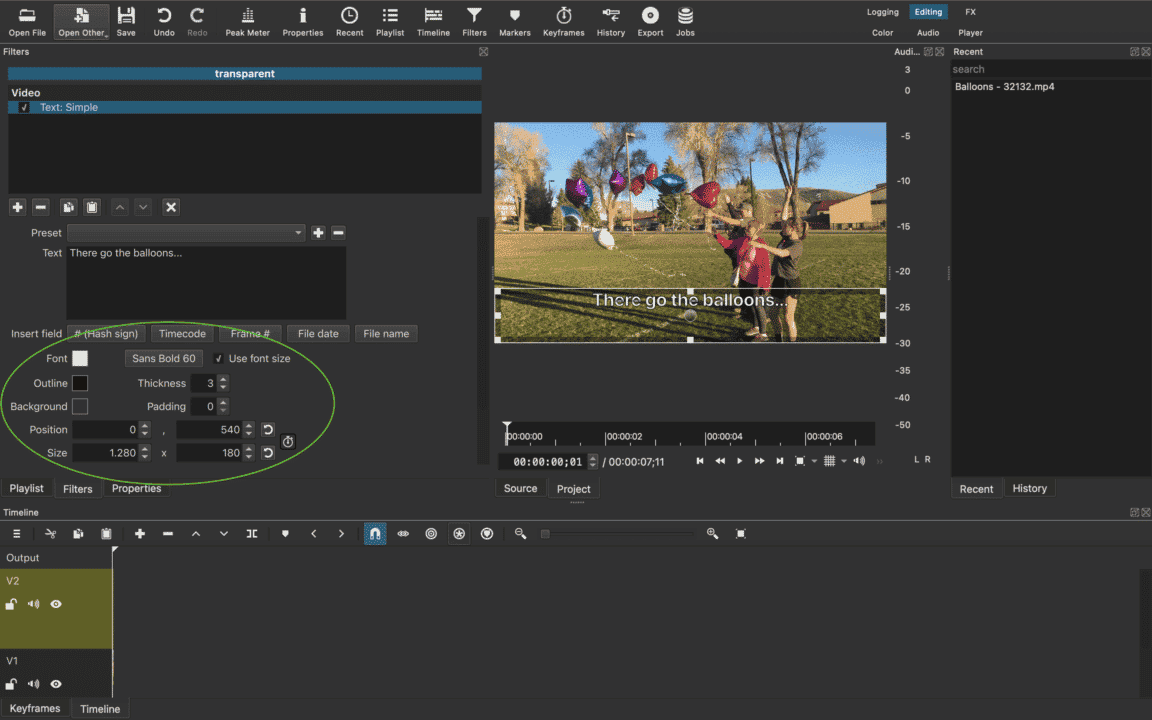
Frequently asked questions
-
What is ShotCut?
ShotCut is an open-source and free app used for editing videos. It offers various features to the users, which is why beginners prefer it for basic editing, and professionals use it for advanced modifications as well as adding subtitles to the videos.
-
Can I import SRT Files into ShotCut?
Yes, you can. VTT files are another common type of subtitles file that you can easily import into ShotCut. To save your time and energy, it’s better that you use an automatic subtitles generator that supports VTT files.
-
How do I add subtitles to ShotCut?
You can manually add subtitles to ShotCut easily. But before that, you need to extract an .SRT or .VTT file of your video transcript. If you have a strict deadline, you can use an automatic subtitles generator platform like Amberscript and get a well-designed transcript within a few minutes. You can then add this file with the steps mentioned above.
-
What is the difference between subtitles and closed captioning?
Subtitles are for viewers who are unable to understand the language spoken, whereas captions are for viewers who are not able to hear the audio.
Captions, which can be closed or open captions, incorporate both the conversation and any other relevant sounds. They are used to assist the deaf by showing all auditory sounds. That is, they include environmental sounds as well as changes in speaker and speaker tone.
Captions can also be used by hearing people who cannot hear the audio in a noisy place or who do not want to disturb the other people in their environment. Subtitles can also be used for this purpose if the viewer just wants to follow a conversation.
How to Add Subtitles in KineMaster
Table of Contents
- Adding Subtitles in Videos with KineMaster
- How to Add Video Subtitles in KineMaster
- Using Amberscript to get subtitles
- Appending Subtitles Using Layers
- Burning Closed Captions in Kinemaster
- Further guidelines
- Conclusion
Subtitles hold a critical value in making your videos more reachable for the global audience. In addition, they can simplify the video content for viewers who have difficulty keeping up with the audio content. Therefore, your videos become more beneficial to your audience. Interestingly, you can do it quickly on your mobile device using the KineMaster.
KineMaster is a popular app for mobile devices that allows users to edit videos. You can add subtitles and create fascinating videos with ease. So, if you want to switch to a seamless method to add subtitles to your videos, this post will guide you on how to add subtitles in KineMaster.
Adding Subtitles in Videos with KineMaster
KineMaster is naturally an excellent option for video editing, especially for adding subtitles. It’s a comprehensive tool that offers a quality video output of everything you need. For instance, you can use blending modes for overlaying images, use slow motion, reverse videos, and add intriguing transition effects to give your videos a unique look.
That’s why, if you want to add these videos to your social media accounts like Facebook, Instagram, etc., KineMaster can be an excellent tool for your needs. It’s a free tool and works with most video types. So, it’s convenient for beginners who want to create and edit professional-quality videos.
Adding subtitles to a video can be a great way to enhance its accessibility and reach a wider audience. However, before creating subtitles for a video, it’s important to have high-quality visuals and graphics to work with. For those looking for a free and user-friendly tool to create stunning photo collages, check out the best free photo collage maker. By using these tools in conjunction, creators can make their videos more visually appealing and engaging.
How to Add Video Subtitles in KineMaster
There are a couple of ways to add subtitles to your KineMaster videos. Depending on how much time and effort you are willing to put in, you can use either of the two methods to create subtitle-supported videos through KineMaster.
Adding Subtitles Yourself
KineMaster offers a built-in text editor, which is quite intuitive. It allows you to run the video and edit the text on the go. In addition, you can customize the text font, colors, and styles to ensure that the subtitle looks precisely the way you want.
Sure KineMaster is compatible with different platforms. It’s pretty convenient to use with any smartphone or tablet. But there is just a slight problem when working with mobile devices for subtitles.
The only problem with manual subtitles is that you need to type in everything yourself. And it can be particularly daunting and time-consuming when you are doing it on a mobile device. In addition, typing on mobile isn’t as smooth as that on the keyboard. So, it’s also a good idea to connect a remote keyboard to order faster.
More importantly, it’s not a suitable option for professional editing because it takes way too much time. Imagine how much time you will need to fit in all the subtitles if you have a two-hour-long video.
While adding manual subtitles doesn’t require importing or exporting files, it’s quite a long process and not suitable for larger video files.
Using Amberscript to get subtitles

Did you know that transcribing one hour of audio can take over 4 hours of manual work? Platforms like Amberscript exist to help you cut the manual time and help you produce accurate subtitles quickly.
Using Amberscript is pretty smooth – all you need to do is create an account and then upload your video or audio file. You’ll then have two options to choose from:
Human-Made Subtitles
Amberscript works with over 500 professional subtitlers from all over the world. Our team comes from a variety of industries, which means that any terminology will be localized correctly. You’ll get subtitles that are 99.9% accurate within a 48-hour turnaround. What’s better is that you won’t have to do the manual work yourself.
Machine-Made Subtitles
Alternatively, you can choose Machine-Made Subtitles. Amberscripts’ automatic speech recognition system will listen to the video’s audio and create a transcript. You’ll then have the option to perfect the text yourself using Amberscript’s Text Editor. This option is suitable if you don’t have a large amount of content and if you don’t mind putting in the time to edit the text to completion.
Whatever option you choose, you’ll be able to export the text file in a variety of formats, including SRT, to use in your KineMaster video.
Translated Subtitles
Our newest subtitling service is Translated Subtitles. With this option you will be able to reach a wider audience internationally. Our team of professional translators translate automatically generated subtitles in 15 different languages. A quality checker also makes sure everything is correct to provide 100% accuracy of your translated subtitles.

A detailed step-by-step guide
How to create subtitles?
- What are subtitles?
- Types of subtitles
- Why do you need subtitles?
- What subtitle formats are there?
- How to easily create subtitles with Amberscript?
- Subtitles for different platforms
Appending Subtitles Using Layers
To use the layers option to add subtitles to your videos, follow this method:
1. Choose Your Video
First, choose the video that you want to add subtitles to and then add your .SRT file.
2. Choose Your Clip
Once you have all the video clips in your KineMaster interface, you can add the subtitles by navigating to your concerned video section.
Now, choose the video size. Here you would want to consider the standard screen sizes. For example, computer and television monitors are 16:9, while the phone screens are 9:16.
Then click the media section icon. Here, you select the video source for the subtitles. Moreover, this section allows you to choose the background images for the video.
Next, you can select the video clip and the duration for which you want the subtitle to appear on the screen.
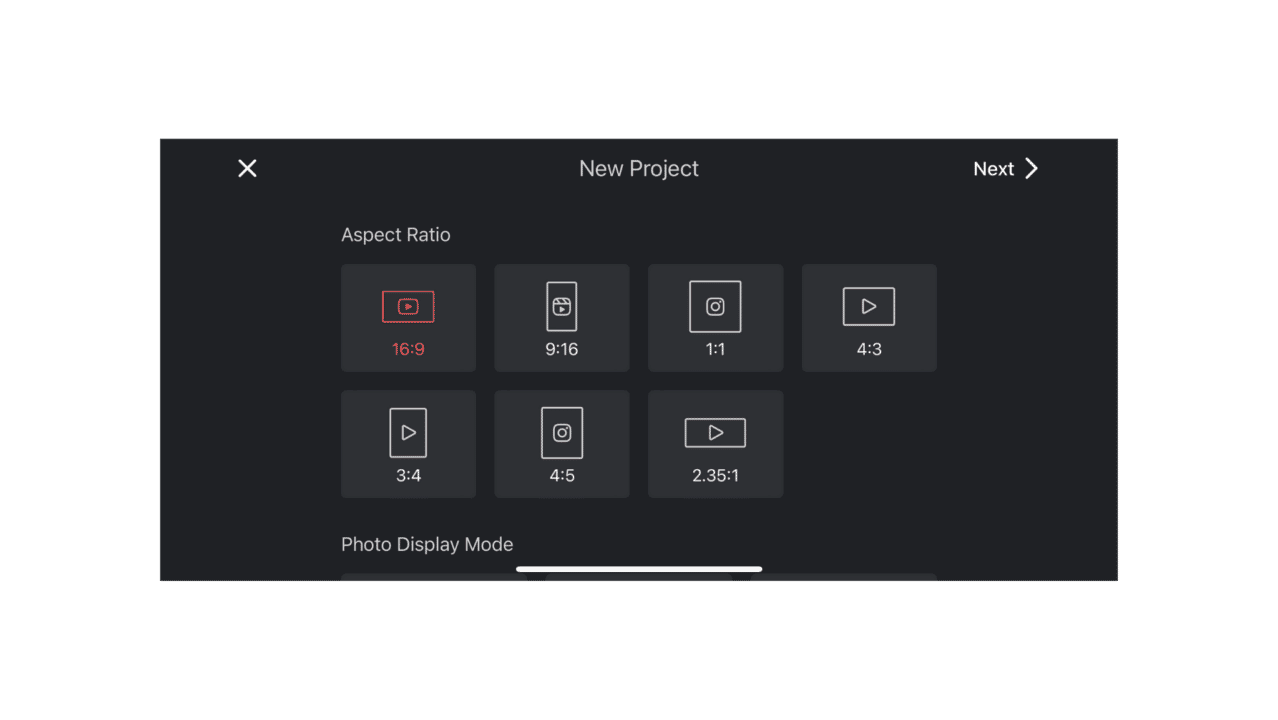
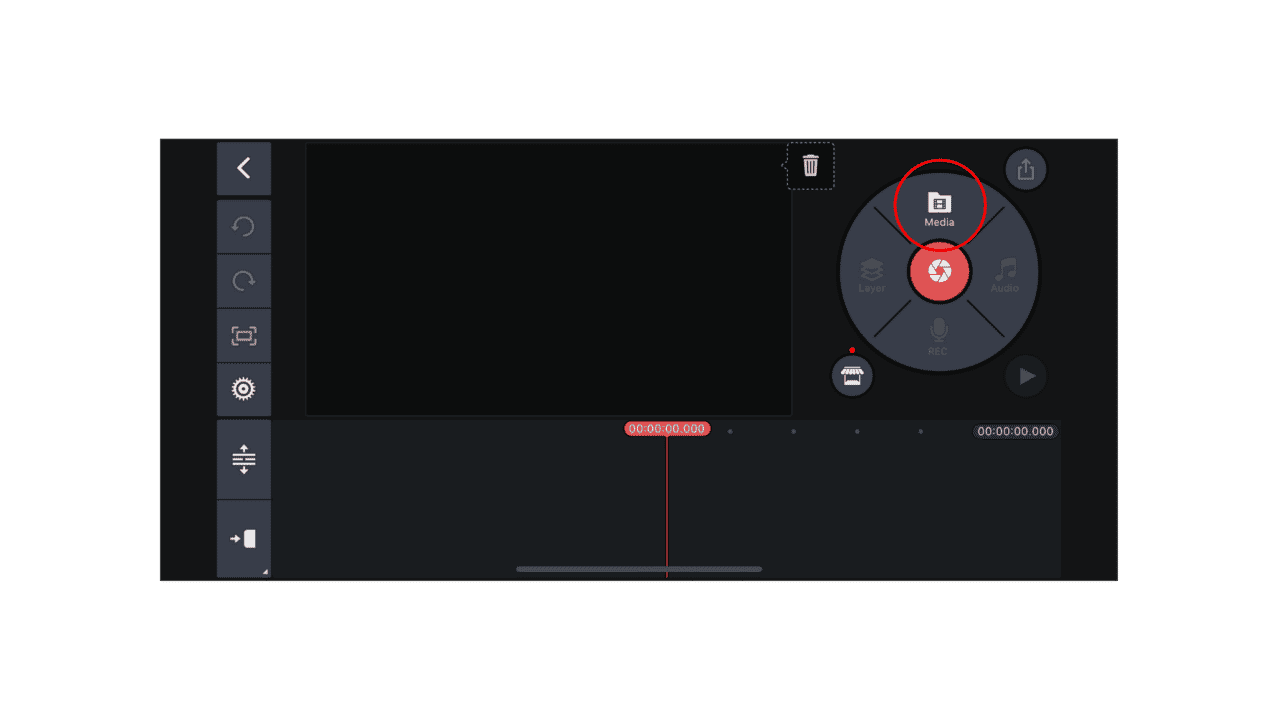
3. Go to the Layers Option
After selecting the clip and duration for your subtitle, click on the ‘Layers’ option. Next, click ‘Text.’
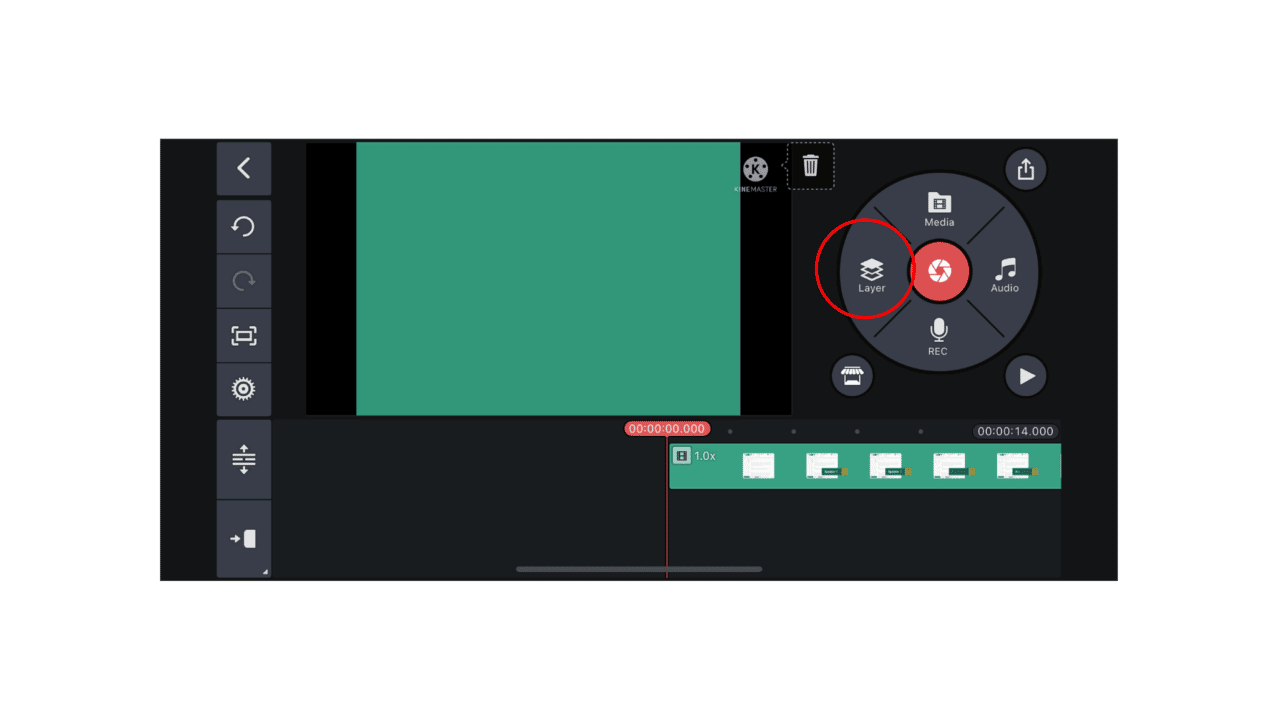
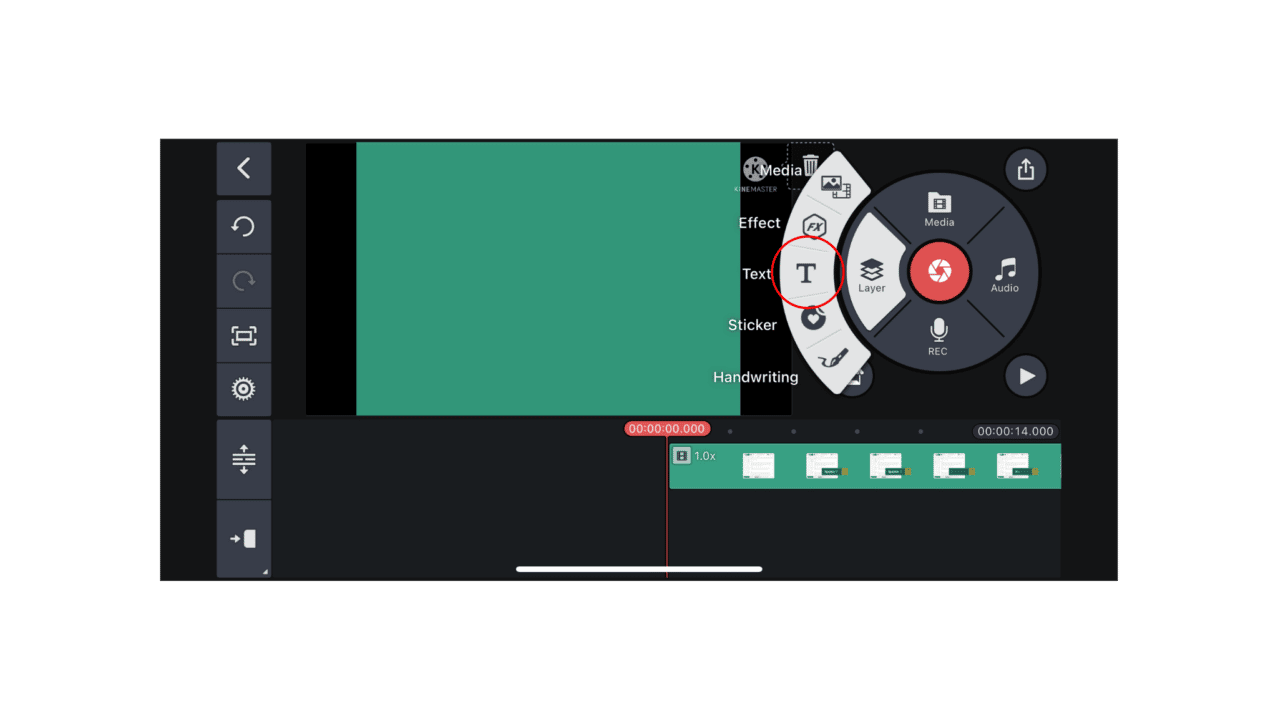
4. Enter Your Subtitle
Once you click the text, you will see a text box to add the subtitle for the video clip. Write your subtitle. Make sure that the subtitle is easily readable. Generally, the average subtitle reading time is about 12 to 15 seconds.
5. Confirm the Subtitle
Once your subtitle is final, click on OK. Your subtitle should appear on the video screen.
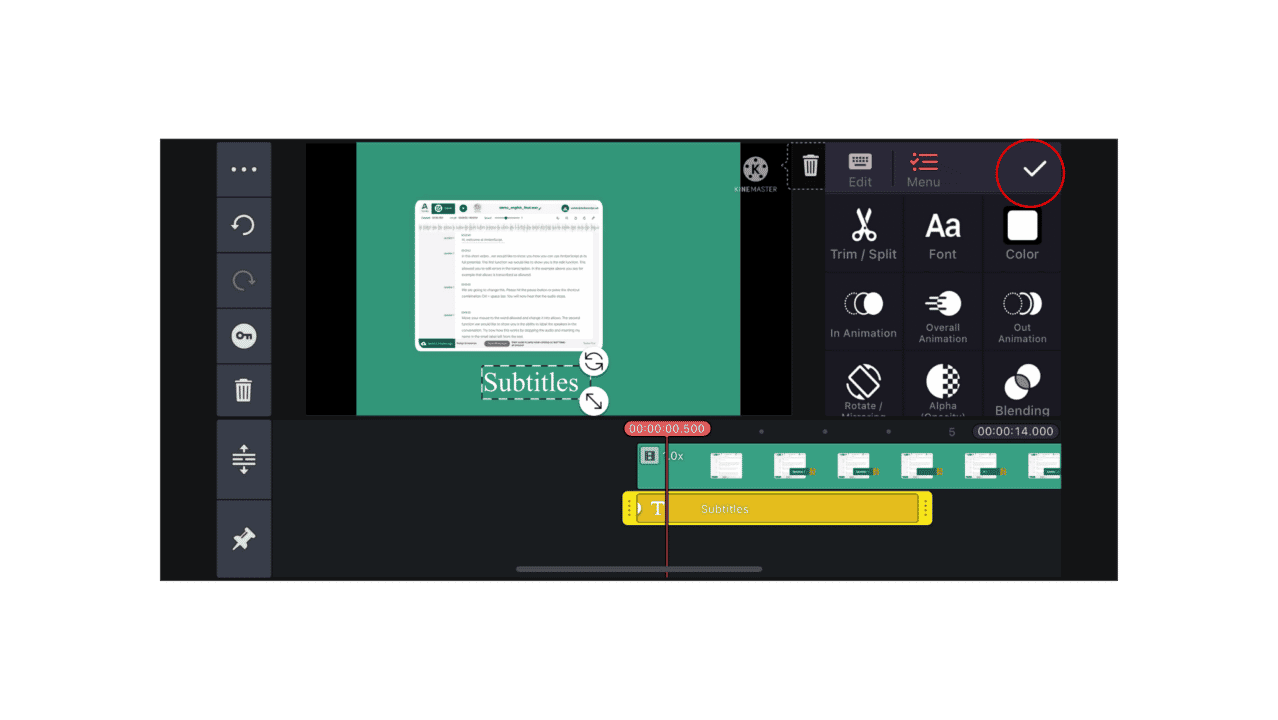
6. Stylize the Subtitle Font
You can add styles to the subtitle font to make it more readable. Or maybe you want to give it a different look from the conventional subtitle formats. So, you can choose your preferred font, size, color to make your subtitles prominent on the video screen.
7. Video Export
When you are done with all the video subtitles, it’s time to export the video. Make sure you have made all the changes to the video before finalizing the subtitles. So, to ship the video, first, click the checkmark that appears on the top right. Next, click the Save option.
While exporting the video file, you must choose the video resolution and frame rate. To do that, drag the Bitrate Parameter bar. Next, click on ‘Export.’ While exporting, KineMaster also indicates the amount of exported video and the time of export.
There are a couple of options when you add subtitles with KineMaster. You can either export the video with the KineMaster watermark, or you can get rid of the logo. So, when prompted for this option, you can click the one depending on your subscription type.
For instance, you can export the file without the watermark, but you will need to purchase the KineMaster app and add its features. On the other hand, you can also do it for free by choosing ‘No Thanks, Export with watermark.’
Essentially, KineMaster isn’t entirely a free option. The logo comes with the edited video unless you purchase the software. But this is of little concern for those who are more concerned with subtitles.
Generally, beginners opt for the free version. On the other hand, professional video editors who have larger audiences may be concerned about promoting the editing tool. In such cases, they are better off purchasing the added services to eliminate the KineMaster logo.

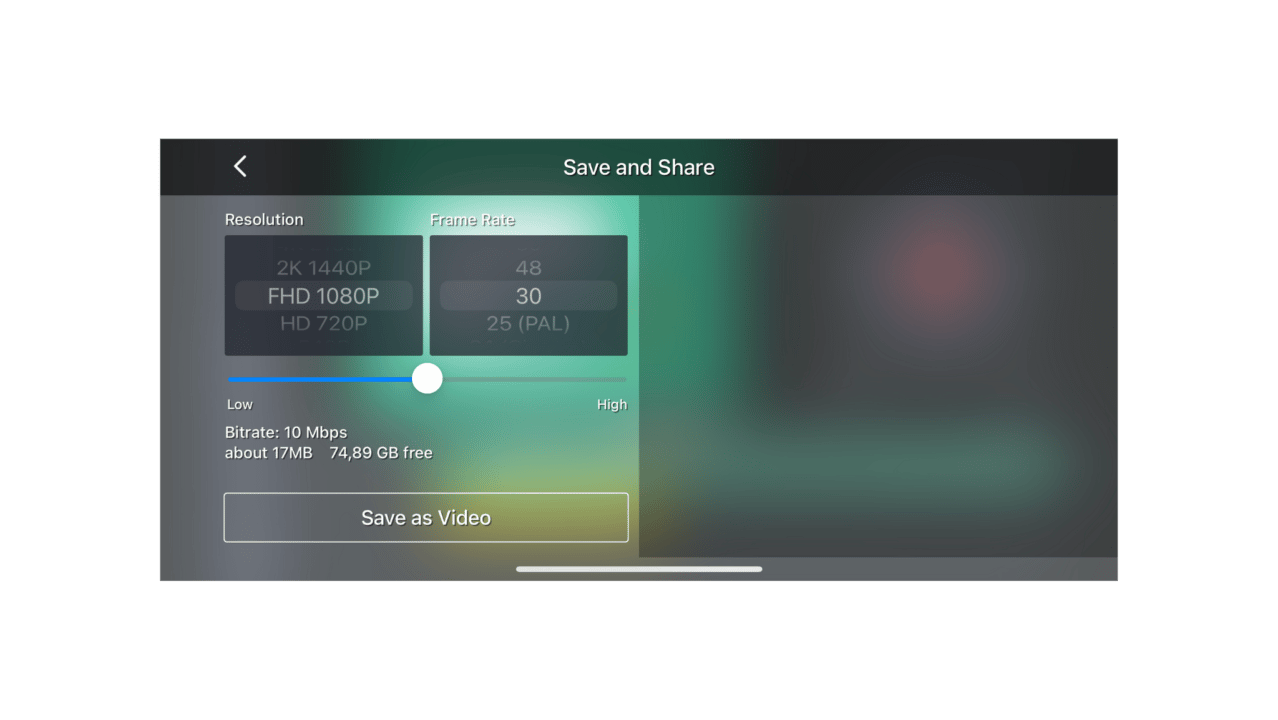
Burning Closed Captions in Kinemaster
- Open KineMaster and import your video: Open KineMaster and tap on the “Project Assistant” button to create a new project. Import the video you want to add closed captions to by tapping on the “+” button and selecting the video from your gallery.
- Create a new text layer: Tap on the “Layer” button and select “Text” to create a new text layer. Type in the caption text you want to add.
- Adjust the text layer: Tap on the text layer to open the editing tools. Adjust the font, size, and color of the text to your liking. You can also adjust the position and duration of the text layer by dragging it along the timeline.
- Add more text layers: Repeat steps 2 and 3 to add more text layers for each caption you want to include in the video.
- Export the video with closed captions: Once you’ve added all the captions you want, tap on the “Export” button to export the video. Under “Export Settings”, make sure to check the “Burn Captions” option. This will ensure that the captions are included in the final exported video.
By following these steps, you can easily add closed captions to your videos in KineMaster. With closed captions, your videos will be more accessible to a wider audience and ensure that your message is accurately conveyed. If you want to learn more about what closed captions are, you can check out our extensive blogpost about it.
Further guidelines
If you found this blog post about adding subtitles to KineMaster useful, you might want to check out our guidelines about adding subtitles to additional platforms. Read our accurate step-by-step manuals for more information.
- Final Cut Pro X
- iMovie
- Kaltura
- Moodle
- Panopto
- Shortcut
- TikTok
- Twitch
- Udemy
- Vimeo
- YouTube
Conclusion
KineMaster video editor is the perfect option for adding video subtitles. It’s simple, intuitive, and highly mobile-friendly too. Therefore, if you want to create engaging content using high-quality videos, KineMaster can help you with the right tools for your requirements.
It supports VTT and SRT files that you can create manually or use auto transcription tools like Amberscript. Therefore, adding subtitles to your videos is no longer a tedious job. KineMaster works with different operating systems like Chrome OS, Android, iPhone, and iPad. So, it’s time you get started with KineMaster subtitles and create quality videos to engage a wide-stretched audience.
Frequently asked questions
-
What is KineMaster?
KineMaster is a video editing mobile application that allows users to modify their video content. It’s available for Android, iPad, iPhone, and Chrome OS. Thanks to a powerful editor toolkit, KineMaster supports video rendering and other tools, making it an ideal choice for video editors for mobile devices.
-
Can I import SRT Files into KineMaster?
mporting is not an option with KineMaster. So, if you have generated an SRT file from any transcription software, you will still need to add the subtitles manually through the text editor.
-
How do I add subtitles to KineMaster?
Subtitles can be added to KineMaster videos in two ways. Firstly, there is manual writing, where the users can write the subtitles manually in KineMaster. Secondly, they can use transcription software like Amberscript to automatically generate subtitles and add the subtitles through the text editor on KineMaster.
-
Can I import VTT Files into KineMaster?
KineMaster doesn’t allow users to import VTT files. All subtitles must be added through the text editor. You can always copy the subtitles generated from a transcription app like Amberscript. But you will still need to enter the subtitles manually in KineMaster.
How to Add Subtitles In Premiere Rush in 5 Easy Steps
Table of contents
- How to Add Subtitles In Premiere Rush
- Why Add Subtitles to Premiere Rush Anyway?
- Captions vs. Subtitles: Do You Know the Difference?
- About Amberscript
With more people viewing video content today, there’s no better way to make it more accessible to a wider audience than by adding subtitles. Premiere Rush is an incredible video editing app. The only downside is that it doesn’t offer a subtitle feature. If you’re willing to target a broader audience through your video content, perhaps you’ll wonder, “How to add subtitles in Premiere Rush?” Stick with us to find out!
How to Add Subtitles In Premiere Rush
Fortunately, there’s no secret sauce to adding subtitles in Premiere Rush. Although the tool does not contain the subtitle feature, there is a reliable and practical way to add subtitles. Below, we’ve shared a few steps to help you include subtitles in your video content seamlessly.
Create and Import an SRT Subtitle File
To begin with, you need to create an SRT file. Also known as the SubRip Subtitle file, SRT is a plan-text file that includes crucial information about subtitles. From start and end timecodes to subtitle sequence, the SRT file ensures to match your subtitles to your audio.
This helps you to import everything into Premiere Rush with minimal effort. The best part? You do not need to create the SRT file manually. Instead, you can use Amberscript for that purpose.
The tool helps automate audio and video into subtitles using speech recognition. How cool is that? This way, you get to create the SRT file in the blink of an eye.
Auto Generate an SRT File with Amberscript
Amberscript auto generates an SRT file which is great. The question is, how do you do that? Begin by uploading the video and audio you want to include the subtitles into.
As the video gets uploaded, the AI tool will create the transcript for you. In the next step, you can edit the file using our user friendly platform. Generally, editing involves fixing the grammar, adding punctuation, and so on.
Once you’ve edited the video to your satisfaction, you can export it to your PC. What’s more, you can use a preferred format for the video subtitles.
Additionally, if you are in need of subtitles of the highest quality, you can opt for our human-made services: Human-made subtitles and translated subtitles.
How To Add Your Subtitles Into Premiere Rush
Unfortunately, there isn’t a feature that allows you to upload SRT files into Premier Rush, however we’ve found a hack that can help you get around it. Thought the hack is manual, it may be worth upgrading to Adobe Premier Pro, which allows you to upload SRT files automatically, or another tool such as iMovie or Final Cut Pro X.
After auto-generating the SRT file, it’s time to upload it into Premiere Rush. Here’s how you can do it:
- Open the video
- Add an unformatted Title and move it to where you want it on your screen.
- Open the SRT file
- Check the time code and make sure it correlates to the title on the video
- Copy the text from the STR file
- Paste it into the Title
Fix the Subtitles
After adding the subtitles to Premiere Rush, you’d need to make some adjustments. When you see the text and title in your video, make sure you set the timing. Otherwise, the content might not align properly.
You can trim the subtitles by grabbing the block and cropping it to the desired length. Next, drag the titles and place them on the top. However, do it with extra care; otherwise, you may end up overwriting the existing captions.
Format Your File
You’ve uploaded the file and the subtitles and adjusted them per your preferences; what’s next? You can style the text or customize the video format per your liking.
Because your goal is to make it more engaging and reach a wider audience, here’s your chance to make your video impeccable. If you’re willing to make it more understandable to the viewers, you can change the text color and the font and even underline a few parts to make them more prominent.
Export the Video
Finally, you have to export the video, and luckily, it’s pretty simple. Follow the steps below to ensure you export your video properly.
- Choose the caption icon and click Burn in the captions
- As you hit enter, the window will close.
- Now, select the file and export it.
- Do not forget to save your file, and you’re good to go!
Benefits of using Amberscript
Amberscript’s subtitle services are:

Fast
Edit your own text within minutes or leave the work to our experienced subtitlers.

Accurate
Our experienced subtitlers and thorough quality controls ensure 100% accuracy of your transcriptions and subtitles.

Easy
Thanks to a variety of integrations and API interfaces, you can fully automate your workflows.

Secure
Your data is in safe hands. We are GDPR compliant + ISO27001 & ISO9001 certified.
Why Add Subtitles to Premiere Rush Anyway?
Now that you know how to add subtitles in Premiere Rush, it is imperative to understand why including subtitles is essential. Although Premiere Rush offers a seamless way to create and edit videos, on top of that, if you’re a beginner, the tool has plenty of features for video formatting.
The only shortcoming is: It doesn’t include a subtitle feature. Luckily, adding subtitles to Premiere Rush is not a hard row to hoe. In fact, it’s pretty straightforward. However, you might wonder, “What’s the purpose of adding subtitles to a video?”
The answer is simple: It offers you several tangible benefits:
- Adding subtitles to your video boosts engagement. People get to view and read the video’s message regardless of their native language.
- Viewers on varying social platforms can easily interact with your video content. What else would you want as a content generator?
- More people would prefer watching your videos because, indeed, you have enhanced your visual content through subtitles.
- You are enabling deaf or otherwise hard-of-hearing individuals to understand your content better.
- There are around 6,500 languages in the world. Simply put, not everyone speaks the same language as yours. You’re restricting your content to your native speakers only by not adding subtitles to your video.
- More people viewing your quality content will certainly refer it to others. As such, you have a chance to target the audience regardless of their geographical area.
For more details on how to create subtitles, you can use our detailed step-by-step guide.
Captions vs. Subtitles: Do You Know the Difference?
Although the terms captions and subtitles are often used interchangeably, they are both distinct. The only similarity captions and subtitles share is that they are text versions of the audio in any video.
Closed captions are essentially the words spoken in the video. Simply put, if you cannot hear the information or want to turn off the volume for some reason, you can know what’s going on in the video through captions.
On the other hand, subtitles are the translation of the words spoken in a video. For example, consider you’re a US national who only knows English. If you want to stream a Korean film, you’d need a translation of the dialogue at the bottom of your screen.
The actors in the film are speaking Korean, but you’re watching English subtitles on your screen – these are subtitles. Generally, subtitles are developed before releasing a movie or a TV show.

Subtitles, Closed Captions, and SDH Subtitles: How are they different?
- Subtitles: text created from a transcript
- Closed captions: describe what is happening in addition to the dialogue
- SDH captions: Subtitles designed for deaf and hard of hearing
About Amberscript
Amberscript is an online AI voice recognition software that specializes for video and audio transcription and subtitling. We offer machine-made and human-made transcriptions alongside machine-made, human-made and translated subtitles.
Amberscript is the smartest solution for creating and editing subtitles for a variety of reasons, including speed, accuracy and security. Just a few minutes pass during the entire process.
Frequently asked questions
-
What Is Premiere Rush?
Premiere Rush is a desktop and mobile video editing app. You can shoot, edit, format, and share HD-quality videos with the tool no matter where you are.
The good news is the tool is free and suitable for all skill levels. So, whether you’re a newbie or a pro video editor, it comes in handy.
-
How Do I Add Subtitles to Premiere Rush?
First, you need to create and import an SRT file. If you do not want to create the SRT file manually, you can use Amberscript to auto-generate the file for you. Once the file is generated, you can upload it to Premiere Rush, adjust the subtitles, format your video content, and export it.
-
Can I Import SRT Files Into Premiere Rush?
Because there’s no way to add subtitles in Premiere Rush, you’d perhaps need to create an SRT file for that purpose and proceed. So, yes, you can import SRT files into Premiere Rush and adjust your video content per your liking.
-
Can I Import VTT Files Into Premiere Rush?
VTT file is also a plain text file containing video information like subtitles, captions, and descriptions. If you want to create and import a VTT file into Premiere Rush, you can do so. Regardless of what file format you choose, we recommend you automate file generation to ease the process for yourself.
Ultimate Guide to Adding Subtitles in Davinci Resolve
If you’d like to edit programs and videos, Davinci Resolve is the perfect software to use. It’s equipped with the latest tech tools that help video editors easily integrate graphics, render images, customize colors, optimize sound features, and add audio subtitles to videos. As a result, it’s a perfect solution for professional video editors. In this step-by-step guide, we will tell you how to add subtitles to Davinci Resolve.
Table of Contents
- What are subtitles
- Adding Subtitles with Davinci Resolve
- Manual Creation of Subtitles
- Add SRT Subtitles to Davinci Resolve
- How to add your subtitles to Davinci Resolve
- How to Burn Closed Captions in DaVinci Resolve
- A Couple of Tips to Consider
- Conclusion
What are subtitles?
The definition of subtitles
Subtitles are text that is usually positioned at the bottom of your video and are created from the dialogue of videos or movies. Thanks to the subtitles, members of the Deaf and Hard of Hearing community or users who don’t want to turn up the volume can understand what’s happening and what’s being said in the video.
The benefits of subtitles
- Your video content will be discovered by more people on social media
- Reach a potentially wider audience
- Improve SEO
- Attract more foreign viewers to your content
Adding Subtitles with Davinci Resolve
Subtitles are one of the primary requirements from video makers these days. Whether a short video or a full-length program, content creators like to target a wider audience by providing video subtitles for non-native language speakers.
So, you can communicate with those who are deaf or hard of hearing, or the ones unable to understand the language used in the video. As a result, tools like Davinci Resolve let you target a global audience, enhancing your brand outreach.
Working with Davinci Resolve makes adding subtitles to your videos more straightforward and quicker. Therefore, this tool adds to your efficiency as a video editor. Whether creating video subtitles or exporting them for other videos, it’s all possible through Davinci Resolve.
How to Add Subtitles
Davinci Resolve offers several ways to add subtitles to your videos. There are both manual and automatic methods to do it. So, let’s find out more.
Manual Creation of Subtitles
Let’s say that you have completed your video editing and you are only left with the subtitles. In this case, you can add the subtitles manually by following these steps:
1. Select Subtitle Track
Go to your video track timeline in the Davinci Resolve software and click the ‘Add Subtitle Track’ option. Doing this will add the track containing your video subtitles.
2. Add Subtitle Track
Now, move your cursor to the point where a dialog starts. Next, right-click on the subtitle track. Then, select the ‘Add Subtitle’ option.
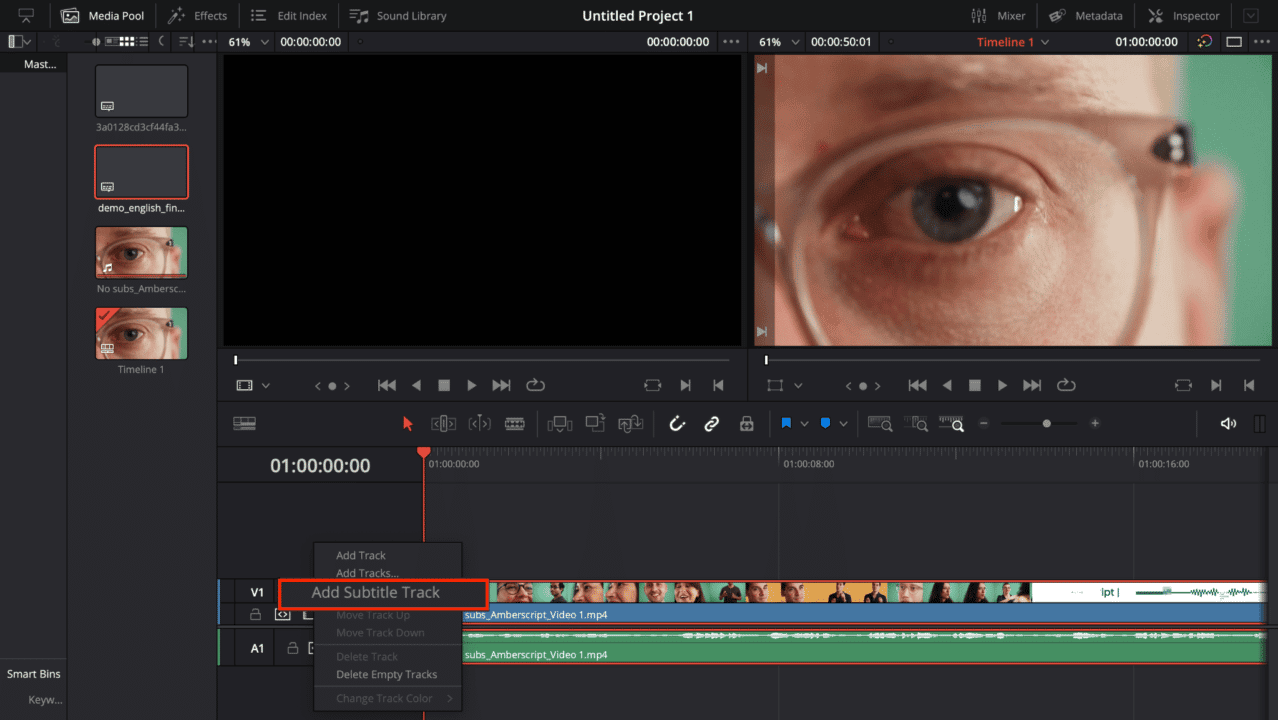
3. Type In the Caption
Once you have selected the subtitle, you can now type your caption in the new panel. Next, fill in the caption in the Inspector.
4. Adjust Subtitle Length
Match the section of the audio to your subtitle and adjust its length.
5. Listen to the Audio
Listen to the audio section and type it into the caption space. This will add the subtitle and start appearing in the video.
6. Styling Subtitle Font
In the inspector window, you can also see the Style tab. Use this tab to modify how your caption appears in the video. You can customize the font, size, color, background, etc. Moreover, you can keep the same style for all your subtitles by clicking the ‘Use Track Style’ checkbox. Make sure to use an easily readable font to make it easier to read at a faster pace.
7. Add Next Subtitle
Now, move the cursor to the point where the following audio line begins. Then, in the inspector window, click ‘Add New .’ Alternatively, you can right-click on the subtitle track and add another title. Now, repeat the process to add subtitles throughout the video.
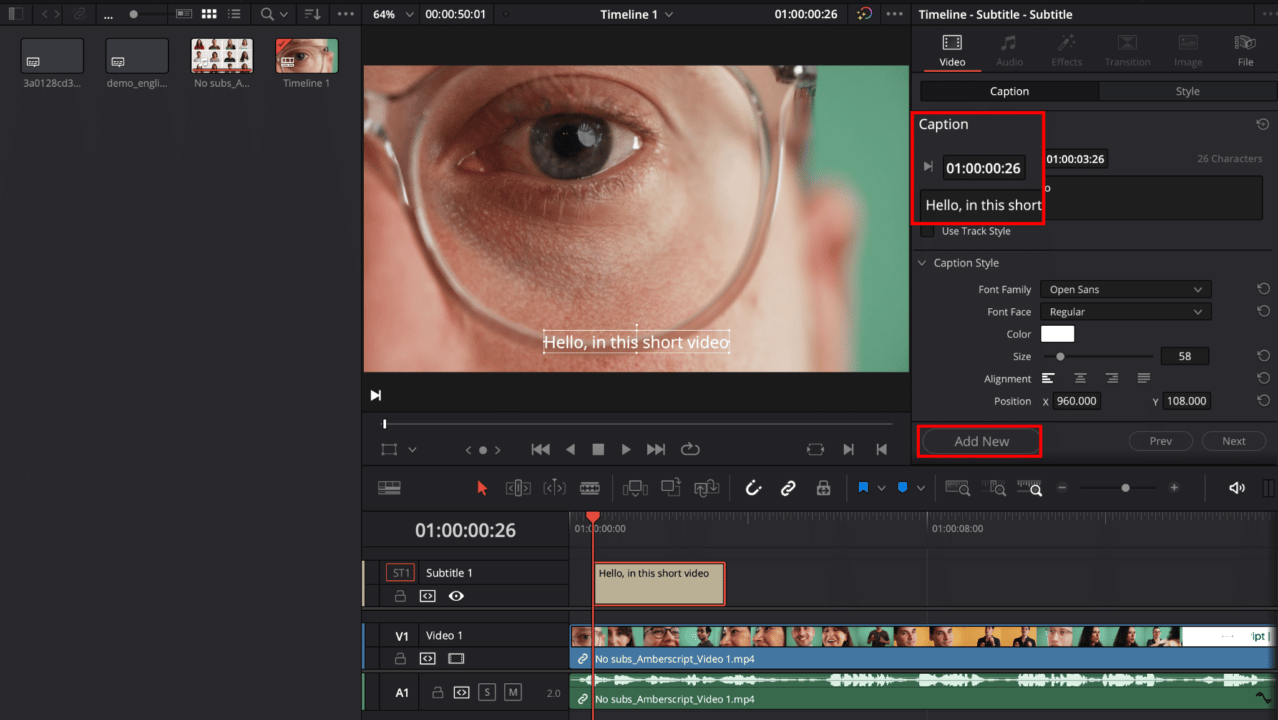
Add SRT Subtitles to Davinci Resolve
While manual addition of subtitles is a simplified process, it is quite laborious. Therefore, there must be a much faster option to shift the subtitles to the video quickly. There are a couple of ways to do it if you want to import the subtitles to your video.
Getting SRT Subtitles with Amberscript
Platforms like Amberscript, are an easy way to get subtitles for your videos. All you need to do is upload your video content and then choose to get machine-made subtitles, have our team of professional subtitlers take the lead or reach a wider audience by using our human-made or translated subtitling services.
After you have uploaded the video, Amberscript starts to transcribe your video. With the help of their machine-made subtitle generator, this process doesn’t take long, and within minutes you would get your text draft. Then you will be able to download the first draft which has gone through its online text generator.
You can edit the first draft of your subtitle on their online text editor to suit anything you want. The editing includes correcting grammar structures, such as punctuations and align them to your video perfectly. As a plus, you even get the chance to annotate and highlight parts of the text (subtitle edit).
Afterwards, if you are happy with the edited subtitles, you can download them in Text, SRT, VTT or EBU-STL and many other formats, with optional timestamps and speaker distinction. You even have the chance to download your video together with your subtitles.
Alternatively, if you have more complex, or a large amount of video content, you can have our team of professional subtitlers manually edit the text. The added value is that it’s 99.9% accurate and you can convert speech to text in over 15 languages. As our team of freelancers are from different part sof the world, we make sure to transcribe jargon or accents accurately.
For more details on our subtitling services, start your free trial now.
Once you have the .srt file, it will be imported to your video. Here’s how to add your capions to Davinci Resolve.
Add your subtitles to Davinci Resolve
1. Import and Select
Go to the ‘File’ menu in your Davinci Resolve software and click on ‘Import.” Next, click “Subtitle.’ Then, navigate to your .srt file and select it to import. Once imported, the .srt file should appear in the media pool on your Davinci Resolve software.
2. Drag and Drop
Once the .srt file is in the media pool, you can drag and drop the files to your current timeline. Just place the file where your dialogues start and make minor syncing adjustments.
3. Stylize Subtitles
The subtitles do not retain the styles, so you must restyle them. However, it can be done in the same way as mentioned earlier.
4. Modifying Subtitles
Generally, the subtitles are correct, but YouTube automatic transcriptions may have a few mistakes. Make sure to correct the errors and finalize your subtitles. You can do it in the Captions section in the Inspector.
Export Subtitles
Once you have your subtitles in place, you can export the entire video along with the subtitles. First, go to the delivery page in the Davinci Resolve software. You can find this option in the ‘Subtitle Settings’ option. There are three ways to export your subtitles.
- Exporting as a Separate File
When you export the subtitles file as a separate file, it is more convenient for the users to turn the subtitles on or off. Especially when they are watching it on YouTube, the users can view or block the subtitles. If you want to use this option, you must upload the subtitles file separately on YouTube.
- Burn Subtitles into the Video
This option permanently places the subtitles into your video, and you cannot remove them. Moreover, the viewers don’t have the opportunity to turn them off either. This option suits specific platforms like Facebook or Instagram, where the videos autoplay on mute.
However, if you are putting the video on YouTube, it’s always a great option to let the users decide whether they want the subtitles or not.
- Video Embedding
The embed option is mainly for broadcast use. Moreover, it only works if there is a supported file format. To export the subtitles, follow these steps:
Step 1- Selecting the Export Format: Go to the delivery page and choose your export format. Also, configure all the settings you want before starting the export process. Check the bottom left of the window, and you should see the Subtitle Settings option. The dropdown menu should have the Export Subtitles option. Click it and proceed to selection.
Step 2– Pick Your Export Method: Now, select your export method. For instance, if you want to export as a separate file, choose your file and then check the ‘include the following subtitle tracks in the export’ option. Next, start rendering the video, and it will export your subtitles according to your preference
Benefits of using Amberscript
Amberscript’s subtitle services are:
Fast
Edit your own text within minutes or leave the work to our experienced subtitlers.
Accurate
Our experienced subtitlers and thorough quality controls ensure 100% accuracy of your transcriptions and subtitles.
Easy
Thanks to a variety of integrations and API interfaces, you can fully automate your workflows.
Secure
Your data is in safe hands. We are GDPR compliant + ISO27001 & ISO9001 certified.
How to Burn Closed Captions in DaVinci Resolve
DaVinci Resolve is a professional video editing software that offers robust features for creating closed captions for accessibility purposes. To create closed captions in DaVinci Resolve, follow these steps:
- Import your video: Start by importing the video you want to add closed captions to into DaVinci Resolve.
- Create a new subtitle track: In the timeline, right-click and select “New Track > Subtitle” to create a new subtitle track.
- Add subtitles: On the new subtitle track, click on the “Add Subtitle” button and enter the subtitle text for each line. You can also adjust the timing of each subtitle by dragging the subtitle marker on the timeline.
- Customize subtitle appearance: DaVinci Resolve allows you to customize the appearance of your subtitles, such as font style, size, and color. You can do this by selecting the subtitle track and opening the “Inspector” panel.
- Export your video with closed captions: When you’re done creating your closed captions, you can export your video with closed captions by selecting the “Deliver” tab, choosing your desired export format, and selecting the “Burn In” option for subtitles.
By following these steps, you can create closed captions in DaVinci Resolve for accessibility purposes, ensuring that your video content is accessible to all viewers. If you want to learn more about what closed captions are, and how closed captions are different from subtitles, you can read our extensive blogpost about it.
A Couple of Tips to Consider
While you’re adding subtitles to your video with Davinci Resolve, here are a couple of considerations to make your work smoother.
- Make sure that you add the subtitles at the very end of your video rendering. If you do it earlier, new video edits would mean shuffling the subtitles. Hence, you’re doing the same thing from the start.
- Use the industry standards for the number of characters per line. The standard duration of the title depends on the number of characters in it. Generally, it’s around 12 to 17 seconds.
Conclusion
Working with Davinci Resolve to add subtitles to your videos is a seamless process, and it can give you high-quality results within no time. Besides subtitling, Davinci Resolve is a comprehensive software offering tools for color enhancement, rendering, and audio processing. Therefore, it can be a standalone software for all your professional video editing needs.
As you deploy Davinci Resolve for subtitling, it gives you a better chance to export quality content to your social media platforms. Moreover, your video content gets an international appeal, allowing you to showcase your art to a global audience.
Frequently asked questions
-
Can I burn the subtitles directly onto my video?
If you have exported the transcript as a SRT, EBU-STL or VTT file, you can easily burn them onto your video using video-editing software.
-
Can I change the position of the subtitles?
That needs to be done using a video editor like VLC. Go to Tools > Preferences [CTRL + P]. Under Show settings, select the option that says All to switch to the advanced preferences. Navigate to Input/Codecs > Subtitle codecs > Subtitles. Under Text subtitle decoder set, the Subtitle justification to left, right or center.
-
How do I order translated subtitles?
To order translated subtitles, you can upload your file like you would normally do. You can then select manual subtitling. Once you have selected this, an option will appear where you will be able to select the language the subtitles need to be translated to. If the language that you want is not one of the options you can contact us through our contact form.
-
What subtitle file formats are supported?
Our software allows you to export the transcript from the video or audio file as an SRT, EBU-STL or VTT file.
-
How do I generate captions?
You can generate captions automatically using Amberscript. Our software allows you to export transcription based on audio/video files as SRT, EBU-STL or VTT files, which can easily be inserted into a video-editor. Want to know more? Here is a step-by-step guide.
-
How do you keep my files secure and confidential?
Amberscript’s IT infrastructure is built on the server infrastructure of Amazon Web Services located in Frankfurt, Germany. All data that is processed by Amberscript will be stored and processed on highly secured servers with regular back-ups on the same infrastructure.
-
In which formats can I export my subtitles?
Our software allows you to export the transcript from the video or audio file as an SRT, EBU-STL or VTT file.
-
What is the price?
For our prices, please refer to our pricing page.
-
What is the turnaround time?
Our state-of-the-art speech AI delivers results in less than an hour (depending on the size of the file, it can take only takes a few minutes). Just upload your audio into our system and we will notify you as soon as the file is ready! if you would like to learn about turnaround times for our manual subtitling services, click here.
Closed Captioning Services – what are the benefits?
What are closed captioning services?
Closed captioning services are providers that transform audio-to-text. Captions are shown at the bottom of the video, like subtitles, but are in the same language as the audio and also describe what audio is being played, for example: “there was a knock at the door”.
Amberscript’s closed captioning services include:
- Video closed captioning services
- Broadcast closed captioning services
- Television and film closed captioning services
- Marketing and advertising closed captioning services
- Higher education closed captioning
- Media production closed captioning
- Closed captioning for governments
Why Use Closed Captioning Services?
Some people will watch your videos in crowded places or quiet places like libraries. These people can’t raise the volume on the video, making it impossible for them to hear the audio. Closed captions services provide text at the bottom of the video. This text acts as word-for-word verbatim of the video, helping these viewers stay engaged.
Closed captions also help your content rank better on SEO. Algorithms also need help with understanding your video without audio. Algorithms will pull into closed captions when deciding how to rank videos. They will look for keywords and other information to determine what your video covers.
Amberscript provides closed captioning services for individuals and companies worldwide. Our competitive pricing structure and quality service provide reliable closed captions at an affordable price.
What are Subtitles and Closed Captions?
Subtitles and closed captions are similar, making them easy to mix up. We offer services for subtitles and closed captions. Both show up as text at the bottom of a video.
Subtitles translate the video’s language into the viewer’s native tongue. Many Japanese anime shows come with subtitles for people who don’t know Japanese. Subtitles provide the translation for character dialogue so viewers can still follow the story. Subtitles have various uses that extend beyond anime shows. What’s even better is that, subtitles help businesses communicate with more customers and shatter the language barrier.
Closed captions help people follow the video even if they can’t hear the audio. Viewers who are deaf or hard of hearing, read the closed captions to understand what is happening. Other people find themselves in environments where it’s best to keep the volume off. These viewers will read the closed captions while watching the video to fully grasp the content.
Amberscript’s Closed Captioning Process
Our closed captioning software generates closed captions for your videos. It saves you the time and pain of manually adding closed captions to your videos. Our intuitive editor helps you improve closed captions yourself.
After uploading your video into our software, we provide the closed captions. You can easily search through the text to find what you want to edit. Amberscript will save you plenty of time while making it easy to review your closed captions.
Our software will save you time on editing. You can save even more time with our closed caption writers. After you upload your file, our expert writers do their magic. They will edit the closed captions for you. We conduct a quality check to ensure everything is smooth before delivering the closed captioned video. We then provide you with a file with optional timestamps and speaker distinction.
Video Caption File Formats
Amberscript delivers your video captions in multiple file formats. Our range of formats ensures your captions get provided based on format requirements.
- .docx — Microsoft Word file format
- .json – JavaScript Object Notation
- .srt – SubRip Subtitle file
- .vtt – Web Video Text Tracks
- EBU-STL – European Broadcast Union subtitles
- .txt – Plain text file
Benefits of Professional Captions Over AI
Amberscript lets customers choose between AI-generated and professional captions. You can either edit the captions yourself or hand off the responsibilities to one of our expert writers. AI makes our lives easier and provides quick captions.
However, these captions are not perfect. They will come with errors, making it essential to review AI-generated captions. Some speakers talk too fast for a robot or use vocalizations the robot cannot understand.
Errors can confuse viewers and cause them to click off your videos. The closed captions need to read like human sentences. AI provides the rubric, but you should not consider it as the final product.
Our language experts can edit the captions for you, creating that professional touch. We only hire native speakers who can create the highest accuracy texts for captions. Professional captions come at a quick turnaround. Instead of scheduling time to review and edit AI-generated captions, a language expert focuses on your closed captions until the job is finished.
Transform your audio and
video to text and subtitles
- High accurate, on demand service
- Competitive pricing with the fastest turnaround using AI
- Upload, search edit and export captions and transcripts with ease.
Industries that Benefit from Closed Captions
Amberscript works with many individuals and corporations. We happily serve clients like Amazon, Netflix, and Disney+, providing them with accurate closed captions. Various industries use closed captions to improve their messaging and reach more people. Here are some of the industries and people we help.
Marketers
Marketers create audio and video content to reach their customers. Not all of these customers can listen to the audio. Closed captions retain viewers by providing the text for the video at the bottom.
Converting video and audio content into text will enhance their SEO. Search engine optimization is a primary focus for many marketers and their clients. Closed captions help marketers, and their clients rank higher than the competition for their keywords.
Marketers can also use Amberscript to assist with their research. Market research involves many interviews and promotional videos. These long-form pieces of content can feel drawn out. Automatic transcriptions help marketers skip to the essential insights from these interviews and videos. Saving time on market research allows marketers to shift their attention to more productive activities.
Media and Broadcasting
Amberscript provides accurate closed captions in minutes. Your video content will become searchable across search engines, helping you attract new viewers. Our transcription services ensure you no longer waste time coordinating transcribers and video-loggers yourself. We do the closed captioning for you so you can focus on other tasks.
You’ll still save time with our AI. Sky-high TV lowered their transcribing from 10 hours per interview to 20 minutes using our tool. They’ve saved hundreds of hours of work using our software.
Our batch-upload functionality helps media and broadcasting personnel upload several videos simultaneously. This feature makes it easier to manage large volumes of video.
Media Producers
Filmmakers, YouTubers, and vloggers often get overwhelmed with deadlines. They have to stay on pace with their content and produce it at a reliable schedule. Adding closed captions to your videos helps your viewers understand the content. It also helps with search engine visibility.
However, some media producers forgo closed captions because they take too much time. They’re already stressed about meeting their deadlines. Amberscript makes it easy to keep up with closed captions. We help creators save time and boost productivity. Our software helps them keep up with deadlines while providing their viewers with accurate closed captions.
Governments
Amberscript helps governments achieve affordable and accurate closed captions with our human transcribers. We have speech recognition models trained explicitly for political terminology. Our AI-generated closed captions are fully GDPR compliant and support 12 European languages. We have the largest transcriber network in Northern and Central Europe.
Closed captions allow citizens with hearing disabilities to fully grasp your videos. Our automatic first-draft transcripts get generated within minutes. These automated transcripts come with 90% accuracy. Our human service guarantees 99% accuracy and adherence to accessibility guidelines.
Universities and Education
Closed captions help universities reach broader audiences. They can cater to students with hearing disabilities and make their content more accessible. Our software can distinguish between speakers, making it easier to dissect interviews.
Universities deploy many resources to educate students. Amberscript gives them more affordable access to closed captions and subtitles. Our quick service and robust software help universities allocate more time and resources to other objectives.
Most transcribers need four hours to transcribe a single hour of audio. We do the transcribing in a few minutes instead of a few hours. You can either polish the closed captions through our editor or use our manual closed captioning services to cross the finish line.
Closed captions help various corporations and individuals reach broader audiences. Amberscript makes it easy for these entities to obtain accurate closed captions at an affordable price.
10 Best Transcription Services in 2025
- What is transcription?
- Why use a transcription service?
- Amberscript
- Rev
- GoTranscript
- Temi
- Scribie
- Sonix
- GMR Transcription
- Otter.ai
- TranscribeMe
- SpeechPad
- The Verdict
For years the only way to get a written record of what was said in an audio or video recording was to type it all out yourself, that is, until transcription services were popularized. Nowadays, with the internet, transcription services have become much more widely available and even more reliable than in days gone by. But what are the best transcription services on the market?
Foot pedals, text-to-speech software, and artificial intelligence have all helped to make transcription services faster, less error-prone, and more affordable, but with so many excellent companies offering transcription services online, how do you choose the best one for your needs?
In this article, we will explain what transcription is, the benefits of using a professional transcription service, and we’ll look at and compare ten of the very best transcription services in 2025.
What is transcription?
Transcription is the process of typing out the audio heard on a voice or video recording so that you have a written record of what was said and who said it. Many of the best transcription services also feature timestamps so that you know when something was said in the recording, which makes it easier to find and refer back to later on when you need to.
Why use a transcription service?
There are a number of excellent reasons to use a professional transcription service versus trying to transcribe the audio yourself. Let’s go over a few of the main reasons for why so many companies rely on transcription services as an integral part of their business.
Less manual work
Transcription is hard work, and it’s a lot trickier than you might think at first glance. It can be hard to make out what was said, who said it, and when they said it, but even if you have a crisp, clean audio recording, you still need to actually listen to it all and type it out, which requires a ton of time and manual work on your part.
Faster turnaround times
Professional transcriptionists are able to transcribe one audio hour in as little as two to three hours, but for the average person, with no experience transcribing audio, this can take up to eight hours or longer. So, if you want to free up your time or allow your employees to work on other, more important tasks, then hiring a professional transcriptionist might be the best solution for you.
Reduced error rates
Oftentimes, the audio you want to transcribe wasn’t recorded with the best possible quality, and as such, it can be hard to make out exactly what was said. Things get even more complicated when there are multiple people speaking on the recording, especially if it’s an audio-only recording. Then, there’s the fact that people often speak with accents or mumble, which makes transcribing accurately incredibly difficult.
Professional transcriptionists are trained and experienced at transcribing less-than-perfect audio accurately. By using a professional transcription service, you can reduce the number of errors in your transcribed document, which will allow you to maintain an accurate record of exactly what was said on the recording, and by whom.
Cost-effectiveness
When you consider the amount of time it takes an average person to transcribe audio and video, caption videos, and translate foreign languages, the value that you can receive when using a professional transcription service becomes apparent. If you were to do all of these tasks yourself, you could easily spend an entire day transcribing only a single audio hour.
Passing the task off to one of your employees is also time-consuming and costly, not to mention the fact that it takes them away from their other duties. Therefore, using a transcription service is, in most cases, a cost-effective solution that allows you to get the accurate transcription you need without having to spend all day or possibly even several days on the task.
Timestamps
In many instances, it’s helpful to have a timestamp in your document so that you can refer back to a certain time in the audio to reference what was said. This is especially helpful in medical, legal, and other technical recordings, which can be long, monotonous, and confusing.
Trying to timestamp things yourself is a huge challenge in and of itself, but when you use a professional transcription service, you’ll get an accurate document that shows not only what was said but who said it and exactly when it was said in the recording, which makes referring back to certain statements a breeze when it would otherwise be a tedious, tiresome task.
Get a customized offer
Request a quote for your transcription needs
The Top Ten Best Transcription Services in 2025
Now that we’ve gone over what transcription is and looked at some of the very best reasons to use a professional transcription service in 2025, let’s turn our attention to some of the best professional transcription services online and see what makes them so good. We will compare their features and benefits so that you can choose the one that will work best for you, your needs, and your budget.
1. Amberscript
Amberscript has to be the first transcription service on this list, as we found them to be the best overall transcription service in numerous different categories, including best overall accuracy and best value for money.
After reviewing the service, it’s no surprise that many of the world’s biggest companies use Amberscript for their transcription services, including Amazon, Microsoft, Disney+, Netflix, and Warner Bros.
Amberscript offers a couple of different solutions based on your individual needs. For those who need a great but not pixel-perfect transcription, who want to save some money and don’t mind perfecting the script themselves, Amberscript offers an automated transcription service that has one of the fastest turnaround times online, for an incredibly low price given the quality of the transcription.
Alternatively, if you want a perfect, or as near to perfect as you can get, transcription, then Amberscript’s professional all-inclusive manual transcription service is probably the best you can find anywhere; it was certainly the best we found after reviewing dozens of transcription services online.
Benefits of using Amberscript
Amberscript’s subtitle services are:
Fast
Edit your own text within minutes or leave the work to our experienced subtitlers.
Accurate
Our experienced subtitlers and thorough quality controls ensure 100% accuracy of your transcriptions and subtitles.
Easy
Thanks to a variety of integrations and API interfaces, you can fully automate your workflows.
Secure
Your data is in safe hands. We are GDPR compliant + ISO27001 & ISO9001 certified.
Features & Benefits of Amberscript
Some of the best features of Amberscript include automatic transcription, automatic subtitles, data annotation, manual transcription, manual subtitles, as well as API and custom models. Plus, Amberscript features an excellent online tool that makes uploading, editing, and exporting your audio and completed transcription as easy as can be.
2. Rev
Rev is a very close second, as they offer many of the same excellent features as Amberscript, including per minute transcription and captioning. Rev also supports foreign language subtitles which is a feature that’s particularly helpful when your audio recording has multiple speakers who are speaking in different languages throughout the recording.
Rev is also trusted by a number of the world’s foremost companies, including CBS, Visa, Marriot, and many highly esteemed academic institutions such as Duke University, UCLA, The University of Michigan, and the University of Texas at Austin.
Features & Benefits of Rev
Some of the best features of choosing to hire Rev for your transcription services include the following: simple, upfront pricing, speedy delivery, secure online ordering, a top-quality guarantee, and excellent world-class support and customer service. Another standout feature of Rev is that they offer live captioning for Zoom meetings and video conferences.
3. GoTranscript
GoTranscript is another excellent choice for your transcription needs. They guarantee 99% accuracy and have incredibly quick turnaround times, averaging about 6 hours.
You can order your transcription service online, upload your audio, and receive your finished document without ever having to speak with anyone in person, making GoTranscript one of the best choices if you want to have the job done quickly and don’t want to spend time on a long phone call with someone trying to upsell you on premium services that you neither need nor want.
Some companies that use GoTranscript for their professional transcription needs include Forbes, The Huffington Post, TechCo, and Entrepreneur.
Features & Benefits of GoTranscript
Some of the best features you can expect to receive when working with GoTranscript include verbatim results with legal-level quality, rush ordering, a 100% satisfaction guarantee, custom orders, and the ability to order your transcription instantly without ever having to speak to anyone.
4. Temi
Temi offers one of the fastest turnaround times available anywhere with a speech-to-text service that can be ready in as little as five minutes, not a typo. They also feature some of the very best prices you can find online with a 90=95% accuracy guarantee.
Temi doesn’t feature manual transcription services, so this is entirely an AI service, but the results for the price are truly hard to beat.
The trick to using automated AI-type transcription services such as Temi is to ensure that the original audio quality of the recording you’re uploading is crisp and clear so that the software can work its magic.
If your audio file is distorted, distressed, or is otherwise of a lower quality, then you’ll definitely want to use a professional manual transcription service from one of the bigger professional brands such as Amberscript or Rev.
But, if your audio recording is of a high-quality, and you don’t mind tweaking and fine-tuning the transcription, then it’s really hard to beat Temi in terms of price and turnaround time.
Some companies that use Temi include broadcasting mainstay PBS and sports giant ESPN.
Features & Benefits of Temi
The main features of Temi are the incredibly quick turnaround time and super cost-effective price point. Temi also features a free transcription editor so that you can fine-tune your finished document right there from within the site’s dashboard.
5. Scribie
Like some of the other big names in online transcription, Scribie features both automated but imperfect and human-based, much more accurate transcriptions. Scribie guarantees 99% accuracy for manual human-based transcriptions, making them a reliable choice for any business that needs to ensure accuracy.
The average turnaround time for receiving your finished document is around 36 hours which is not exactly the best, but at $0.80 per audio minute, their rates are certainly competitive, compared with some of the other professional transcription services offering manual transcription.
Features & Benefits of Scribie
Scribie features a good overall level of accuracy, reasonable prices, and an excellent online transcription editor that can be used from within the user interface. For these reasons, it’s a reliable transcription service that’s well worth considering, especially if you don’t need your document to be completed in a hurry.
6. Sonix.ai
Sonix is quickly becoming one of the trusted sources for reliable, professional transcription services online in 2024. What makes Sonix stand out from the crowd is the fact that they support 35+ languages. Sonix is entirely automated, meaning that they offer AI-based transcription, translation, and subtitling.
There are also a number of unique features offered by Sonix that would cost you a ton of additional money if you used another service, including automated file sharing, publishing, and team collaboration tools.
For these reasons, Sonix is now trusted as the go-to professional transcription service for many ivy-league universities such as Stanford and Yale and major companies like ScotiaBank, Vice, The Gap, Sephora, and a little company called Google.
Features & Benefits of Sonix
Some of the best features and benefits of Sonix include language support for 35+ different languages, rapid turnaround times, translation services, file sharing, file publishing, and a number of different team collaboration tools that enable teams to view, edit, and share the finished document amongst each other.
7. GMR Transcription
GMR Transcription is entirely human-based, meaning that the site entrusts all of its transcriptions to professional freelancers who have been vetted for their abilities and accuracy. Automated transcription services are popular these days, in part because of the value that they offer for the money, but automated transcriptions are never perfect, and when you want something done right, there’s no substitute for a real human.
GMR employs all of their transcriptionists in the U.S., ensuring that the person transcribing your audio will have a native level of English comprehension. They also offer a 99% accuracy guarantee. GMR also has excellent customer service and support, so if you have any issues, you’ll be able to get them addressed and resolved quickly by a human rather than by an AI chatbot, which is actually a significant and underrated benefit.
GMR is used by a ton of world-class companies, including McDonald’s, ADP, Amazon, Chevron, Dell, and the best university in the world: Oxford.
Features & Benefits of GMR Transcription
The main reason to use GMR Transcription is because they guarantee that your audio or video file will be transcribed by a professional transcriptionist rather than by an automated AI software. GMR features relatively quick turnaround times, a free trial service, and excellent customer support.
8. Otter.AI
Otter.AI is a bit different from the other professional transcription services we’ve looked at so far in that they are primarily focused on generating smart notes. Otter allows teams to work together by sharing documents, files, folders, and notes together online from within the dashboard.
However, although Otter offers all of these advanced capabilities, they are still one of the best transcription services online in 2024, and a membership with Otter includes 600 minutes, or ten hours, of free transcriptions each month, making them one of the best value transcription services online in 2024.
On top of all that, Otter also offers live captioning for Zoom calls and other videoconferences, which is quickly becoming one of the most sought-after transcription services online.
Some household names that trust Otter.Ai with their transcription needs include IBM, Verizon, DropBox, and Zoom, along with educational institutions like Columbia University and Tulane University.
Features & Benefits of Otter.AI
Powerful AI-generated noted taking, live captioning on Zoom and videoconferencing sites, as well as a tremendous number of free transcriptions each month.
9. TranscribeMe
TranscribeMe is another AI-based transcription service, but it is without a doubt one of the very best ones available online in 2024. The site is powered by Ai datasets, which are constantly being improved upon to ensure the highest level of accuracy from a non-human-based transcription software.
Because of the accuracy of the transcriptions, rapid turnaround times, and excellent rates offered by TranscribeMe, the site is one of the only AI-based transcription services trusted in technical sectors such as the medical and legal sectors, where accuracy is of the utmost importance.
Some of the big names using TranscribeMe include Ipsos, Oracle, Meta (formerly Facebook,) and the best university in America: Harvard.
Features & Benefits of TranscribeMe
There are a ton of excellent features and benefits that come along with using TranscribeMe for your professional online transcription needs in 2024, including a security guarantee that’s second to none, data annotation, custom AI datasets, and automated translation services.
10. SpeechPad
Last but not least, SpeechPad, is one of the oldest transcription services online and has thousands of happy customers who rely on them exclusively. Like many of the other online transcription services we’ve looked at, SpeechPad offers a 99% accuracy guarantee so that you can rest assured that your audio or video recording will be transcribed accurately.
SpeechPad offers very quick turnaround times, captioning services, foreign language support, and competitive prices, making them a reliable choice for those looking to have professional transcriptions and translations completed online.
Some of the companies that regularly use SpeechPad include Yahoo, LinkedIn, L’oreal, and NYU University.
Features & Benefits of SpeechPad
The main features of SpeechPad are the rapid turnaround times, the 99% accuracy guarantee, an excellent captioning service, and the fact that the site supports a number of different foreign languages. The site is also fairly reasonably priced, especially for foreign language transcription and translation, with services starting at $3.00 per audio minute for foreign languages.
The Verdict
After looking at dozens of professional transcription services, we were able to narrow the list down to the ten companies listed in this article. Each of the transcription services listed above can save you time, money, and a ton of effort. Plus, they all offer accurate transcriptions and quick turnaround times.
That said, if we could only recommend one transcription service in 2024, it would have to be Amberscript, as we found that they provided the best quality, the highest degree of accuracy, the quickest average turnaround times for manual transcriptions, and the best overall value for money with all factors taken into consideration.
Frequently asked questions
-
Can I add a glossary with specific words to the transcription job?
Yes, we also offer specialized transcription, which can include jargon or specific vocabulary. To learn more about this or discuss specifics, please contact us.
-
Can I translate my subtitles and transcriptions via your app?
No, translation is not available in the automatic services but you can order translated manual subtitles services on our platform. Unfortunately, we do not offer translated manual transcriptions. Please check our prices here.
-
Can you also deliver transcriptions for other media formats?
We deliver data annotation for speech-to-text solutions. However, if you have a special request, please contact our sales team here.
-
Can you transcribe audio with foreign accents?
Yes, our software is constantly being trained to pick up on accents and know how to understand them. Want to know more about how this works? Read it here!
-
Can I adjust the formatting?
From your account, you can export the transcript in different formats. So if you require both a Word file and an SRT file, you can simply export the file twice.
Best Transcription Softwares
Table of Contents
For years the only way to get a written record of what was said in an audio or video recording was to type it all out yourself, that is, until transcription services were popularized. Nowadays, with the internet, transcription services have become much more widely available and even more reliable than in days gone by. But what are the best transcription services on the market?
Foot pedals, text-to-speech software, and artificial intelligence have all helped to make transcription services faster, less error-prone, and more affordable, but with so many excellent companies offering transcription services online, how do you choose the best one for your needs?
In this article, we will explain what transcription is, the benefits of using a professional transcription service, and we’ll look at and compare ten of the very best transcription services in 2024.
What is transcription?
Transcription is the process of typing out the audio heard on a voice or video recording so that you have a written record of what was said and who said it. Many of the best transcription services also feature timestamps so that you know when something was said in the recording, which makes it easier to find and refer back to later on when you need to.
Why use a transcription service?
There are a number of excellent reasons to use a professional transcription service versus trying to transcribe the audio yourself. Let’s go over a few of the main reasons for why so many companies rely on transcription services as an integral part of their business.
Less manual work
Transcription is hard work, and it’s a lot trickier than you might think at first glance. It can be hard to make out what was said, who said it, and when they said it, but even if you have a crisp, clean audio recording, you still need to actually listen to it all and type it out, which requires a ton of time and manual work on your part.
Faster turnaround times
Professional transcriptionists are able to transcribe one audio hour in as little as two to three hours, but for the average person, with no experience transcribing audio, this can take up to eight hours or longer. So, if you want to free up your time or allow your employees to work on other, more important tasks, then hiring a professional transcriptionist might be the best solution for you.
Reduced error rates
Oftentimes, the audio you want to transcribe wasn’t recorded with the best possible quality, and as such, it can be hard to make out exactly what was said. Things get even more complicated when there are multiple people speaking on the recording, especially if it’s an audio-only recording. Then, there’s the fact that people often speak with accents or mumble, which makes transcribing accurately incredibly difficult.
Professional transcriptionists are trained and experienced at transcribing less-than-perfect audio accurately. By using a professional transcription service, you can reduce the number of errors in your transcribed document, which will allow you to maintain an accurate record of exactly what was said on the recording, and by whom.
Cost-effectiveness
When you consider the amount of time it takes an average person to transcribe audio and video, caption videos, and translate foreign languages, the value that you can receive when using a professional transcription service becomes apparent. If you were to do all of these tasks yourself, you could easily spend an entire day transcribing only a single audio hour.
Passing the task off to one of your employees is also time-consuming and costly, not to mention the fact that it takes them away from their other duties. Therefore, using a transcription service is, in most cases, a cost-effective solution that allows you to get the accurate transcription you need without having to spend all day or possibly even several days on the task.
Timestamps
In many instances, it’s helpful to have a timestamp in your document so that you can refer back to a certain time in the audio to reference what was said. This is especially helpful in medical, legal, and other technical recordings, which can be long, monotonous, and confusing.
Trying to timestamp things yourself is a huge challenge in and of itself, but when you use a professional transcription service, you’ll get an accurate document that shows not only what was said but who said it and exactly when it was said in the recording, which makes referring back to certain statements a breeze when it would otherwise be a tedious, tiresome task.
Get a customized offer
Request a quote for your transcription needs
The top 10 Best Transcription Softwares:
1. Amberscript
Amberscript is one of the most effective transcription tools in the market today. The platform offers both automatic and manual transcription services. The software also has solutions fit for both personal users and businesses. But businesses will benefit more. That’s because they can request customized solutions using the power of AI that transcribes the text for you, which you can then polish up; or have professional native transcribers do the hard work for you.
But what truly stands out about this software is its impressive security and privacy features. Clients can have peace of mind when it comes to the protection of their data, since the software is GDPR compliant.
Amberscript works on desktop and mobile. With its help, you can upload some video formats such as WMA, M4A, MP3, MP4, AAC, and WAV. It also comes with an online text editor. Once you’ve created your free account, you can upload your file, select the number of speakers and begin transcription.
Using this impressive tool, you can save at least half the time you would use during manual transcription. It exports file types such as JSON, text file, SRT, VTT, EBU-STL, XML, Word, etc. The browser-based platform also offers transcription for 70+ languages.
Additionally, Amberscript is especially suitable for transcribing research interviews and lectures. Reputable institutes such as Grundl Institute and HVA (Amsterdam University of Applied Sciences), and Nordunet are among Amberscript’s customers.
Pricing
Pricing starts at $10 for an hour for audio or video. It has a 10 min free trial for all users who sign up
Features
- Automatic transcription and subtitles
- Advanced dashboard
- Add multiple speakers
- Online Text Editor
- Full API
- Multi-user accounts
Benefits
- High accuracy of up to 90%
- Quick turnaround with the use of AI
- Ready-to-go transcript without putting in the work
- Recognition software that picks out academic terminology
- Converts audio and video to SEO and social media-friendly content
- Access to professional quality checkers
Tools in Comparison
| Software | Features | Pricing | Unique Benefits |
| Amberscript | High accuracy, ease of use, strong security | Customized pricing and subscription option, free trial available | Meeting transcription, integrations, best for security and accuracy |
| Sonix.ai | Multiple languages, integrations | Subscription-based, free trial available | Fast and supports multiple languages |
| Otter.ai | Real-time transcription, collaboration features | Free and premium plans | Good for real-time transcription |
| Descript | Editing and transcription in one, video support | Subscription-based, free trial available | Combines editing and transcription, supports video |
| Trint | AI-powered, easy editing, team collaboration | Subscription-based, free trial available | AI-powered for easy editing |
| Maestra | Subtitle generation, multi-language support | Varies, multiple plans | Good for subtitle generation in multiple languages |
| Colibri.ai | User-friendly, customizable | Subscription-based | Customizable |
| Transkriptor | Simple interface, accurate, affordable | Varies, multiple plans | Simple and affordable with good accuracy |
| Meetgeek.ai | Meeting transcription, integrations | Subscription-based, free trial available | Focused on meeting transcriptions |
2. Sonix.ai
Sonix.ai is easy and fast to use. You simply upload your audio file and receive the transcript in less than 5 minutes! The browser based software translates, and organizes your audio and video files in over 40 languages. Multiuser permissions make it easy to share transcripts for large teams. Customers can choose from dozens of export options.
Pricing:
Users will receive a 30 minute free trial and then pay $10 for every extra hour they need!
Features:
- Online text editor
- Auto speaker separation
- Search previous transcriptions
Benefits
- Has a free trial
- Requires little experience with previous transcription software
- Rated as one of the best transcription software for medical use

3. Otter.ai
Otter.ai is an accessible and easy-to-use transcription software. It is a reliable go-to tool powered by AI. All you need to do is upload your audio to Otter.ai and let it do its magic.
Like AmberScript, it offers automatic transcription. Furthermore, it allows the integration of your recordings and audio from Dropbox and Zoom.Whether your audio files are in UK or US English, the software got you covered.
Using the Otter mobile app, you can transcribe live recordings, therefore, it can come in handy in your next Zoom Meeting. If you need software that searches, manages, and edits your recordings from any device, then you need Otter.ai.
Pricing
It is free, but up to 600 minutes per month of transcription. Also, you can only export TXT files-types. Pro accounts start at $8.33 per month for 6000 minutes and allow users to users’ access PDF, DOCX, and SRT file formats.
Features
- Identification of speakers by name
- Mobile or web audio
- Highlighting of words when you rewind
- Developed search by speakers, time range, and much more for the paid versions
- Uses TLS encryption and optimizes AES-256 encryption for live audio
Benefits
- Has a free option
- Shareable to all team members
- Enables Single-Sign-On for businesses
- Fast rewind and skips the quiet bits of a lengthy audio
4. Descript
Start transcribing your audio or video now for free using Descript. But keep in mind, the free plan limits you to only 3 hours of transcription. Just like Otter.ai, this software offers automatic transcription for your recordings. It comes packed with a speedy podcast editor and a fully functional video editor. Largely used by businesses and creatives, it is suitable for your vlogging and sales.
Besides that, users enjoy a wealth of resources and news via webinars, blogs, and events. The software gets updated constantly with new features to deliver the best user experience. Additionally, you can add other editors to your basic plan with ease, edit transcriptions and create screen recordings.
Pricing
It is free with a finite vocabulary of 1000 words and watermarks. Starts at $12 per month if you prefer the paid option, but it’s limited to 10hrs of transcription per month.
Features
- You can select any of its voices on sale when converting your text to speech
- Record your podcast, transcribe and edit it all at once
- Achieve high-quality sound by getting rid of echo and background noise from your audio
- Construct transferable pages for your recording quickly
- Descript adds captions to your videos timely
- You can create beautiful videos of your podcast hassle-free
- Removes filler words
Benefits
- Availability of fast correction tools
- Creation of customized payment for a team of 20 or more
- Allows purchasing of more transcription hours at $2 per hour once you’ve reached your limit
- Discounted prices for students, teachers, and charities
5. Trint
Supporting up to 31 languages, Trint is an AI-powered transcription software. It integrates faultlessly with your business platforms and you get to enjoy quality security. You can also grant your team access to this transcription tool, irrespective of where they are around the world.
Do you need to create content but are lacking some resources? Are you a freelancer and have limited time to complete your project? This software will transcribe your recording quickly.
Trint enables you to assign the names of your speakers and find the specific word you are looking for. Individuals and small teams can begin transcribing using the free trial as soon as they sign up. Large companies need to fill a form located at the main hope page of the software.
Export your files in formats such as Word, Doc, and CSV. Supported formats for audio include MP3, M4A, MP4, AAC, and WAV. Keep in mind you can only upload 3GB of file caped at 3 hours.
Pricing
You can either pay monthly or annually. The monthly packages start at $60 per month while the annual packages at $48 per month.
Features
- Safe and private production of content
- Addition of custom vocabularies
- Combination of transcripts into a script entailed with time codes
- Sync with Adobe Premiere Pro
- Use of strikethrough and Highlight is available
- Edit simultaneously with team members in secure workspaces
- Live transcription, review of security and analytics inclusive in the enterprise package
Benefits
- Leave notes using comments written on certain sections
- Create markers
- It allows pausing of your plan for only $5 per month
- No more extra costs after payment
6. Maestra
One of the most reliable transcription software in 2024 is Maestra. It is an incredibly quick audio-to-text converter supporting over 50 languages. Some of the popular languages include English, French, and Spanish.
Maestra allows you to create video captions and add subtitles automatically. And your content will be accessible to larger consumers. According to research, three-quarters of your audience will complete your videos if it has captions. Also, remember that more than half of YouTube users are non-English speakers. Therefore, Maestra is a worthy investment.
File type exports available for your texts are Word, PDF, TXT, and Maestra Cloud. You can also Export in MP3, FLAC, WAV, SRT, VTT after adding and editing text to your audio or video.
Since it uses the cloud, you can access your files anywhere, anytime as long as you have a strong internet connection. Save your time by up to five times and get going today with your free Maestra trial.
Pricing
You can begin your free trial with each of the paid versions, which start at $29 per month. This plan limits you to up to 5 hours each month. But you can cancel it and select another plan at any time. Teachers, students, and non-profit organizations get to enjoy a 20% discount on the plans.
Features
- High accuracy
- Advanced text editor
- Voiceovers and converts your videos to other languages instantly
- Uses bold texts to identify the current time
- Move from voiceovers, captions, and transcripts by the tap of a button
- Guaranteed privacy and security
- Video dubbing enabled.
Benefits
- Add or restrict team permissions
- Translation services of up to 50+ languages
- Share and edit files with your members live
- Create more than 150 distinct voices
- Cloud-based

7. Murf.ai
Recently updated with a new voice catalog, Murf.ai prioritizes quality. Using Murf, you can edit recorded voices and import links from YouTube and Vimeo. You also gain access to free music, which you can add to your videos.
The largest upload size limit is 50 Mb for the free plan, 200 and 400 MB for the basic and pro plan, respectively. Expect a Full HD quality in all your video exports. You can export your audio in either MP3 or MP4 formats. And if you’re a student, you can upload the transcribed files into e-learning software, like Adobe Captivate and Articulate.
In terms of languages, Murf supports Chinese, Tamil, Hindi, Korean, among others. As you can see, this a very handy tool for students, teachers and event businesses.
Pricing
There is a free plan whose limit is 10 minutes of voiceover time. The basic plan is $156 a year, which comes to $13 per month. You can get a onetime plan that goes for $9 and 30 minutes of voice production.
Features
- A large collection of voices spread over over 15 languages
- Upload videos, images, or music to integrate with your chosen voice
- Produce a pitch, edit punctuations, and create emphasis
- AI-powered all-in-one tool to write and correct scripts and convert them to voiceovers
- Unlimited downloads and commercial usage rights for the paid versions
- Centralized billing and an account manager for the Enterprise plan.
Benefits
- Requires little to no experience to use
- Saves a considerable amount of time when making voiceovers
- Access to a complete voice collection with any subscription
- Immediately change your text and audio upload to your desired voice
- Optimized accuracy

8. Colibri.ai
Would you like to attend your meeting smarter? Colibri.ai is transcription software that will allow you to do so. It transcribes your Slack meetings and Zoom calls as they take place. You will find your transcripts, summaries, and audios all in one place for your quick editing. Additionally, you can share your files with other members.
With Slack, Colibri allows your team to go through your meeting transcripts. This is true, whether your meeting is ongoing or finished. Besides that, it supports text exports of several file formats, including PDF, DOCX, and TXT.
Colibri supports only English. But with the Pro and Business plans, users can access other languages upon request. The text search is up to date and has high playback speeds.
Colibri is the ideal tool for creating online lectures for students and creating transcripts of meetings. One integrated with a web-conferencing software, it initiates the transcription process.
Pricing
A free plan is available with a 5-hour transcription limit. The starter plan starts at $16 every month and is billed per year, saving users at least 20%. If you choose per-month basis billing, you will need to part with $20.
Features
- Records your audios automatically
- Integrates with web-conferencing tools such as Zoom, Microsoft Teams, and many more.
- Enables live transcription
- Provides an option of highlighting important parts of the audio
- Automatic identification of speakers
- Dial into web-conferencing applications available
Benefits
- Create closed captions of the meetings
- Simple saving and transfer of files
- Zoom sign-in available
- Tailored vocabulary and language models as well as shared workspaces available for the Business Plan
9. oTranscribe
Accessible from your browser, oTranscribe is great transcription software packed with efficient features. It will meet all your needs at no cost.
The transcription software supports up to 24 languages and you can transcribe your audio file on your phone or desktop. The software has received many positive reviews from the Guardian, The Next Web, and other companies.
oTranscribe accepts audio uploads of MO3 and WAV format only. You cannot access your files from another device as it ensures your file stays in your local storage. Also, you can only store up to 100 transcript copies.
For those seeking transparency in Transcription software, oTranscribe is your go-to tool. The whole app and its components are open sources under the MIT license, meaning its source code is accessible at no cost. Additionally, you can share or modify it and also verify its trustworthiness
Pricing
It is free software and has no paid versions.
Features
- Your recorded files stay on your device
- Export to Google Text, Markdown, and plain text enabled
- Sync your videos with the impressive player
- Auto-saves your transcripts automatically on your browser
Benefits
- Playback, forward, and stop your videos using one keyboard using shortcuts
- Mark your transcripts with timestamps for east navigation
- You don’t need to switch between QuickTime and Word
- Automatically stores an offline copy of itself in your cache
10. Meetgeek.ai
Last but not least, we have Meetgeek.ai. It’s an impressive transcription tool optimized for teams. It also you to concentrate on the meeting by instantly converting the audio into text. Later, you can edit the text to achieve perfection.
Once you have linked it with your calendar, Zoom, and Microsoft Teams, it will record your calls or live meetings. At the end of the meeting, you will get a transcript in your inbox. What’s even better, you can manage calls you want the software to record and transcribe.
It saves your conversations on the web, allowing you to access the old recording and certain words with ease. Also, you’re free to download the transcripts to Dropbox, Google Drive, or where you prefer. Whether it’s for personal use or business, Meeteek.ai is a worthy consideration. It’s backed up by Google for Startups, Earlygame Ventures, and others.
Owing to its recent update on December 2021, Meetgeek has some new features. Support for Slack and Trello is available. You can transfer highlights in text or video to your Slack channels. Also, you can add speaker tags to your Zoom Calls live. Just allow the requested permission on Zoom and organize your transcripts by speakers.
Pricing
The basic plan is free, but the pro plan starts at $12 per host and is charged monthly.
Features
- Transparency – All participants know of the recording and can choose to leave the meeting before it begins
- Safe and secure storage of data since its GCP and AWS compliant
- All meeting attendees can access the recording and share it with other people
Benefits
- Highlight transcripts using voice commands, AI-generated recommendations, and clipping parts of the audio files
- Cuts back time spent in minute-writing
- High accuracy in meeting details
- Sharing highlights during calls to inform your teams of any changes as soon as they take place
Conclusion
Whether it’s your favorite podcast or recent video that needs transcribing, the paid and free transcription software on this list will meet your needs. They are effective, secure, and easy to use. All you need is to sign up, upload your files and start transcribing.
We hope now you can make an informed selection. Thanks for stopping by, and best of luck!
How to Add Subtitles in Final Cut Pro X – the ultimate guide
Table of contents
- Subtitles and Captions: What’s the Difference?
- Creating an .SRT file
- Creating Subtitles in Final Cut Pro X
- The advantages of adding subtitles in Final Cut Pro
- Some more features that may be useful
- How to customize your subtitles
- How to make your subtitles accessible and inclusive
- How you can create your subtitles with Amberscript
Subtitles are an important tool to engage with your viewers and ensure your video content makes an impact. If you want to learn how you can add subtitles into your Final Cut Pro X editing software, then this guide is for you!
Keep reading to learn more about captions and subtitles, how to add them into videos, and the benefits of doing so. We’ll also review how you can automatically create .SRT files by using the power of AI with Amberscript.
Subtitles and Captions: What’s the Difference?
Before we get into the steps you need to take to add subtitles in Final Cut Pro X, it’s necessary to address an important question: what’s the difference between subtitles and captions? While you may think that they are the same thing at first glance, captions and subtitles serve distinct purposes.
The term subtitle refers to the text you see on your screen while watching a video. Their purpose is to translate all the spoken dialogue into written text so viewers can watch content in another language. Videos with subtitles assume that the person viewing them can hear audio cues but still need to translate the dialogue.
Although captions also translate the dialogue in the video, they also describe things like sound effects, audio cues, and music. This means that they can give additional context to the viewer even if they don’t have their sound on at all.
Creating an .SRT file
When you create video content in Final Cut Pro X, you must add subtitles to your final product. Follow this easy step by step process to get started:

1. Create an SRT File and Import It
The first step is to create a .SRT file. This unique file type includes a time-coded transcript for the video content so that you can import everything into Final Cut Pro X with minimal rearrangement or effort.
The good news is that you don’t need to create the .SRT file by hand – instead, use the automatic subtitle software provided by Amberscript! The platform includes a subtitle generator that helps you create the .SRT files from audio and video clips in minutes.
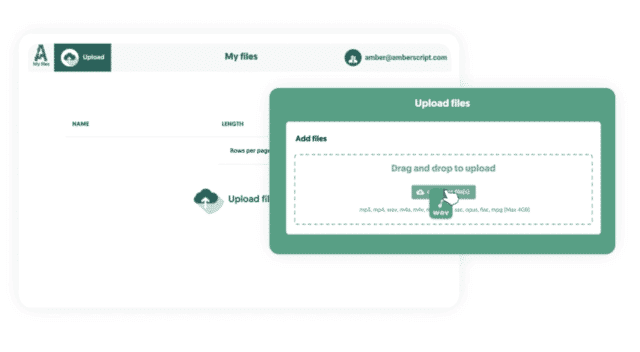
2. Generating automatic subtitles with Amberscript
Start by uploading the audio or video you want to add subtitles to and hit upload. Next, the artificial intelligence tool will start to create your transcript. Once it is complete, you can edit the file, add punctuation, and adjust grammar. When you are satisfied with the result, export it to your computer.
Additionally, you can export the subtitle in any format you want. Since you want your subtitle in the SRT file format, you pick that with optional timestamps or annotation. Learn more about different types of subtitle file formats
Creating Subtitles in Final Cut Pro X
1. After you have a completed .SRT File, it’s time to upload it into Final Cut Pro X

2. Once you uploaded the file, edit it based on your preferences
• Adjust the Subtitles as Needed
Although Final Cut Pro X will use the .SRT file as a starting point for the subtitles, you’ll likely need to make some adjustments. When you load the titles and text into your project, you must arrange the timing to ensure that everything lines as desired for your viewers.
To trim the subtitles, all you need to do is grab the block and crop it to the appropriate length. Drag and drop the titles to move them around – just do so with caution as they will overwrite existing captions when you place them on top.
• Format your Video File
So, you’ve got the subtitles uploaded and everything is in place – now what? At this point, you can choose to stylize the text or add some custom formatting to the video.
Remember that the goal of subtitles is to provide a simple solution for translating dialogue spoken in the video. However, there are times it makes sense to choose the font or the text color for the subtitles to help the viewer understand the additional context.
You can also emphasize specific parts of the subtitles by underlining them or using bold and italic formatting.
• Export your video
The last step to add subtitles in Final Cut Pro X is to export the video. There are two ways you can do this: a regular export or a caption role.
If you choose a regular export, you simply need to click File > Export and save the file accordingly. Note that the captions will not be included in the final product if you use this option.
To ensure that the video track includes the subtitles in the final export, you need to complete the following steps:
- Select Roles in the export window
- Click the Captions icon and select Burn in Captions
- Once you hit OK, it will close the window
- Choose File then Export as normal
Benefits of using Amberscript
Amberscript’s subtitle services are:
Fast
Edit your own text within minutes or leave the work to our experienced subtitlers.
Accurate
Our experienced subtitlers and thorough quality controls ensure 100% accuracy of your transcriptions and subtitles.
Easy
Thanks to a variety of integrations and API interfaces, you can fully automate your workflows.
Secure
Your data is in safe hands. We are GDPR compliant + ISO27001 & ISO9001 certified.
The advantages of adding subtitles in Final Cut Pro X
Now that you’ve learned how to add subtitles in Final Cut Pro X, you may be wondering, how can they be used to boost engagement? Including subtitles in your video content can improve overall engagement by connecting with users that keep their sound off, making your content accessible, and enhancing your SEO efforts.
1. Connect with Viewers that Keep Their Sound Off
You may be surprised to learn that most people that watch videos on their mobile devices do so without turning the sound on. Whether they are in a public place and can’t turn up the audio or simply do not have access to headphones, these users need subtitles to understand the context of your videos.
2. Make your Content Accessible
Another way that subtitles increase engagement is that it makes your content accessible to everyone. Individuals who are deaf or hard of hearing won’t be able to enjoy your videos to the fullest without the help of subtitles.
In other words, if you want to comply with accessibility requirements and ensure that everyone can engage with your brand, you should add subtitles to your videos.
3. Enhance your SEO
SEO, or search engine optimization, refers to creating content that allows your website to rank higher on the search engine results pages. You want to be the first result when someone Googles a topic you have shared a video about, right?
Unfortunately, search engine algorithms are not able to index video content alone. However, they can if you have subtitles and an attached transcript! Use that as an opportunity to improve your SEO efforts and engage with a broader range of viewers.
Some more features that may be useful
How to sync your subtitles with the video
Syncing subtitles with video is an important step in creating professional-looking videos, and Final Cut Pro X offers several tools and techniques to make the process easier and more accurate. One of the most effective methods for syncing subtitles with video is by using timecode. Timecode is a way of measuring the duration of a video based on a specific time format, such as hours, minutes, seconds, and frames. In Final Cut Pro X, you can use the timecode of your video and subtitle tracks to align the two and ensure that your subtitles appear at the correct moment. This can be done manually by entering the timecode values for each subtitle, or you can use Final Cut Pro X’s built-in synchronization tools to automatically match the timecode of your subtitle track with that of your video. With a little practice and attention to detail, syncing subtitles with video using timecode in Final Cut Pro X can be a straightforward and effective way to add professional-looking subtitles to your videos.
How to export your video and subtitles
Once you’ve added subtitles to your video in Final Cut Pro X, it’s important to export your video in a format that is compatible with different devices and platforms. Here’s a step-by-step guide to exporting subtitled videos from Final Cut Pro X in various formats and resolutions:
Step 1: Select your video in the timeline and go to File > Export.
Step 2: Choose the desired format and resolution for your exported video. You can select from a wide range of formats, including MP4, MOV, and ProRes.
Step 3: Click on the “Add Captions” checkbox to include the subtitles in your exported video.
Step 4: Choose the desired subtitle format, such as SRT or WebVTT.
Step 5: Adjust the settings, such as video and audio quality, and frame rate.
Step 6: Click on “Next” to choose the location where you want to save your exported video.
Step 7: Click on “Export” to begin the export process.
By following these simple steps, you can easily export subtitled videos from Final Cut Pro X in a variety of formats and resolutions. This will ensure that your content is accessible and compatible with different devices and platforms, making it easier for viewers to enjoy your videos with subtitles.
How to import and work with different formats (SRT, SCC)
Importing and working with subtitle files in different formats is an essential part of the subtitling process. Final Cut Pro X supports a variety of subtitle file formats, including SRT, and SCC, which can be imported and edited within the software.
To import a subtitle file, navigate to the “File” menu, select “Import,” and then choose the subtitle file you wish to import. Once imported, the subtitles will appear as a separate subtitle track in the timeline.
To edit the subtitles, double-click on the subtitle track to open it in the viewer window. From there, you can adjust the timing, duration, and text of each subtitle as needed.
It’s important to note that different subtitle file formats may have different formatting requirements, such as font size, color, and position on the screen. It’s important to ensure that the imported subtitle file is formatted correctly to ensure legibility on different types of screens and devices.
In summary, importing and working with subtitle files in different formats is an essential part of the subtitling process. Final Cut Pro X supports a variety of subtitle file formats, and it’s important to ensure that the imported subtitle file is formatted correctly to ensure legibility on different types of screens and devices.
Adapting your video to a vertical format
Final Cut Pro X is a powerful video editing tool that can be used to add subtitles to vertical videos for social media platforms like TikTok and Instagram. Here’s a step-by-step guide on how to add subtitles using Final Cut Pro X:
- Open Final Cut Pro X and create a new project with a vertical aspect ratio.
- Import your vertical video and subtitle files into the project.
- Drag the subtitle file onto the timeline and adjust the timing so that the subtitles appear at the right moments.
- Use Final Cut Pro X’s text tools to adjust the font size, style, and color of your subtitles.
- Position the subtitles so that they are not blocking important visuals in the video.
- Preview the video and make any necessary adjustments.
- Export the video with subtitles in the appropriate format and resolution for the social media platform.
By following these steps, you can add subtitles to your vertical videos for social media platforms like TikTok and Instagram using Final Cut Pro X. Adding subtitles can enhance the accessibility and engagement of your content, as well as increase the reach of your content to viewers who are deaf or hard of hearing. If you wanna know more about the specific platforms you can read our guide on TikTok closed captions, TikTok subtitles or Instagram subtitles.
How to use the role feature
Final Cut Pro X’s role feature is a powerful tool for organizing and managing subtitle tracks for multilingual projects. Here’s a step-by-step guide on how to use the role feature to streamline your subtitle workflow:
- Create a new project in Final Cut Pro X and import all of your video and subtitle files.
- Assign different roles to each language’s subtitles, for example, “English” and “Spanish.”
- Select the video clip and use the “Assign Roles” option in the “Modify” menu to assign the appropriate language role to the clip.
- Once the roles are assigned, create a new subtitle track for each language by clicking on the “Add Subtitle” button in the timeline and selecting the appropriate role.
- Add subtitles to each track and adjust the timing as necessary.
- Preview the video and make any necessary adjustments.
- Export the video with subtitles in the appropriate format and resolution.
By using Final Cut Pro X’s role feature to organize your subtitle tracks, you can streamline your workflow and ensure that each language’s subtitles are properly assigned and easily manageable. This can be especially useful for multilingual projects, where keeping track of multiple subtitles tracks can become overwhelming without proper organization.
Adding captions while live streaming
Creating subtitles for live video streaming events is a critical aspect of ensuring that your audience can fully engage with your content. Fortunately, Final Cut Pro X provides robust tools for creating and managing subtitles in real-time.
To create subtitles for live streaming events using Final Cut Pro X, you’ll first need to set up your project with the appropriate settings, including video and audio inputs, resolution, and aspect ratio. Once you’ve done that, you can use Final Cut Pro X’s built-in subtitle editor to create and edit your subtitles on-the-fly.
To make the process even smoother, you can use a dedicated hardware device, such as a subtitle encoder, to capture and stream your subtitles in real-time. These devices allow you to input your subtitle text and timing information directly into Final Cut Pro X, which can then be sent to your streaming platform.
When creating subtitles for live streaming events, it’s also essential to consider the placement and design of your subtitles. Be sure to use a font and color that are easy to read on a range of devices, and avoid obscuring any important visual elements in your video.
With these tips and Final Cut Pro X’s powerful tools, you can create professional-quality subtitles for your live streaming events that enhance accessibility and engagement for all viewers.
How to create and use templates
Subtitle templates in Final Cut Pro X are a great way to save time and maintain consistency across multiple videos. Here’s how to create and use subtitle templates in Final Cut Pro X:
- Create a new project and add the subtitles you want to use in your template.
- Once you have the subtitles in place, select them and go to Edit > Copy.
- Next, open the Titles and Generators panel by clicking on the Titles button in the top right corner of the screen.
- Select the template you want to use as a base and drag it onto your timeline.
- Click on the template to select it, and then go to Edit > Paste. This will paste the subtitles onto the template.
- Adjust the position and size of the subtitles as needed to fit the template.
- Once you’re happy with the layout of the subtitles, go to Edit > Save as Template.
- Give your template a name and description, and select the category where you want to save it.
- Click Save to create your new subtitle template.
To use your new subtitle template in a future project, simply select it from the Titles and Generators panel and drag it onto your timeline. Then, copy and paste your subtitles onto the template and adjust the position and size as needed. This will help you save time and maintain consistency across all of your videos.
How to customize your subtitles
Adding and using custom fonts
Adding custom fonts to use for subtitles in Final Cut Pro X can enhance the look and feel of your videos and make them more engaging and visually appealing. Here’s a step-by-step tutorial on how to do it:
Step 1: Download the font file that you want to use. The file should be in a supported format such as .ttf or .otf.
Step 2: Open the Font Book application on your Mac.
Step 3: Click on the “+” button at the bottom left corner of the Font Book window.
Step 4: Navigate to the location where you downloaded the font file, and select it.
Step 5: Click “Open” to install the font.
Step 6: Once the font is installed, open Final Cut Pro X and create a new subtitle text box.
Step 7: Click on the “Font” dropdown menu in the Inspector panel and select your custom font.
Step 8: Adjust the size and style of your subtitles as desired.
That’s it! With these simple steps, you can add custom fonts to use for subtitles in Final Cut Pro X and take your videos to the next level. If you are unsure which fonts to use, we have you covered with a list of he best fonts for subtitles.
Animating your subtitles
Creating stylized subtitles can add a unique and creative touch to your video, while also enhancing its visual appeal. Here are some tips for creating subtitles that match the tone and style of your video:
- Choose a font that matches the style of your video, such as a modern or vintage font for a contemporary or retro look.
- Experiment with different font sizes, colors, and styles to create a visual hierarchy and make the subtitles stand out.
- Consider adding background colors or outlines to the subtitles to make them more visible against different backgrounds.
- Use animation or motion graphics to add movement and interest to the subtitles.
- Keep the subtitles consistent throughout the video to maintain visual coherence.
- Avoid using too much text on the screen at once, as this can be overwhelming and distracting.
By following these tips, you can create stylized subtitles that match the tone and style of your video, adding an extra layer of creativity and visual interest. This can help to engage your viewers and enhance the overall viewing experience, making your video more memorable and impactful.
Detailed customization with advanced text tools
Final Cut Pro X provides a range of advanced text tools that allow you to customize the look and feel of your subtitles. Here are the steps to use Final Cut Pro X’s advanced text tools:
- Import your video and subtitle files into Final Cut Pro X.
- Select the subtitle file on the timeline and click on the “Text” button in the top toolbar.
- Use the text tools to customize the font, size, color, and style of your subtitles.
- You can also add outlines, drop shadows, and background colors to make the subtitles stand out.
- Use the “Transform” tool to adjust the position and size of your subtitles on the screen.
- Add animations or effects to your subtitles using Final Cut Pro X’s motion graphics tools.
- Preview your changes and make any necessary adjustments.
By using Final Cut Pro X’s advanced text tools, you can create customized subtitles that enhance the look and feel of your video. These tools can help to engage your viewers and make your content more visually appealing, while also making the subtitles easier to read and understand.
How to make your subtitles accessible and inclusive
Burning closed captions with Final Cut Pro X
Closed captions are essential for making video content accessible to viewers who are deaf or hard of hearing. Final Cut Pro X provides several tools for creating closed captions, making it easy to add captions to your videos. Here’s how to create closed captions in Final Cut Pro X:
Step 1: Create a new project and import your video.
Step 2: In the timeline, select the clip you want to add captions to.
Step 3: Click on the “Captions” button in the toolbar to open the captions editor.
Step 4: In the captions editor, select “Add Caption” and type in the text for your first caption.
Step 5: Use the timeline to set the in and out points for each caption.
Step 6: Adjust the caption style, font, and color to your liking.
Step 7: Export your video with the closed captions embedded.
By following these simple steps, you can create closed captions in Final Cut Pro X and make your videos more accessible to a wider audience. Closed captions are an essential tool for ensuring that everyone can enjoy and understand your content, regardless of their hearing ability. If you want to learn more about how closed captions work and why they are important, you can visit our blogpost where we explain this thoroughly.
Translating accurately and effectively
Please keep n mind that, to ensure accurate and effective subtitle translation, use a professional translator with experience in subtitle translation, consider cultural differences, keep text concise, adjust subtitle timing, ensure legibility and proper grammar, and double-check translations for accuracy and synchronization with video. Proper subtitle translation can increase accessibility and break down language barriers for a global audience.
If you want to know more about this topic you can read all about in our extensive subtitling guide.
Staying culturally sensitive and respectful
The best practices for creating culturally sensitive and respectful subtitles include working with qualified translators, using appropriate language and terminology, respecting cultural norms and diversity, considering visual presentation, and providing context. This approach will enhance the viewing experience and resonate with a global audience.
If you are working with a project for a global audience, we recommend you to check our subtitling guide for a detailed explanation.
How you can create subtitle for your videos with Amberscript?
Human-Made Subtitles
We already described how easy and fast it is to generate subtitles with the Amberscript software. On the other hand, in many cases you need 100% accurate transcripts. Luckily, Amberscript also offers professional services provided by native speakers in more than 15 languages.
Translated Subtitles
Our newest product is Translated Subtitles. Our team of native speakers will translate your audio into 15 languages ensuring up to 100% accuracy, so you can scale your content for a global audience.After uploading your files into your dashboard on our platform, our software will automatically generate your subtitles. This will be translated by our freelancers and our quality checker will make sure that everything is of the highest quality. You can export your file as a video with subtitles or the subtitles separately in Text, SRT, VTT or EBU-STL and many other formats.
Frequently asked questions
-
Can I burn the subtitles directly onto my video?
If you have exported the transcript as a SRT, EBU-STL or VTT file, you can easily burn them onto your video using video-editing software.
-
Can I export my files with timestamps?
Yes, you can. The transcript always includes timestamps in our online editor and you can choose to export the file with or without timestamps.
-
Do you add timestamps?
Yes, timestamps are included in the transcript.You can choose to export the transcript with or without timestamps.
-
Do you offer services in other languages?
For our human-made subtitling services we work with a network of language experts in 15 different languages. Find out which here. If the language you want is not on the list, please contact us through our contact form.
-
How do I add captions to a video on Vimeo?
To add captions to your Vimeo video, simply add the file you have created using Amberscript to your video in the editing window on Vimeo. Click on “distribution”, then “subtitles” and finally click on the + symbol to upload the SRT file.
-
To which languages can you translate subtitles?
For our human-made subtitling services we work with a network of language experts in 15 different languages. Find out which here. If the language you want is not on the list, please contact us through our contact form.
-
What subtitle file formats are supported?
Our software allows you to export the transcript from the video or audio file as an SRT, EBU-STL or VTT file.
-
Can I burn the subtitles directly onto my video?
If you have exported the transcript as a SRT, EBU-STL or VTT file, you can easily burn them onto your video using video-editing software.
-
How do I generate captions?
You can generate captions automatically using Amberscript. Our software allows you to export transcription based on audio/video files as SRT, EBU-STL or VTT files, which can easily be inserted into a video-editor. Want to know more? Here is a step-by-step guide.
-
How to become compliant with the WCAG 2.1?
To become compliant with the WCAG 2.1, it is important to ensure that all audio and video files and features on your website have a textual alternative and vice versa. Do you need to convert audio/video to text? Or do you want to generate captions/subtitles? You can use Amberscript to do so!
Why transcription and closed captioning are important in media
Broadcast media is an industry of information and entertainment. They exist with the sole aim of distributing various contents to interested viewers and the general public. These contents could be broadcasted through auditory or visual means. The goal is simple; communicate, spread information, and make sure it is done easily for a diverse audience to understand and receive. While communication is one of man’s daily activities, it is not exactly the easiest to pull off. This is why there are a few things to take note of if broadcast media aims to communicate effectively. Two services that aid communication and help make things better for broadcast media are transcription and closed-captioning. What important role do these two services play in broadcast media? How do they help to improve coverage and boost ratings? Let’s answer these questions and more.
Why do you need transcription and closed captioning?

Here are some reasons why broadcast media need transcription and closed captioning.
Broadcasting Regulations
By order of various broadcasting bodies, there is a directive that closed captioning must be provided for most programs broadcasted on television. The Federal Communication Commission has given a clear directive on this. Failure to comply would lead to sanctions. Broadcast media have to comply with these regulations. Some of the regulations include the following.
1. High-Quality Captions
It is not enough to provide captions on the screen; they have to be of high quality. High-quality captions must be provided throughout the length of the program. This is compulsory for all programs except short news and announcements. They should capture words, gestures, and signs as much as possible.
2. Accurate Captions
Sometimes, it is better and safer not to have information than have a misinterpreted version or an incomplete version. This is why the captions also have to be accurate. The accuracy should be in text and also in time. Synchronization is essential. The caption has to appear on the screen when appropriate. Failure to do so would lead to inaccurate closed captioning.
3. Proper size and placement
It should also be placed on the screen to make it easier for the viewers reading the caption without playing over the essential part of the broadcast.
What transcription services are offered for television?
They are two basic transcription services available for television broadcast media. These are transcription and closed captioning. Let us elaborate on the meaning of these two services and explain how the two are different.
1. Transcription
Transcription, in simple terms, is the conversion of recorded video content to text that is made available for others. Editors, analysts, and interested audiences tend to use a transcript at one point in time. Some programs are produced without a script. The audio version of these programs is transcribed into text. Then they are made available online for viewers.
When journalists and other broadcasters gather information through research, reporting, and interviews, they often have to sit through the research to summarize it and extract the necessary information. Transcription is needed for this important step. This is why it is a major service for television broadcast media.
Closed captioning

Closed captioning, in broadcast media, involves converting what is being broadcasted to text and made available on screen for the viewers. It is quite different from the subtitles. Subtitles are prepared along with the program before broadcasting. And they are embedded in the video. Closed captioning is mostly done with live programs. The caption has to be provided simultaneously as the speakers speak. This is why closed captioning is different and takes a level of expertise. The input has to be immediate and instantaneous, just like the program.
Television broadcast media now have to include closed captioning in their services to include the diverse audience in the scheme of things. Programs like reality shows and debates are broadcasted live and without a script. These are examples of situations where closed captioning comes in handy for television broadcast media.
It is important to note that closed captioning is not a replacement for transcription. Broadcast media houses can provide transcription and closed captioning for the same television program. The two are made available for different purposes.
What benefits does transcription offer for broadcast media
Transcription and closed captioning do more than just provide text to read or display. They contribute immensely to the growth of broadcast media. Here are some benefits of using these services.
1. Growing your audience
The goal of broadcast media is to increase their audience and spread information to all. Some of these audiences do not have the opportunity to tune into a program at the time of broadcasting. Transcription makes it possible for them to enjoy the program in text format. This is available online, and they can read it at any time. If one should miss their favorite show of the week, transcription ensures that all is not lost. One can still read the recap and get the necessary information before the time for the next series.
Those that have hearing issues will also be able to enjoy the information provided due to transcription. They can read the program and enjoy the information or entertainment provided like the rest of the world—another simple way of increasing your audience.
2. Content analysis
For programs that are pre-recorded, there is a need to analyze the content before broadcasting. Without transcription, analysts would have to watch the program several times before they can analyze and give a report. This issue is nonexistent, thanks to transcription.
3. SEO boost
Today, the internet provides search engine features that make it possible for the audience to search for their favorite programs from options numbering up to thousands. When a program is transcribed, the use of keywords makes it easy for the audience to search for such a program. This will boost search optimization, making it easier for people to find.
Transform your audio and
video to text and subtitles
- High accurate, on demand service
- Competitive pricing with the fastest turnaround using AI
- Upload, search edit and export captions and transcripts with ease.
How to transcribe your television media
The importance of transcription and its benefits are reasons why a broadcast media should employ the services of experts in transcription and closed captioning. It needs to be accurate and efficient. Employ our professionals at Amberscript and enjoy the best quality services available.
The steps involved in transcription are as follows.
- Log onto our Amberscript website and select your preferred services.
- Upload your pre-recorded program
- The transcription starts immediately by means of an automatic text generator.
- The transcription is provided in minutes.
- Download or export the text in your preferred format.
In these simple steps, you have the accurate, high-quality text ready to serve various purposes.
Radio broadcast media is another section of the media industry that continues to evolve. Radio broadcasters also make use of transcription services for several reasons.
How transcription helps radio broadcasters

1. Hard of Hearing Audience
There are no screens in radio broadcast media, which means there are no subtitles or closed captioning. Transcription is the only means available for those with hearing issues to enjoy the information and entertainment provided by radio broadcasters. This makes transcription very important for this type of audience. Transcription helps them to engage with the programs and enjoy every bit of it. It also increases the number of audiences and boosts the ratings of the radio broadcast media.
2. Search Options
Transcription helps the audience to search through various radio programs using keywords. It also gives the audience the opportunity to read through a new program and get an idea of what is discussed.
3. Convenience
Transcription provides convenience for a wide variety of audiences. It makes it easier for them to enjoy what is being broadcasted at a time that is convenient for them. You can read the transcript of your favorite program if you miss it. Transcription also makes it possible to revisit a program and clarify misconceptions.
What services are offered for radio broadcasts?
Transcription is the major service available for radio broadcasters. They are available in two different formats. Automatic transcription – which makes use of AI text generator software to provide text in minutes. The second is manual transcription. This service makes use of professionals to help transcribe the audio programs.
How to transcribe radio media
Transcription services for radio media are something we do expertly at Amberscript. We are readily available to convert your audio content to text.
Here are simple steps to transcribe your audio
- Visit our website and select the service offer of your choice
- Upload your audio file on the platform provided
- Transcription starts automatically through an AI software system.
- The text is ready in a few minutes.
- Download the file in any of the available formats.
As simple as that, you have a complete transcription of your files ready to be uploaded for users and the general audience.
Amberscript
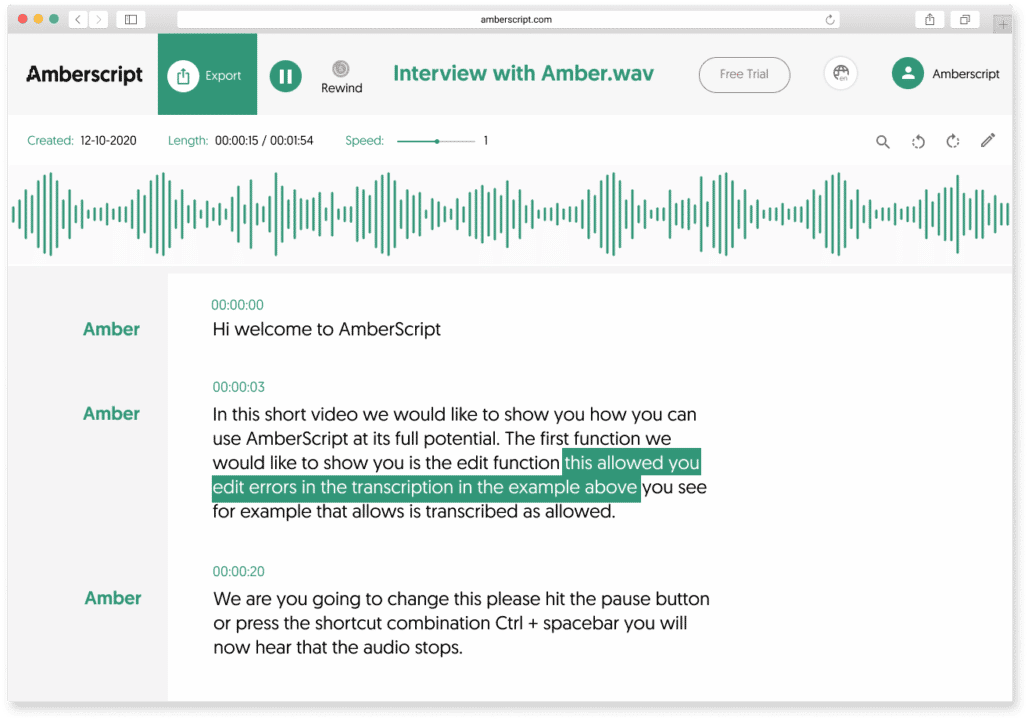
More about us
We at Amberscript aim to make communication more efficient across different platforms. We make use of experts and professionals to give you the best services available.
Here are some reasons why you should make use of our services
- We offer security for your audio and video content
- Our transcription services are fast and accurate. Making it possible for you to transcribe urgent contents without delay.
- We work with different audio and video formats. We also provide various text formats for download.
Today, broadcast media have to do all they can to stay ahead of the curve and continue to increase their audience. The use of closed captioning and transcription makes this possible. As a broadcast media house, you must employ professionals to help with these services. Here at Amberscript, we offer you the best.
Want to make your subtitles look good? Try our new AI-powered alignment and formatting solution
Subtitles are crucial in making media content more accessible and in improving user-friendliness in general. Primarily, it enables people who are deaf or hard-of-hearing to consume the content. Furthermore, it improves comprehension of proper names, foreign words as well as regular speech in the presence of strong accents or background noises. It also enables content creators to expand their reach via translated subtitles. You can read more about the advantages of subtitling here.
Creating subtitles from audio
The creation of subtitles is however not trivial and needs to follow certain rules that improve its readability. There are constraints on the number of characters in a subtitle line, the number of lines in a subtitle frame, the duration of the subtitle frame, and the positioning of line breaks within a subtitle frame.
Subtitle rules can vary between different entities. For example, BBC and Netflix have slightly different guidelines. It is recommended to insert line breaks such that they occur at natural points. For instance, inserting a line break between an article and a noun (e.g., the + book, a + tree) or a pronoun and a verb (e.g., he + runs, they + like playing) hurts the reading flow. Line breaks after punctuation marks such as a comma and a full stop are good since they indicate natural pauses. Therefore, the creation of subtitles involves a careful insertion of line breaks while obeying all the other constraints.
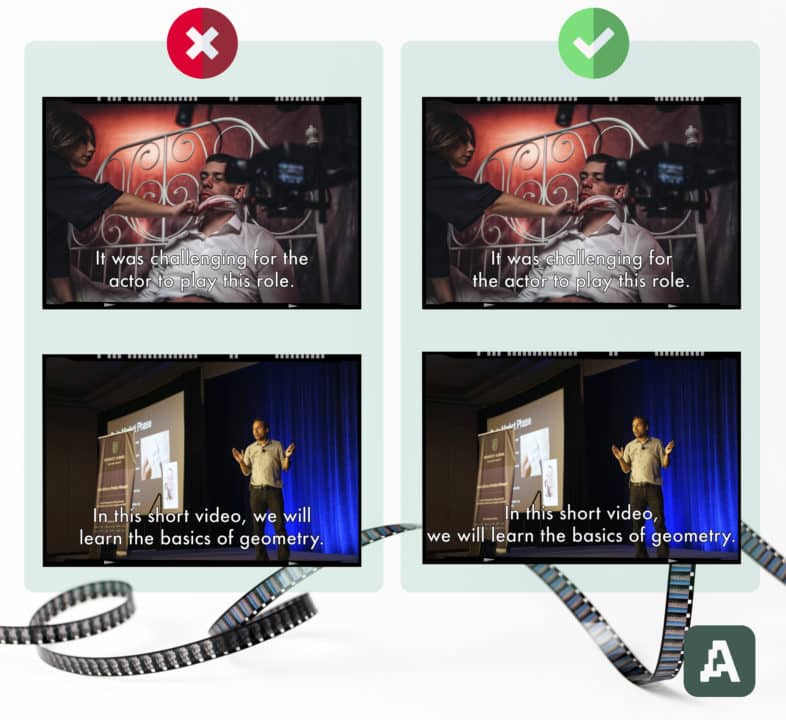
Making subtitles is not always easy
Traditionally, subtitling is done manually by humans. Automatic speech recognition (ASR), which is one of Amberscript’s offerings, assists subtitle creators by automatically converting speech to text. In this case, the mistakes in the ASR transcript are first manually corrected to be perfect. Next, subtitlers use the transcript to generate the subtitles. This process is cumbersome and involves a lot of manual effort trying to conform to the subtitle rules. As a result, subtitling takes a lot more time and costs more money than a simple transcription.
Automatic or manual subtitles from Amberscript
With the growing amount of media content, the demand for subtitling has increased tremendously. At Amberscript, an increase in subtitling jobs means an increase in turnaround times given the limited number of subtitlers. We thus wanted to reduce the human effort in subtitling by automatically formatting subtitles.
While the other rules can be satisfied programmatically, the subtitles rules regarding line breaks indicate that they should rely on linguistic features of the text. Hence, we designed an approach based on deep learning and natural language processing (NLP). We trained models to automatically determine the best position to insert a line break, using high-quality subtitles as training data.
Our models are trained to deliver accurately aligned subtitles in 13 different languages: Dutch, German, English, Swedish, Finnish, Norwegian, Danish, French, Spanish, Italian, Portuguese, Polish, and Romanian. Rather than hard-coding all the rules regarding line breaks, we trained the models to learn to determine when to insert a line break from human-generated subtitles. Our final subtitle formatting algorithm utilizes these models for line breaks while satisfying all the other constraints. The algorithm also runs fast, producing formatted subtitles in just a few seconds for most files. A 12-hour file, for example, requires under two minutes.
Subtitle alignment
An important prerequisite for automatic subtitle formatting is the alignment of speech to the corresponding text. Transcripts from ASR are often edited to add missing words and remove/edit incorrect words. After a transcript is edited and finished, we would need to realign the words to the corresponding speech segments so that the word-level timestamps are accurate. We built an automatic forced alignment algorithm that can perform this step. We currently support forced alignment in three languages – Dutch, German, and English, with more to come in the future.
New workflow for creating subtitles
In order to facilitate the creation of subtitles, we also built a subtitle editor where users can directly edit the formatting of subtitles. When a subtitle job is requested, the ASR first converts speech to text in the form of a transcript. The mistakes in the transcript can be corrected in our transcript editor. Once the transcript is perfected, users can click on the ‘Create Subtitles’ button and set the subtitle rules. The job is then queued for forced alignment followed by subtitle formatting. Once it’s ready, the file can be opened in the subtitle editor, which includes a preview window that shows the subtitles overlayed on the media. Users can adjust the formatting if required and finally export the subtitles in the desired file format.
Faster, cheaper subtitles
The combination of ASR and automatic subtitle formatting enables us to offer subtitles much quicker than before. The final result is highly accurate. What’s more – users can decide whether generated subtitles should meet either BBC or Netflix standards.
Additionally, the lower amount of subtitler engagement required means that we can also offer subtitles at a reduced cost. We believe that takes us one step closer to our mission of making all audio accessible.
Add subtitles to your video automatically
- Automatic speech recognition, formatting and alignment saves hours of subtitling time
- Upload, search, edit and export with ease
- Competitive pricing with the fastest turnaround
Turn your smartphone into a dictation machine
Thanks to downloadable apps smartphones can become powerful tools. One of the features that might be very useful is turning your smartphone into a dictation machine, that will record all your voice memos, speech notes, lectures, meetings, or any other type of audio you’d like to save in your phone’s memory.
Let’s start with dictation definition
Definition of dictation from the Cambridge Advanced Learner’s Dictionary & Thesaurus states that it’s
the activity of dictating something for someone else to write down.
Cambridge Advanced Learner’s Dictionary & Thesaurus
Sounds pretty obvious, right? Nowadays not many people dictate their words to be written on paper or computer. Thanks to technology we can record voice, speech, or any other type of audio, and playback it afterward. But recording audio doesn’t necessarily mean that we’ve started a dictation process.
Let’s use the Cambridge dictionary definition of dictation machine, to understand better the process itself:
Dictation machine
a machine used to record spoken words so that they can be written down later
Cambridge Advanced Learner’s Dictionary & Thesaurus
You might know it as a “dictaphone”, which is a trademark of the company of the same name. Today any device that is capable of recording voice can be considered as a dictation machine, which includes modern smartphones.
We need to keep in mind that recording any type of speech is just a first step in the dictation process. Then words need to be written down – and this part is called transcription.
Again, if we refer to history the whole process used to be much more complicated (and time-consuming!): recorded audio was transcribed by a human, who had to playback the recording over and over again until the whole speech was written down.
Digitalization of dictation process
Today we’re surrounded by hi-tech solutions: home appliances that can be controlled wirelessly, super-fast computers, games with real-life physics implementation, etc. We were able to digitize many areas, including dictation.

Thanks to AI-powered speech recognition engines, we can offer automatic transcription, that is capable of transcribing speech to text with high accuracy. The whole process is simple:
- You need to log in or register on our website.
- Upload a file you would like to have transcribed.
- Select automatic transcription in the ordering process (alternatively, you can always choose manual transcription in case you need a text with over 99% accuracy).
- Finish the ordering process and wait a few moments till your transcript is ready.
- Review the text of converted audio, amend some changes if necessary.
- Save the transcript and export it to the text file format of your choosing.
There are countless areas where transcribing speech to text comes in handy: media and broadcasting, call centers, healthcare, marketers – just to name a few. The process is already simple, straightforward, highly accurate, and effective. Is there any way to bring that to another level? There it is!
Transcription app in your smartphone
As mentioned above – you probably own a smartphone. A powerful device that allows you to do much more than making phone calls and receiving text messages. Is a machine that helps us and simplifies many areas of our lives. Why couldn’t it help you get your voice memos, meeting, lectures, or recorded conversations transcribed?
All you have to do is go to the App Store (or Google Play) or look for a Transcribe voice to text app and install it on your phone.
Once it’s there launch the app, log in to your account, or register (if you’re a new user), and voila – your smartphone has now become a fully functional dictation machine. You can start recording speech, voice memos, lectures, meetings, or any other type of audio you would like to convert into text afterward. Simply tap the recording button – the application will save your audio file in a .m4a format. It’s a MPEG-4 audio file encoded with AAC or ALAC (Apple Lossless Audio Codec). Most commonly used for audio content like songs, podcasts, or audiobooks. This way you can be sure that your recordings are in a quality good enough for Automated Speech Recognition (ASR) engines, to receive highly accurate transcripts. If you want to make sure that your recording is good enough for automatic transcription, please read our article on how to improve audio quality.
Also converting your recording to text is as simple as possible: just select the file you want to be transcribed, approve your order, wait a bit and your transcript will be ready for review. That’s it – a simple transcription app changed the smartphone into a fully functional dictation machine.
Add subtitles to your video automatically
- Automatic speech recognition, formatting and alignment saves hours of subtitling time
- Upload, search, edit and export with ease
- Competitive pricing with the fastest turnaround
Convert speech to text with a free app
Next time, when you start wondering how to record audio on iPhone or does Android phone allows you to record speech – you can use our app as a voice memos icon.
You can use this app to record your meetings, lectures, interviews with one tap in our app and convert them instantly to text. The most accurate and reliable transcription service is available directly on your phone.
Zoom etiquette for students: do’s and don’ts during the meeting
Online meetings have been around as far back as the inception of the internet itself. However, a lot of people from different parts of the world preferred the basic way of meeting. That was up until now. However, Covid-19 came into the discussion, and it changed the way people interact. Online meetings became popular. Apps like Zoom became a must-have for many on their PC or mobile phones.
Even the education systems of many countries started adopting Zoom meetings as an alternative to meeting physically in class. Lecturers, teachers, and students have all had to adapt to the new life of working or learning from home. However, this new way of meeting is still new to many.
This is why it is important to learn some zoom etiquettes while having meetings on the platform. This article will focus on Zoom etiquette for students. They need to know a few things that can help with learning.
Zoom etiquette: do’s and don’ts

Students need to follow proper zoom meeting etiquette. It could be the difference between a wholesome learning experience and a complete waste of time behind the screen. It will also improve the relationship between the lecturers and the students. We would use this etiquette in the form of dos and don’ts. We would also discuss the importance of each rule of engagement. Let’s get right to them.
What are the do’s of a Zoom meeting?
1. Appropriate outfit
Online meetings can be enjoyed from anywhere. For students, most times, this happens at home. However, the time for a zoom meeting should be treated as a time at work and away from home. When ‘work’ is mentioned in the context of students, it refers to ‘class.’ Therefore, students must treat zoom meeting classes like they are in actual classrooms. This means dressing well. Some meetings or classes involve the use of videos by participants, while some others do not. You might think it is unnecessary to dress in a class that does not require the zoom video option. But it is the first important step; dressing well.
Why it is important to dress well during an online meeting:
- One of the obvious reasons is in the case of using videos. If you are not dressed for class, you won’t be able to participate if called by the host to contribute or answer a question. Dressing well gives others, especially the lecturer, the impression that you are interested in the class.
- Another reason that is not very obvious to many has to do with mood and work setting. Dressing for class in the right way sets you in a mood that makes it easier to concentrate. Your mind feels ready for class, so concentration becomes achievable. Dress like you would if you are going to class and prepare your brain and mind for the class. This is another important reason why it is necessary to dress well.
2. Looking into the camera

Another zoom meeting etiquette for students that falls under the list of “do’s” is the proper use of cameras. One could be called during the class to make presentations or answer a question. What is the best way to do this? Talking while facing the camera is the best way to do this. It is important to set up the camera in a way that makes it easy for you to look directly into it while talking.
Why it is important to look into the camera?
- Speaking directly into the camera prevents the students from getting distracted by happenings in the surrounding.
- It is also important to look into the camera because it gives the impression of a focused student. Other participants find it easier to focus on what is being said if the speaker speaks directly into the camera. The presentation will be well received if the student looks into the camera.
3. Staging the background
Staging the background is quite necessary, and it should be done before the start of the meeting. Here are some tips for setting up the stage for a meeting.
- The background should be a wall.
- Only the wall should be exposed, and not the other belongings in the room.
- Choose a stage that allows you to face a light source.
Why it is important to stage the background properly
- You should remember that the camera would show not just the student but also everything behind the student. This is why it is important to have a background that is proper and plain. A background that shows the things in the room could be a source of distraction. But backing a wall helps others focus on the student and not the room.
4. Appropriate names
Before you can log into a zoom meeting, you have to input a name that stands as a source of identification. You can also change the name at any point during the meeting. This is one key feature of zoom meetings that attendees, especially students, need to use properly.
Why it is important to use appropriate names
The use of nicknames and short forms of names is not ideal. For reasons such as attendance and the likes, you must use your real name. The class should be treated as a professional workspace, so the use of names should be proper.
Now that we have gone over the Dos of zoom meetings, here are some don’ts to help put things in order.
Don’ts of Zoom meetings

1. Don’t unmute your mic if there’s no need
It is wrong to leave the mic on when you are not talking. It would contribute to noise and distract others from learning and concentrating in class. The option to turn off the mic and video is available when joining a meeting. So, one should not forget to set it properly before joining the meeting.
2. Don’t publicize private meetings
The meeting ID is always sent to students before the class. While some classes set up a meeting password, others do not. Whichever is the case, it is proper zoom meeting etiquette for students not to make the zoom meeting public. This is to ensure that only the students have access to the meeting.
3. Don’t exit and join the meeting unnecessarily
Some zoom meetings give notifications when a new member joins the meeting or when they exit the meeting, which is why it is proper to avoid leaving or joining the meeting frequently. It would draw attention to what is being discussed.
4. Avoid noisy environment
A student should not choose a noisy environment as the place for zoom meetings. It will distract the students from learning. If one is speaking in a noisy environment, it will also distract others.
5. Avoid other types of distractions
Some other types of “don’ts” that one should avoid during a zoom meeting
- Avoid turning on notifications during meetings.
- Eating during meetings should be avoided.
Recording Meetings
One of the many options available to students during zoom meetings is to record them. A student can decide to listen to a meeting for learning purposes. This allows the student to visit and revisit the class at will and take note of previously missed points. However, there is a problem with revisiting an entire recording that could very well last hours. It will be difficult to listen to all, especially if one is listening for a single point. So how does one overcome such problems? Let’s answer that.
Transform your audio and
video to text and subtitles
- High accurate, on demand service
- Competitive pricing with the fastest turnaround using AI
- Upload, search edit and export with ease.
Transcription
Transcription is the process of converting audio and video recording to texts. It is the easy solution to getting the best out of a recorded zoom meeting. But it is also important to get quality transcription in order to get the right information and avoid mistakes. That is where we come in at Amberscript.
Amberscript
We provide the best and most reliable transcription service for our clients. Our system makes use of AI software to generate text from videos automatically. The whole process is simple and smooth.
How to transcribe your video
After recording your zoom meetings, you can easily transcribe them using our website. All you have to do is visit our website and select your preferred service. Upload your video and leave the rest to our experts. Your transcript would be ready in no time.
Our transcription services
Choose and learn about any of the two transcription services on our website.
Zoom meeting provides convenience and ease for its users. This is especially true for students. If one can follow the proper zoom meeting etiquettes for students, the experience would be wholesome. You can also use our transcription services to convert your recorded meetings to text and read it at your pace and convenience.
Transcription in broadcast journalism: uses and importance
The role of broadcast journalism in society today goes beyond getting the right information. The need to get the information across to the general public is equally important. It could mean life for some. Since journalism is associated with ‘truth,’ it is necessary for broadcast journalism to get information across to the audience without misinterpretation or misunderstanding. It is also vital that the news or the information is made accessible to as many people as possible. Transcription is one way to achieve all of this without problems. This begs the following questions. What is the use of transcription services in broadcast journalism? What important role do subtitles play in broadcast media? This article will focus on these questions. It will also elaborate on the importance of transcription services in the media industry in general. Let’s start with transcription in media.
What is transcription in media?

Transcription in media is the conversion of audio and video content in the media industry to text for analyzing and editing. Transcription services play a major role in the media industry. Its importance continues to be appreciated by all involved. Also, the media world continues to expand and the competition grows every day. This expansion, coupled with some media and broadcasting regulations rules and directives is why transcription is important in successful broadcast media.
Several media programs – both audio and video – are produced with a script and are pre-recorded. It is easier to analyze these programs before recording. However, many other programs are also pre-recorded but without a script. It could be a show, or a documentary, or any other interesting program. There is a need to analyze every part of these programs to ensure that they do not violate any broadcasting regulation. In this situation, transcription comes in handy. How? To analyze the video, an editor might need to watch and rewatch it several times. This is stressful and time-demanding. A transcription provides a detailed text of what has been recorded, making it easier to analyze. This is the major role of transcription in broadcast media.
What is transcription in journalism?
Journalism today requires resilience and expertise. Journalists have to do all they can within the frame of the law to get the right information at the right time. Research has also shown that many do not feel comfortable talking to a journalist at the sight of pen and paper. What’s more? Using pen and paper to note down points from the field is slow and stressful. Journalists now use recorders, other audio devices, and video devices to get information during interviews, research, and many others. The conversion of these audio recordings and video recordings to reports for broadcast journalism requires transcription. Transcription in broadcast journalism helps journalists to convert to reports that are read to the general public. Simply transcribing the recordings is not enough, it has to be efficient. The use of transcription services in broadcast journalism is important for the following reasons.
Inaccurate Reporting
One of the many interesting features of language is seen in the use of words. The context or idea of a sentence can be altered simply by omitting or adding a single word. The entire information and the reporting become inaccurate. The journalist loses reputation because of an inaccurate report due to bad transcription.
Libel Cases
Accurate transcription helps to prevent cases of libel. One can sue a journalist if what is said is different from what was reported. Without transcription, it is hard to report people’s comments without mixing words. Cases of libels could cost as much as million in dollars and they also affect the credibility of the journalist. It is another reason why the use of transcription services in broadcast journalism is very important.
Transcription services for broadcast media

Broadcast media can make use of various transcription services to promote their content and broadcast to a wider audience. Here are some reasons why transcription services for broadcast media are quite important.
SEO features
The use of internet search engines is one reason why transcription for broadcast media is important. People today have to shuffle through hundreds of TV channels and thousands of programs to find their favorite. With transcription, one can easily use keywords to find their preferred program. Transcribed text increases the SEO features of a program, giving it a wider platform and audience.
Varieties in information format
The viewers and audience have unique ways of digesting the information being shared through broadcast media. Research has shown that some love to read through the programs instead of watching, as they can absorb the information faster this way. Transcription in broadcast media makes it possible for them to have access to a text version of the program.
The importance of transcription in broadcast media continues to grow. It is an interesting fact to note. Transcription services have continued to play a major role in various sections of the information world.
Subtitles for broadcast media
Subtitles for broadcast media are more than just transcription. It takes a step further. The transcribed text is embedded in the video and made available on-screen to make it available for viewers. Based on requirements by the various broadcasting commissions, the use of subtitles or captions is important in broadcast media. This is especially true for some programs such as live news, and important announcements. The Federal Communication Commission has directed that all broadcast media should include subtitles and captions to their programs. But what is the use of subtitles in broadcast media?
Here are some reasons why the need for subtitles is paramount.
Hard of Hearing or Deaf audience
Subtitles reveal what is being said and make it available to those who have hearing issues. The subtitle text is added on a part of the screen that makes it easier for viewers to read the text and watch the actions conveniently. This helps them to get the needed information or expected entertainment from the program. The audience also appreciates the fact that they are considered in the scheme of things. This would greatly boost the ratings and reputation of this broadcast channel.
Accents or fast talkers

Even those who do not have a hearing impairment can sometimes have a hard time hearing a program. This happens when the presenter or the guest on the program has a thick and unusual accent or perhaps a fast talker. Subtitles or captions would ease things up for the listeners.
Homonyms
Words that sound alike might give room for confusion. The audience perceives something entirely different from what is being said. The use of subtitles helps to remove that confusion.
These are some of the reasons why the use of subtitles in broadcast media is very important. However, there are technicalities involved in both transcription and subtitles. If a broadcast media wants to do it right, the need to use an efficient transcription service is more than important.
This is where we at Amberscript come into the discussion. Here is a little insight on services.
Amberscript
Amberscript is a transcription service provider that gives its client and users quality transcription with the highest accuracy. We aim to bridge the gap that exists in communication as a result of dynamics in language making it easier for you to pass your information across without the fear of misinterpretation. Our goal is to make language and communication more effective using science and technology.
Transform your audio and
video to text and subtitles
- High accurate, on demand service
- Competitive pricing with the fastest turnaround using AI
- Upload, search edit and export with ease.
Why Us?
Advanced Technology and Experts
We make use of AI speech recognition software that helps to generate texts from audio and video content with the highest accuracy. We also have seasoned experts that ensure that the transcription is in order. The use of AI technology and our experts guarantees the best services.
Security
Broadcast media understands the need to secure information and avoid leakage until the news is officially broken. Therefore, there is a need for security during transcription. This is exactly what we offer our clients. Our server is built on a secure network. What’s more? Every step of transcription is handled by a professional. Your security is assured when you use Amberscript.
Fast Delivery
The broadcast media world is a fast one and there is a need for a constant flow of information. This also means there is a need for transcription that can offer the best services in the shortest time possible. Our next-generation system only needs a few minutes to provide the most accurate transcription.
Multiple Formats
We accept and work with multiple formats including MP3, MP4, AVI, MOV, and many others for both audio and video. We also provide the transcription and subtitles in various formats of your choosing.
Our services
We offer the best in any of the following.
Journalism is not complete and efficient if the information is not passed across efficiently. This is why broadcast journalism has to use all the means necessary to pass the information across to others. The use of transcription in broadcast journalism helps to solve the issues that arise from communication. Make use of our services to enjoy the best bit of broadcast media.
Ok vs. Okay – which one is correct?
Language is dynamic, and it is always something exciting learning about the dynamism that each language presents. The English language is no different. As a speaker and learner of this popular language, you come across a situation that seems tricky and demands careful attention. In situations like this, people use what is known as an eye test. This is a way of using what you have seen about the changes in the language to assume and judge the dilemma before you. Sometimes, it works, and some other times, it doesn’t. One of such dilemmas is the variation that exists in the usage of the words “OK” and “Okay.” Many have questions about the use of these two words. Which is right, “OK” or “Okay?” What is the difference between OK and Okay? How do you spell Ok? Here are some of the questions that learners of the language seek to answer. This article is here to provide those answers. It will also reveal some interesting facts about the usage of OK and Okay. Before that, let us start with the origin of the word.
OK or Okay: Which came first?
When you consider other English words, you find that a word that seems like the abbreviated version of the other always comes after the original word. In simple terms, the original word comes before the abbreviated version. This makes the situation before us quite interesting. It is one of those cases where a simple “eye test” would fail. Did you know that “OK” came first, and it’s not an abbreviation of the word “Okay?” Well, now you know. In fact, “Okay” was derived from “OK.” The next thing one would want to know is how that came about. Understanding the origin of “OK” in the English language would help to clear some confusion.
What is the origin of “OK”?
It all started with the phrase “all correct.” As stated earlier, English is dynamic, and that played a part here. In the mid-1800s, most speakers of the language were pronouncing the phrase above as “oil korrect” or “orl korrect.” Then from pronunciation, it went into writing. After much writing usage, the two words’ initials were adopted, and that was the birth of “OK.” In addition, something happened at that time that contributed to the establishment of OK in the English language. Let’s go back in time to a bit of political history.
President Martin Van Buren of the United States was running for reelection. This president was from Kinderhook in New York. He had the nickname “Old Kinderhook.” He adopted the name for his reelection and soon shortened it to “OK.” Though, in the end, everything was not OK with “OK.” He lost. However, his campaign, the buzz around the election made the word popular throughout the country. While President OK was finding his way out of the office, “OK” was finding its way into the dictionary.
What is the origin of “Okay”?
The word Okay emerged a few decades after the “OK” incident. This is according to the Oxford English Dictionary. It was invented as a way of spelling the word in a way that looks more formal and acceptable. This might be because “OK” looks like an abbreviation. But for whatever reason, the word “Okay” came around, and it’s here to stay. Now that the origin is clear, people tend to wonder which one is right.
Which is right: OK or Okay?
Both are right and can be used interchangeably. People tend to assume that Okay is more formal. However, many popular brands and companies have been seen using either OK or Okay on their website and in their written speech. Wall Street Journal and The Guardian both use “OK” in their publications, while others like Reuters, New York Times, The Star-Ledger all use “Okay.” So, for most, it’s definitely in terms of preference. You can use the one you prefer.
What is the difference between OK and Okay?
There is no difference in terms of use and role. Both can be used as a noun, verb, and adjective. Due to their versatile usage, you often find that some people use them in different contexts. For example, you might find that statements like “the teacher okays the use of abbreviation in his assignment” are more common in writing than “the teacher OKs the use of abbreviation in his assignment.” Both are right. However, one important point to note is consistency in writing. If you decide to start with “OK”, it is better to maintain it throughout the text. The same goes for “Okay”.
Transcription
Now that you know all there is to know about OK and Okay. The issue of transcription comes up. When there is audio content or video content with the speaker using those words, how do you transcribe them correctly and with the needed consistency? Some content lasts for hours, and it is very difficult to do the transcription yourself. Now that’s where we come in.
Transform your audio and
video to text and subtitles
- High accurate, on demand service
- Competitive pricing with the fastest turnaround using AI
- Upload, search edit and export with ease.
Amberscript
Amberscript is a trusted and efficient service provider that deals with transcription and subtitles. We offer the most reliable means of converting your audio and video content to text. Our services make use of AI speech recognition software, experts, and seasoned professionals to give you the best and the best only. The goal is to bring technology, language, and science together. We use technology and science to help people understand the different languages that exist today. We also help to reduce the error that results from issues regarding communication.
Manual Transcription
One of our services aimed at bridging the gap between spoken words and written text is the use of manual transcription. Manual transcription allows you to work with our professionals and have your transcription tailored to your satisfaction. How does it work?
How can you transcribe using Amberscript?
You can get your manual transcription done in these simple steps:
- Visit our website and register or log in.
- Upload your files into the dashboard.
- Choose your language of choice, and number of speakers.
- Select manual transcription. You can indicate your preference. For example, you can state that you prefer “OK” or “Okay.” You can make other preferences.
- The text is automatically generated.
This is where our professionals come in. They perfect the text. They help to distinguish the speakers using variations in sizes, fonts, and others. A quality checker would check the final result.
The resulting text is sent to you in an editable format. You can export after checking that all is to your satisfaction. The available format includes Word, JSON, and others.
With those simple steps, you have a quality transcription at your disposal ready for professional use.
Subtitles
If you have created visual content and include interviews, social media content, seminars, and the likes, it is important to add subtitles to your content. Subtitles help you get the message across to a wider audience. However, your content might have different speakers using the word “OK.”
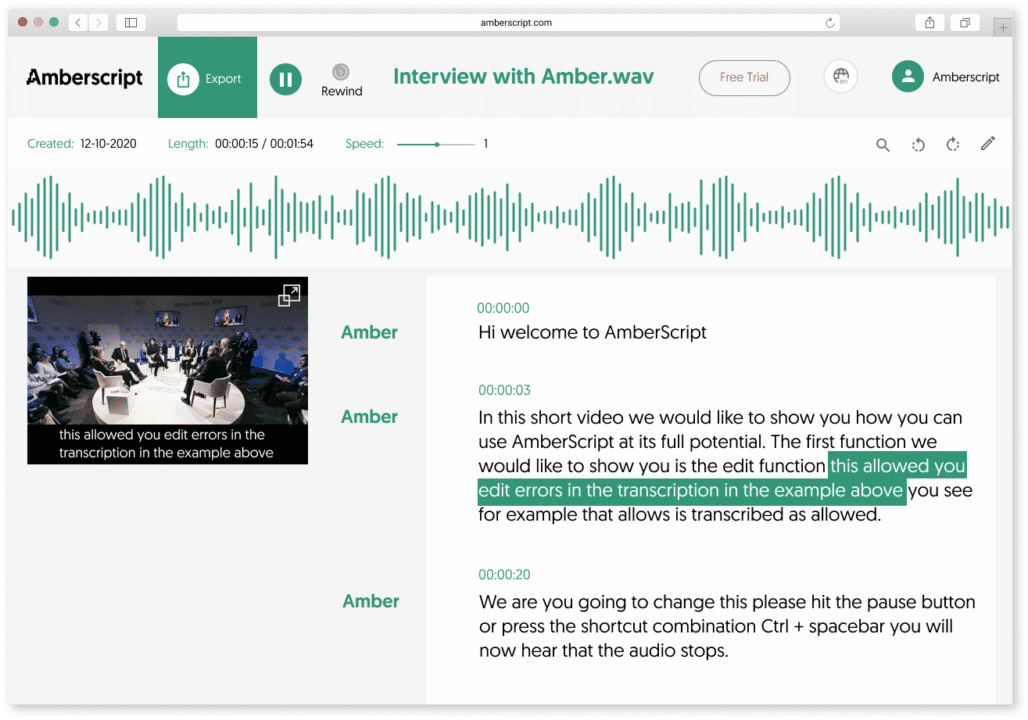
This is another one of our excellent services. We allow users to tailor the subtitle of their video content to their preference. It is about what you want and what you feel is okay for your audience. You can work with our expert subtitlers to perfect your subtitle file.
How to use our manual subtitle?
- Visit our website and register or log in.
- Upload the files on the dashboard provided.
- Choose your preferred language from the numerous options available. First, you indicate the language of the video and then the language needed for the subtitle.
- Select manual subtitles service.
- Our speech recognition software generates subtitles. Then our experts help to make the necessary changes and adjustments to the generated subtitle.
The final subtitle is checked for errors using a quality checker. There are two options for exporting the file. Either you download the video with the subtitle as one file or download the subtitle separately in formats like Text, SRT, VTT, or EBU-STL, and others.
You can also get timestamps and speaker distinction.
Just like that! You have a well-edited subtitle to go with your video.
Why Us?
We offer you the best and the most reliable services that give you the needed satisfaction. We aim to make your work easier. Transcription or subtitle, the goal is to ease your workload.
Here are some reasons why you should consider working with us.
- Security: Our software operates on a secured web server. Confidentiality is assured when you work with us.
- We accept various audio and video formats. They include MP3, MP4, WAV, AAC, WMA, and M4A.
- Our transcription process is done in minutes.
“OK” and “Okay.” Both are correct. Your preference will determine what you go for. Now that you know that they are both acceptable, go ahead and use our transcription services to convert your content into the text of your choosing. One form of the word that might not be acceptable is “ok.” This is because the original word came from initials, so it is maintained in capital letters. The best bit about language is its dynamism, and we are here to enjoy it.
Qualitative and quantitative research: differences and roles
Qualitative and Quantitative research are the two major types of research methods employed by social scientists, psychologists, and others when trying to understand more about a concept in society. Both research methods vary in approach. The ultimate goal determines which method is employed. Though they are often used together in many research works, these two have their differences. To understand more about the two research methods, it is important to get in-depth knowledge about them. Informed knowledge would help you decide which method is more suited to your research goals, which is why this article answers the following questions: What is qualitative research? What is quantitative research? What is the data collection method for both? What are some of their similarities and differences?
Quantitative Research

What is Quantitative Research?
Quantitative research involves the use of numbers and graphs. The goal of quantitative research is to test the relationship between variables. In this method, researchers use numbers and graphs to test existing theories. Quantitative research helps to confirm or deny a general assumption in a field of study or society in general.
Quantitative Data Definition
These are the variables collected using various methods and techniques in a bid to affirm or reject a theory. Researchers use different methods for data collection. These methods depend majorly on the target or aim of the research. What are some of the methods?
- Surveys
This is the most common method of data collection in quantitative research. This method uses questions to sample people’s opinions of individuals, set of respondents, or communities that fall under the scope of the research. The questions in the survey are mostly closed-ended, multiple, or polar questions. Conversion of numbers to analyzed data follows.

- Experiments
When collecting data from a controlled environment, experiments are used. The environment is set up to either support or oppose the point of the research. The numerical data in the experiment have a cause-and-effect relationship with the research topic. - Observations
Observation involves a more natural setting. The researcher does not interact directly with respondents. He collects variables and interprets them within the context of the research — no control over the types of variables.
Quantitative Data Analysis
Analyzing the data is the next step in the research. Quantitative analysis involves processing numerical data into facts, theories, or assumptions. Statistics is used in analyzing quantitative data. They are of two types:
- Descriptive Statistics
The analysis aims to describe the relationship between the variables and the theory. - Inferential Statistics
This type of analysis compares data and identifies differences between data and theories. It helps to study the relevance of the data collected with other data types collected for the research.
When to use quantitative research
- To determine changes in variables in natural phenomena. Examples include changes in temperature level.
- To determine numerical efficiency when using different marketing methods.
Qualitative Research

What is Qualitative Research?
This focuses more on opinions and reactions, and it is non-numerical. This type of data includes language, basic concepts about society, and so on. Data is analyzed after collection to understand why and how people interpret social happenings. Qualitative research takes into account the reason for those answers. People’s experiences are also considered in the course of the study.
Qualitative Data Definition
Data collected to understand a concept in the societal setting is qualitative data.
The data is often collected in a natural setting. The results are not controlled or determined. Most of the qualitative data collection methods involve the active participation of the researcher in the environment. Here are some of the methods:
- Interview
It is the simplest and most direct method. The researcher asks open-ended questions. He records their response and reaction, takes into account their stance and experience. Interviews are best done with one respondent at a time to prevent influenced answers. - Focus Group
Some individuals are grouped in discussions. These individuals have a unifying criterion that makes them suitable for the research. The discussion is held in a relaxed setting. The researcher records points and arguments for further analysis. If you would like to know more on how to run a focus group, please read our comprehensive A to Z guide.

- Ethnography
The researcher lives or participates with the community or the respondents to observe the behavior that relates to the research topics. This data collection method allows the researcher to collect data from the respondents in their most natural environment. The researcher does not influence the answer or result.
Qualitative Data Analysis
Data collected through various methods are collected in the form of texts or converted to texts. Analyzing and summarising the texts helps to generate results about the research topic. Inferential analysis of the summarized data generates theories or hypotheses.
When to use Qualitative Research
Here are some projects that require qualitative research:
- When accessing ideas and experience-based opinions about a new product.
- To understand dynamics involved in purchase choices.
- To study the market reaction to changes in marketing.
- Studying the emotions and attitudes of society on a trending topic.
- Understanding the public opinion about a company or brand’s image.
Combining Qualitative and Quantitative Data
In the course of research work, there are times when it is necessary to combine the two research methods and collect both data types. Academic research and marketing research are some common examples. You can collect quantitative data to sample preference between limited marketing options, while qualitative data is collected to learn more about the customers’ background and experience.
Key differences
Differences between qualitative and quantitative data collection determine their use and purposes. Here are some of them:
| Qualitative Data | Quantitative Data |
|---|---|
| For descriptive purposes. Generation of ideas is also involved. | To test the accuracy and efficiency of generated ideas. |
| Interpretation, inference, and summarization are the analysis method. | Statistics is the main tool for analysis. |
| Most qualitative data are available in texts or equivalents. | Mainly available as numerical values. |
| Researchers use open-ended questions. | Researchers use multiple-choice questions. |
Transform your audio and
video to text and subtitles
- High accurate, on demand service
- Competitive pricing with the fastest turnaround using AI
- Upload, search edit and export with ease.
Transcription with Amberscript
Some of the qualitative and quantitative data collection methods include interviews and focus group discussions. They are often recorded as audio or video content. Before one can analyze the collected data, they have to be transcribed into text.
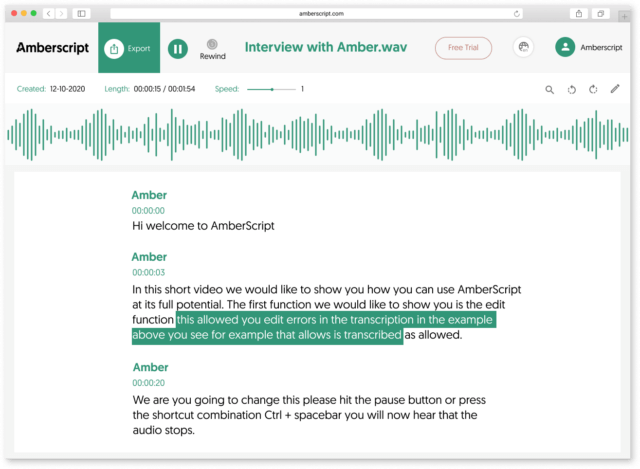
Amberscript gives you a trusted and efficient transcription service. We help to convert your audio and video content to text in a matter of minutes. This makes it easier for you to move on with the data analysis and interpretation. Our automatic transcription service makes use of AI speech recognition software to give you the best.
How can you transcribe using Amberscript?
This will, no doubt, be the simplest part of your research work. Here are the steps involved:
- Visit the Amberscript website, log in or register and select automatic transcription.
- Upload your content (audio or video) to the editor.
- The speech recognition software begins the process of automatic transcription and completes it in minutes.
- A draft of the transcription is provided using our online text generator. This allows you to edit the text if necessary.
- Another option available is the use of professional editors to help edit the text to your preference.
- After completion, you can save and export or download the file. The file can be downloaded as a word document. For data annotation, JSON and XML are the recommended options. Other formats include VTT and SRT.
Manual Transcription
Our services also include manual transcription. We have professionals trained in various languages to help transcribe your content to text. If you prefer manual transcription for some reason, you can go ahead and make use of our expert services.
Benefits of using transcription services from Amberscript
Transcription from audio to text must be done with the highest efficiency. This is to prevent loss of data or misinterpretation of data due to transcription errors. We provide the best services that ensure that your data and variables are not lost in transcription.
Here are some other reasons why we are the best for your audio and video transcription:
- When you upload a confidential interview or other content, you do not have to worry about exposure. The IT software is built on a secured web server that assures cybersecurity. Also, we store data adequately.
- The audio and video transcription software format include MP3, MP4, WAV, AAC, WMA, and M4A.
- You can also get automatic or manual subtitles for your videos.
Quantitative and Qualitative data is necessary for the completion of most research work. It is important to identify where and when to use each type. The aim of the research also plays a major role in this selection process. Determine the topic or scope of the research, and then, you can go ahead and draw out a research plan. When the data is recorded, our transcription services allow you to convert them to text and continue your analysis. Now you have everything you need for a wholesome experience.
Meet our transcribers: Lukas
Amberscript uses AI to automatically transcribe audio and video files, but we are especially proud of our pool of more than 500 transcribers and subtitlers who provide manual services. Transcribers and subtitlers make sure that AI-generated text is near perfect! Today we are sharing one of our transcribers, Lukas’s story.
Tell us a bit about yourself and your background.
My background is mostly related to teaching and transcribing. Before joining Amberscript, I used to transcribe TV programs when I was still a student at university. After my studies, I got a job as a teacher in Austria, but next to that I was transcribing dissertations.
Currently, I live in Cambodia, where I am a teacher of English grammar, math, biology, and other subjects. Next to that, I am also a transcriber at Amberscript.
What made you start working with Amberscript?
I applied not only because I already had some transcribing experience, but also because Amberscipt is at the forefront of technology. Amberscript develops the tech of the future and I wanted to be a part of it.
What does a typical working day look like for you?
I combine working at Amberscript together with my teacher’s job in Cambodia. Usually, I transcribe for a few hours in the morning, then I teach at school in the daytime, and in the evening I transcribe for a few hours again. I always choose how many hours I want to work – on the weekends I work longer hours, but when there’s an exam season at school, I work less. I also work from various different places – sometimes at home or a cafe and sometimes by the river close to my home. There is no fixed transcribing schedule as I always choose how much I want to work that day.
Did you face any challenges when you started working as a transcriber?
In the beginning, it was challenging to work with verbatim transcriptions, as you have to capture every background noise and write it down. However, I could always choose which transcriptions I want to do. I specifically chose verbatim transcriptions as I wanted to get used to them and challenge myself. Now, I even prefer doing verbatim transcriptions as I write everything I hear and I do not have to correct any mistakes that are made by speakers.
Could you tell us more about what it is like to be a transcriber at Amberscript?
What I really like is that I transcribe audio or video files on a variety of topics. Sometimes I also transcribe an audio file about a topic that is unfamiliar to me or I choose to transcribe audio that has a distinct dialect (e.g. Austrian dialect). This makes the job even more interesting and I also feel that I am learning a lot whilst transcribing.
Become a transcriber, subtitler or translator
- Work wherever you want
- Have a flexible work schedule
- Pay-out every month
How to transcribe audio using Google Docs?
Table of contents
- Pros and Cons of Transcribing with Google Docs
- Is Google Docs Transcription good enough?
- Which types of transcription can Google Docs provide
- Google Docs
- Machine-Made Transcription
- How to transcribe using Amberscript
- Human-Made Transcription using Amberscript
- More About Amberscript
Transcription of audio content is gradually becoming a crucial part of content development. There are various reasons why anyone would need to transcribe their audio content.
Manually transcribing content takes time and nerves. But transcriptions are important to make your content truly accessible to everyone; including people who are deaf or hard of hearing. Apart from transcription services like Amberscript, which makes it easier and faster for you to transcribe content automatically and manually, there is also Google Docs.
Google Docs, which most people probably don’t know, has many extra features exclusive to Google Chrome users. One of these features allows these users to convert voice notes to text. This feature is known as voice input. We explain these features to you and give you all the information you need to know about automatic as well as manual transcription.
Pros and Cons of Transcribing with Google Docs
Pros:
- Convenience: Google Docs is easily accessible from anywhere with an internet connection. This makes it an ideal tool for transcribing recordings remotely, without having to be physically present in the same location as the recording.
- Collaboration: Google Docs allows multiple users to work on the same document simultaneously. This is particularly useful for transcribing long recordings, as it enables multiple transcribers to work on different sections of the recording at the same time, which can significantly speed up the transcription process.
- Voice typing: Google Docs has a built-in voice typing feature that allows users to transcribe recordings using their voice. This can be a convenient option for users who find it easier to dictate their transcriptions rather than typing them out manually.
Cons:
- Accuracy: Google Docs transcription is not always 100% accurate. The accuracy of the transcription depends on the quality of the recording, the clarity of the speakers’ voices, and the complexity of the language used. In some cases, the transcription may require significant editing and correction to ensure accuracy.
- Limited functionality: Google Docs is not specifically designed for transcription, and as a result, it has limited functionality when it comes to features such as playback speed control, timestamp insertion, and speaker identification. These features can be crucial for certain types of transcription, such as legal or medical transcription.
- Security: Google Docs is a cloud-based tool, which means that the transcription data is stored on Google’s servers. While Google has robust security measures in place, some users may be uncomfortable with storing sensitive or confidential transcription data on a third-party platform.
Is Google Docs Transcription good enough?
While Google Docs can be a useful tool for transcribing recordings, it’s important to note that its accuracy may not always be 100%. While the built-in voice typing feature can be convenient, it’s still necessary to carefully review and edit the transcription for accuracy. For specialized transcription needs, such as legal or medical transcription, it may be better to use a dedicated transcription software or service that offers more advanced features and greater accuracy. Nevertheless, by combining the use of Google Docs with the best free audio editing software, users can create polished transcriptions and audio recordings that meet their needs.
Which types of transcription can Google Docs provide
Google Docs can be used for general transcription needs, such as transcribing interviews, podcasts, and meetings. However, it may not be suitable for specialized transcription needs, like legal or medical transcription, as it lacks some features that are often required for these types of transcriptions.
Types of transcription
There are several ways to transcribe your audio content. In general terms, those ways can be classified into two:
Both types can effectively get the job done if one is patient and committed to the process.
Though manual transcription does take time, many people still use it for reasons that include privacy, security, and the likes. Some don’t like the idea of using third-party software or apps to transcribe their audio files. So, the use of manual mode comes in handy.
There are several ways to transcribe your audio files manually. One of such is Google Docs.
Google Docs
This is a product from Google that enables content developers to write and edit text. Google Docs can transcribe audio to text. This feature is known as voice typing. It is similar to the voice feature on google that allows you to search on the Google engine using your voice.
The voice typing feature on Google Docs is only available in the Chrome browsers.
You can use the Google Docs voice typing feature by following these steps:
- Just make sure you are connected to the internet. If you want to access your file offline, use Google Chrome as your browser. You can also download the Google Docs app on your mobile phone.
- Visit the Google Docs website.
- The process requires that you register your Google mail. If you do not have one, you can easily open a new Google mail account.
- Enter your Gmail address and open the docs page
- Start a New Document on the page
- At the top of the screen, click on the “Tools” option and click on Voice Typing. Alternatively, use this shortcut ⌘+Shift⇧+S / Command CMD+Shift⇧+S. Note that this feature is only available if you are connected to the internet.
- Permit the voice typing feature to use your pc or laptop microphone.
- Start transcribing your audio by talking into the microphone.
- The laptop or PC has an inbuilt microphone. However, you can use an external microphone for better capture. This increases voice recognition accuracy and reduces errors.
- You can edit the file as you transcribe.
- Google Docs automatically saves your audio transcription to the online drive if you are connected to the internet and on the device if you are not connected.
Google Docs voice typing is just one method of transcription. There are several others we are referring to in the following. This much we can say already, one major disadvantage of manually typing in order to transcribe, is the time required to complete the process. Transcribing a 30 minute audio recording may well take an operating time of twice that. Not to mention keeping the error to the minimum.
Machine-Made Transcription
Another method of transcribing your audio content is through the use of third-party software. This software automatically transcribes your audio files within minutes; provides the draft for you to check and edit; then gives you the option of saving using the format of your choice. One of such third-party software with excellent accuracy is Amberscript.
Amberscript
Amberscript is a reliable transcription service that offers you more than conversion of audio to text. They have a holistic model of services that leaves you wanting more. The automatic transcription is done using their AI speech recognition software. This software transcribes the audio content in minutes and presents the result which you can further edit, save, and export. The website offers transcription services for video files as well.
Benefits of using Amberscript
Amberscript’s subtitle services are:
Fast
Edit your own text within minutes or leave the work to our experienced subtitlers.
Accurate
Our experienced subtitlers and thorough quality controls ensure 100% accuracy of your transcriptions and subtitles.
Easy
Thanks to a variety of integrations and API interfaces, you can fully automate your workflows.
Secure
Your data is in safe hands. We are GDPR compliant + ISO27001 & ISO9001 certified.
How to transcribe using Amberscript
The process is very simple and straightforward:
- Visit the Amberscript website and log in or register in the upper right corner of the page.
- Upload your audio or video file to the online editor.
- Choose your service: We offer machine-made and human-made transcription services
- In case of the machine-made option, after the speech recognition software completed transcribing your files you can edit the text with the online text editor feature . Editing includes changes like paragraphs, highlighting a part of the text, some special words, and many others.
- Once the editing is done, save and export your file. Machine-made transcription is available in more than 39 major languages.
Human-Made Transcription using Amberscript
If you insist on the use of manual transcription for reasons best known to you, but you do not have the time to do that yourself, Amberscript has got you covered. We have professional transcribers that are expert and native speakers of the language chosen. These experts are available in 15 different languages. You can make use of our services for your audio transcription.
Amberscript offers two types of manual transcription services:
- The clean read service allows the expert to transcribe your audio using the highest-accuracy text to make the transcription more readable.
- The verbatim service allows the expert to transcribe all the words and phrases exactly as said.
Choose one of these features, and the experts would deliver in no time. The steps involved are basically the same as the steps involved in automatic transcription. The one difference is the product selected. Select manual transcription, and you are good to go.
Get a customized offer
Request a quote for your transcription needs
More About Amberscript
Here are some points to note about the Amberscript Machine-Made Transcription:
- The transcript can be saved in different formats. This basically depends on why you need the transcription. For data annotation, JSON and XML are the recommended text. Amberscript provides both formats. There are other formats available; they include Text, SRT, VTT, EBU-SLT, etc.
- In terms of security and confidentiality, Amberscript takes those very seriously. Our IT infrastructure is built on a secured web service located in Frankfurt, Germany. The data is processed by Amberscript and is stored on highly secured servers with regular backups. You need not worry if you want to secure your uploaded file.
- The audio transcription mode accepts audio format that includes MP3, MOV, WAV, WMA, AAC, and many others.
- Other services include data annotation, automatic subtitles, manual subtitles, or business solutions.
Google Docs transcribes your audio content using the voice typing feature. This is an excellent tool by Google, allowing those that prefer the do-it-yourself model of transcription to do so without stress. You can make use of this feature by using Google Chrome. Amberscript provides the automatic alternative. Select based on your preference and enjoy the service.
Frequently asked questions
-
What is the turnaround time?
Our state-of-the-art speech AI delivers results in less than an hour (depending on the size of the file, it can take only takes a few minutes). Just upload your audio into our system and we will notify you as soon as the file is ready! if you would like to learn about turnaround times for our manual subtitling services, click here.
-
Are there limitations on the number of files I can upload?
No, you can upload as many files as you would like.
-
Can I adjust the formatting?
From your account, you can export the transcript in different formats. So if you require both a Word file and an SRT file, you can simply export the file twice.
-
Can I translate my subtitles and transcriptions via your app?
No, translation is not available in the automatic services but you can order translated manual subtitles services on our platform. Unfortunately, we do not offer translated manual transcriptions. Please check our prices here.
-
Can I add a glossary with specific words to the transcription job?
Yes, we also offer specialized transcription, which can include jargon or specific vocabulary. To learn more about this or discuss specifics, please contact us.
-
Do you offer cloud transcription services?
Yes, our services are offered on the cloud.
The Best Font for Subtitles : our top 8 picks!
Table of Contents
- Arial
- Roboto
- Times New Roman
- Verdana
- Tiresias
- Antique Olive
- Futura
- Helvetica
- Amberscript
- Open Sans
- Final tips for the perfect subtitles
Great digital content requires more than just creating or recording videos. You have to take the needed step to make sure your videos reach the target audience with ease. One way to ensure this is to have readable subtitles for your videos. If part of your target audience is speakers of another language, then a subtitle file in their language would be great. Subtitle font is an important part of your video. This is especially true if you have a wide audience, including those that are not native speakers of the language used to record the video. However, adding subtitles is meant to add simplicity and understanding to your video, not take it away from it.
A good subtitle would be clear for all to see, and at the same time, it would not draw attention away from the video. A viewer should be able to focus on your video while reading the subtitle easily. So, what is the best font for subtitles? This is a question many content creators have been asking. Many, through trial, have come to stick to the one that they feel is readable for all.
The good news is that there are many options available to you when choosing the best font for subtitles. The many options come in different styles and designs. Choosing a unique font gives your video a different feel and adds to your originality.
Let’s take a look at the best types of subtitle fonts.
1. Arial
We start off with the most widespread font in the world. Arial guarantees safety and readability. How? Almost everyone has come across the font at one point in time; it is ubiquitous. So, there is a guarantee that your viewers are familiar with it. Arial is a generic sans serif style, and it is used for various purposes.
One reason why Arial is a good choice is seen in the use of numbers and symbols. You might need to add symbols and numbers to your subtitle; Arial has them in a clear and simple design. There are variations like Arial Black, but this might not be suitable for long sentences.
If you want a font that is safe to use, then pick Arial. However, it doesn’t add any distinction or uniqueness to work. If you want something more unique, continue down the list.
2. Roboto
Roboto is the official subtitle font for Google. Roboto Medium (one of the variations of the original Roboto) is the default subtitle font for YouTube users. There is a reason for this. Roboto is one of the best fonts for subtitles. It has a wide range of styles and lengths and you can use it based on preference and length of sentences.
Roboto is generally better when dealing with long sentences in your subtitles. The fact that it is seen everywhere makes it easier to read for your audience.
Thanks to its open-source license, Roboto is free for all.
3. Times New Roman

This is another font that promises excellent readability. It was formed for the famous British Magazine, The Times. Times New Roman has come a long way from its days of being the popular font of the older version of Microsoft Word. It might not be the favorite font for some back then, but this font has its level of uniqueness that makes your work look sophisticated. It is another serif typeface with a note of simplicity.
Times New Roman is best for subtitles with short sentences on the screen at a time. If you are the audacious type looking for something different, this might just be your needed breakthrough.
4. Verdana

Verdana offers something different to users. This font is a condensed style, and this makes it suitable for small screens. So, if your target audience is those with mobile phones or small tablets, this option is a great one for you. It also brings a touch of freshness to your video.
The font is also suitable for users with larger screens. It takes up a very small space at the bottom of the screen while still being clear. That way, the focus is on your video and nothing else.
5. Tiresias
Tiresias is another great option when looking for the best font for subtitles. This font was created for vision-impaired people. It is clear and readable, so much so that it has become the standard font for BBC subtitles. It is a font that is best used when your viewers must read to grasp the information on the screen.
It is, in fact, one of the most legible fonts in the san serif category. It has up to six different styles. One more reason to consider Tiresias; it is unique and different. So, you have clarity and uniqueness.
6. Antique Olive

Antique Olive is formed specially for video content. It is a classic style of lettering and subtitles, another san serif with unique characters. Antique Olive is best fitted for content that would appear on the big screen. So, if a digital board is what you have in mind for your developed content, then Antique Olive is the way to go.
One common thing with Antique Olive is the use of black box-like background. This is to help make the font stand out. Though some might argue that this draws attention to the font, it is still a good way to make the font clearer.
7. Futura
Want something uniquely designed for a promotional video? Futura is one of the best options for you. Another sans serif font and with its level of flexibility. The regular version is great for subtitles. You can also use the condensed type for your text when you want longer sentences to fit the small mobile screens. It is great for just about any letter or character. It is readable and clear. What’s more? It gives your content a futuristic sense of appeal.
8. Helvetica

This font takes you to the media scene. It is popular among many broadcasting companies and some top advertising companies. Helvetica is one famous font; it has a documentary to its name. It has a full fill and looks concrete. Helvetica comes in different typefaces: Condensed Bold, Condensed Black, Thin, Thin Italic, Light, Light Italic, UltraLight, and many more. This gives a wide range of options in terms of design and styling. It also gives your work a modern touch.
Now that you have a comprehensive list of the types of subtitle font available to you. Questions like: “what is the best font for subtitles?” should be easy to answer by now. However, how do you generate a customized subtitle for your video? YouTube, for example, has a default subtitle font. If you don’t want to use this default font or your video is intended for some other platforms, you need to customize your subtitle.
There are many options available, but one that really stands out is our automatic subtitling and manual subtitling service.
9. Open Sans

To further enhance our list of the best fonts for subtitles, we’re excited to include Open Sans. Known for its exceptional readability, Open Sans is perfect for a variety of screen sizes, from mobile devices to large displays. This font was designed with digital use in mind, ensuring consistency and clarity across all devices and browsers. Its clean, neutral design makes it a versatile choice that seamlessly fits into both casual and professional settings, providing a modern and reliable option for your subtitles.
Benefits of using Amberscript
Amberscript’s subtitle services are:
Fast
Edit your own text within minutes or leave the work to our experienced subtitlers.
Accurate
Our experienced subtitlers and thorough quality controls ensure 100% accuracy of your transcriptions and subtitles.
Easy
Thanks to a variety of integrations and API interfaces, you can fully automate your workflows.
Secure
Your data is in safe hands. We are GDPR compliant + ISO27001 & ISO9001 certified.
Amberscript
This is an online AI speech recognition software that helps to transcribe your videos and audio. They convert the result of the transcription process to text or subtitle. Their services include automatic transcription and automatic subtitles. Amberscript does more than just generate subtitles for your video. The online editor feature allows you to edit this subtitle to your preference.
Another reason why Amberscript is the best for your subtitle generation and editing is the speed of operation. The whole process lasts for just a few minutes. You have a video with an accurate subtitle with your preferred font in no time, and you are good to go. Here are the simple steps involved in the process.
- Visit the Amberscript website.
- Select the preferred services under the products. Amberscript offers machine-made subtitling services, human-made subtitling services and translated subtitles. In this case, machine-made subtitles would be the perfect option.
- Upload your video on the online software
- The speech recognition software detects the language and starts the transcription process. As mentioned earlier, it only takes a few minutes.
- Next is the online text generator, which helps generate the first draft of text with time stamps.
- You can download the text directly if it is to your satisfaction.
- If it is not, there is an online text editor that allows you to edit the text. This option allows you to change the font, font size, background, and many more. You can also change punctuation, highlighting important parts of the text.
- After editing, you can export the file using various formats.
- You have two options here. One, You can decide to download the subtitle as a separate file. SRT would be the saving option for this. Two, you can decide to burn the subtitle into the video and make it a single file. The formats for this option include SRT, EBU-SLT, VTT.
- You are set to save and download your video. Amberscript also gives you the option of uploading the video directly to different platforms of your choice, including YouTube.
Final tips for the perfect subtitles
| Font | Strengths | Screen Size Suitability | Design Aesthetics |
| Arial | Familiarity, clear readability | Small to large | Clean, modern |
| Roboto | Modern, designed for digital screens | All sizes | Contemporary, versatile |
| Times New Roman | Classic, high readability in small sizes | Small to medium | Traditional, professional |
| Verdana | Excellent legibility, wide spacing | All sizes | Clear, informal |
| Tiresias | Designed for TV, highly legible | Small to large | Functional, simple |
| Antique Olive | Unique, distinct appearance | Medium to large | Retro, stylish |
| Futura | Geometric shapes, clear readability | Medium to large | Futuristic, bold |
| Helvetica | Widely used, clean lines, neutral appearance | All sizes | Timeless, versatile |
| Open Sans | Highly legible, versatile, web-optimized | All sizes | Clean, neutral, modern |
When editing your subtitle, here are some tips that can help you decide.
- Color
Most people use sharp and contrast colors like white or black for subtitles. However, depending on the video, you might want to consider some other options. If it is a video with extremely dark scenes and extremely light scenes, a colored font might be advisable. Remember, it should be something cool and nice.
- Size
You should not just select the font; you should also adjust the size to fit the video. You don’t want a size so big that it blocks out vital information on the screen. It should not be too small that readers find it hard to read.
You should align your text to the left or middle if you prefer, but not to the right.
One concern many expresses is in terms of security. Amberscript is excellent in this regard. Your video is processed through a secure network. So, if the uploaded video is something you want to keep private, then you are at the right place.
Frequently asked questions
-
What is the difference between subtitles and closed captioning?
Subtitles are for viewers who are unable to understand the language spoken, whereas captions are for viewers who are not able to hear the audio.
Captions, which can be closed or open captions, incorporate both the conversation and any other relevant sounds. They are used to assist the deaf by showing all auditory sounds. That is, they include environmental sounds as well as changes in speaker and speaker tone.
Captions can also be used by hearing people who cannot hear the audio in a noisy place or who do not want to disturb the other people in their environment. Subtitles can also be used for this purpose if the viewer just wants to follow a conversation.
-
How do I export my subtitles?
Once your file is ready and available in your account, you can simply click on the file name and then select the “export file” button at the top left of the page. You can then select the file format, style of subtitles (between BBC and Netflix) and alignment. Please note that you can only export a file if you have validated your email address when creating an account.
-
What file formats are supported?
Our software allows you to export the transcript from the video or audio file as an SRT, EBU-STL or VTT file.
-
How to add subtitles to a video?
To add subtitles to a video:
- Import the video to be subtitled.
- Choose the clip in the movie or video to which you want to add subtitles.
- The viewer will then display a title sign at the top. Tap the Title sign.
- After clicking the title sign, select the title style you want.
- There are title variations for the bottom of the screen. Examples are lower, lower third, and reveal lower third. You may select any of them.
- To add a title (subtitle) style, double-click it.
- Go up to the observer. There is a text box at the top of the viewer where you may enter your text.
How to convert cassette to digital file
The world today is going digital, and it is doing so for a lot of good reasons. Digital files can be kept safe for as long as you need them. The condition or the quality does not reduce over time. In contrast, analog files tend to lose their quality over time. This could happen as a result of decay or accident. It makes it really hard to hold on to them.
However, there is good news for all. You can now convert your old cassette to digital recordings. Most precious old cassettes are filled with memories that the owner wants to keep alive. An old song? The recordings of an event? An old interview? All this can be converted to digital and preserved for a lifetime.
How to Convert Cassette to Digital?
There is more than one way to convert cassette to digital. Each approach has different methods and steps. We would discuss each method, highlighting the steps involved as well as the pros and cons.
Using a cassette to digital converter

The first method is one of the simplest approaches, and this is the use of cassette tape or cassette to digital converter. If you are using a cassette tape, make sure it is in good condition. The tape would serve as a cassette to digital converter in this regard. If you don’t have a cassette tape, you should get a portable cassette to digital converter. After securing the tape or the converter, you need a desktop or laptop computer next. You do not need much expertise, so there is no need to worry. All that is left is to get a cable with a 3.5mm minijack and two RCA phono outputs on one end and a USB connector on the other end. Desktops have the two RCA phono outputs colored red and white, while laptops only have the 3.5mm minijack. Next are the steps involved.
What you need
- A cassette to digital converter or alternatively a cassette tape.
- A desktop or laptop computer
- USB connector with 3.5mm minijack and optionally two RCA phono outputs.
- Accompanying software.
Steps Involved
- Connect the cassette tape and the desktop or laptop computer using the cord.
- Install the accompanying software from the cassette tape. The software is always provided in the form of a small disk. Insert into the computer disk drive and install. If the laptop does not have a disk drive or the cassette tape does not have accompanying software, you can download online software that works perfectly. Examples of such include Audacity.
- After installation, insert the cassette into the tape and play the audio. The recording is converted to digital simultaneously.
- After the recording is completed, the software creates a digital file that allows you to edit the sound of the audio as you wish.
- Save the file, and you are good to go. If you wish to convert to MP3, choose MP3 in the save dialog.
Advantages
- It is the cheapest method.
- You don’t need much expertise to operate.
Disadvantages
- It is time-consuming
- You might encounter problems depending on the quality of the cassette.
Using a tape deck for digitization

The second approach is the use of a tape deck. This is a better way if you want to convert cassette to digital. It is best when one has a lot of cassettes to digitize to the best quality available. You can get a new tape deck or a used one depending on your choice and budget. If you have one at home in good condition, it will do the trick. Tape decks are different, and they often have different types of output. The type of output would determine the type of cord used for the digitization. The many options include:
- 3.5mm microphone input: There are two types – the RCA to 3.5mm cable and the male-to-male 3.5mm cable. The first one is used if the deck does not have a 3.5mm audio output jack.
- ¼ inch to 3.5mm cord: This is used if the deck has a ¼-inch headphone jack. If the deck has two separate ¼ jacks, you should buy a stereo version of the cord.

- Capture card: Get a capture card if the laptop does not have a microphone output. The capture card allows you to add a microphone function to the laptop using a USB drive.
Now that you have the right cord, the next step involves installing the software needed. Some software can use the deck as a cassette to digital converter. One popular software is Audacity. Once you have Audacity installed on your computer, you have what you need to proceed. The installation process is straightforward. Now we take you through the steps involved.
What you need
- A tape deck.
- Laptop or desktop computer.
- A cassette to digital converter software.
- The appropriate type of cord for connection.
Steps Involved
- Connect the deck to a laptop or PC using the appropriate cord.
- Open Audacity, choose Audio input. Audio input can be found on the menu beside the microphone icon on the software.
- Play the audio cassette to test for volume. Use the knob on the deck to adjust the volume. Alternatively, you can use the equalizer on the software to adjust the volume. Make sure the soundbar is all green. A little yellow is ok, but a red bar shows that the volume is too high, distorting the recording.
- Once the volume is good, rewind the cassette to the beginning and start recording. Record the whole cassette without pausing. When the first is done, keep the recording on while you switch to the other side. This is safer to maintain the quality of the recording.
- You can divide the recording into different files if you have more than one file on the cassette. Do this by pressing F1. This turns on the selection tool. You would see where each song or recording stops. It would be an empty space between the sounds.
- Select each portion. You hold down the CTRL or Command key, click on the mouse and drag it over the part you want to select. The portion selected should be saved as a separate audio file. Repeat the process for each file.
- You can save the file using different formats. For simple recordings and personal use, it is best to use MP3. That way, you have converted the cassette to MP3.
Advantages
- Produce high-quality sounds.
- You will encounter fewer issues with this.
Disadvantages
- The process is long and time-consuming
- Requires a certain level of expertise.
Now that we have the audio file, there are many options available to you to convert the audio file. If the audio file is an old interview, as mentioned earlier, the next step would be transcribing the audio file to text. If the audio file is an old endearing song, you will want to get the lyrics or the subtitles of the song.
The two options above are very easy to achieve. You can use many methods, but the easiest and fastest is using an AI software that automatically transcribes audio to text or adds subtitles to the file. One online software that many experts recommend for this process is Amberscript.
Transform your audio and
video to text and subtitles
- High accurate, on demand service
- Competitive pricing with the fastest turnaround using AI
- Upload, search edit and export with ease.
How to Transcribe the Audio to Text
Transcribing audio to text is an easy process on this website. We would take you through the steps involved.
Steps Involved
- Visit the site and upload the audio file.
- Once the file is uploaded, the speech recognition engine creates the first draft from the audio. This process is done in minutes.
- The text is connected to the audio in the online text editor. The online text editor allows you to check the file and edit as you wish. You can customize each speaker’s part by giving it a different color or font. You can also adjust the timestamps.
- Export the transcript. This can be done using a different format, including Word, JSON, Text, and many others.
If you wish to add the text to the file as a subtitle, select SRT when you want to save the text. Add the subtitle to the digital file on your computer, and you are good to go.
Note
You might worry about security depending on the type of file you wish to upload. Your file, once uploaded, is processed through a secure network that keeps your file secure and confidential.
Why should you use Amberscript?
There are many reasons why Amberscript is the go-to option when you want to transcribe your audio files.
- Unlike the digitization process, the transcription process is much easier and faster. You get your text in minutes.
- The audio-to-text speech engine is very accurate, and it gives you the best result.
- You can also edit the text to your satisfaction, giving an all-around experience.
The process of cassette digitization might be time-consuming, but it is worth the effort if one wants to preserve the recordings and the memories involved. With two different approaches, you have the option of choosing. This article gives you the opportunity to make an informed choice. Cassette to digital converter tape is one, and the tape deck is another. After digitization, transcription is a much easier and straightforward process. With Amberscript, the process is simple and cheap. Try it out, and you will be happy to have done that.
Dutch punctuation model
Grammatical aspects like gerund, prepositions, and basic grammar rules play an important role in most known languages. Have you ever thought about the fact that punctuation also plays a critical part?
Punctuation matters in language. It implies the correct arrangement of small, sometimes hardly noticeable marks in the appropriate places to indicate the exact length and the meaning of the sentence.
In the following text, we’ll take a closer look into the AI punctuation model we have developed for our Dutch language speech recognition model.
The role of punctuation in language
Punctuation is an integral part of written text and helps in making text intelligible and coherent. The absence of punctuation hampers readability and can make texts incomprehensible. Furthermore, punctuation marks reduce ambiguity. Consider this example where a comma can completely alter the meaning of a sentence:
“Most of the time travellers worry about their luggage”
vs
“Most of the time, travellers worry about their luggage”
Missing punctuation can also lead to awkward sentences, as in this classic example:
“I find inspiration in cooking my family and my dog”
Punctuation in speech-to-text
Therefore, speech-to-text systems must include punctuation when they produce a transcript. Typical automatic speech recognition (ASR) systems, however, do not output punctuation marks since they don’t have a spoken form. Furthermore, the generated transcript is composed of only lowercase words, making it difficult to understand. A properly punctuated transcript also aids in the automatic generation of subtitles for videos.
This problem can be solved by incorporating a separate punctuation model that can automatically add punctuation to the output from an ASR model. It can be cast as a natural language processing (NLP) problem where the goal is to predict the punctuation mark (or the lack thereof) for every word in a transcript.
Language models
Deep learning has witnessed tremendous progress in the last few years, fuelled by the increase in computational power. The field of NLP was taken by storm by the introduction of BERT in 2018. Developed by Google AI, BERT is a large language model based on the transformer architecture. It was touted as NLP’s ImageNet moment, referring to how ImageNet steered progress in representation learning from images in the field of computer vision. BERT is a marked improvement over earlier language representation models such as GloVe embeddings, and contextual representations such as ELMo.
For an intuitive explanation of how BERT works, refer to this excellent blog post by Jay Alammar. In simple terms, it is trained on raw texts in a self-supervised manner, i.e., without human annotations. Specifically, it is trained on two tasks — masked language modeling and next sentence prediction. At the end of the training, the model is said to be “pre-trained” and captures the semantics of language with its word and sentence representations. A pre-trained BERT can then be fine-tuned on a downstream NLP task. When it was published, BERT produced state-of-the-art results after fine-tuning on a range of NLP tasks, including natural language inference (NLI), question answering, etc.
Punctuation model at Amberscript
At Amberscript, we develop custom ASR models, one of them for Dutch. As noted before, the transcripts produced by the model lack any punctuation marks. Currently, there are no open-source punctuation models available that are specific to the Dutch language. Therefore, we developed a punctuation model based on BERT to automatically add the following punctuation marks — question mark, period, exclamation mark, comma, colon, and semicolon. Other punctuation marks that occur in pairs, such as quotation marks and parentheses are much more difficult to determine solely based on the text.
Transform your audio and
video to text and subtitles
- High accurate, on demand service
- Competitive pricing with the fastest turnaround using AI
- Upload, search edit and export with ease.
Pipeline
The entire ASR pipeline thus consists of three main components — the ASR model that produces lower-cased text, a post-processing module that capitalizes named entities (names of people, places, etc.), performs number denormalization, spelling corrections, etc., and finally, a punctuation model that adds the required punctuation marks.
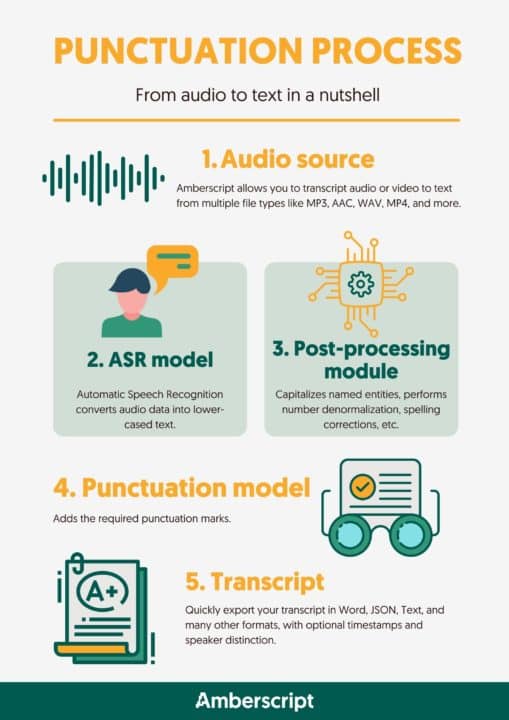
Demo
To show the punctuation model in action, we can take this example output from the ASR model:
nog een laatste een likje verf zodat de attracties er piekfijn uitzien hier is alles bijna klaar om weer open te kunnen je merkt dat het nu weer begint te kriebelen eigenlijk bij ons alle monteurs zijn weer bezig de groendienst is weer bezig het park mooi te maken de schoonmaakdienst is alles weer aan het schoonmaken dus we zijn er echt gereed een maken om straks weer de poorten te openen
The result of applying post-processing and the punctuation model is as follows:
Nog een laatste: een likje verf, zodat de attracties er piekfijn uitzien. Hier is alles bijna klaar om weer open te kunnen. Je merkt dat het nu weer begint te kriebelen eigenlijk bij ons. Alle monteurs zijn weer bezig. De groendienst is weer bezig het park mooi te maken. De schoonmaakdienst is alles weer aan het schoonmaken, dus we zijn er echt gereed een maken om straks weer de poorten te openen.
Notice that the output from the ASR model is difficult to read, whereas the final transcript after adding punctuation marks is more natural.
Punctuation included in transcripts from Amberscript
If you’re looking for a clean, accurate transcript, that includes proper punctuation you should try using an automatic transcription service from Amberscript.
We offer fast, accurate, and affordable transcription options that will surely improve your workflows.
Moreover, if you need the most accurate transcript then you should try Amberscript’s manual transcription. Our language experts are native speakers and create the highest accuracy texts in clean read (text made more readable) or verbatim (all words typed exactly as said).
How to add subtitles & captions in iMovie?
If you are stuck and don’t know how to add subtitles to your video or you are curious about how to add auto-generated subtitles to your movie with iMovie, then this article is for you!
Have you ever wanted to subtitle a video on your iMovie and don’t know how to do it? This comprehensive guide will explain to you the whole process as well as describe what subtitles and iMovie are, how to add subtitles to your videos, and how to get SRT files with Amberscript.
Table of Contents
- What are Subtitles?
- Is it possible to add subtitles to videos using iMovie on your Apple products?
- How to add subtitles to videos using iMovie on Mac?
- How to edit and customise subtitles on iMovie on Mac?
- How to add subtitles to videos using iMovie on iPhone and iPad?
- How to edit and customise subtitles on iMovie on iPhone and iPad?
- How to get SRT files
- How to burn closed captions in iMovie
- How Amberscript can help in creating subtitles for iMovie
What are subtitles?
Subtitles are texts created either on the basis of the transcript or the script of the dialogue or commentary of films, television programmes, video games, etc. They are also called captions. They are usually displayed at the bottom of the screen in a pyramid-like manner. Subtitles have various advantages, the biggest being that they make content accessible to people who are deaf or hard of hearing. To find out more about subtitles and their advantages, check out our step-by-step subtitling guide.
Is it possible to add subtitles to videos using iMovie on your Apple products?
Definitely! Subtitles can be added to videos using the title tool. This process is a manual one, and it works this way; you add the individual block of texts into the iMovie timeline, edit it and tweak it to resemble the subtitle you want it to be.
You should note that the subtitles are open captions and would always appear on the video, which means they can’t be turned off.
Tip: What are open captions? They are an essential component of a video and cannot be turned off. As a result, their quality is closely related to the calibre of the video (e.g if the video file is pixelated, this will also apply to the subtitles).
How to add subtitles in iMovie?
Firstly, as it applies to every other thing, you have to open iMovie.
- Now that you are in the software, import the video you wish to subtitle.
- Select the clip in the movie or video you wish to add the subtitles to.
- Next, you will see a title sign on the viewer at the top. Click the Title sign.
- After you have clicked the title sign, pick the title style you desire. Since you are looking towards having a subtitle, there are title options for the screen’s bottom. They include lower, lower third, or reveal lower third. You can pick any of them.
- Since your clip is selected on the timeline, double click the preferred title (subtitle) style to add it. However, you can do it alternatively by dragging the option chosen to your desired location on the clip.
- Now it is time to add your text. To do this, go up to the viewer. At the top of the viewer, there is a text box and that is where you enter your text. You can simply copy and paste.

Tip: If you want to see how the option would look on the video. You would drag the option onto the clip. For example, if you want a lower third, you will click the option and drag it left to right. The program will present a preview to you.
How to edit and customise subtitles on iMovie?
You might want to adjust the duration of the shown subtitles (title), add more captions or subtitles or customise the look of the text that you are adding. For example, if you have a one-minute video clip and want to add about seven subtitles within that one minute, you can do that.
5.1 How to adjust the duration of your subtitles in iMovie?
If you want to either extend or shorten how the subtitles would appear on the screen, all you have to do is select the subtitle (title) in the timeline and do any of the following:
1. Drag any of the edges
To lengthen or shorten the duration, drag one of the edges. As you do this, the duration will start to change.
2. Click the Clip information
The clip information is an “i” icon above the viewer. When you have clicked this, you can enter the number of seconds you want the duration to be.

5.2 How to change the text style of your subtitles in iMovie?
With iMovie on a Macbook, you can also change the text style of your subtitles (title). The colour, font, style, and even alignment of your auto-generated subtitle can be adapted. All you need to do is:
- click the title clip in your timeline
- click the title setting icon at the top of your viewer
After you have done that, all the options that allow you to adapt your text will appear and you can pick the one you want.
5.3 How do you trim your subtitles to the audio’s dialogue?
After you have inputted the subtitles (titles) using all the tips above, flow is also an important aspect to consider. You will have to listen to the dialogue to type the corresponding text in each correct segment of the video. This is rather simple. All you have to do is:
- Drag and drop the subtitle (title) to the frame that starts the dialogue you are working on
- Trim this subtitle (title) to end with the end of the dialogue
If the sound isn’t dialogue but is somehow meaningful to the video, you can put it in brackets within the subtitle. This way it will become similar to closed captions, describing the scenery of the video.
In order to start your next clip, all you have to do is copy and paste your current subtitle to the new clip to start. This helps you retain the text style and saves you the stress of having to start editing every time you begin a new clip.
5.4 How do you align your subtitles to the audio’s dialogue?
To prevent subtitles (titles) from going on top of each other, you will have to align them. This can be done by moving the play head that is shown to you to the part in the timeline where the title doesn’t exist.
5.5 Export your file from iMovie
After you have typed in all the subtitles and edited the fonts, style, and everything aligns with what you propose your subtitle to be, you can now share the file you have made. You can decide to export it as a file or send it into the iMovie theatre, share it on Facebook, Vimeo, iTunes, or YouTube. There is a small share icon at the top right corner of the app. Click on it, then share the file.
Fortunately, iMovie does not need or require any special settings for you to be able to export your videos with the open subtitles you have. As a matter of fact, they are titles rendered onto the video. Note, however, for the best experience, export at the best resolution, quality, and compression.
After you export the file, open it. Now, you would be able to see all your captions during playbacks.
6. How to Add Subtitles or Captions in iMovie on iPhone or iPad?
Not everyone has a Mac, but you can still add subtitles or captions to your video using an iPhone or iPad. Follow these steps to get started:
Step 1: Launch iMovie
First, launch iMovie on your iOS device. If you don’t have the app, download it from the App Store. Tap the iMovie icon on your screen to open the app. You’ll see a bar labeled “Start New Project” with options below it. Select the “Movie” option.
Step 2: Import the Video
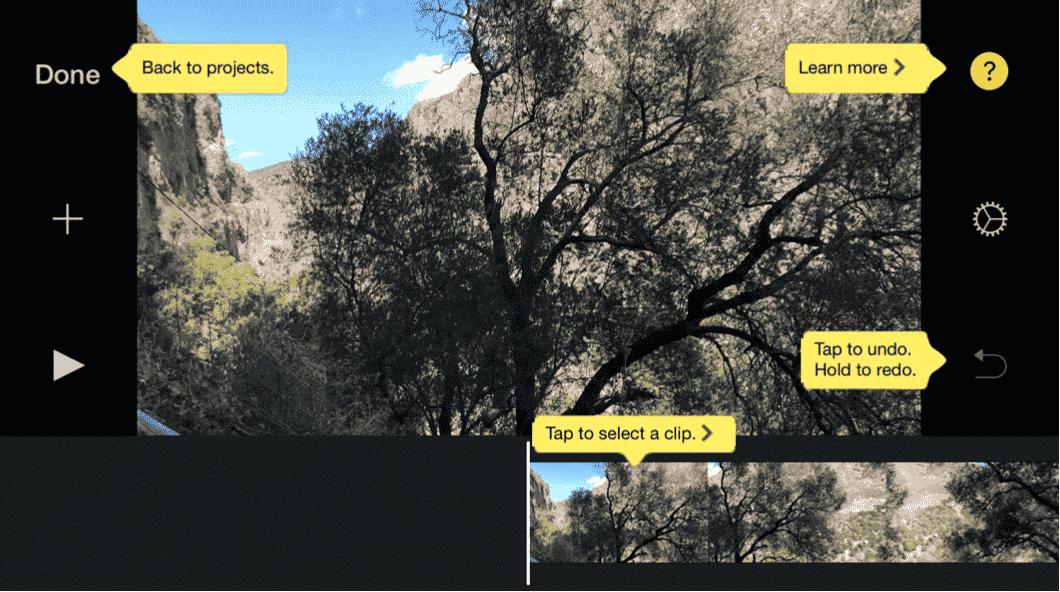
Next, import the video you want to add subtitles to. Ensure you have the video saved on your iPhone or iPad. After selecting the “Movie” option, the app will display the videos stored on your device. Choose the video by tapping it, then press the “Create Movie” button.
Step 3: Add the Text
Now, click the video clip in the timeline and select the “T” button at the bottom of the screen. A range of Title styles will appear beneath the timeline. Pick a style that suits your needs and position the timeline to the point where you want the text to appear.
Step 4: Type Out Your Captions
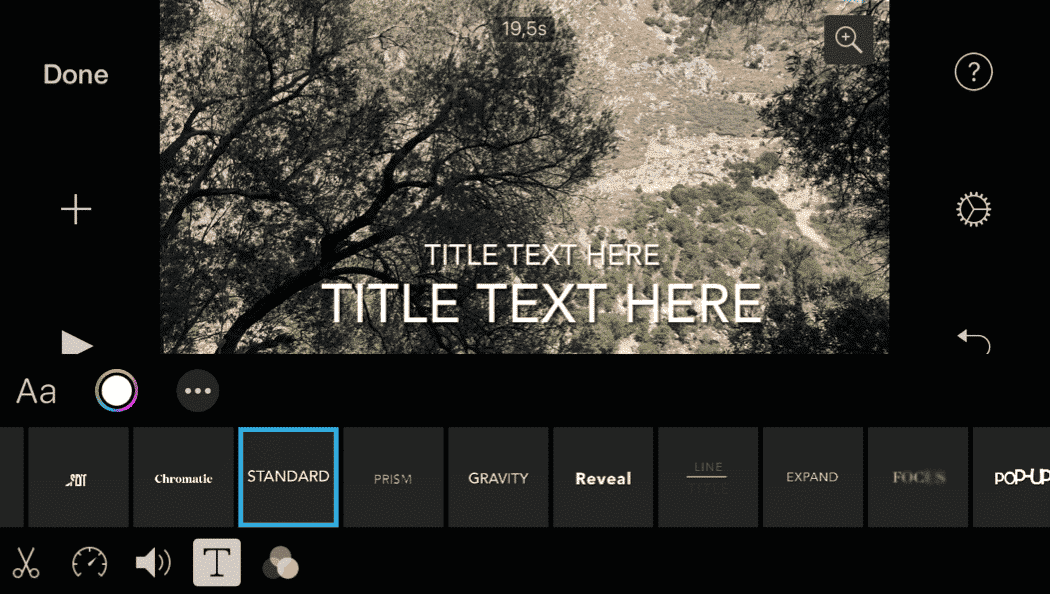
The text will overlay on the video at the top of the screen. Tap on the text and select “Edit.” Type your desired text into the box. When you press “Play,” the text will display on the video clip at your chosen point.
Step 5: Repeat the Process
To add multiple captions, repeat the above steps for each segment. You can use the same Title style or choose different ones for variety.
Step 6: Save the Video
Once you’re satisfied with your captions, tap the “Done” button in the top left corner of the screen. To save your video, tap the “Share” icon at the bottom of the screen. You can share the video via apps like WhatsApp or Messenger, transfer it using AirDrop, or click “Save Video” to store it on your device.
By following these steps, you can easily add subtitles or captions to your videos on an iPhone or iPad using iMovie.
7. How to edit subtitles in iMovie on iPhone and iPad?
7.1. How to adjust the duration of your subtitles in iMovie?
If you are editing your video on your phone or iPad, the process of editing the subtitle duration is relatively easy. Just like in case of iMovie on your Macbook, it is possible to edit the duration of your subtitles.
1. Find the ‘ timer’ icon
First, you need to click on the ‘timer’ icon, next to the previously mentioned ‘Title’ icon. This will allow you to select a clip in your video that you’d like to add subtitles to.
2. Select the preferred duration
At this point, you have two choices to edit the duration:
- You can either drag the yellow bar manually or
- You can select the preferred speed of you subtitles by clicking on a point on the scale at the bottom
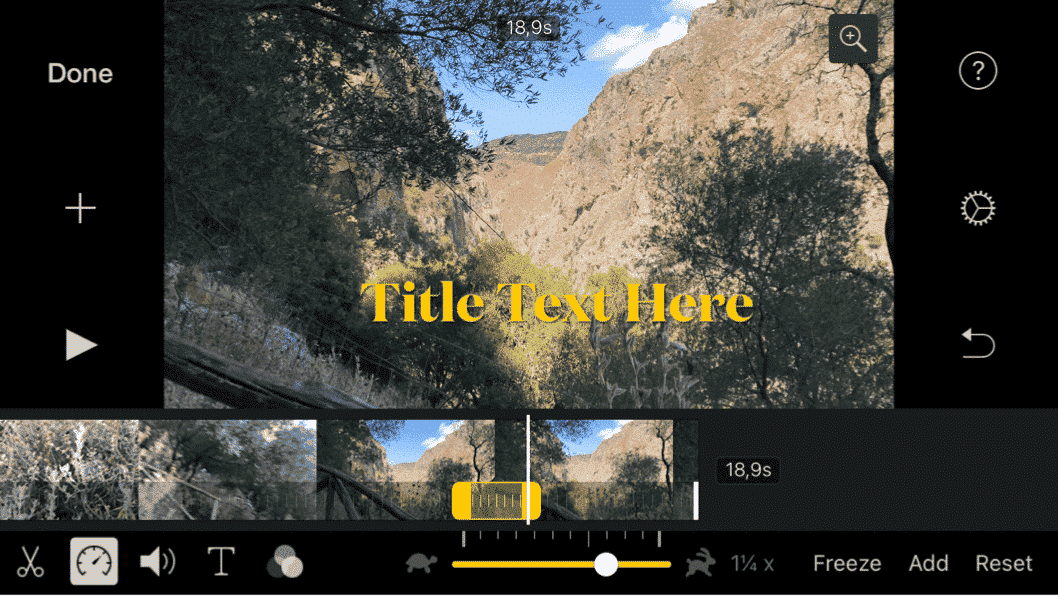
7.2 How to change the text style of your subtitles in iMovie?
On iPad and iPhone, the style of your subtitles can be changed similarly to how you would do it on your Macbook.
- You need to select the ‘Options’ (icon showing three dots) under the ‘ Titles” icon. By doing this, the app will allow you to change the following settings:

You can also change the colour and the font of your subtitles, by selecting the corresponding icons under the ‘Titles’.
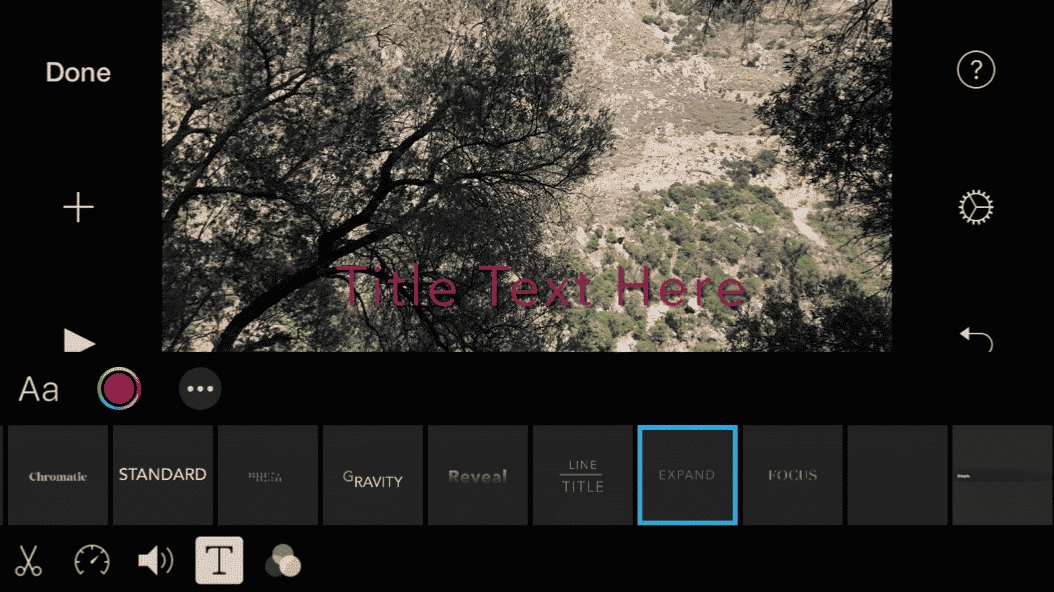
7.3 Export your file
Exporting your subtitled video is really easy on iPhones and iPads. After clicking ‘Done’, you simply need to click on the ‘Export’ icon just like in case of any other image, video or other file type. This will allow you to share your video with your friends, on social media or save your masterpiece for later.
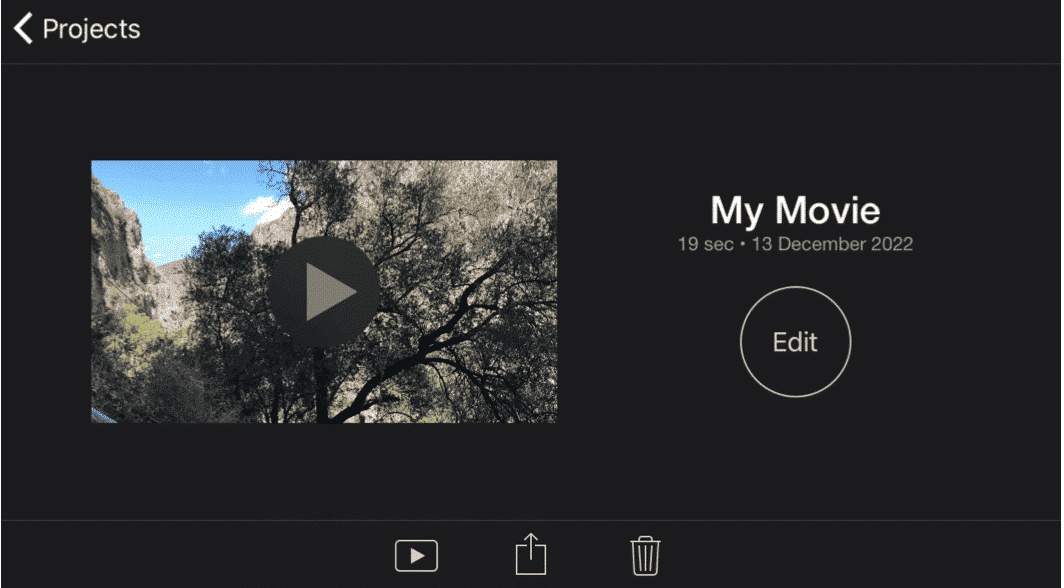
8. How to get SRT-files
Though you can use open captioning to make subtitles (titles) in iMovie as explained above, you can do the same with SRT files, and in fact, it proves to be a more time-efficient alternative.
Nevertheless, you would have to get an SRT file for your video before you can do this.
There are several ways you can get SRT files, from using a manual process, hiring a freelancer, to using software. However, over the years, a means has proved more effective in the regard of creating subtitles (.srt file), and the means is using Amberscript.
9. How to burn closed captions in iMovie
Closed captions are an important accessibility feature for videos, as they provide a text-based alternative for viewers who are deaf or hard-of-hearing. iMovie makes it easy to create closed captions for your videos, and the process is quite similar to adding regular subtitles.
To create closed captions in iMovie, start by opening your project and selecting the video clip that you want to add captions to. Then, go to the menu bar and click on Window > Show Closed Captioning. This will bring up the Closed Captioning window.
Next, type out the caption text in the text box provided. You can also adjust the timing and duration of the captions by dragging the blue markers in the timeline. Once you’ve added all of your captions, click on the Export button to save your video with closed captions.
It’s important to note that iMovie supports several different closed caption formats, including CEA-608, CEA-708, and iTT. Before exporting your video, be sure to select the appropriate format in the Closed Captioning window.
Overall, creating closed captions in iMovie is a straightforward process that can greatly improve the accessibility of your videos. By taking the time to add captions, you can ensure that your content is accessible to a wider audience and meets accessibility standards. If you wanna learn more about what closed captions are and how they work you can view our explanatory blogpost about it.
10. How Amberscript can help in creating subtitles for iMovie
Amberscript is a reliable AI-based transcription service and tool that creates subtitle files using the audio transcription. It also possesses the machine-made subtitle generator that helps it get the best subtitle files you want in the quickest time possible. So here is how you get your SRT files using Amberscript.
1. Upload your video to the Amberscript Platform
To get SRT files, the very first step is to create a free account at Amberscript and upload the video you wish to create subtitles for.
2. Let the AI generate your transcript for you
After you have uploaded the video, Amberscript starts to transcribe for you. With the help of their machine-made subtitle generator, this process doesn’t take long, and within minutes you will get your draft. You will then be able to download the first draft which has gone through its online text generator. If needed, you can edit the first draft of your subtitle on the online text editor. The editing includes things like correcting grammar structures and punctuations. As a plus, you even get the chance to annotate and highlight parts of the text (subtitle edit).
3. Export your file
Afterward, if you are happy with the edited subtitles, you can download them into an SRT file. Although you can’t necessarily upload your SRT file onto iMovie, you can copy and paste the formatted texts onto your video to ease the editing process.
Benefits of using Amberscript
Amberscript’s subtitle services are:
Fast
Edit your own text within minutes or leave the work to our experienced subtitlers.
Accurate
Our experienced subtitlers and thorough quality controls ensure 100% accuracy of your transcriptions and subtitles.
Easy
Thanks to a variety of integrations and API interfaces, you can fully automate your workflows.
Secure
Your data is in safe hands. We are GDPR compliant + ISO27001 & ISO9001 certified.
Conclusion
Tersely, all of what is above is how to add subtitles in iMovie. The process of adding subtitles to iMovie videos is not easy and it involves a lot of effort. However, the effort pays off and you can create nice subtitles that look good in your video and that flow very well with the video’s audio. iMovie is not particular about subtitling. However, it is really convenient to be able to use the title feature and create subtitles directly on your MacBook or other Apple products.
Hopefully down the road, Apple will bring in a better option that makes creating and adding subtitles to your content way easier than this. But for now, using the title feature works just fine. Not to forget, when partnered with Amberscript, it works best. Amberscript is a reliable AI-based transcription service and tool that creates subtitle SRT-files. It’s easy, fast and you can even edit your subtitles.
Frequently asked questions
-
Can I burn the subtitles directly onto my video?
If you have exported the transcript as a SRT, EBU-STL or VTT file, you can easily burn them onto your video using video-editing software.
-
Can I change the position of the subtitles?
That needs to be done using a video editor like VLC. Go to Tools > Preferences [CTRL + P]. Under Show settings, select the option that says All to switch to the advanced preferences. Navigate to Input/Codecs > Subtitle codecs > Subtitles. Under Text subtitle decoder set, the Subtitle justification to left, right or center.
-
How do I add subtitles to a YouTube video?
To add subtitles to your Youtube video, simply add the file you have created using Amberscript to your video in the Youtube Studio. Click on “subtitles”, then “add” and finally “upload file” and select the SRT file.
-
How do I add subtitles to a video on Vimeo?
To add subtitles to your Vimeo video, simply add the file you have created using Amberscript to your video in the editing window on Vimeo. Click on “distribution”, then “subtitles” and finally click on the + symbol to upload the SRT file.
-
How do I order translated subtitles?
To order translated subtitles, you can upload your file like you would normally do. You can then select manual subtitling. Once you have selected this, an option will appear where you will be able to select the language the subtitles need to be translated to. If the language that you want is not one of the options you can contact us through our contact form.
-
To which languages can you translate subtitles?
For our human-made subtitling services we work with a network of language experts in 15 different languages. Find out which here. If the language you want is not on the list, please contact us through our contact form.
-
What subtitle file formats are supported?
Our software allows you to export the transcript from the video or audio file as an SRT, EBU-STL or VTT file.
Can I add SRT files to videos in iMovie?
No. You cannot import SRT files directly into iMovie.
However, you can copy and paste the text from the SRT file – this is much faster than typing directly into the text box.
Tip:
You can also retrieve your SRT file from iMovie. After opening subtitles, you can request the subtitle file. How to do it:
- First, export a QuickTime file of your project to a video file on your computer.
- Next, arrange the subtitle files along with your export.
What is an SRT file, how to create it and use it in a video?
Ever wondered how SRT subtitles are created? Ever thought about how to use .srt subtitles perfectly with videos and all the processes it requires? A guide is no longer afar. In this article, we will cover how to make and use SRT subtitles and all it entails.
What are SRT files, and what do they contain?
Firstly, SRT(.srt) is an acronym for SubRip subtitle. In simple words, they are plain texts that have subtitle information in them. They entail the start and stop time, the time a subtitle is required to move to the next, and they ensure that there is congruence with the written text and spoken word so that they move seamlessly and are displayed at the appropriate time in the video.
Why SRT files?
There are different kinds of subtitle files out there; some examples include VTT and EBU-STL. So, why SRT then? Why is SRT so preferred?
To begin with, SRT files are often seen on social media apps that permit uploading captions. You can upload a single file to the video you have created.
Adding .srt files to your videos can increase your viewer’s retention rate and ensure more engagement level. Also, it gives your videos SEO benefits. When you upload/post videos on social media platforms like Instagram and Facebook, Google indexes them and considers them scalable. Most, if not all, of the keywords you have added to your video become searchable and this, in turn, helps your video appear on more search results.
To go further, with SRT files, you get absolute control over your subtitles. Though audio transcriptions are good, they aren’t perfect. With these SRT files, you get full control over your subtitles.
Lastly, its simplicity. SRT has aged well since the DVD times and is still preferred because of its simplicity.
How to make SRT subtitles?
Just as there are several ways to make a pie, there are also several ways one can make SRT files.
However, there are three main ways you can do it:
1. Create the subtitles yourself
There is a lot of software you can use to create subtitles this way. These applications allow you to lock a time frame and write/type in the corresponding subtitle. However, you should keep in mind that this method is slow and time-consuming. Moreover, you will have to invest more time figuring out how the software you have chosen works and the best way to use it.
2. Outsource for creating subtitles
If you don’t have the resources or time needed to make subtitles for yourself, you can always hire a person or an agency to do the work for you. Though this saves you a lot of time and is an easier way out, it could sink a deep hole in your budget. To give you a little bit of what you will be going into, the price for subtitling a one-minute video is about €10.
3. Use a speech-to-text service
You can automatically create subtitles using the proper software. And no doubt, this is the best of all the three options as it is time-efficient and cheap. You might have heard or been acquainted with the fact that YouTube can automatically generate subtitles. Nevertheless, the product is about 60% accurate. It is no new titbit that accuracy is a highly prized asset in subtitling. However, there is a transcription platform, Amberscript, that has come up with a speech recognition tool to make your search for the perfect subtitles for your video way easier. And guess what, as a plus, subtitles are embedded to a particular time frame by default, thereby saving you a lot of unnecessary stress. But how is this done?
Creating subtitles using Amberscript
With Amberscript, making .srt subtitles is a straightforward process. Amberscript does this subtitling via their automatic .srt file generator. Below are five steps you have to follow to make your SRT file:
- Upload the video file to AmberscriptVisit the Amberscript website, upload your video, specify the language you want the video to be transcribed in. Amberscript takes over the rest, and in the space of minutes, your video is transcribed.
- Correction of subtitlesAmberscript goes further to correct the grammar errors that might appear during the transcription. This site does this using their built-in text editors.
- Exportation of subtitleYou pick the style of text you want. Also, you choose the alignment you want.To add, this is the determining stage, where you pick if you want a .SRT file. You are given the option to export the subtitle file to the format you want, and in this case, it would be a .SRT file. Nevertheless, it doesn’t stop there. You can decide to edit your subtitles to suit your preference. This is called formatting.
- Personal editsThis is making local changes to individual lines in a .SRT subtitle. You select the line and make the changes you desire. For example, you can italicize text in the subtitle.
- Export the fileEnsure you leave your subtitle in a default format so your changes are applied.
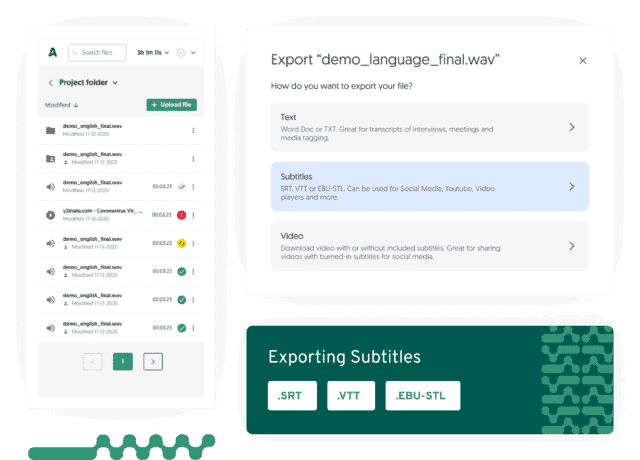
How to use SRT subtitles?
Though you have made your SRT file, it doesn’t stop there; you will have to use it.
After you have made your SRT file, you have to apply. Use it in your video. This is the next and final step after getting your SRT file, and it is quite easy. You have to find a media player to play the video and .srt subtitle. Some subtitles are required embedded in the video for those who want to post on any social media platform. For this, you will have to take a different route to use these subtitles.
To embed the subtitle in the video itself, there is a way you can do it, and this process is called open captioning. This can be briefly described as;
To add open captions to your video file, you need the application, Handbrake, the video file, and a .SRT file.
Firstly, launch Handbrake, and open the video file. Next, you will go to the subtitle tab and import the SRT file. After you have done this, you will select the corresponding language and offset setting. Click browse and select the file name and location. Also, don’t forget to tick the Burn in checkbox. After you have done this, click encode.
When you are done with all the above steps, you will wait till handbrake renders your footage.
After all of the above, you have your SRT file, with little or no stress and the best accuracy ever. However, why use Amberscript? Why not any other means? Here are three reasons you made the best choice by using Amberscript.
- High accuracy
Amberscript is all about accuracy. Since we don’t want viewers getting the wrong idea when they see our subtitles, accuracy is very vital. With Amberscript, after automatic transcription gets the spoken part of the video, It is perused repeatedly to ensure there are no flaws. Let’s also not forget the inclusion of text editing, which helps to go over the grammatical aspect. - The large variety of languages
You have access to over ten different languages. Some of these languages are Danish, Chinese, Spanish, English, among others. The highly impressive thing about this is that the computers are not left on their own to handle these transcriptions. There are also numerous native speakers who help to make sure you get the best subtitles. - It is inexpensive
Comparatively and even taken individually, Amberscript is not expensive.Tersely, subtitling is an art that only the best hands should perform, and that is why Amberscript is the option you should be looking for and should be your .srt file generator. With them, you have assured accuracy and ease while creating your .srt subtitles.
How do you transcribe audio files to text?
Years before the invention of voice recording, meeting proceedings had to be taken with pen and paper. Now, even with so many innovations that allow us to make sound and video recordings of meetings, audio recordings come with several limitations. For instance, you cannot scan through an audio file without leaving out some informative pieces. Also, writing out the important information from an audio file can be tasking, laborious, and time-consuming when you do it on your own. So how do you solve this problem? Simple, outsource the task to a professional audio transcription service.
In this article, you’ll learn what audio transcription means and how to easily transcribe your audio files.
What does audio transcription mean?
Audio transcription refers to a process that involves converting audio files into readable text usually called a transcript. The audio file in question could be from academic research, an interview, a meeting proceeding, a video clip of someone’s speech, or anything in general.
When audio transcription or transcript definition is done for a single person, like in a monologue, it is called a dictation. That is, only one person’s voice was recorded. Audio transcriptions that involve general discourse or conversations between two people are called interviews. Finally, when the speakers are three or more, the audio transcription becomes a focus group, conference, or workshop, which is usually the hardest of all types. That’s because a lot must be done to distinguish between the voices speaking.
People who transcribe audio to texts are called transcribers or transcriptionists. Although people use these two interchangeably. Transcribers are used in the UK English form while the latter is used in American English.
What does a transcriber do?
In the past, transcribers took down notes using shorthand. However, people do not do that anymore because it requires a lot of knowledge, and it’s grossly inefficient. To make things easy, nowadays people can take recordings on their PCs or mobile devices. Later on, the recordings can be sent to transcribers via mail. Thanks to cloud storage, people can also save their recordings online and grant access to their transcribers to do their job.
Usually, the transcriber would download the audio and play it with a professional software player. From there, he would listen and type the speech into a transcript.
Nowadays, people do not dictate punctuations with speech. Therefore, audio transcription services extend farther than speech to text. Instead of just converting speech to text, transcribers also make appropriate grammar corrections while they type for you.
How long does it take to transcribe 1 hour of audio?
The short answer to that is it depends. Generally speaking, an expert transcriber needs about 4 hours to transcribe an audio file of 1 hour. Another way of putting it is, a transcriber will need 1 hour to transcribe 15 minutes of audio to text. However, this time can differ depending on how you outsource your transcription.
When you finally decide to outsource your audio transcription, you will have to make a crucial decision. That is to choose between the types of transcription services that are available to you.
Audio transcription service is of two types; manual or automated transcription. Manual transcription, like the name, is where a human does the job. On the other hand, automated transcription occurs when a machine uses Amberscript to generate texts from an audio file.
Generally speaking, the time taken to complete a task is usually shorter when using automated systems. While humans might need up to 5 hours to transcribe 1-hour audio or video, software like Amberscript will only require minutes. That’s because humans have to first listen to the file and make grammar corrections. The delivery time for manual transcription could even be as long as 10 hours for 1-hour audio or video if the conditions are not favorable. Consider the following scenarios as examples.
- With poor quality audio files, the transcriber would have to strain his ears to get the correct information
- Background noises, if present, might reduce the transcriber’s efficiency, and so the delivery time will increase.
- Also, if there are too many speakers in the conversation, the transcriber might have to stop intermittently to write names.
- Audio files that require research will require a longer delivery time.
- Special issues with the speakers like accents and coherence can also impact the time needed for transcription.
On the other hand, machines will create their text files from audio inputs using algorithms and artificial intelligence software. Since these automated speech-to-text services do not involve too many humans, the price is usually lesser.
However, automated transcription comes with some limitations. For instance, machines may not be able to understand and translate colloquial terms or slang. When used in such situations, one might lose the contextual value of such phrases or sentences. When you use automated transcription in terrible conditions like the above, the quality of work is usually very low.
To cover these limitations and many more, professional services like Amberscript allow you to combine the speed of artificial intelligence with humans’ accuracy. Therefore, when you use their software, you can choose to use the basic automated transcription tool or have a perfect transcription. With the perfect transcription package, you can have your work transcribed within minutes, after which a team of experts will look through and correct errors. Even though the perfect transcription comes at an extra cost and an extended delivery time, you are sure of a perfect transcript with no errors.
How to transcribe audio files to text?
Step 1 – Find a transcription service or transcription software such as Amberscript
Step 2 – Upload your video or file
Step 3 – Choose whether you’d like to have language professionals or AI transform your audio to text
Step 4 – Edit the text yourself to perfect it or change the speaker notes
Step 5 – Export the file
Who needs a transcriber?
Almost all businesses would require audio transcription services at one point or the other. However, the following are some places where speech-to-text transcription is needed the most.
VIDEO EDITING AND PRODUCTION
One of the fastest ways to get your content to the world is by creating videos. Today, more than 5 billion people watch videos on YouTube every day. For videographers and editors, that is a lot of tasks, especially for subtitling.
While you cannot avoid subtitles because users need them for several reasons, you can learn to create subtitles and captions without stress. That is an automated process that does not require you to type all the time. With this software, you can create correct text files and get your viewers engaged in your videos.
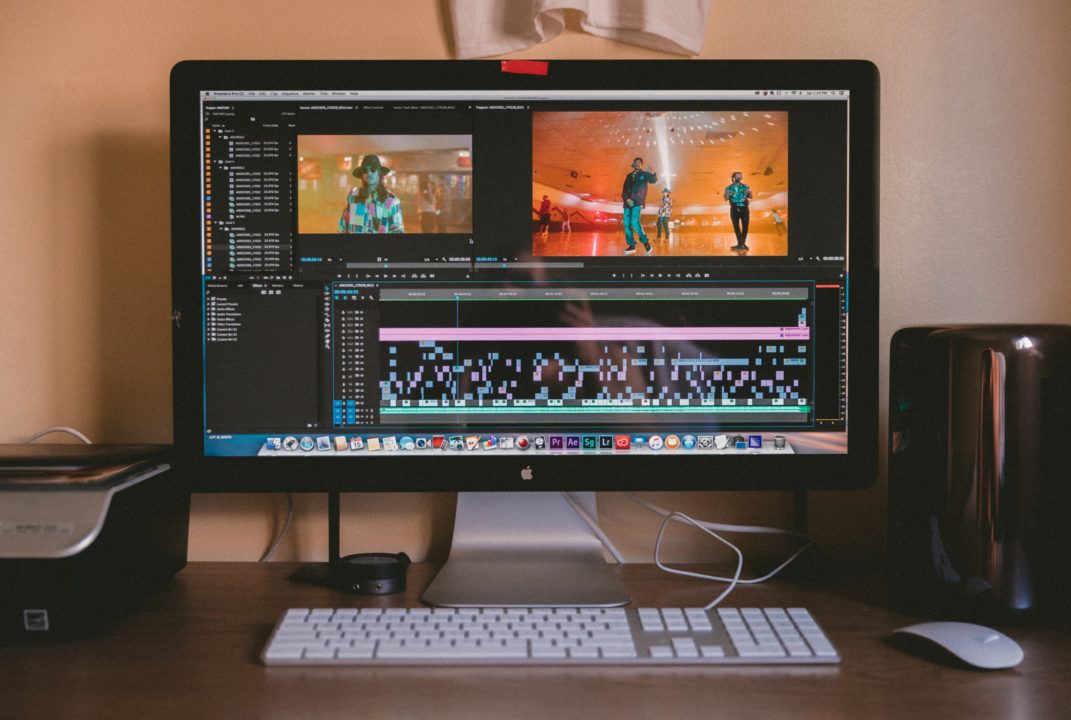
ACADEMIC RESEARCH
For academic research to be successful, it must involve some level of voice records and analyses. Often, researchers generate their data from interviews, focus groups, and some other methods that require them to record audio or video.
After collecting these data, they sit back to analyze these data and find patterns to make theories.
However, transcribing audio by hand can be tiring and time-consuming, considering the large volume of data usually associated with academic work.

JOURNALISM & MEDIA
Like every other professional, productivity is key for any journalist that wants to be successful. You have to schedule meetings, meet deadlines while making sure that you produce catchy articles for your firm. To achieve all these, journalists need to make smart decisions. One of those decisions is to use the best tools.
There are several software tools that you can use as a journalist to get recordings from your interviews and meetings. However, the bulk of the job lies in converting these audio recordings into articles that readers can enjoy. With audio transcription services, journalists can now manage their time effectively. For instance, using the digital transcriber from Amberscript can create texts from lengthy audio files with ease and in just a few minutes. Using the latest artificial intelligence technology, the software will help you create text files from your videos and audio interviews. That way, you can have more time for other productive tasks.
Create text files from audio in minutes, besides the speed, the speech-to-text service offered by software like Amberscript can help researchers to do more with little time.
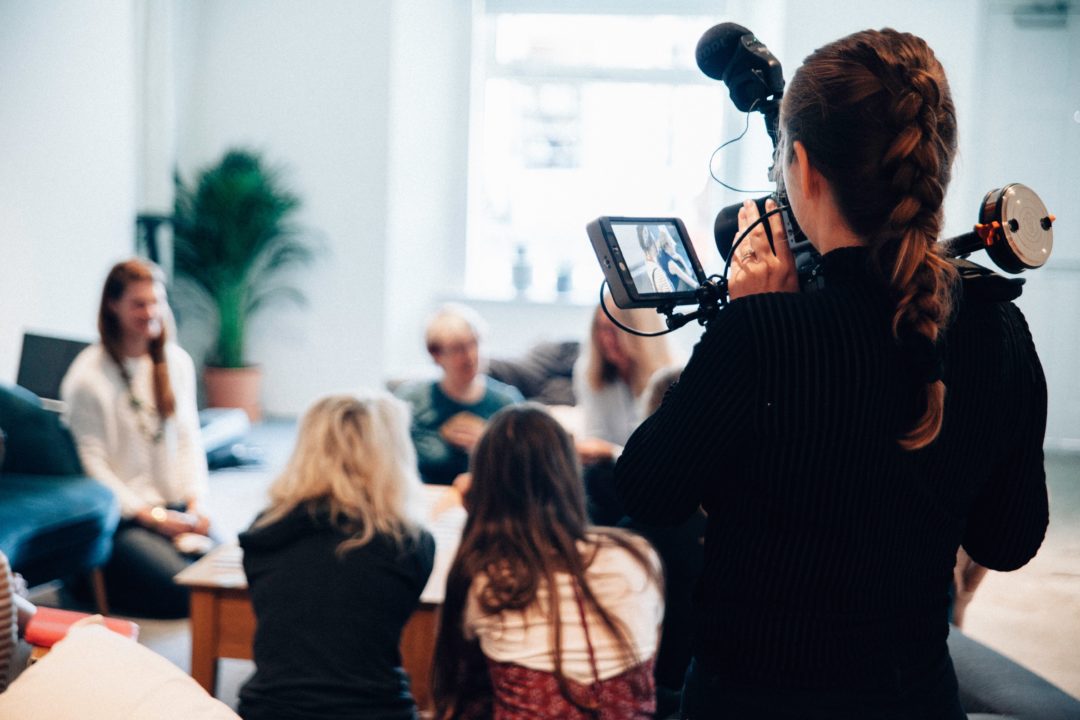
MARKET RESEARCH & USER EXPERIENCE UX
As customer demand continues to grow, there is an increased need for audio transcription. The core foundations of market research and user experience lie around understanding customers properly. With so much competition going on right now, your firm cannot afford to make mistakes.
By taking down the responses of customers during UX testing, businesses can fully understand their market. However, that understanding can only be harnessed for market optimization if they can transcribe and analyze these recordings to text. This is why every business that wants to get the best from its market must take audio transcription very seriously.
Conclusion
Transcription is becoming a crucial tool in many industries of the world. And that’s because people now conduct their meetings and business agreements around the world using the internet. As the need arises for recording meetings, conferences, and more, companies must devise smart means to transcribe these sounds to words. With Amberscript, you will be able to transcribe your audio files accurately without taking much time. Also, the tool allows you to search through the generated texts to find quick insights when you need them.
- High accurate, on demand service
- Competitive pricing with the fastest turnaround using AI
- Upload, search edit and export with ease.
What is audio transcription and why you might need it?
What audio transcription means?
The evolution of new recording devices has made it easier to note interviews, conversations, and even speeches. These devices have evolved to the extent that even at the reach of our fingertips, we can record long speeches using our smartphones.
Despite the groundbreaking innovation, there are audio files of certain meetings and interviews, where the recordings are needed in a written format. Although the traditional method of taking down notes while listening to the audio file is often jumped at, even for the fastest typist, this conventional way of “audio transcription” could be time-consuming, and to a large extent, inaccurate. Trying to do this without the backing of proper transcribing software and a foot pedal could almost look like a fool’s errand. Hence, this is the instance where referring your audio files to a professional, adequate transcriptionist could be very resourceful.
Finding an organization that transcribes audios manually or automatically and accurately from your recordings is helpful. And to make it way easier, Amberscript does it in due time, and compared to other organization and freelance services, at a frugal price.
Nevertheless, a proper definition of audio transcription is paramount to getting into the process itself. Simply, audio transcription is the conversion of the speech content in an audio file to a written text. Often, these audio files include; interviews, academic research, conversations, a video of your dad’s speech at your wedding, or even recording at your graduation.
As a plus, transcript definition can also come in handy. Transcripts, in audio transcription, are the written texts that are gotten from an audio or video file and contain every word from it.
What industries need audio transcription?
Though anyone and any organization can decide to transcribe audio, for some industries transcribing audios are crucial and necessary. Here are some of those industries:
How long does it take to transcribe audio?
One of the reasons why automated transcription is preferred over the traditional method of taking notes is the speed and accuracy. A professional typist has a typing speed of about 70 words per minute. At this speed, transcribing an audio or video file which has a duration of 1 hour will take 4 to 5 hours. However, it doesn’t stop there. There are other factors to consider. We have:
- The number of people talking in the audio or video (cross talking).
- The clarity (there might be disturbances like; background sounds, interferences).
- The cadence of the speaker(s) (things like accents, mumbling, the distance of the microphone can also come to place).
- The speed at which the speaker(s) talk.
All of the above variables are factors that can lengthen a manual transcriber’s time. While for automated audio transcription, it takes far less time. For a 30 minutes audio file, using an automated transcription service will be done in under 5 minutes with far better accuracy than those manually transcribed.
How to turn your audio or video file into a text format?
There are several ways to get an audio or video file transcribed. One of the methods is via professional transcribers, which people can find on online freelancing platforms. Systems are set to ensure that only qualities are delivered.
Nevertheless, there is also the use of transcription companies to which Amberscript belongs. These organizations are composed of several members and teams devoted to ensuring files given to them are made to the best of their quality. With these people, you upload the file you wish to transcribe. For Amberscript, however, the company uses a more advanced method.
Not all of the options above promises proper transcription. One of the few that do, however, is Amberscript.
Transform your audio and
video to text and subtitles
- High accurate, on demand service
- Competitive pricing with the fastest turnaround using AI
- Upload, search edit and export with ease.
Why Amberscript?
Amberscript is a startup enterprise based in Amsterdam and Berlin that is involved in providing audio transcription services. We are building a SaaS application that uses speech recognition to transform speech to sample text format. Amberscript also seeks to build search engines devoted to automated transcription with ease and increased accuracy. Here are some of its features to why Amberscript is the number one choice for turning your speech-to-text:
- AI-Driven speech to text engineAmberscript’s self-developed engine produces the best results in the market. It is trusted by
thousands of scientists, journalists, lawyers, and doctors. - 100% AccuracyAmberscript helps those who trust our services elude the stress and discomfort that comes from manually transcribing. Our algorithm and web editor ensure the utmost accuracy in every regard.
- Export your transcript in several different formatsYou can export your transcript either as a word document (.docx) or a JSON file with an optional speech distinction and timestamp.
- Transcription is available for 35 languages Amberscript doesn’t only transcribe English speech to text. There are over 35 other languages that we transcribe to text. Some of the other languages include: Spanish, French, Italian, Swedish, Russian, Greek, and Mandarin Chinese.
- Improved transcript quality after the speech recognition engine has made a text from your audio file. Amberscript runs the
result through our online editor, thus saving you lots of time while improving quality.
To round it up, Amberscript is a company endorsed by some of the best organizations out there (like Amazon and Warner Bros). Our automated speech recognition saves up lots of time at the lowest price ever with ease, in the end changing businesses and lives.
The world is becoming more dependent on the act of automated audio transcription as the manual method of typing out slowly fades away. The need to have a reliable, competent audio transcription organization is crucial. Maybe as a journalist, scientist, or lawyer, audio transcription is important.
Since you need a competent audio transcription organization, this is where Amberscript comes in. Succinctly, it is the easiest and quickest way to go. With the works turned back almost as immediately as it is submitted on their site. Its accuracy is also next to none. If for nothing, Amberscript has harnessed the power that lies in proper automated transcription. Join Amberscript and start your journey to digitization today.
How to record (and transcribe) Clubhouse conversation in 5 easy steps
Clubhouse is a new audio-chat-based social networking app. Right now the only way to become a user of this hybrid app of conference calls and talkback radio is by getting an invitation. Also – you need to have an iPhone, as it’s still not available for users with phones running on Android. If you’re lucky enough to get invited, you can jump into different rooms, that covers topics you’re interested in most. You can also set up your room and start a conversation. What you can’t do right now is to record any conversions through an in-app option. The application doesn’t offer any captioning or subtitling ongoing conversions as well. That’s why we’ve prepared an easy 5-step guide, that will help you not only record any conversation you might find interesting but also – how to subtitle them with a transcription service.
Why recording Clubhouse sessions can be important?
Many rooms cover highly interesting topics, like marketing, entrepreneurship, books, health, or finance. Sometimes big names, like Bill Gates or Elon Musk, take part in these conversations. Believe it or not, but such an audition can be filled with key takeaways or interesting observations.
Try to imagine taking notes with multiple participants. That can be a very challenging task (but of course feel free to try!). What’s much easier and efficient is to record and transcribe such sessions. This way you’ll not only have the audio but also a transcript, that will allow you to find the most interesting parts of recorded conversations.
How to record and transcribe Clubhouse conversations?
The fact that the app is currently only available for iPhone users, makes the whole recording process unified. Please keep in mind that you should always ask for the speaker’s consent before you decide to start recording, as not having any authorization might be a violation of law in your place. If that’s covered – we’re ready to start recording:
Step 1: Add Screen Recording to Control Center
Go to the Settings > Control Center > Add Screen Recording to Included Controls

Step 2: Open the Clubhouse application and join the room
Step 3: Slide down (or up for iPhone with TouchID) to access Control Center and tap the Screen Recording button

Step 4: When you’re finished with the recording, go to the Photos to export your file
Step 5: Use Amberscript’s automated transcription service
- Sign in to your account (if you don’t have an account yet – sign up here – the first 10 minutes are free).
- Upload file you’ve exported in previous step. Amberscript’s editor supports many audio file types, like: .mp3, .mp4, .aac, .m4a or .wav. Also video file types are supported: .mp4, .mov or .mpeg. Full list of supported formats can be found here.
- Select desired transcription language and click “Proceed”.
Now all you need to do is wait for our automatic speech recognition (ASR) engine to do its work, and after a while, you’ll be able to edit or cut your file and export transcription into a desired text file format.
A detailed guide on how to automatically transcribe an audio recording can be found under this link.
# Tip for recording Clubhouse sessions
If you don’t want your contributions to be recorded or any other external sound apart from Clubhouse conversation – make sure to turn your microphone off.
Swipe down (or up for iPhone with TouchID) to access Control Center. Hold down the Screen Recording button for 2-3 seconds, and toggle the microphone off.
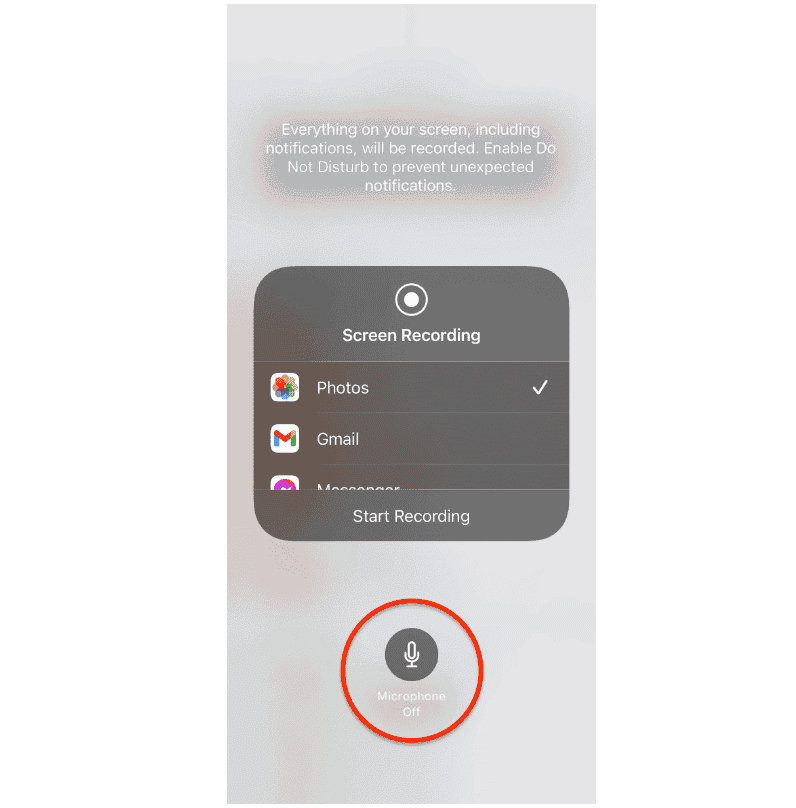
Transform your audio and
video to text and subtitles
- High accurate, on demand service
- Competitive pricing with the fastest turnaround using AI
- Upload, search edit and export with ease.
The value of transcribed conversations
Although it’s a pity the Clubhouse app doesn’t allow in-app recording, it still makes sense to record the most interesting sessions by a third-party solution. What makes even more sense is to have these recordings transcribed. This way you can easily find the most interesting parts of due talks. Moreover, having captions makes social networking app conversations accessible for deaf and hard of hearing folks who are currently excluded from participating.
Start creating captions with ease
We truly hope this guide helped you on how to record Clubhouse sounds. This social platform is a very interesting idea, for sure worth our attention. Still – it’s a shame it does consider digital accessibility from its very beginnings.
Thanks to our automated transcription services you can convert any type of speech into text. Our ASR engines are highly accurate, especially when it comes to European languages. Find out more about our service here.
Automatically convert your audio and video to text now! Start Your Free Trial!
Internet universality: definition and why it matters to accessibility
The power of the Web is in its universality.
Access by everyone regardless of disability is an essential aspect.
Tim Berners-Lee, inventor of the World Wide Web
Internet universality, accessibility, and web or digital accessibility are all interconnected but divided by levels of responsibility and the scope of their applications.
Internet universality is a term created by the UNESCO in 2013 to summarize their vision on internet policy.
In brief, universality measures the equality of access to the internet (using indicators such as physical resources, privacy, and government filtering and blocking).
It takes into consideration users with or without a disability that could face any barriers to access digital content such as old devices, and poor connection.

Accessibility, as a pillar of universality, encompasses all digital divides including literacy, language, gender, or disability.
The terms digital and web accessibility focus on users with some form of disability (visual, auditory, cognitive, etc). Their scope starts from the point where users already have access to digital content and deal with how adapted the information available online is to their needs.
Digital accessibility relates to any form of digital content, including electronic documents, audio, video while web accessibility centers on websites and associated content.
Internet Universality – principles and indicators
The UNESCO created indicators for governments and other stakeholders to measure their internet environment. The framework was published in April 2019 and contains 303 indicators (109 core ones).
The organization has identified the pillars of internet universality as the ROAM principles.
R – that the internet is based on human Rights
O – that is Open
A – that it should be Accessible to all
M – that is nurtured by Multi stakeholder participation
Each one of these pillars has 3 to 5 themes that break down into indicators that public and private institutions can use to evaluate their adherence. UNESCO Internet Universality Indicators.
Why is this important? The digital environment is unequal between and within countries. The UNESCO hopes that these indicators can serve as a reference for stakeholders to take the necessary actions to promote Inclusive Knowledgeable Societies.

How can you promote universality in your company or organization?
Of course, adapting to all these use cases is not always an option but some sectors such as the public sector should be well aware of who their users are and how they will gain access to the information to ensure the message is successfully received.
Incorporating digital accessibility
While other pillars of the ROAM principles depend on external and complex factors, you can help to promote accessibility in your company or organization by applying the Web Content Accessibility Guidelines to your digital content (website, digital documents, etc.).
In some regions such as Europe, that is a requirement for public institutions and regulations are moving towards making it mandatory for everyone.
Even if you are not required to comply with the regulations on Digital accessibility, promoting inclusion offers additional advantages.
5 reasons to promote Digital Inclusion
Summary
The definition of universality is the quality of being shared by all things and people. In the context of the internet, universality relates to the equality of access to the digital environment.
Digital accessibility in its turn promotes inclusion by adapting the digital content to those with permanent or temporary disabilities.
Sdh or Captions? Subtitles for Digital accessibility
If you are interested in captions and subtitles, you probably know that the difference between captions and subtitles is: the first assumes that the viewer cannot hear the audio while the second assumes that they can hear it but not understand it.Considering this, which one is the best for digital accessibility: Sdh (subtitles for the deaf and hard of hearing) or closed and open captions?
Differences in technology
Media types such as Blu Ray and DVDs do not support the same type of captions you will find on most televisions shows and broadcasts. That is because closed captions are not compatible with HDMI ( High Definition Media Interface) but SDH are.
There is also a difference in terms of how the SDH and captions are encoded in a video file, with the first being burned as images, dots or pixels, and the latter as commands, codes or text.
Appearance
Most SDHs do not allow positioning, so you will find them centred in the lower bottom third of the screen. However, they do allow personalization of styles, colors and font sizes, which is not something you will see with closed captions ( usually displayed in white over a dark background).

Example of closed caption

Example of non-speech information in SDH (source)
Which one should you use for Digital accessibility? Captions or SDH?
According to the Web Content WCAG 2.1, every video posted online needs to offer captions or a text version. The requirements specify, among other things, the inclusion of important sounds besides the dialogue. That means that closed captions and SDHs could both be used to meet the accessibility standards but not regular subtitles.
Read more: Digital accessibility and the WCAG standards.
Do you need to create SDH subtitles or captions?
Creating subtitles for Digital accessibility
Automatic Speech Recognition is a powerful ally of Digital accessibility as it makes the process of creating transcripts and subtitles faster and more affordable.
Technology has advanced enormously in this field but the results will be around 80% accurate if you are using an automatic tool like Amberscript and the quality of the audio is good. That means you need to make adjustments in the final files to use it for Digital accessibility purposes, making sure that the timestamps are matching the video file and correcting minor spelling mistakes in the online editor.
By using an automatic tool, you will be saving hours of your time in comparison to creating the subtitles or transcriptions from scratch.
How to create subtitles – a Step by Step Guide
If you have a large volume of audio and video or simply need to outsource the final edits, you can request a service where the subtitles are fully edited and perfected by language experts, such as the manual subtitling service provided by Amberscript.
Watch the webinar about Digital accessibility and the legislation
Summary
- Captions assume viewers can’t hear the audio while subtitles assume they can hear it but not understand it – therefore this term is more associated with translations.
- SHD subtitles were created by the DVD industry to include the description of sounds that give content to the dialogue.
- SHD differs from closed captions in appearance, positioning but also on the technology it supports – captions are not compatible with HDMI.
- For Digital accessibility purposes, you can use sdh or closed captions but not regular subtitles as it should be possible to understand the context without hearing the sound. You can find the full guidelines here.
- If you need to create SDH subtitles or captions for your videos, Amberscript can help you!
Every Country’s Highest Rated Movie
IMDb (the Internet Movie Database) rates every film out of 10, according to the public vote. Here at Amberscript, we scoured the online database to create a map showing the best-rated movies either produced, filmed, or credited in each country around the world.
Top-rated films include modern masterpieces like BAFTA winning “1917” for Spain and Oscar-winning “Parasite” for South Korea, whereas for America and New Zealand, the highest-rated movies are classics: “The Shawshank Redemption” and “The Lord of the Rings: The Return of the King”, respectively.
The highest rated films
The film with the highest rating is The Shawshank Redemption (America) – a film based on the novella by Stephen King – with an IMDb rating of 9.2 stars. It beat other well-known movie titles, like The Dark Knight (9 stars) and The Lord of The Rings: The Return of The King (8.9 stars), to the top spot.
Other highly rated films on the list include:
- Mirror Game (2016), Bangladesh – 9.1 stars
- Zana (2019), Kosovo – 9.1 stars
- Aloko Udapadi (2017), Sri Lanka – 9 stars
The lowest rated films
The lowest rated film on the list is Wrong Cops (Angola) – a 2013 French-American independent comedy film – which came in with just 6 stars out of a possible 10.
Other less popular films on the list include:
- Half of A Yellow Sun (2013), Nigeria – 6 stars
- Viva Riva! (2010), Democratic Republic of Congo – 6.2 stars
- Africa United (2010), Rwanda – 6.2 stars
The most popular film genres
We also sought to find out which genres seem to be the most highly rated by users on IMDb. Drama films make up the majority of the top-rated movies around the world — 49 to be exact, which works out to be almost 4 in 10 movies! Drama is followed closely by comedy (19) and biographies (15). Interestingly, no horror movies featured on the list.
The full breakdown:
- 49 drama films (average rating: 7.7 stars)
- 19 comedies (average rating: 7.5 stars)
- 15 biographies (average rating: 7.6 stars)
- 13 action films (average rating: 8 stars)
- 10 adventure films (average rating: 7.7 stars)
- 7 crime films (average rating: 7.8 stars)
- 5 animations (average rating: 7.8 stars)
- 4 documentaries (average rating: 8.2 stars)
- 3 war films (average rating: 8.2 stars)
The following only had one film representing each genre:
- Fantasy – Pan’s Labyrinth (2006), Mexico, 8.2 stars
- History – The Soviet Story (2008), Latvia, 8.1 stars
- Romance – Paris Je T’aime (2006), Liechtenstein, 7.2 stars
- Thriller – A Seperation (2011), Iran, 8.3 stars
- Western – The Good, the Bad and the Ugly (Il buono, il brutto, il cattivo) (1966), Italy, 8.8 stars
Which films are the highest rated per genre?

Photo credit: Willrow Hood / Shutterstock
The full breakdown:
Which films are the highest rated per genre? We have the answers:
The most popular action films:
- The Dark Knight (2008), United Kingdom – 9 stars
- The Lord of The Rings: The Return of The King (2003), New Zealand – 8.9 stars
- Seven Samurai (1956), Japan – 8.6 star
The most popular adventure films:
- Interstellar (2014), Canada – 8.6 stars
- Mudras Calling (2018), Myanmar – 8.5 stars
- Fitzcarraldo (1982), Peru – 8.1 stars
The most popular animation films:
- The Pinchcliffe Grand Prix (1975), Norway – 8.5 stars
- Finding Nemo (2003), Australia – 8.1 stars
- Bilal: A New Breed of Hero (2015), United Arab Emirates – 7.9 stars
The most popular biography films:
- The Pianist (2002), Poland – 8.5 stars
- Lion of the Desert (1980), Libya – 8.4 stars
- Downfall (2004, Austria), Green Book (2018, China), The Message (1976, Egypt) – 8.2 stars
The most popular comedy films:
- Parasite (2019), South Korea – 8.6 stars
- 3 Idiots (2009, India), When I Grow Up, I’ll Be A Kangaroo (2004, Serbia) – 8.4 stars
- Underground (1995, Czech Republic, Federal Republic of Yugoslavia, Hungary), Black Cat, White Cat (1998, Greece) – 8.1 stars
The most popular crime films:
- Mirror Game (2016), Bangladesh – 9.1 stars
- City of God (2002), Brazil – 8.6 stars
- The Bandit (1996), Bulgaria – 8.2 stars
The most popular documentary films:
- Samsara (2011), Ghana – 8.5 stars
- Inside Job (2010), Iceland – 8.2 stars
- Waltz with Bashir (2008), Israel – 8 stars
The most popular drama films:
- The Shawshank Redemption (1994), America – 9.2 stars
- Zana (2019), Kosovo – 9.1 stars
- Aloko Udapadi (2017), Sri Lanka – 9 stars
The most popular war films:
- 1917 (2019, Spain), Come and See (1985, Russia) – 8.3 stars
- Before the Rain (1994), Macedonia – 8 stars
Do you need captions for your videos? Read our guide on How to Generate Automatic Subtitles with Amberscript!
An oldie but a goodie?
Interested to find out whether the world prefers contemporary films or the classics, we found out which decade has the highest rated films, and which film is the “best”, per decade.
The oldest film on the list is Albania’s Skanderbeg, released in 1953, followed by Seven Sumarai (1956) from Japan, and The Seventh Seal (1957) from Sweden. The newest highest rated films from 2019 include Kosovo’s Zana, South Korea’s Parasite, and Spain’s 1917.
Film breakdown by decade:
- 1950s: 3 films
Highest rated film of the decade: Seven Sumarai (1956), Japan
- 1960s: 4 films
Highest rated film of the decade: The Good, the Bad and the Ugly (1966), Italy
- 1970s: 4 films
Highest rated film of the decade: The Pinchcliffe Grand Prix (1975), Norway
- 1980s: 5 films
Highest rated film of the decade: Lion of the Desert (1980), Libya
- 1990s: 17 films
Highest rated film of the decade: The Shawshank Redemption (1994), America
- 2000s: 34 films
Highest rated film of the decade: The Dark Knight (2008), United Kingdom
- 2010s: 63 films
Highest rated film of the decade: Mirror Game (2016, Bangladesh) and Zana (2019, Kosovo)
Methodology
Using data from the IMDb website, we sought to find out the most popular film to come out of each country. The site’s search option enables you to filter film titles by country to see a list of all films produced, filmed or credited in that location. Only films with a minimum of 1,000 votes were considered, bringing the total number of locations considered to 130. Amberscript then sorted the movies by the number of public votes on IMDb. The film with the highest rating for each country was taken as their highest-rated movie. All data was collected between September 29th and October 1st, 2020.
What is useability and how it relates to web accessibility?
Useability (or usability) and accessibility are both facets of user-centered UX. See how their application will help you to create a user-centered website.
Web useability and accessibility are both elements of good UX and overlap in a few aspects as the goal of both is to make the content on a web page understandable and accessible by everyone.
There are a few differences in the scope of these topics in design but if you structure your site with your user in mind, you may be able to successfully meet these two standards.
The User Experience Honeycomb by Peter Morville illustrates the pieces that should be taken into consideration when building a website – as you can see in the image, “accessible” and “usable” are both essential parts of a design that delivers outstanding user experience.

What is useability, or usability in web design?
In the world of web design, useability (also spelled usability) is related to how easily the information provided on a webpage can be digested by its readers. Reference
To achieve good website usability, the development and design should start from the customer perspective. Put yourself in your customers’ shoes and start by asking basic questions:
– Can I find what I need on the website?
– Do I understand what is being sold?
– Do I manage to do what I came here to do?
There are a few ingredients in the usability formula: effectiveness, efficiency, engagement, error tolerance, and ease of learning.
Efficiency is a big one: users are not willing to navigate through a complicated design or confusing communication to find what they need.
Here are some factors that compose and affect usability:
1) Accessibility: as mentioned, the two are intrinsically connected. An accessible website is a website that can be easily used by anyone.
2) Responsiveness: linked to the ability of your website to work on different devices.
3) Search Engine Optimization (SEO): the architecture of your website makes in crawlable and searchable by search engines, making the content available for users.
4) Content and Messaging: clear and effective communication that leads the visitor to perform reach their goal.
5) Layout & Navigation: It should be easy and intuitive to navigate your website and find the information users are looking for. Menus, structure, etc. Look at good examples such as Apple: basic design that keeps the focus of the user where it should be.
6) Site speed and errors: Your website may be wonderful, but if it takes too long to load users won’t visit it. They should also be able to fast complete the actions they want. Monitor errors and ensure users can recover from it.
Digital accessibility: offering an inclusive user experience
Putting the user at the center of the design of your website means considering the needs of all users. That is only possible if you remember that 10-15% of the world population has some type of disability.
For this group, the experience of visiting a website that is not adapted can be extremely frustrating.
Digital accessibility is not only nice to have, but in Europe, as in other regions, it is mandatory for public institutions to offer accessible content.
There is a broad range of disabilities that can become a barrier for users including visual, auditory, and cognitive (such as dyslexia). Following the web content accessibility guidelines will also make your content more inclusive, favoring an even broader group such as people with low literacy or sleep-deprived.
Amberscript can help you to meet the WAGC 2.1 Digital accessibility standards for the deaf and hard of hearing.
How to get started
If you already have a website
Test it and adapt it
If you already have a website, you can assess how usable and accessible it is by running a few tests.
- For usability, the tests are run with the purpose of identifying issues in the user flow, catching errors, and spotting opportunities to improve the overall user experience.
You can use tools like Optimizely, UserZoom, and UserTesting to get new insights and validate your hypothesis.
- For digital accessibility, there are specific tests and tools that can be applied.
If you managing a website for a public institution in Europe or any other organization required by law to meet the accessibility standards, you should look into all the requirements of the WGAC 2.1 (Learn more by visiting our Digital accessibility page and downloading our ebook).
If you are not required but would like to improve your website by making it accessible, you can follow the best practices such as adding subtitles and transcripts to audio and video content, using a proper contrast ratio, and providing an audio version for written content.
Learn how to create subtitles and add them to your videos
There is an array of tools that can test how accessible your website is. You can find an extensive list of testing tools here.
If you are building a website
If you are designing a new website, make sure you take the elements in the User Experience Honeycomb into consideration.
Create a website that is:
1) Useable – remember the main features are effectiveness, efficiency, engagement, error tolerance, and ease of learning.
2) Useful – Your product is filling a need, otherwise, you would not be selling it. Make it clear how useful it is by proving valuable and clear information.
3) Desirable – remember that the focus should be on what you promoting, not on the website alone. You don’t want to have a design that takes the attention away from your product. Take Apple’s example again for this point – a minimalist design that puts the product on the center of the stage.
4) Findable – that goes for SEO friendly architecture that helps users to find it but also for breadcrumbs, menus, and features that make the navigation inside your website easier.
5) Accessible – include users with disabilities to your marketing personas to ensure you will reach a larger audience. Incorporate the WCAG 2.1 guidelines to build an inclusive user-centered website.
6) Credible – make sure you make room for badges, testimonials, and ratings that show your users they can trust you.
Have in mind that usability is an ongoing process. The way users behave is not always intuitive so test, iterate, test again, and keep consistently improving the user experience on your website.
Summary
- Useability (or usability) is an essential part of the user-centered design – it means to offer an easy-to-use website where information is clear and understandable.
- Factors that compose and affect usability: Accessibility, responsiveness, SEO, Layout and navigation, site speed, and errors.
- Accessibility is intrinsically connected to usability. It promotes digital content that can be used by everyone, including users with disabilities.
- To ensure your website is useable and accessible, you should test it.
- To build a user-centered website, you should take into consideration the facets of UX illustrated in Peter Morville’s User Experience Honeycomb: useful, useable, desirable, findable, accessible, credible, therefore valuable.
- To learn more about how to create accessible content, visit our page, and download your ebook on Digital accessibility.
Video conferencing for the deaf and hard of hearing
According to The Economist, there could be over 1billion remote workers by 2035. COVID-19 accelerated the telecommuting trend making the point of Digital accessibility even more pressing. Companies need to guarantee that the workforce of users with hearing disabilities do not encounter another barrier with the implementation of the remote environment.
When organizing a team meeting, be mindful of the elements that can make the event accessible.
Before the meeting: Provide slides and an agenda
Providing slides and an agenda for a meeting in advance is a powerful productivity tip but it’s even more relevant when it comes to users with hearing impairments. Knowing the context facilitates the understanding of the words.
This benefits everyone attending the meeting, including those who are working from home with children or in a noisy environment.
During the meeting: use a video conferencing software with accessibility features
Learn more about the digital accessibility functionalities of your video conference tool:
Turn on live captions and leverage the chat feature
Most of the most popular video conferencing software will provide a live caption feature, although it’s only available in English and it doesn’t provide the highest accuracy.
To support that, ensure you have the speaker on camera for lip-reading or a clear slide with the topics that are being discussed.
Leverage the features of the chat to ask and answer questions and check if the audience is following the meeting.
Use proper devices – the quality of the audio is important!
The quality of the audio impacts the understanding of the live meeting but also the possibility of transcribing the recording.
Ask all participants to use adequate speakers and microphones to guarantee the audio is clear.
Record and transcribe the meeting
Even for users without hearing impairments, the amount of information exchanged in a video conference can be overwhelming. Adopt video conference recording as a practice to avoid losing precious information from your meetings.
How to Record Video Calls on Zoom, Skype, Hangouts, or with your Computer
With the video files in hand, you add easily add subtitles and generate transcripts to follow up with the attendants and ensure that even those with hearing impairments will have access to the information and can retrieve it when needed.
Adding subtitles to the recording will also make up for any misunderstanding that the (sometimes inaccurate) live captions could have created.
How to create subtitles – a Step by Step Guide
Additional tips
- Meetings with a sign language interpreter. If you are planning a virtual event or meeting with sign language interpreters, there are additional recommendations for interpreters and audio setup.
- Try to keep the group small and avoid mixing remote with same-room groups.
- Ask everyone else who not the speaker, to mute their microphones so attendants do not get distracted.
- Lastly – ask for feedback! The best way to ensure these measures are effective in promoting an inclusive meeting is asking those with disabilities to evaluate what worked and what didn’t. Digital accessibility is an evolving process that requires participation!
4 easy ways to make video content accessible to everyone
Table of content
- Current digital accessibility legislation at a glance
- Making your video content accessible
- 1. Principles of video accessibility
- 2. Give preference to an Accessible Media Player
- 3. Add captions to your video
- 4. Add transcripts to your video
Digital accessibility is about ensuring that your content is accessible to everyone and ensuring that your information is received. After all, excluding the deaf and hard-of-hearing audience means leaving out 10 -15% of the global population. Those are some big numbers, and are not accounting for those who use screen readers, or are not native speakers in the language of your contents audio.
Unfortunately, making video content accessible is often pushed to the back burner and can be seen as an afterthought to most organizations and content creators. But if you’re here then that means you’re on the right track!
We’ve come up with 7 easy ways to ensure that your video content is accessible to most. But first…
Current digital accessibility legislation at a glance
In the US on October 8, 2010, Twenty-First Century Communications and Video Accessibility Act (CVAA) went into law. The role of CVAA was to update federal communications law to increase the access of persons with disabilities to modern communications. The CVAA updates accessibility laws enacted in the 1980s and 1990s, so they could comply with 21st-century technologies, including new digital, broadband, and mobile innovations.
The European Union also didn’t leave people with disabilities behind and prepared The Web Accessibility Directive (Directive (EU) 2016/2102). The Directive obliges websites and apps of public sector bodies to meet specific technical accessibility standards. Fulfilling those requirements helps people with disabilities to have better access to websites and mobile apps of public services.
Also, the World Wide Web Consortium (W3C), the organization behind Web Accessibility Initiative (WAI) has prepared Web Content Accessibility Guidelines (WCAG) 2.1, and a guide on how to make media accessible. It helps to figure out which accessibility aspects specific audio or video needs in order to meet accessibility requirements.
Of course, those laws and regulations don’t apply if you are a non-institutional content creator, but it always makes sense to make your video content accessible as much as possible. Creating accessible videos will influence reach and usability. Sadly, the accessibility of produced videos is often overlooked. On a positive note: accessibility doesn’t have to add significant time or cost, especially when considered from the beginning. Read our guide to find out how to easily incorporate accessibility features into your video content.

Making your video content accessible
When it comes to the accessibility of videos, adding subtitles and transcripts will benefit a much larger group. Just as an example, most videos on social media are watched without the audio on. provides people with disabilities with better access to websites and mobile apps of public services.
Here are the main factors you need to check to ensure your video content is accessible for the deaf and hard of hearing.
1. Principles of video accessibility
If you’re producing a video and you would like to fully adhere to the accessibility guidelines as much as possible, please consider the following points:
- Speaker visibility
Make sure the face of the speaker is visible and has good lighting. Some viewers with auditory disabilities use mouth reading to understand spoken language. When possible, consider this when preparing the setting of the video. - Sign language
If you plan to include sign language, make sure the frames have enough room at the lower right side to add the sign language overlay without blocking important information. - Colors and contrast
The text size should be large enough to be easily readable (and should stay on the page long enough to allow readers to follow it). Be conservative on the use of colors – the background should offer enough contrast and not compromise the visibility of the subtitles. - No flashing content
Remember the Pokemon shock incident when over 12,000 people in Japan had photosensitive epileptic seizures due to a flashing visual effects in one episode. Flashing content can be dangerous for sensitive viewers so avoid anything that flashes more than 3x per second.
2. Give preference to an Accessible Media Player
When choosing a video player, it is best to choose from the ones that are fully accessible. Such video players should be compatible with WCAG 2.1 media player standards, but also Section 508 of the Rehabilitation Act.
Accessible media players have a user interface that works without a mouse, through speech interface, when the page is zoomed larger, and with screen readers. For example, media players need to:
- Provide keyboard support
- Make the keyboard focus indicator visible
- Provide clear labels
- Have sufficient contrast between colors for text, controls, and backgrounds
- Incorporate accessibility features like captioning and audio descriptions.
- Offer speech recognition so viewers can use voice commands to play, pause the video.
Here is a list of 508-compliant video players, among them, Kaltura and JW Player. This list contains a more detailed accessibility comparison of web-based media players.
After picking a video player, do not allow autoplay mode. Users should be able to start and stop the video whenever they want.
3. Add captions to your video
Captions for videos created for digital accessibility should follow the WCAG standards. This is mandatory in cases such as public institutions in Europe.
In summary, captions are different than standard subtitles as they should include contextual information besides the dialogue (i.e. phone ringing, capital letters to represent someone screaming, etc.).
Here is a quick list to follow when creating captions for the deaf and hard of hearing:
- Timestamps for captions should match the sound;
- All the important information should be captured in the captions: descriptive sounds, lyrics of songs, etc.;
- Stay on the screen long enough to be read;
- Enough contrast between the color of the text and the background;
- No pauses without captions
- Speaker identification
Transform your audio and
video to text and subtitles
- High accurate, on demand service
- Competitive pricing with the fastest turnaround using AI
- Upload, search edit and export with ease.
4. Add transcripts to your video
Transcripts are a great way to allow users with hearing disabilities to follow video and audio content.
As is the case with captions, it is also a requirement for public institutions in Europe to adhere to digital accessibility guidelines.
You have different options to generate transcripts from your audio or video file:
- Transcribing your audio to text manually
- Have a company make your transcriptions
- Use an automated transcription service
The final steps of your thesis: Finding the right printing and binding services and choosing the right style for you
One of the best things is the feeling you get when you’ve finished writing your thesis. After months of research and writing, at long last, your paper, thesis, or dissertation is finally done. What’s left to do is the printing and binding of your thesis. But still, you need to find out the best printing and binding services and choose a style that makes you proud of the final result of your work.
There are a few things to consider when choosing how to print and bind your thesis or dissertation: the quality of the paper, the material, and color of the binding. A few other details can be customized, such as the ribbons and corner protectors. To help you decide, we have selected a few options from our partner, BachelorPrint.

Our pick: Premium Leather book binding
- Page limit: 10 – 370 pages
- Color options: Red, green, blue, black
- Textured, leather-look surface
- Upgrade your leather book:
- Ribbon bookmark in white, silver, gold, blue or black
- Corner protectors in black, gold, and silver
- Customized embossing in gold, silver, and black
BachelorPrint is your go-to expert when it comes to printing and binding your thesis. The online market leader offers a wide range of bindings and will transform your thesis into a work of art.
The ultimate: with their free express shipping they guarantee that your thesis will be in your hands within a few days!


Leather book binding: a thesis to look like a book
- Page limit: 10 – 370 pages
- Color options: Red, green, blue, black
- Appearance: textured matte (premium bookbinding) or marbled leather-look with a slightly glossy finish (standard bookbinding)
- Upgrade your leather book:
- Ribbon bookmark in white, silver, gold, blue or black
- Corner protectors in black, gold, and silver
- Customized embossing in gold, silver, and black
You’ve made it! You’ve finished writing your thesis. Now all that’s left is printing and binding and knocking your examiner’s socks off! That’s why we recommend leather bookbinding.
A leather book has the best quality for printing and binding your thesis. Your thesis will look like a classy book.
Choosing this type of binding will make your thesis stand out from the rest and leave a lasting impression on your examiner. Combine that with additional options such as customized embossing, corner protectors, and a ribbon bookmark, and after that process your thesis you’ll have a one-of-a-kind, sophisticated-looking book.
There are two options available with this leather book: Premium leather book and standard leather book. Whereas the premium leather book has a matte finish, a standard leather book has a glossy finish. However, both are done in leather-look and consist of a solid and sturdy cover.
Which leather book you choose for your thesis binding is a matter of personal preference.
Upgrade your binding
Deciding on a leather book when printing and binding your thesis gives you the option to upgrade it to your tastes and create a one-of-a-kind binding. Here are the upgrade options:

Corners protectors:
Adds a touch of class
Prevents the corners from binding
Available in silver, black & gold

Ribbon Bookmark:
Enhance your book’s appearance
Can be used as a bookmark (your examiner will be grateful!)
Available in white, black, blue, silver & gold

Customized embossing:
E.g.: University logo and title of your dissertation on the cover
Embossed spine optional
Available in black, silver & gold
You can use BachelorPrint preview tool see how your dream binding would look like:

Thermal binding: a clean and classic style
- Page limit: 2 – 450 pages
- Color options: black, red, green, yellow, blue, white, gray
- Appearance: transparent front cover, colored, leather-look back cover
Of all the different types of binding, thermal binding is a classic. One of the features is the transparent front cover: it shows off the title page of your dissertation as well as the title of your thesis. This means that attention is immediately drawn to the topic of your dissertation.

Softcover: A thesis for artists
- Page limit: 20 – 150 pages
- Color options: customizable to suit your needs
- Appearance: satin matte, smooth appearance; design and print your cover to your liking (magazine look)
- Cover: 300 g/m² premium paper
Looking to make an impact with your thesis? In that case, the softcover is just for you! You have free reign and can decide what you want your cover to look like: Logos, colors, photos, or different fonts – you’re the one who decides what goes on the cover of your softcover. That is why this type is ideal for more creative fields of study.
Note: Designing a one-of-a-kind binding that looks super original is tempting, but remember to keep it aligned with your field of studies and professional looking.

Spiral binding: A sleek solution for your thesis
- Page limit: 1 – 300 pages
- Color options for cardboard back cover: black, red, green, gray, blue, yellow or white
- Appearance: Leather-look cardboard back cover, transparent front cover
- Spiral options: Metal or plastic
Of all the different types of binding, spiral binding is the sleekest and simplest type BachelorPrint has to offer. It has a transparent front cover. This allows the examiner to see the topic of your Master’s thesis or dissertation right away. However, spiral binding is better for printing shorter dissertations.
Some professors will require that you use spiral binding for printing your thesis. If your post-secondary institution has no guidelines regarding printing and binding, then you should make sure that the “packaging” of your thesis matches the contents: If you are looking into printing and binding your Master’s thesis, we definitely recommend the leather book over spiral binding.
Overview of thesis bindings
Tips from printing experts
It’s one thing to know what thesis binding to choose when printing your thesis. But there are lots of helpful and important tips that you should consider when it comes to printing. We sat down with BachelorPrint to put together some exclusive advice just for you:
Tip #1- Choosing the right paper: Most printing services use 80 g/m² paper by default. However, 80 g/m² paper is relatively thin and as a result, the print on the reverse side will shine through if you are printing double-sided.
Tip: Remember that printing and binding your thesis is not something you do every day – be sure to use high-quality paper and select 100 g/m² paper – if printing double-sided, we actually recommend 120 g/m² paper. BachelorPrint automatically uses 100 g/m² paper.
Tip #2- Printing single-sided or double-sided: It’s totally up to you whether you print your thesis single-sided or double-sided. Make sure you check the examiner’s guidelines first – if there are none, the choice is yours!
Tip: When printing double-sided, make sure your page numbers are formatted correctly. Uneven page numbers should always be on the right-hand page, and even page numbers should be on the left-hand page.
Tip #3- Printing in color: It’s up to you whether you print in color or black and white. This depends on your thesis. If your dissertation has lots of charts and photos, color printing would look better.
Tip: Color printing gives your thesis a classier appearance. But take note! Too much color and your thesis will look less professional.
Tip #4- Number of copies: You can assume that two members of the examination board will read your thesis. Furthermore, the person or organization you did your internship with might also like a copy of your thesis. Last but not least, you would probably also like to own a copy of your dissertation, Master’s thesis, or research paper.
Tip: Find out beforehand, how many copies you’ll need. We generally recommend making 4 to 5 copies. Of course, the type of binding is up to you.
Tip #5- Cost: The cost of printing and binding your thesis is based on various factors: Paperweight, color printing, and actual printing. Many service providers often add a surcharge when you opt for color printing or thicker paper.
Tip: BachelorPrint printing expert automatically uses 100 g/m² paper, and does not even add a surcharge. The same applies for color printing: whether you choose black/white or color, BachelorPrint charges the same.
Do you need to transcribe interviews for your thesis?
How to add speaker tags to audio files for transcription
This blog post will go through the process of diarization, which is the task of adding speaker tags to an audio file for transcription. It will quickly describe techniques to work with speaker vectors and an easy way to perform it using our tool.
What is diarization (adding speaker tags)?
Adding speaker tags to transcription or answering the question “who spoke when?” is a task named diarization.
This task is not as easy as it seems, because algorithms do not nearly have the same level of understanding of sound that we have. It involves finding the number of speakers and when they spoke using the sound wave signal.
Also, it is a necessary step in Automatic Speech Recognition systems, as it lets us organize the text transcription and have additional information about the audio.
At Amberscript, we analyzed different approaches and integrated the best one in our product. In this post, you will find some elements of what the existing techniques are, followed by a short guide on how to add speaker tags using our tool.
Why is diarization a complicated task?

Adding speaker tags is not easy, because it involves a lot of steps. Let’s quickly describe the usual pipeline.
First, you have to split the audio into segments of speech. That means removing the parts without speech and splitting the segments of audio at speaker turns, so you end up with segments involving one speaker only.
After splitting, you must find a way to regroup segments that belongs to the same speaker under the same speaker ta. This very task is itself split into several steps.
You must extract a speaker vector for the segments and then cluster the speaker vectors to finally regroup the vectors in the same cluster under the same speaker tag. The difficulty of this task is the origin of the diarization challenge called DIHARD.
Now, on to the extraction of the said speaker vectors.
Automatic generation of speaker vectors
Usually, making the activity segments is not the most complicated part. This is called Speech Activity Detection (SAD) or Voice Activity Detection (VAD). It is usually done by using some threshold on the activity at a given moment on the audio.
What is harder is the task to make speaker vectors out of the obtained segments. For this, you can check different techniques to extract the speaker vector (called speaker embedding) in the table below:
| Name | Internal tool |
|---|---|
| i-vectors | Statistical models |
| x-vectors | Time delay neural networks |
| d-vectors | Recurrent neural networks |
| ClusterGAN | Generative adversarial networks |
The complete list would be much longer, but we can limit it to these techniques that are the most common.
I-vector is based on Hidden Markov Chains on Gaussian Mixture Models: two statistical models to estimate speaker change and determine speaker vectors based on a set of known speakers. It is a legacy technique that can still be used.
X-vector and d-vectors systems are based on neural networks trained to recognise a set of speakers. These systems are better in terms of performance, but require more training data and setup. Their features are used as speaker vectors.
ClusterGAN takes this a step further and tries to transform an existing speaker vector into another one that contains better information by using 3 neural networks competing against each other.
When this step is done, we end up with speaker vectors for each segment.
Clustering of the speaker vectors
After getting those speaker vectors, you need to cluster them. This means grouping together speaker vectors that are similar, hence likely to belong to the same speaker.
The issue on this step is that you may not necessarily know the number of speakers for a given file (or set of files), so you are not sure how many clusters you want to obtain. An algorithm can try to guess it, but may get it wrong.
Again, several algorithms exist and may be used to perform this task, so the most common ones are included in the table below:
| Name | Internal tool |
|---|---|
| K-means | Iterative clustering |
| PLDA | Statistical models |
| UIS-RNN | Recurrent neural network |
PLDA refers to a scoring technique used in another algorithm. K-means is usually the standard way to go for clustering, but you have to define a distance between two speaker vectors and PLDA is actually more suitable for this case.
UIS-RNN is a recent technique that allows online decoding, adding new speakers as they appear and is very promising.
After the clustering step, you can add the speaker tags to the segments that belong to the same cluster, so you end up with tags for each segment.
What is left after diarization for a full transcription?
When diarization is done, you still need to actually transcribe the file (which means getting the text out of the audio), but the technology behind this merits another post!
The output of the transcription will then be a full transcription with the words of the audio file, plus the speakers associated to each part of the text.
How to add speaker tags using the Amberscript tool
Now onto the real part, how can you add said speaker tags without having to perform all the technical steps above?
You can simply head to our website and log in. When this is done, you will be able to upload a file and select the number of speakers (for better accuracy) and then let the algorithm run!
You do not have to worry about which technique to choose. After a few minutes, your file will be fully transcribed, and you can check in the editor if the speaker tags have been added correctly.
You can even correct mistakes if you can find any, and then download your transcript ready for publication.
Conclusion
To conclude, let’s say there are a lot of diarization techniques available and this process is really complicated, but we built a tool using the best available technique to let you add speaker tags to your audio files so you can get the best transcription.
Why captions are important? 8 good reasons
It is widely known that captioning a video not only promotes digital inclusion for those viewers with hearing impairments but that it also greatly improves the user-friendliness of your content. But why captions are important? This is our takeaway in 8 points.
1. Make your content easier to understand
To be honest – this point would actually already be enough to stop what you’re doing right now and start captioning your videos immediately. Because captions and subtitles improve the comprehension of your content in more than just one way:
- Specific terms and proper names can be – thanks to subtitles – absorbed and understood the first time they are heard or read.
- Content including foreign languages or strong accents can be followed a lot easier on subtitled videos. Obviously it is also possible to provide subtitles in more than just one language for a video to reach a wider audience.
- Background noises and poor video or audio quality can be compensated by adding subtitles since they make sure that it is still possible to follow the content or the story line.
2. Engage your audience everywhere
Regardless of the time and place, subtitled videos not only make your content accessible for everyone – but everywhere and at any time! Probably you have already experienced it yourself – you are in a noisy location like in the public transport or at the office, you forgot your headphones or own those kinds of headphones that equally entertain the people around you, but you still want to watch a video!
It’s quite simple. By adding captions to your videos, your audience can keep on watching, without them there is no point in watching the video since you probably wouldn’t pick up a single thing. And that’s a loss on both sides: the provider does not reach as many people as he could (research has shown that over 80% of the videos on social media are watched on mute!) and the users miss valuable and enriching content.
3. Improve SEO score and Searchability
By adding captions you make not only all your archives searchable but also each and every video! And that’s not only an internal advantage. Every search engine works text-based. With subtitles you will significantly improve the SEO of your videos, meaning that search engines can find and rank your content and thus increase the traffic of your videos.
Transcripts and subtitles for content marketing optimization
4. Improve your language skills and train your competence
Nowadays it’s quite common to learn a new language online or via an app. Did you know that the learning effect can be additionally increased by watching videos in the language you are learning with corresponding subtitles? But not only that: Studies also show that subtitles are extraordinarily helpful to students or people that are diagnosed with learning disabilities, attention deficits, or autism. The following links provide further information and results on that topic:
- Closed Captioning matters: Examining the value of Closed Captions for ALL students
- Student uses and perceptions of Closed Captions and Transcripts
5. Interculturality
Subtitled videos give access to a whole new world: The world of foreign cultures. Only a fraction of movies or videos are translated into more languages – and without subtitles, we definitely miss out! With subtitles, everyone has access to these movies or videos – regardless of the O-tone.

6. Repurpose of content
With captions and transcripts, you can easily give your content a new purpose: You can for instance create a blogpost on your video content or write a summary, an article, etc.. – everything is possible!
7. Farewell concentration fatigue
Very long videos or movies with over-length are prone to be tiring at a certain point. The consequence of that is a lack of concentration and missing a lot of the content. Adding subtitles to your videos can help with that! Because they help to stay focused and to relax the brain even when it’s confronted with strong accents, complicated content, disturbing background noises, or tiring lengths. The following link leads you to an interesting article on concentration fatigue in connection with deafness: https://hearmeoutcc.com/concentration-fatigue-affects-deaf-people/
8. Translations are based on captions and transcripts
Once you have a transcript or captions of your content, you can easily translate it or let it be translated (which, by the way, increases your geographical reach significantly!)
Looking for a step-by-step? Read our guide on How to Generate Automatic Subtitles with Amberscript!
How to Record a Phone Call in 3 Easy Steps
In many cases, it may be useful to know how to record a phone call. If you are working from home for example, and you have an important call with your boss, or maybe you are receiving medical results from your general practitioner over the phone.
How to record a phone call in 3 easy steps
At times, it could be that you do not remember all of the information shared in this call, in which case it could be handy to have the ability to listen back.
Here is an easy and quick guide on how to record your phone calls, suitable for both iOS and Android devices:
Step 1: Download a call recorder app
Unfortunately, neither iOS nor Android has a built-in function to record phone calls. So, we have made a quick overview of some of the best paid and unpaid phone call recorder apps for both systems:
| Android (Unpaid) | iOS (Unpaid) |
|---|---|
| Call Recorder | Call Recorder Unlimited |
| Automatic Call Recorder | Call Recorder RecMe |
| Call Recorder S9 Pro | Call Recorder for Me |
| Call Recorder – Callx | Call Recorder plus ACR |
| Call Recorder Automatic HD | Call Recorder ACR+ |
| Android (Paid) | iOS (Paid) |
|---|---|
| Call Recorder Pro | TapeACall Pro: Call Recorder |
| Voice Recorder Pro | Call Recorder plus ACR Pro |
| Smart Call Recorder Premium |
Important to note: most free apps work as well as paid apps. The general difference is that free apps have a time limit per call of about 1 hour. Furthermore, most free apps offer the option to upgrade to a paid version of the app, which will allow for longer call recording.
We believe that Automatic Call Recorder for Android, and TapeACall Pro for Android and IOS are the best two applications to record a phone call.
Step 2: Use the app to make the call
Most of the apps mentioned above will require you to dial the number within the app, it will then automatically record the phone call. Naturally, we understand that this doesn’t work for all situations. The most obvious: an incoming phone call.
In this case, the paid versions of the apps are recommended, as they allow you to transfer the call into the app. Simply answer the call, return to the home screen and open the call recorder app, tap the incoming call button on the dialing screen and tap the option “merge calls”.

Step 3: Transcribe your phone call
At Amberscript we build software that enables users to automatically transcribe audio and video files to text files. You can use our software to upload your recorded phone calls in order to transform them into text. This way you can easily share the information and read it back over if needed.
So, head on over to our online tool and get your first 10 minutes of audio/video content transcribed for free!
Digital accessibility and WCAG 2.1 standards
In Europe, digital accessibility will play a big role in the public agenda in 2020. Driven by a legislation change and mandatory standards on the web content accessibility guidelines (WCAG 2.1), many public organizations are struggling to find pragmatic solutions that fit into the budget, fit into processes, and solve the issue of making digital content accessible.
Table of Contents
- The background of digital accessibility in Europe
- What exactly does digital accessibility mean?
- The elephant in the room: what applies when and for whom?
- Additional mandatory measures
- Conclusion
The background of digital accessibility in Europe
Here is why it is worth taking the legislation and the move towards a digitally accessible Europe seriously:
- The US is far ahead of Europe when it comes to Digital accessibility (especially in the educational sector) and serves as a role model for peers in Europe;
- Technology has come a long way and is now ready to pave the way towards better digital inclusion on the Internet by using AI, as for example in automatic speech recognition;
- It’s a universally known fact that digital accessibility not only benefits the disabled or impaired people but all of us by dramatically improving overall user-friendliness;
- On the 2nd of December 2016, the European directive 2102 on digital accessibility has been published. This guideline comes with some major deadlines and binds public institutions to accessible online content and presence.
Unfortunately, that doesn’t really apply to everyone. Physically, mentally or sensorially disabled people, as for instance hearing impaired or deaf people, cannot access or use all the digitally available resources unless they are designed in an accessible manner.
And the problem doesn’t lie within the handicaps themselves or the derived dependency of those who are affected but within how these handicaps and difficulties are handled by the society. And that is exactly where the new EU directive jumps in and initiates a shift towards more digital inclusion, towards more given accessibility instead of demand-based solutions – because the inclusion, as well as having equal opportunities and being able to participate in the day-to-day life is considered to be a basic human right.
As statistics show, there are more than just a few people that will benefit from the steps that are required by the directive: Around 80 million people in Europe live with a severe handicap and around 5% of the world’s population is hearing impaired. That adds up to over 360 million people.
But as already mentioned, these are not the only ones to benefit from measures concerning digital accessibility since a more accessible approach primarily means a more user-friendly approach.
With the new EU directive on digital accessibility regarding websites of public institutions’, a more inclusive Europe with a unified legislation on the mentioned topic is pursued. After the directive was put into force on the 22nd of December 2016, the deadline for EU members to implement the included objectives into national law was on the 23rd September 2018. The applicable standard for digital accessibility that has been established by the European Union within the EU 2016/2102 framework is the European norm (EN) 301 549 V 2.1.2. This refers to the level A and AA of the international standards of the web content accessibility guidelines (WCAG) 2.1 as valid minimum requirements in digital accessibility.
What exactly does digital accessibility mean?
Officially, accessibility meaning implies that all people, independently of their physical or mental condition, can equally access and utilize things and applications – without substantial difficulties or external assistance.
Digital accessibility is a more specific term. It refers to digital, often web-based, offers (Internet and Intranet), programs, operation systems, digital and mobile applications and file formats of office applications. All these things need to be designed perceivable, operable, understandable and robust in order to be considered accessible. All people, i.e. people with auditory and visual impairments, as well as people with physical, motor, cognitive and neurological limitations, must be able to have equal and independent access to all of the former mentioned offers.
Digital accessibility measures are not only targeted at people with handicaps, but they also benefit elderly people since, on one hand, they were not born as “Digital Natives” and on the other hand, age naturally leads to a decrease in certain abilities. Furthermore, also people with temporary limitations, i.e. for instance broken limbs, benefit from digital accessibility.

Learn more about digital accessibility
- Local digital accessibility legislation map
- The status of technology
- Leave your e-mail address to download the free eBook
The elephant in the room: what applies when and for whom?
The directive addresses public institutions, i.e. any federal, state, county or municipal institution such as public universities or political institutions.
As already mentioned, the minimum requirements regarding the level of digital accessibility are given in form of the European Norm EN 301 549, which in turn refers to around 50 criteria of the web content accessibility guidelines WCAG 2.1.
No matter how complex the national legislation can get, in the end the WCAG 2.1 standards are a reliable guide to achieve the minimum accessibility standards as required by the EU directive.
Please find the links to the mentioned standard and guideline here:
In the following you’ll find a summary of the most important measures and requirements:
All content and applications etc. have to be designed perceivable, operable, understandable and robust.
Text alternatives: For all content that is not text (i.e. for instance non-moving pictures, graphs or infographics) there has to be an alternative as for example large print, braille, speech, symbols or easy language. The according success criteria from the WCAG are the following:
- SC 1.1.1 Non-text content
- SC 1.3.1 Info and Relationships
- SC 2.4.4 Link Purpose (in context)
For time-based (pre-recorded) video and audio, transcripts and captions need to be available. Please find the exact requirements in the attached table below:
| Alternative text content | Subtitling/Captions | Audio description | Transcription | |
|---|---|---|---|---|
| Pre-recorded audio (only audio, e.g. podcasts) | Required | Not required | Not required | Required |
| Pre-recorded moving pictures (video only, e.g. animations without sound) | Required | Not required | Required if there is no transcription | Required if there is no audio description |
| Pre-recorded films (lecture capture, tutorials, learning videos, etc.) | Required | Required | Required, unless all visual information is also audible | Not required unless the film contains interactive elements |
The according to WCAG-success criteria are the following:
- SC 1.2.1 Audio or video-only (pre-recorded)
SC 1.2.2 Captions (pre-recorded media)
SC 1.2.3 Audio Description (pre-recorded media); - Content should always be presented in various ways (e.g. by an easy layout) without losing any information or structure;
- Content should always be presented in a way that it is easy to detect and read, e.g. by using high color contrasts or the possibility to increase the font;
- All features should be operable through the keyboard;
- Websites should always be designed in a way that they are predictable to use.
Watch the webinar about Digital accessibility and the legislation
Get a customized offer
Request a quote for your transcription needs
Additional mandatory measures
- Provision of a comprehensive, detailed and annually updated statement regarding the provided accessibility. This statement must be reachable from every page of the corresponding website.
- Provision of a possibility to easily and electronically get in touch (Feedback-Mechanism). This feedback-mechanism must also be reachable from every page of the corresponding website.
Staggered deadlines
23.09.2019: New websites, created after 23.09.2018, have to be accessible
23.09.2020: All other websites (intranets, extranets), and time-based media such as video and audio have to be accessible. This deadline is the most relevant to institutions that use media to support learning.
23.09.2021: All mobile applications have to be accessible
Read this guide to have a comprehensive overview on all applicable measures and requirements according to WCAG:
Conclusion
While the legislation around Digital accessibility can be perceived as a challenging task, or even as an operational hurdle, it is important to keep in mind the essence of the legislation: To take responsibility as a society for all citizens – including people with handicaps.
Eventually, all institutions and companies, be it public or private, benefit from making their (online) presence and offers accessible for anyone. But not only that – as already mentioned, the inclusion of all people in all parts of everyday life is also a basic human right and should not find an end anywhere. Furthermore: to become inclusive as an organization is not the job or the responsibility of one single person or department. Being digitally accessible is a process and has to be actively lived, integrated and coordinated from all sides.
In the end, the whole “digital accessibility” issue should not be considered a burden, but much more an opportunity! Ultimately we all benefit from the applicable measures since the basic meaning of accessibility is user-friendliness.
You might also be interested in reading:
– 3 Ways Automated Speech Recognition (ASR) can help to foster Digital Inclusion
Frequently asked questions
-
Do you offer audio description and other accessibility services?
Our focus is on speech-to-text solutions. We also have a vast network of people concerned with accessibility services, so please do not hesitate to contact us with any questions/queries.
-
How is the topic of Digital accessibility related to the EU legislation 2016/2102?
On the 22nd of September 2016, the EU published a directive on digital accessibility regarding the websites of public institutions.
The objectives included in the directive are to be implemented in each EU member state’s national law as of the 23rd of September 2018 and have come into effect. Public institutions are to conform to the European Norm (EN 301 549 V 2.1.2), which refers to a level “A” or level “AA” of the international standards of the Web Content Accessibility Guidelines (WCAG 2.1), as valid minimum requirements in digital accessibility.
To learn more about this topic, read our blog about Digital accessibility and WCAG 2.1 standards.
-
What does Digital accessibility mean for me?
Whether you are a public institution or not, it is always important to think about inclusivity in our society.
We can all help to make sure that everyone is part of the digital revolution, which is making our lives easier every day. In order to help those with visual, auditory, motor or cognitive disabilities, we can come up with solutions to help everyone enjoy the same content. Amberscript is providing software that provides such a solution: we convert audio/video files to text using our speech recognition software, running on an AI-driven engine. To find out more about our products, click here. -
What is Digital accessibility?
Digital accessibility is the ability of a website, mobile application or electronic document
to be easily navigated and understood by a wide range of users, including those users
who have visual, auditory, motor or cognitive disabilities. -
Why is Digital accessibility important?
Digital accessibility is important because it promotes inclusivity and ensures that everyone, regardless of any disability, can have access to the same information. As more and more services and processes in our society become digitalized, it is important to ensure that everyone can enjoy these services and processes. Digital accessibility has also become a topic of interest in European politics, so much so that there are now laws which make it mandatory for public institutions to make all their content understandable and readable for everyone.
-
What is WCAG 2.1?
WCAG stands for the Web Content Accessibility Guidelines. WCAG 2.1 is the latest version of these guidelines, which are intended to make the world’s digital environment more accessible for those with a visual, auditory, motor or cognitive disability.
How to record video calls on Zoom, Skype, Google Meet, Hangouts, or with your computer
Don’t want to miss anything about your video call? Here is how to record video calls with Zoom, Skype, Google Meet, Hangouts, and with your own computer.
Table of Contents
- Why it is inevitable to record your calls and meetings
- How to record a Zoom call
- How to record video calls on Skype
- How to record Google Meet or Hangouts video calls
- How to make a video recording from my computer
- How to transcribe your calls with Amberscript
Why it is inevitable to record your calls and meetings
Working from home, flexible working hours, or remote work are trends that Since it is simple to get an internet connection almost everywhere in the world, costly business travels are unnecessary. Empoloyees can work across borders with little to no effort, flexible work schedules are possible, and people may therefore easily juggle work and other responsibilities, such as family life.
While working from home may seem perfect, it may be difficult to coordinate communication across teams and throughout the entire organization. Online conferences and meetings are possible, but how does one spread information or training content to those that cannot be present in a video call at a particular time?
At Amberscript, we offer transcription and subtitling services by combining artificial and human intelligence. Our AI engine can create automatically generated transcripts from your meetings and calls that will help individuals save time and effort while still keeping a record of the most important information. Thus, to generate transcripts, you will first need to record your calls. Here are four guides on how to record your business meetings.
1. How to record a Zoom call

Recording calls is a feature available to all users on Zoom. Free users have access to local recording, meaning that the audio or video file could be saved locally to their computer, while paid users have the option to store it in the cloud.
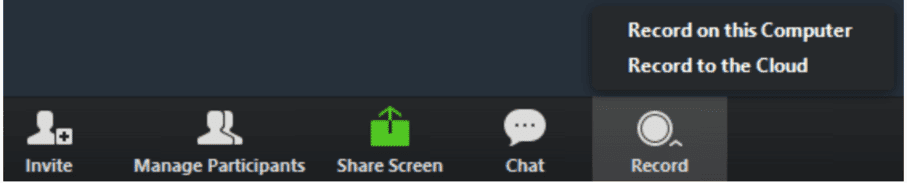
- Open a Zoom meeting
- Click on “Record” on the lower bar
- The recorded files can then be uploaded to Google Drive, your dropbox or uploaded to streaming platforms like Vimeo or Youtube.
Go to Zoom for more detailed instructions and features.
2. How to record video calls on Skype
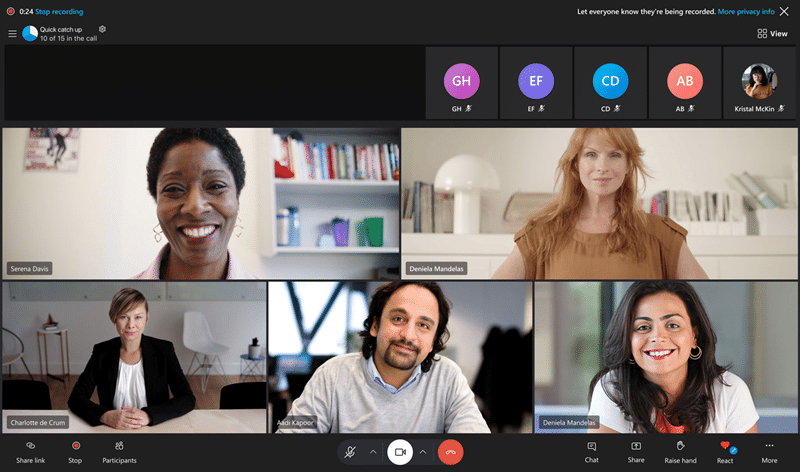
The recording function is only available for Skype to Skype calls (not when using skype to call a land phone number). One of the nice features of Skype is that the other speaker(s) receives a request for permission, so there is no need to verbally ask for consent. These are the steps to take to record and save your Skype call:
- Open a Skype Call
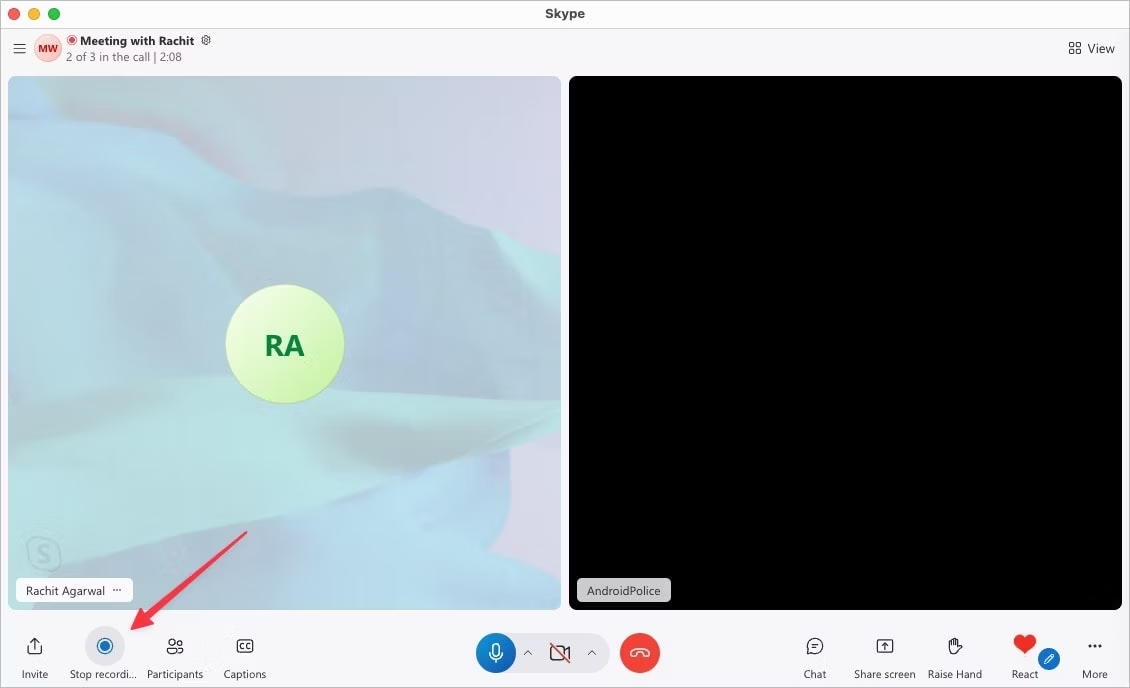
2. If you are on a desktop, click on Start Recording, for mobile users, you can tap on the Start Recording icon.
3. All people in the call will receive a pop-up announcing that the call is going to be recorded.
The recorded file will be kept in your chat for 30 days. If you want to keep it longer than that, you can download it and save it on your computer.
4. Files from Skype will be saved in an MP4 format.
Check out Skype information about recording (video) calls.
Get a customized offer
Request a quote for your transcription needs
3. How to record Google Meet or Hangouts video calls
Google Meet, Hangouts, or Chat?
Google has introduced some significant changes for users: Google Hangouts users will be eventually migrated to the new Google Chat platform. Right now only a few types of G Suite domains can record a Hangouts Meet. This is only available for Enterprise and Enterprise for Education. Classic Hangouts/video calls via classic Hangouts do not have a recording feature.
Can you record a Google Meet video call?
Yes, if you are using one of the Google Workspace editions mentioned in the official Google support article. But that’s not all – additional settings must be met, in order to be able to record a meeting with Google Meet. To record a meeting you need to make sure that a Google Workspace administrator has enabled the recording feature for your account. If it’s enabled you can record only if:
- You’re the meeting organizer
- You’re in the same organization as the organizer
Last but not least: Recording is only available from Meet on a computer. Mobile app users are notified when the recording starts or stops, but can’t control recording.
How to record a Google Meet call?
- Start or Join a meeting.
- At the bottom right of your screen, click Activities icon
Recording.
- Click Start recording button.
- In the window that appears, click Start.
- Wait for the recording to start. Other participants will be notified when the recording starts or stops.
- When you finish, click again on Activities
- In the window that appears, click Stop recording.
For more information about recording a video meeting please visit Google Meet Help.
If you do not have a G-Suite business account, you can still record the video calls by using a screen recording software.
4. How to make a video recording from my computer

1. Choose a method to record
- Option 1: use the media player on your computer
Whether you have Windows or Mac, you will need some type of software to record video and audio on your screen. The easiest way of recording your screen is using a media player, such as Quicktime Player (which is often already installed on Mac) or VLC Player. In both players, if you select “File” you will have the option to either “Start New Video Recording”, “Start New Screen Recording” or “Start New Audio Recording”. Select this option to start recording your entire screen, a part of your screen or simply the audio.
- Option 2: use a screen recording software
You can also visit the Google Playstore or iOS App Store to look for other screen-recording software. Generally, some recommended apps include Screen Record, Screen Capture or Screen Recorder Robot. These apps have additional features but have not yet proven to work better/worse than media players if all you want to do is record video or audio.
For Mac
For Windows
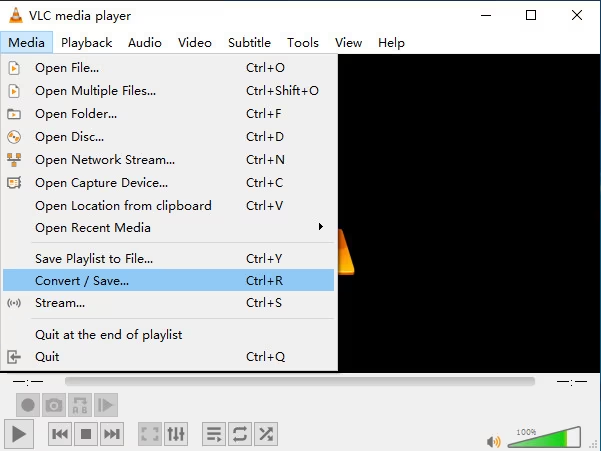
2. Record your video/audio
Depending on what you want to record, you need to select the right option. Once you have selected the option, a small window with control buttons will open. You can use this to start, pause and stop the recording.
3. Save and export your recording
Once you are done recording, you can hit the stop button in the controls window. Then press Control + s (command + s for Mac users), to save your recording and export it as an MP3 or MP4 file.
4. Keeping important bites of information
Did you learn how to record video calls? If you would like to have a written version of them, you can use a platform like Amberscript to transcribe, edit and save the most important information from the meeting in-text format. Text files are easier to keep than video and audio and information can be consolidated before shared.
You can use Amberscript to transcribe your video or audio file, the first 10 minutes are free!
How to transcribe your calls with Amberscript
Amberscript is a reliable AI-based transcription service and tool that creates subtitle files using the audio transcription. It also possesses the automatic subtitle generator that helps it get the best subtitle files you want in the quickest time possible. So here is how you get your SRT files using Amberscript.
- Upload your files to the Amberscript platform
- Choose your service: we offer machine-made and human-made transcription services
- In case you chose our machine-made service, let our AI generate your transcript in minutes
- Export your files in Word, JSON, Text, and many other formats.
Benefits of using Amberscript
Amberscript’s subtitle services are:
Fast
Edit your own text within minutes or leave the work to our experienced subtitlers.
Accurate
Our experienced subtitlers and thorough quality controls ensure 100% accuracy of your transcriptions and subtitles.
Easy
Thanks to a variety of integrations and API interfaces, you can fully automate your workflows.
Secure
Your data is in safe hands. We are GDPR compliant + ISO27001 & ISO9001 certified.
Frequently asked questions
-
Why is it important to record video calls?
Recording video calls ensures that information from meetings is preserved for future reference, helps disseminate information to those who couldn’t attend, and aids in creating accurate transcripts for documentation or training purposes.
-
How can I record a Zoom call?
To record a Zoom call, click the “Record” button at the bottom of the meeting screen. Free users can save recordings locally, while paid users can also save them to the cloud.
-
How do I transcribe recorded calls?
Upload your recordings to Amberscript, choose between machine-made or human-made transcription services, and export your transcript in various formats.
-
How do I record a Skype call?
During a Skype call, click the three dots to open the menu and select “Start Recording.” The recording is saved in the chat for 30 days, during which you can download it.
-
Is it possible to record Google Meet calls?
Yes, if you have a Google Workspace account with recording enabled by an admin. Start or join a meeting, click the “Activities” icon, then select “Recording” and “Start.”
-
How can I record video or audio from my computer?
Use built-in media players like Quicktime Player or VLC Player to record your screen or audio. Alternatively, use screen recording software available on app stores.
The best way to keep meeting notes and other working life hacks
Voice transcriptions, meeting notes from recorded audio, and phone call recordings can save you time and keep valuable information exchanged verbally more accessible. We will show you how to use technology to boost productivity while on home office mode.
Table of Contents
- Taking meeting notes efficiently – AI is here to help!
- Keeping track of information exchanged in phone calls
- Voice transcription – Make voice notes and keep the written record!
- Create Instructional Videos and Training
- How Amberscript can help to keep your meeting notes
Home office, flex-working, or working remotely: it is a trend that is taking many industries by storm and becoming applicable to more and more job situations. It is easy to find an internet connection in almost any corner of the world, meaning the need for expensive business trips becomes nearly obsolete. Colleagues can work across borders with little to no effort; it allows for flexible working hours; and therefore also allows people to easily combine their work with, for example, family life.
While a home office sounds pretty ideal, coordinating the communication within teams as well as company-wide could be tricky. Meetings and conferences may be held online, but who is taking notes? How does one keep a record of important phone calls? How does one spread information or training content to those that cannot be present in a video call at a particular time?
At Amberscript we build AI engines that enable users to automatically transcribe audio and video files to text files. Our software helps businesses and individuals to save time, and have an accurate written record of their verbal communication, whether that takes place in person or online. Here are four examples of how our technology can improve communication within your remote teams.
1. Taking meeting notes efficiently – AI is here to help!
Do you have 5 online meetings a day and no time to take notes? How can you easily get back to what was discussed in one of these meetings and retrieve valuable information?
Our suggestion is to record at least the important meetings and quickly transcribe it using an automatic transcription software. If you use software like Amberscript, the information will be available in text format and it can easily be stored.
Another advantage is that, by using our online Editor, you can search through the text, highlight, edit it, and quickly make a summary of the meeting to be shared with your colleagues.
The alternative is using templates for meeting notes but if you can use technology to save you time and have more accurate records of your discussions, then why not?
How to Record a Video Call on Zoom, Skype, Hangouts, or with your Computer
Don’t want to miss anything about your video call? Here is how to record video calls with Zoom, Skype, Google Meet, Hangouts, and with your own computer.
Learn more2. Keeping track of information exchanged in phone calls
While working remotely, you will probably need to make a lot more phone calls, to talk to your boss, a supervisor or a colleague. You might need to explain new working processes or onboard a new colleague. Everything that is said in these calls may be very important and difficult to remember as the conversation continues. If you record the phone call, you can upload the recording to Amberscript and get a textual transcript. In this way, you will not miss out on any important information.
Do not forget to get consent from the person on the other side of the line to record it!
3. Voice transcription – Make voice notes and keep the written record!
Do you like to brainstorm out loud but sometimes forget to take notes? Start recording your voice and simply upload the recording to Amberscript. Our tool lets you transcribe voice memos and is very easy. We will make sure that your thoughts are converted into notes and no good ideas are lost!
4. Create Instructional Videos and Training
In case you need to adopt new processes or onboard new employees, working from home may mean you will provide instructional videos or online training material. It might be hard for those watching the content to process all information. So why not provide the option for co-workers to upload the video or audio content to Amberscript, so they can have a textual version of the content? Saves time writing up long and detailed guides and manuals.
As you can see, there are many ways that our software can help make working remotely a little easier. Automating meeting notes, recording phone calls recording, and using voice transcription can provenly improve your work routine! So, head on over to our online tool and get your first 10 minutes of audio/video content transcribed for free!
Get a customized offer
Request a quote for your transcription needs
How Amberscript can help to keep your meeting notes
As we already mentioned above, one of the best ways to keep your meeting notes is by transcribing them. On the other hand, transcribing only 1-hour of audio can take up to 5-6 hours to manually transcribe.
What is a transcript?
A transcript is a word-for-word written record of what was said during a conference or consultation, and it’s used for various purposes. It may be requested for those with a hearing impairment, who don’t speak the language being spoken, or for those unable to attend the meeting in person. In addition, transcripts help keep track of who said what and at what time. Transcribing your meetings is extremely beneficial as you can easily keep all of the information.
How can you easily transcribe your meetings with Amberscript?

Luckily, there are companies, such as Amberscript that offer automatic transcription solutions. Amberscript’s software is highly accurate and can generate transcripts in as fast as 5 minutes for the highest efficiency. Are you interested in how you can easily generate transcriptions of your meeting notes with us?
- Upload your file(s) to the Amberscript platform
- Choose between automatic and professional (human) transcription.
- Choose the languages of your audio that best suit your needs (several languages are available including English, Portuguese, Spanish, Italian and French).
- Wait a few minutes for our software to transcribe your audio
- Export your files
With automatic transcription, our transcription software will create a first draft of your transcript in a short time. You can then view this and edit and perfect it in our intuitive online editor. Our automatic transcription software is already up to 85% accurate. However, it is still a machine and errors can occur, especially with proper names. To avoid these, you can also try our new Glossary/Dictionary feature!
Once you’ve finished post-editing and are happy with your transcript, you can export it in a format of your choice. Amberscript has all common file formats for import and export.
In case you would like to receive transcripts of up to 100% accuracy, you can always request a quote for our human-made transcriptions.
Additional guidelines
Would you like to know how to transcribe your meeting on different platforms? Read our detailed guides on the steps:
Frequently asked questions
-
What is the price?
For our prices, please refer to our pricing page.
-
How do I transcribe a Google Hangouts meeting?
To transcribe a Google Hangouts meeting, you will first need to record the meeting. Read more about how to record and transform a Google Hangouts meeting into an audio or video file on our blog. Once you generate the audio file, you can simply create an account, upload the file and transcribe automatically or order a manual transcription.
-
How do I transcribe a Skype meeting?
To transcribe a Skype meeting, you will first need to record the meeting. Read more about how to record and transform a Skype meeting into an audio or video file on our blog. Once you generate the audio file, you can simply create an account, upload the file and transcribe automatically or order a manual transcription.
-
How do I transcribe a Zoom meeting?
To transcribe a Zoom meeting, you will first need to record the meeting. Read more about how to record and transform a Zoom meeting into an audio or video file on our blog. Once you generate the audio file, you can simply create an account, upload the file and transcribe automatically or order a manual transcription.
-
What is transcription used for?
Transcriptions can make data recorded in audio (interviews, meetings, phone calls etc.) readable and easier to analyze. Transcripts and subtitles also make audio and video content accessible for the deaf and hard of hearing, and allows video content to be indexed for SEO.
An easy introduction into setting up a digital accessibility strategy
For organizations of all sizes, it’s becoming increasingly important to ensure that their content is accessible to all users, and have a robust digital accessibility strategy in place. By having a digital accessibility strategy, you’ll have a step-by-step, internal guideline that ensures all users, regardless of ability, will be able to receive the knowledge that you’re communicating.
More precise rules and regulations are defined in the EU directive 2016/2102 and US Workforce Rehabilitation Act of 1973, Section 508. Although these rules are mandatory only on the governmental or federal level, individuals and businesses in the private sector are encouraged to adopt them to support the good cause.
Watch our webinar video, where our co-founder Thomas Dieste explains the implications of the legislation on the publication of video and audio. In this webinar Thomas tells how modern technology, such as automatic speech recognition, can help in creating subtitles while staying within budget and tight deadlines.
How to address a Digital accessibility Strategy?
There are 3 steps to ensure that your Digital accessibility Strategy is successful:

1) Build awareness in your organization
If you want people to change their routine way of working and start thinking about the disadvantaged users – you have to raise awareness of this issue. There are a few ways to spread the message across your coworkers:
- Organize workshops
Introduce your colleagues to the subject of digital accessibility by running workshops and tutorials. You can cover all the important topics in about 30 min, but this will be enough to convey the message.
- Include digital accessibility articles in your corporate newsletter
Simply look up some good resources, that talk on this topic and send them to your colleagues, who are in charge of content creation.
- Print one of those articles or policies and stick them to the news boards around your office.
The old-fashioned way is definitely not a bad way to do it.
2) Use the Following Strategy to Comply with Digital accessibility Standards
- Make your visual content descriptive
That’s very easy to do! Just make sure to add alt tags to your images. Usually it’s a brief description of what’s displayed on the picture. (125 characters or less). If your images are complex graphs, diagrams and anything as such – provide a description under the image.

Example: Let’s say we want to look at the GDP of the U.S.A. in the last few years. Below you can see the graph and a short description, highlighting the main take-away.

GDP of the United States has risen from $18.7 trillion in 2016 to $20.49 trillion in 2018
- Add subtitles to your video content.
Millions of videos are being watched every day. Subtitling your videos has a number of benefits, including accessibility compliance. Here’s a link to our blog post, that describes how to add subtitles to your videos automatically, using our speech-to-text software.
- Provide transcripts for your audio content.
With new technologies it has become very easy to transcribe audio files – interviews, recordings, podcasts and so on. For Amberscript it works in the following way: upload an audio file, make some quick adjustments and export your document.
Besides increased accessibility, it’s much easier to navigate and find relevant information in text documents, which makes transcription a smart thing to do.
- Structure your content in a clear, logical way
People with poor vision have a much harder time navigating through the web, compared to regular consumers. Thus, make sure that you use headings and include a table of contents (when necessary) to bring a neat structure to your content.
- Provide link description
Blog posts usually include a high number of hyperlinks, both internal and external. Make sure to describe where the page is going to take the user before inserting a link. This will add value to user experience, as people won’t have to guess whether your link is relevant to them or not. Again, for people with disabilities, it’s not that easy to find relevant information on the webpage.
- Check whether your website is accessible to color-blind users.
There is an online tool called “Check my colours”, that might assist you in the process. Just copy-paste the URL of your website, and this website will run a check on the main criteria for color accessibility: contrast ratio, brightness difference and color difference. In case you want to learn more on how to approach visuals of your website for accessibility, this post on Improving the Color Accessibility for Color-Blind Users features a good guideline.

3) Enforce Digital accessibility standards in online and digital content
Now that you’ve developed a great action plan – all you need to do is make sure that it’s being implemented in the right way. You can assign a person within your organization, who would monitor the accessibility of the website and its content.
Digital accessibility services
Amberscript proudly supports digital accessibility strategies by providing high-quality automatic transcription and subtitling.
Legal Transcription: When and why you might need it?
In recent years, the need for accurate and timely legal transcription has increased. Despite its acceptance, some misunderstandings exist. What exactly is it and why is it so critical? Here’s everything you need to know about legal transcription.
Lawyers, judges, and other professionals in the field often work with large amounts of audio and video recordings. Witness statements, legal agreements, video interviews – here are just a few examples of these recordings. Nowadays, audio and video recordings are transcribed into text, either by legal transcribers (called “court reporters”) or automatically, using speech-to-text software.
WARNING: This post is written with an informational purpose and should not be considered legal advice (!).
Table of contents
- What is legal transcription?
- Transcription in law offices – what is it commonly used for?
- How is transcription used for legal documentation?
- The benefits of legal transcription
- Legal transcription: human-made or machine-made
- The benefits of using transcription tools for lawyers
- Things to consider before ordering a legal transcript
What is legal transcription?
Legal transcription is the conversion of any legal and audio material into text format. In the legal field, transcription can be applied in several ways, including:
- Recordings of official meetings and court hearings are transcribed or captioned.
For public affairs, this is required by the new EU policies on digital accessibility. Transcripts are also used in private legal hearings, particularly to make it easier and faster to view and analyze evidence. For example, you can search for a particular word mentioned in the recording and immediately see when and in what context it was spoken.
- Lawyers can use transcripts as legal documents.
Again, audio/video evidence is much easier to examine when it is in text form. This way, there is no need to go back and watch the video or listen to the recording several times, but just do it once and then produce a transcript or automatic subtitles.
Transcription in Law Offices – What is it commonly used for?
Transcription is a vital tool in law offices as it allows attorneys and other legal professionals to create accurate and detailed records of speech that can be used in a variety of legal contexts. For example, transcription may be used to document witness statements, depositions, hearings, and other legal proceedings. These transcripts are often used to prepare legal briefs, motions, and other legal documents, as well as to review the testimony of witnesses and other parties involved in a case.
Transcription is also important for creating accurate and comprehensive records of meetings, negotiations, and other important discussions that occur within a law office. These transcripts may be used to track the progress of a case, document agreements reached between parties, or provide a record of important decisions made by legal teams. Additionally, transcription can be used to create transcripts of audio or video recordings, such as surveillance footage or phone calls, which can be used as evidence in court.
Transcription can also be used to document communications with clients, ensuring that all parties have a clear and accurate record of any agreements or decisions made during the course of representation.
How is transcription used for legal documentation?
Transcription is often used for legal documentation as it provides a detailed and accurate record of words that can be used as evidence in court or other legal proceedings. For example, court reporters use specialized software and equipment to transcribe the words of judges, attorneys, witnesses, and other parties involved in a legal case.
These transcripts are often used to create official records of court proceedings, which can be used by attorneys to prepare for trial, by judges to make rulings, and by appeals courts to review decisions. Transcripts may also be used to resolve disputes over what was said during a deposition or other legal proceeding, or to provide a written record of a settlement agreement. Overall, transcription is an essential tool for legal professionals who need to create accurate and reliable records of words for use in legal proceedings.
The advantages of legal transcription
Many lawyers are aware of the benefits of expert legal transcription. This greatly increases productivity, and workers have more time to focus on their core tasks.
Most expert legal transcription also includes timestamps and speaker identification, which helps lawyers develop their cases.
Legal transcripts lend greater precision to the presentation of evidence. In addition, this format makes it easier to highlight crucial details. Digitally saved legal transcripts are easier to organize and highlight. In addition, you can quickly find what you are looking for with the click of a button.

Learn more about our legal transcription services
Learn moreLegal transcription: human-made or machine-made
In general, you have two options: hire a company to produce transcripts for you or use an automated transcription service, such as Amberscript. Both choices have their advantages, which you can examine in the table below (look at the parts marked with an X):
| Feature | Human-made | Machine-made |
|---|---|---|
| Faster turnaround time | X | |
| Higher accuracy | X | |
| Privacy | X | |
| Legal jargon | X | |
| Legal compliance | X | X |
You should choose between human-made and machine-made transcription based on your priorities. If you want to make sure that you are the only human being reviewing your files, you should rely on automatic transcription tools. Sometimes it is difficult for software to transpose legal jargon, but you can always make these small changes yourself. For common language, our tool achieves 90% accuracy.
Request a quote
The biggest advantage of hiring a transcriber is that you will receive a 99% accurate transcript without the need to make changes. Compared to automated transcription, however, it takes days instead of a few minutes.
Do you need a legal transcription? Amberscript’s transcription service is accurate, fast and easy to use! If you have any questions about the way we work, please feel free to contact us. Do you want to try it for free? Then click the button below and enjoy 10 minutes for free!
The benefits of using transcription tools for lawyers
Transcription tools are a valuable asset for lawyers and legal professionals, offering a range of benefits that help improve the efficiency and effectiveness of legal processes. Here are some key advantages of using transcription tools in legal settings:
- Versatility: Transcription tools can transcribe a variety of audio and video recordings, including phone calls, meetings, depositions, and court hearings, making them a versatile tool for legal professionals.
- Compliance: Transcription tools can help ensure compliance with legal and ethical requirements, such as providing transcripts of legal proceedings to all parties involved in a case.
- Collaboration: Transcription tools can facilitate collaboration among legal teams, allowing them to share and review transcripts of legal proceedings and discussions.
- Efficiency: Using transcription tools can improve the efficiency of legal processes by reducing the time and resources needed to create accurate and detailed transcripts of legal proceedings.
Things to consider before ordering a legal transcript
- Accuracy in transcription – for official matters, transcripts must be very accurate. Otherwise, you run the risk of running into legal problems.
- Professional jargon – there are many specific terms in the legal field that are familiar to professionals, but not to software.
- Turnaround time – keep in mind when you need the transcript to be ready.
- Privacy – all transcribers are required to sign a non-disclosure agreement (NDA). In any case, many people prefer to review their files themselves without third-party involvement.
- Compliance with the law – any way of producing a transcript is legal, as long as it is accurate and secure.
Benefits of using Amberscript
Amberscript’s transcription services are:
Fast
Edit your text in minutes or leave the work to our experienced transcribers.
Accurate
Our experienced transcribers and thorough quality controls ensure 100% accuracy of transcripts and subtitles.
Easy
Through a series of integrations and API interfaces, you can fully automate your workflows.
Secure
Your data is in safe hands. We are GDPR compliant + ISO27001 and ISO9001 certified.
Frequently asked questions
-
Can I add a glossary with specific words to the transcription job?
Yes, we also offer specialized transcription, which can include jargon or specific vocabulary. To learn more about this or discuss specifics, please contact us.
-
Can you also deliver transcriptions for other media formats?
We deliver data annotation for speech-to-text solutions. However, if you have a special request, please contact our sales team here.
- Do you offer transcription services of pre-recorded files?
-
Do you provide legally trained transcriptionists?
Yes, we do. If you need a legally trained transcriptionist, please contact us via here.
-
Do you provide full verbatim or clean read transcripts?
In the manual transcription service, we provide both transcription types.
Homework and College Hacks (Do‘s & Don’ts)
Homework and college hacks that will make your life easier (without getting you in trouble). In our digital age, you can hire a company or a freelancer to do practically anything for you. No surprise that a lot of students outsource some of their assignments to 3rd parties. While there is nothing wrong with a wish to save time, be aware that outsourcing vital parts of your assignment can have consequences.
Let’s discuss the do’s and don’ts of when simplifying your life a student.
Table of contents
Homework and College Hacks – Do’s:
1. Transcription
Phew! This is a load off! You don’t have to transcribe interviews yourself, you can easily dedicate this task to professionals like Amberscript. Not only it saves you a lot of time but also keeps you focused on tasks that require most of your attention.
About Amberscript
There is an easy way to convert your audio and video to text: via Amberscript. Amberscript will allow you to get accurate and simple transcripts of your audios to help you better understand your data. Here’s how to create transcripts with Amberscript.
- Upload your video to our easy to use platform.
- Choose whether you want Machine-Made or Human-Made transcriptions to turn your video into text
- Edit the transcription to make it more accurate. You can easily make any changes in our cloud-based editor.
- Export the file. Whatever format you need, we’ve got you covered: docx, .txt, .srt, .json, .vtt, or EBU.STL
2 . Proofreading
Just finished writing your paper and want to make sure it’s error-free? Great, because having someone else proofread your work is not an issue. You can outsource this task to a 3rd party, so they can check your grammar, spelling, language style, etc.
Be advised, that proofreading refers to minor adjustments and recommendations, but not writing blocks of text or restructuring your entire work!
Instead of hiring a freelancer or a company, you can check grammar issues using software like Grammarly. Or if you have friends who happen to be native English speakers, just ask them to help you out! Buying beer to your friends is certainly cheaper than hiring a company!

3. Translation
Having someone else translate your work is totally legal and fine. Just make sure to mention that your thesis/ research paper was translated by a 3rd party. Also, make sure to double-check that all the citations are still in the same places as in the original version.
Homework Hacks and College – Don’ts:
1. Writing
Never ever let a 3rd party write an entire paper for you since this is plagiarism! There are a lot of websites that offer writing services: anything from college essays to entire theses. One problem with that… it’s a theft of intellectual property and your degree can be declared invalid if someone finds out. Why? Because writing is an essential part of any research, thus it can’t be outsourced.

2. Literature Research
Strictly speaking, you can ask someone to compile a list of relevant literature for you. However, it’s actually not what you want! Literature research is a very specific process that you might want to handle yourself.
Why? Because there are thousands of articles, books, and publications available online, and when you segregate and filter them you delve deeper into the subject of your research. In other words, the more you research, the more you learn, the better idea you have of what’s relevant and what’s not.
You can start your literature research by searching for publications containing your target keywords in Google Scholar (you can also filter the results by author/ language/ year etc). Then, read the abstract and mark the papers you find interesting and useful.
Last, simply search for those full-length articles in one of many digital libraries, like JSTOR.
As you can see, doing it yourself is not even that complicated!
As you can see, doing it yourself is not even that complicated!
We hope that now you’re aware of what assignments you can outsource. These can be valuable college and homework hacks, as long as you know how and when to use them!
Find out how to be productive working from home!

Frequently asked questions
-
Can I burn the subtitles directly onto my video?
If you have exported the transcript as a SRT, EBU-STL or VTT file, you can easily burn them onto your video using video-editing software.
-
Can I export my files with timestamps?
Yes, you can. The transcript always includes timestamps in our online editor and you can choose to export the file with or without timestamps.
-
Will different speakers be distinguished?
Yes, our software indicates different speakers and when the speaker changes.
-
What subtitle file formats are supported?
Our software allows you to export the transcript from the video or audio file as an SRT, EBU-STL or VTT file.
-
Can I translate my subtitles and transcriptions via your app?
No, translation is not available in the automatic services but you can order translated manual subtitles services on our platform. Unfortunately, we do not offer translated manual transcriptions. Please check our prices here.
-
Can I use an external microphone?
Yes, you can plug in an external microphone to your mobile phone to conduct interviews or record lectures. This is recommended to increase the quality of the audio and the accuracy of the transcription.
-
Can I burn the subtitles directly onto my video?
If you have exported the transcript as a SRT, EBU-STL or VTT file, you can easily burn them onto your video using video-editing software.
-
Can you also deliver transcriptions for other media formats?
We deliver data annotation for speech-to-text solutions. However, if you have a special request, please contact our sales team here.
Top 4 digital transformation trends in education for 2024
The COVID-19 crisis sped up some existing trends in the digital transformation of education. The good news is, even before students went on lockdown, 60% of students felt that digital learning technology has improved their grades, with a fifth saying it “significantly” improved their grades – according to the Digital Study Trends Survey by McGrawHill
Table of Contents
The impact of digital transformation trends in education
Even before the coronavirus crisis, digital technologies were transforming education at an incredibly high pace. All stages of the learning process changed dramatically thanks to digitalization. These digital transformation trends can be leveraged to help students who were suddenly pushed to remote learning.
Traditional classrooms, print books, and the “one size fit all” approaches to learning are history now. Modern universities adopt more and more innovative digital solutions to improve the students’ learning experience.
Let’s have a look at top digital transformation trends in education:

1. Gamification & Game-based learning
What was a dream for many 10 years ago is now becoming increasingly common – playing games as a part of a learning journey. And it’s not limited to schools, you can also see how universities and corporates use games for educational purposes.
Textbook reading is often criticized as being a passive learning method that mainly requires memorization. Game elements in education are meant to foster active learning through experimentation and competition.
Gamification refers to solely adding game elements to traditional learning methods (leaderboards, badges, point-ranking systems), while game-based learning is literally learning through playing a game.
CodeCombat is a great example of game-based learning. It’s meant to teach you how to code while playing an RPG game. No surprise that this game is so popular among beginner coders in the US.
Duolingo is an example of the gamification of a learning process. Duolingo makes learning new languages fun by introducing game elements to it, that only entertain, but also motivate you to try harder.
Part of the success of Duolingo is that it relies on microlearning – another trend in education. Microlearning refers to studying in short bursts instead of long hours. This way of learning is not only effective but also fits the digital era – you decide when you want to study.
Learning a new language in public transport was beyond imagination 50 years ago, but today it’s nothing extraordinary.
2. Audiovisual Media
Text-based content is not necessarily dead, students are still expected to read a lot.
However, visual content is taking over and replaces textbook reading more and more.
Professors already show movies and YouTube videos in their lectures. And.. the lectures themselves are getting recorded.

P.s – captioning greatly benefits your video lectures and is required by the EU law.
Universities like Wageningen University already use Amberscript to create accurate captions.
3. Remote Learning
This trend has been coming for a long time and it’s becoming bigger than ever. Lectures are recorded, workshops are not mandatory, all of the homework materials are accessible online and the list goes on…
Flexibility is an ongoing trend in the learning and it’s not going to disappear anytime soon. Whether e-learning will entirely replace traditional learning in the future remains to be seen.
4. Peer-to-peer learning / social learning
Social elements of learning have been given a lot of attention in the last few years. Group-based projects have already become an essential component of many courses taught in Universities.
What does it have to do with digitalization? Student portals, as well as social media channels, are used to promote peer-to-peer learning and collaboration among students. This is done by means of creating specific forums, Facebook groups, and so on.

We hope that now you’re aware of what impact digital technologies have on our current educational system. Feel free to come across our blog for more thought-provoking content!
Frequently asked questions
-
Can I burn the subtitles directly onto my video?
If you have exported the transcript as a SRT, EBU-STL or VTT file, you can easily burn them onto your video using video-editing software.
-
Can I change the position of the subtitles?
That needs to be done using a video editor like VLC. Go to Tools > Preferences [CTRL + P]. Under Show settings, select the option that says All to switch to the advanced preferences. Navigate to Input/Codecs > Subtitle codecs > Subtitles. Under Text subtitle decoder set, the Subtitle justification to left, right or center.
-
What subtitle file formats are supported?
Our software allows you to export the transcript from the video or audio file as an SRT, EBU-STL or VTT file.
-
Are there mandatory working hours and do I have to work a minimum amount of hours each month?
No. You determine when you work and how often you work. However, keep in mind that when you accept a job, it needs to be submitted before the set deadline.
-
How do I add subtitles to a YouTube video?
To add subtitles to your Youtube video, simply add the file you have created using Amberscript to your video in the Youtube Studio. Click on “subtitles”, then “add” and finally “upload file” and select the SRT file.
-
How can transcription be used to make subtitles?
Using Amberscript the video file can be transcribed, either by humans or our AI. We automatically create a subtitle from the text, in which you can change some parameters. The subtitles and parameters can be seen by clicking next to the text on ‘show subtitle preview’. Then the transcript can be exported in any of the popular subtitle formats, such as SRT, EBU-STL or VTT and the file can be played with the video.
-
How do I generate captions?
You can generate captions automatically using Amberscript. Our software allows you to export transcription based on audio/video files as SRT, EBU-STL or VTT files, which can easily be inserted into a video-editor. Want to know more? Here is a step-by-step guide.
10 best research tools every scholar should use
There were times when those interested in research had to spend hours in the library searching for the right literature. Modern researchers are equipped with a range of digital tools. Here you can find a list of the best citation, statistics, transcription, survey, project management, and plagiarism software. Most of them are free!
We’ve compiled a list of the best digital research tools on the market. Endorsed by thousands of researchers all around the world.
Moreover, if you’re not impressed by our picks, we’ve also included some Honorable mentions. This way you can quickly check out the alternatives.
1. BEST CITATION SOFTWARE – ENDNOTE

This was a tough choice. There are three big players in the citation software market.
We choose EndNote only because it provides some advanced functions. However, competing products are better in other domains. One of them is visuals. EndNote looks outdated and you’ll definitely have to watch a tutorial or 2 on how to use it.
Zotero is extremely user-friendly and has an extension for Chrome to cite web content.
Mendeley offers a social network, where researchers can communicate & collaborate.
Honorable mentions: Zotero, Mendeley.
2. BEST STATISTICS SOFTWARE – SPSS

SPSS is used by thousands of students and researchers worldwide. It offers many functions for advanced statistical procedures, such as factor analysis, ANOVA.
Moreover, you can import data tables right from Excel and run tests. Also it allows you to quickly visualize your quantitative data with plots, charts, and graphs.
Lastly, the interface definitely isn’t striking, but at least it’s not difficult to orient around the software!
Honorable mentions: STATA, Number Analytics, JASP
3. BEST SURVEY PLATFORM – QUALTRICS
There are many platforms that allow you to create surveys. Qualtrics is one of the most popular tools among universities. It comes with a wide range of functions and allows you to do virtually anything with regard to data analysis. The interface is also quite intuitive. The only downside is – it’s super expensive, that’s why it’s mostly used by universities and big organizations.
Honorable mentions: Google Forms, SurveyMonkey
4. BEST OCR (OPTICAL CHARACTER RECOGNITION) SOFTWARE – FREE ONLINE OCR
OCR is a straightforward technology that can potentially add tons of value to your workflow. Although most content (as well as literature) is available online, there will be a few occasions where you’ll have to work with real paper-based books or hand-written texts.
OCR allows you to convert written or printed text into encoded text that you can copy, paste, edit, etc. There are hundreds of tools out there, but they all provide the same basic functions.
Free Online OCR is very simple to use.
5. BEST PROJECT MANAGEMENT SOFTWARE – MIRO

If you’re looking for a tool that would allow managing tasks, to-do lists, and projects – there are many options available.
Many people are wondering why Trello is not our first recommendation. Although Trello is nice and user-friendly, when it comes to visuals – Miro is just one step ahead.
You can literally visualize everything and make your whiteboard look exactly the way you envision it. Something that Trello desperately lacks.
Honorable mentions: Trello, Monday.com
6. BEST PLAGIARISM SOFTWARE – TURNITIN
You all know how big of a deal is plagiarism in the academic world. But how does plagiarism software work?
Turnitin is known as the most sophisticated plagiarism detection software out there. It uses certain machine learning algorithms (such as Natural Language Understanding), which makes plagiarism detection very accurate. The downside is the same as for Qualtrics – only businesses and universities can afford a license.
Honorable mentions: Grammarly, BachelorPrint, Quetext
7. BEST SOCIAL NETWORKING WEBSITES FOR RESEARCHERS – RESEARCHGATE

ResearchGate replaces Quora, Facebook, and LinkedIn for scholars.
You can ask questions, write peer reviews, and even apply for research-oriented jobs. All in one platform.
Honorable mentions: Mendeley, Academia.edu
8. BEST LITERATURE SEARCH ENGINE – GOOGLE SCHOLAR

Where to search for relevant articles? Google it. Google Scholar is a search engine dedicated to academic publications.
Google indexes millions of articles and provides very accurate search results.
You can also use it to download citations/search for authors etc.
Honorable mentions: Microsoft Academic, Scinapse, Semantics Scholar
9. BEST QUALITATIVE CODING SOFTWARE – QDA MINER
After you transcribe an interview, the next step will be to analyze your qualitative data.
Again, plenty of tools to choose from.
We stick to QDA Miner because it’s free and very simple-to-use.

You can check out our tutorial on qualitative coding, where we show the basics of QDA Miner Lite.
Honorable mentions: MAXQDA, Atlasti
10. BEST TRANSCRIPTION SOFTWARE – AMBERSCRIPT
Transcribing interviews manually can be a real pain. Luckily, there are online transcription tools that do the job for you.
Amberscript is not the only transcription software out there. Above all, it has one of the highest accuracy rates and it is adapted to a wider range of languages than its competitors. You do not have to take our word for it, you can try it for free! Works very intuitively, quickly, and performs transcription in multiple languages.
What kind of transcription services does Amberscript offer?
- Machine-made transcripts for fast turnaround time in 39 languages
- Human-made transcripts for up to 100% accuracy in 15 languages
Find out how to save time with research interviews!
Get a customized offer
Request a quote for your transcription needs
Frequently asked questions
-
Can I burn the subtitles directly onto my video?
If you have exported the transcript as a SRT, EBU-STL or VTT file, you can easily burn them onto your video using video-editing software.
-
Can I change the position of the subtitles?
That needs to be done using a video editor like VLC. Go to Tools > Preferences [CTRL + P]. Under Show settings, select the option that says All to switch to the advanced preferences. Navigate to Input/Codecs > Subtitle codecs > Subtitles. Under Text subtitle decoder set, the Subtitle justification to left, right or center.
-
How do I order translated subtitles?
To order translated subtitles, you can upload your file like you would normally do. You can then select manual subtitling. Once you have selected this, an option will appear where you will be able to select the language the subtitles need to be translated to. If the language that you want is not one of the options you can contact us through our contact form.
-
What subtitle file formats are supported?
Our software allows you to export the transcript from the video or audio file as an SRT, EBU-STL or VTT file.
-
How do I generate captions?
You can generate captions automatically using Amberscript. Our software allows you to export transcription based on audio/video files as SRT, EBU-STL or VTT files, which can easily be inserted into a video-editor. Want to know more? Here is a step-by-step guide.
-
How do you keep my files secure and confidential?
Amberscript’s IT infrastructure is built on the server infrastructure of Amazon Web Services located in Frankfurt, Germany. All data that is processed by Amberscript will be stored and processed on highly secured servers with regular back-ups on the same infrastructure.
-
In which formats can I export my subtitles?
Our software allows you to export the transcript from the video or audio file as an SRT, EBU-STL or VTT file.
-
What is the price?
For our prices, please refer to our pricing page.
-
What is the turnaround time?
Our state-of-the-art speech AI delivers results in less than an hour (depending on the size of the file, it can take only takes a few minutes). Just upload your audio into our system and we will notify you as soon as the file is ready! if you would like to learn about turnaround times for our manual subtitling services, click here.
8 tips to get the most out of your business meeting
Feeling anxious about an upcoming business meeting? So many things to discuss and so little time? If that’s the case – we totally empathize with you! This is why we’ve prepared a list of practices that will help to organize productive meetings.
Table of Contents
- What are the rules for conducting a sucessful business meeting?
- More advice to keep your business meeting effective
What are the rules for conducting a sucessful business meeting?
1. Have a clear structure in mind before the start of your business meeting.
You can make a table of contents and put it in your slides or draw a simple schema on a whiteboard. Whichever way you prefer, the most important thing is that everyone knows what is going to happen and when.
2. Keep everything brief and concise.
Sounds so obvious and simple to do, yet very few of us follow this advice! Limit individual speeches to 1-2 minutes. Meetings are NOT supposed to be individual pitches or monologues. Also, when you share your opinion – move straight to the point. “Time is money” – they say. Remember that and don’t waste time on minor details, that everyone will forget immediately.
That’s not it… a well-planned meeting should take about 30-45 minutes. If your meeting is too long, you’ll only tire people and make them lose their attention. If you want to know why – read this article about the magic of 30 minutes meetings.
3. Don’t abuse PowerPoint and similar tools.
If you need to present something, remember, that slides are meant to be your visual aid. Very often we see that people take it too far and put large chunks of text in their slides. What’s even worse is that they simply read the text of the slides! Slides should include as little text as possible. Focus on visuals: pictures, graphs, tables, etc.
Here is an article that describes how to create appealing PowerPoint presentations.
Benefits of using Amberscript
Amberscript’s subtitle services are:
Fast
Edit your own text within minutes or leave the work to our experienced subtitlers.
Accurate
Our experienced subtitlers and thorough quality controls ensure 100% accuracy of your transcriptions and subtitles.
Easy
Thanks to a variety of integrations and API interfaces, you can fully automate your workflows.
Secure
Your data is in safe hands. We are GDPR compliant + ISO27001 & ISO9001 certified.
4. You also need to summarize the content of your business meeting.
You can choose the old-fashioned way and take notes with pen & paper. Alternatively, you can record your meeting and transcribe it with Amberscript. Although transcribing provides a much detailed record, don’t cross out note-taking just yet!
A transcript is a document that captures the content of the whole meeting, while your notes will be your main take-home messages. Not only that, but speech overlap and noise (usual problems of group meetings) make it hard for software to recognize words.
That’s where your notes are going to be helpful to make adjustments to your transcript or recover any lost information.
Read more about transcriptions
- What is transcription?
- What types of transcriptions are there?
- Transcribing yourself or outsourcing?
- An efficient process for transcribing
+1. Transcribe with Amberscript
- Create an account
- Upload your file
- Inform the number of speakers and the language in the audio
- Select the transcription type (Amberscript offers human-made and machine-made transcriptions).
- If you selected the machine-made transcriptions, your file will be ready in a few minutes. If you prefer 100% accurate transcripts, select the manual service and your text will be ready in up to 5 business days.
- You can now edit the file if you want, fixing minor mistakes, highlighting the most important parts, and changing the name of the speakers. This step is important to adjust your content to the reading experience. If you are using the automatic transcription service, you can remove the repetitions and shutters yourself. If you prefer to outsource it, you can hire our manual transcription services and order the “clean read” style. Learn more.
- Export your file in a text format. You can choose to include the timestamps or omit it.
- Done!
More advice to keep your business meeting effective
5. Don’t invite too many people.
More people doesn’t mean that more things will get done. Let’s take a real-life example. You’ve probably noticed, that when working in a team of 2-3 people- you’re all engaged in a discussion and follow along with each other.
Now, what if you would be working with 10 people? Groupthink would be inevitable, individual performance would go down and responsibilities would become less clear. The same logic applies to business meetings. If you want a discussion, where everyone participates and shares his opinion – you can use the “2 Pizza Rule”.
This rule was endorsed by Jeff Bezos, the CEO of Amazon. It states that if a team can’t be fed with 2 pizzas – then the size of a team should be reduced. Of course, that oversimplifies real-life cases, but you get the idea. When possible, organize a meeting among 5-8 people.
6. Play the game.
You can play Phone Stack, the rules are simple. You gather all the smartphones at a certain place in the room. Whoever takes his/ her phone first, must order food & drinks for everyone.
This game is usually played in restaurants, but a meeting is also a social activity! This is a great method to demotivate people to distract on their phones, instead of following the meeting.
7. Create online votes.
Use Shakespeak! It’s very simple to set up, keeps your audience engaged and in case the subject is controversial – all votes can be made anonymously. Not to mention that it integrates with PowerPoint, so you can also create a vote right in your slides.
8. Prepare a follow-up message for all who attended
Firstly, thank everyone for their effort and participation. Secondly, share your notes or transcripts with your colleagues. It will not only ensure that everyone’s on the same page but will also serve as an additional reminder to work on things, discussed during the meeting.
Lastly, you can use some of the existing templates to send your follow-up emails. Take a look at some examples, provided by HubSpot.
We hope that you’ve picked up some nice tips that will help you organize effective business meetings. Good luck!
Frequently asked questions
-
What subtitle file formats are supported?
Our software allows you to export the transcript from the video or audio file as an SRT, EBU-STL or VTT file.
-
Can you transcribe audio with foreign accents?
Yes, our software is constantly being trained to pick up on accents and know how to understand them. Want to know more about how this works? Read it here!
-
How do I transcribe a Skype meeting?
To transcribe a Skype meeting, you will first need to record the meeting. Read more about how to record and transform a Skype meeting into an audio or video file on our blog. Once you generate the audio file, you can simply create an account, upload the file and transcribe automatically or order a manual transcription.
-
How do I transcribe a Zoom meeting?
To transcribe a Zoom meeting, you will first need to record the meeting. Read more about how to record and transform a Zoom meeting into an audio or video file on our blog. Once you generate the audio file, you can simply create an account, upload the file and transcribe automatically or order a manual transcription.
-
Do you offer services in other languages?
Yes, we do. Our software supports 39 different languages and we manually transcribe through our network of professional transcribers in 15 different languages, but if you have a request for another language please contact us through our contact form.
-
How do I convert my files to something that is quicker to upload?
In general, all audio formats are transcribed at a similar speed. Some video formats however, can take some more time. Therefore, to get a faster transcription using our software, you can convert your video file to an audio file. Please note that there is a limit of 4GB for the size of the file.
9 Reasons Why You Should Transcribe Conferences
Are you organizing a conference, seminar, business meeting or any other event aimed at knowledge exchange between people? There are plenty of online tools available at your disposal to get the most out of your conference. You can use LinkedIn for networking or quicky create an online vote via Shakespeak. Today, we’re going to talk about a less mainstream practice that is getting popular – transcribing your conferences.
Table of Contents
- Why Would You Transcribe a Conference?
- The benefits of machine-made transcription
- Machine-Made Transcription with Amberscript
Why Would You Transcribe a Conference?
- Inform those who didn’t attend
Unfortunately, there will always be people who can’t attend the event. Send them a transcript to let them know what was addressed during the conference.
- Focus your audience on listening
Most people either record video or audio or take hundreds of notes, during a conference. Having a transcript that you can share with others eliminates the need for that hassle.
- Additional publicity
Providing a conference transcription can be another source of PR for you. If the content of the conference/ seminar/ meeting is publicly disclosable – you can send the transcript to journalists or media agencies. That’s a win-win – they have something to write about and more people get to know about you!
- Easy translation
This argument is invaluable when it comes to conferences focused on research. There are plenty of scientists that want to stay on track with recent developments in the field, but don’t speak English (or another language). Luckily, it’s very easy to translate the text.
- Automatic subtitles
If you’ve recorded your conference on video, you may want to include subtitles. You don’t even have to do anything for that, just convert your transcript to SRT format and add it to your video.
Learn more about subtitles
- Automatic Speech Recognition and alignment saves hours of subtitling time
- Upload, search, edit and export with ease, or connect a stream
- Competitive pricing with the fastest turnaround
- Online visibility
Want more people to know what happened during the conference? Make a report out of your transcript, upload it on your website and it’s done – now people can find you on Google. You can also extract quotes from the transcript and post them on social media.
- Detailed record
Your transcript will include everything that was said during a conference. You can’t imagine how much headache it saves you on the long-term. First, you know who said what, which prevents debates from the beginning. Not only that, but speaker recognition features separate what was said by different people – very convenient if you need to quote or report someone’s findings. Last, if you have all the information – no idea or thought will get lost or forgotten.
- You can sell it
No one restricts you from using your transcript for business purposes. If you think that there is some valuable information (assuming all the speakers agree to that) – make an ebook or a set of articles out of it and start selling it.
- Accessibility
There are many hard-of-hearing people who may be interested in knowing more about your conference. Provide them with subtitles or a transcript.
The benefits of machine-made transcription
Anonymity – using an automatic transcription service ensures that you’re the only one, who’ll be looking at a transcript.
Faster turnaround – hiring a professional transcriber takes days, and in some cases even weeks.
Speaker recognition – no more debates such as “who said what”. All the speakers are separated in a transcript right off the bat.
We hope that transcription will help you to get more value from each and every conference that you organize or attend. Make sure to check out our blog for more interesting articles!
Benefits of using Amberscript
Amberscript’s subtitle services are:
Fast
Edit your own text within minutes or leave the work to our experienced subtitlers.
Accurate
Our experienced subtitlers and thorough quality controls ensure 100% accuracy of your transcriptions and subtitles.
Easy
Thanks to a variety of integrations and API interfaces, you can fully automate your workflows.
Secure
Your data is in safe hands. We are GDPR compliant + ISO27001 & ISO9001 certified.
Machine-Made Transcription with Amberscript
Transcription software simplifies the process of transcribing by providing features such as shortcuts for adding timestamps and speaker names, as well as the ability to play and pause audio. One key difference is whether the software offers automatic transcription capabilities.
Programs like Amberscript utilize AI and speech recognition to transcribe audio files automatically, but the accuracy may be affected by poor audio quality and the technology is not perfect yet.
The benefit of machine-made transcription is that it only requires correction rather than re-writing the entire text, resulting in time savings and the ability to transcribe more audio in less time if the audio quality is good.
Frequently asked questions
-
Can I add a glossary with specific words to the transcription job?
Yes, we also offer specialized transcription, which can include jargon or specific vocabulary. To learn more about this or discuss specifics, please contact us.
-
Can you also deliver transcriptions for other media formats?
We deliver data annotation for speech-to-text solutions. However, if you have a special request, please contact our sales team here.
-
Do you add timestamps?
Yes, timestamps are included in the transcript.
-
How can AI be used for transcription?
A branch of AI is speech recognition technology, which is used by some companies to create virtual personal assistents. Companies like Amberscript train machines to be able to automatically recognize speech, which is the core of the automatic transcription tool.
-
How can I edit my transcript?
The file will be delivered in your account on Amberscript, so the file can be opened in our online editor, where you can make some final corrections or changes if needed.
-
Does the app offer live transcription?
Yes, you can see a preview of the transcription on the screen of your phone. The text file will be created on your account a few minutes after the recording is complete.
What is a focus group, and how to run one in 2023? Ultimate A to Z guide
Are you conducting social or marketing research? Want to gain more in-depth knowledge of the subject you’re researching? Then it’s very likely that you need to organize a focus group. Read our guide to learn what is a focus group and how to successfully run one!
Table of content
- What is a focus group ?
- Types of focus group
- Preparing for a focus group
- Conducting the focus group
- Analyzing the results
- Tips for running a successful focus group
- Interview transcription
I. What is a focus group?
A focus group is a research method that involves a small group of people discussing a particular topic or product, moderated by a trained facilitator. The purpose of a focus group is to gather qualitative data that provides insight into consumers’ attitudes and opinions, which can help businesses to develop and improve their products or services.
There are 3 phases involved in organizing a focus group: planning, on-the-spot, and analysis.

II. Types of focus groups
There are three main types of focus groups: traditional face-to-face focus groups, online/virtual focus groups, and hybrid focus groups. Traditional focus groups are held in person, while online/virtual focus groups are conducted remotely using video conferencing software, and hybrid focus groups are a combination of both.
Traditional face-to-face focus groups:
They offer the advantage of in-person interaction, which can create a more engaging and immersive experience for participants. However, they can be more expensive to organize, and they require a physical location for the group to meet.
Online/virtual focus groups:
They are more cost-effective and convenient, as they can be conducted remotely, making it easier to reach a wider audience. However, the virtual format can make it more difficult to build rapport and create a sense of community among participants.
Hybrid focus groups:
They combine the benefits of both traditional and online/virtual focus groups. This format allows for in-person interaction, while also leveraging technology to reach a wider audience and reduce costs.
III. Preparing for a focus group
To prepare for a focus group, you need to define your research objectives and questions, determine the number of participants, recruit participants, select a location (if applicable), choose a moderator, and prepare a discussion guide.
1. Pick a single narrow topic
Focus groups have the word “focus” for a reason. In general, you don’t want to go too broad. Choose one specific subject and try to come up with relevant questions. So, instead of asking a lot of different questions about your product/ service – focus on 1 thing. It can be user experience, brand identity, or anything else.
2. Recruit 6-10 participants
How many participants a focus group should have?
We suggest keeping the group size small. The higher number of people goes hand in hand with increased coordination difficulties. The ideal group size is about 6 people.
3. Make sure your group is diverse
You want to make sure that you hear the opinions of different people. You’ll likely want your group members to differ in:
- Age
- National/cultural background
- Income
- Gender
- Interests
Now that you know the scope of your study, it’s time to approach people. You can do it by uploading a post on social media, calling for participation in your focus group. You can also reach out to people individually via email or social media channels.
4. Provide extra incentives for participants
Improving your product/service alone is not that strong of motivation for most consumers. Usually, people would be more inclined to participate in a focus group if they’re offered something in return. It can be a voucher, a gift card, or just some cash.
5. Select a Location
If you’re conducting a traditional face-to-face focus group, you will need to select a location for the group to meet. The location should be convenient for participants to travel to and provide a comfortable environment for the discussion.
6. Choose qualitative research methods – interviews/discussions. Not surveys.
Might sound obvious, but let’s recap it anyway. Focus groups are conducted with a small population sample, but their discussion format allows to obtain detailed information. As such, you should only use qualitative research methods. There is no need to prepare questionnaires or use any methods of statistical analysis.
IV. Conducting the focus group
During the focus group, the moderator will guide the discussion according to the prepared discussion guide. The goal is to elicit open-ended responses and encourage participants to share their opinions and experiences. Here are some tips for conducting a successful focus group:
1. Do an ice-breaking exercise
A lot of people will likely be shy to speak up. That’s why it’s your responsibility to create a welcoming and relaxed atmosphere. You can do so by doing an ice-breaking exercise.
Example: Ask people about their lives. Where have they been traveling on holidays last time? Do they have any pets? What’s their favorite meal?
Alternatively, you can offer free drinks & snacks. We heard that helps!
2. Lead the discussion
When moderating the focus group session, don’t forget that you’re the conversation leader. Here are some things you should take into account:
- Don’t let one person speak for too long, keep it consistent
- Encourage people to share their opinions freely, even if they’re shy
- Keep in mind the structure/question list you’ve made before the focus group. Don’t switch topics too often or too quickly. Nevertheless, you want to change the subject as soon as it’s saturated (no one has anything to add).
3. Ask open questions
Compare these 2 dialogs:
- Example 1: Do you like product X?
- Example 2: Which features of product X are particularly important to you and why?
Open questions (such as the one in Example 2) will help you to obtain richer insights. Avoid asking “yes or no” questions, because the only answer you’ll ever hear is either “yes” or “no”.
Learn more
How to interview and convert audio to text via our interview transcription guide
Learn more4. Different opinions should be encouraged
A Focus group is a discussion. You’re not trying to reach a consensus or find a point that everyone would agree on. On the contrary, you want to observe the contrast in people’s opinions. Even if all of your participants have different viewpoints – don’t make an argument out of it, simply accept it and try to understand what makes them think this way.
5. Approach focus groups with creativity
If you want, you can come up with different ideas on how to engage people, instead of asking them direct questions. For instance, you could:
- Ask participants to draw an image that pops up in their mind when they think about your brand
- Play an associative game. You tell them words – they have to tell you their associations
You can think of any creative tasks that would engage your participants and generate interesting insights for you.
6. Keep the length of the meeting around 1-2 hours
Try not to tire your participants. After an hour or two, we all get tired and are no longer willing to give saturated answers.
7. Record everything
Recording is a “must” for a focus group. You want to be able to come back and review every individual answer. Moreover, you’ll likely have to report your findings. You’ll also be surprised at the number of details you get when you record a discussion, such as tone of voice. To make recording and transcription easier, consider using the Amberscript mobile app (downloadable on iOS and android). With the app, you can record your focus group audio and transcribe it directly, making it easy to review your findings later. Alternatively, you can use the recorder on your phone to capture the audio of the discussion.
P.S. – Don’t forget to inform participants that you’re recording their answers.
P.S.S. – We personally recommend only record audio. Having a video camera may be interrogated for a lot of people and will most likely lead to short, shy (sometimes even dishonest) responses.
If there are details, such as body language that you want to be documented – ask your assistant to take notes on the way.
V. Analyzing the results
Once the focus group is complete, it’s time to analyze the results. This involves transcribing the discussion, reviewing and coding the data, identifying themes and patterns, and drawing conclusions. Here are some tips for analyzing the results:
1. Transcribe your recording with Amberscript
Next, you want your findings to be documented in written form. The easiest way to do it is by using speech recognition software, like Amberscript. Upload your file, make some quick adjustments, and export. Having a transcript simplifies data analysis and makes it easy to share the output with your team.
Get a customized offer
Request a quote for your transcription needs
2. Review and Code the Data
Reviewing and coding the data involves identifying key themes and patterns in the data. This can be done by reviewing the transcripts and identifying recurring ideas or concepts.
3. Identify Themes and Patterns
Identifying themes and patterns involves grouping similar ideas or concepts together to create a coherent picture of the participants’ opinions and attitudes.
4. Draw Conclusions
Drawing conclusions involves synthesizing the data to create actionable insights that can inform business decisions. The conclusions should be based on the data and supported by evidence from the focus group discussion.
VI. Tips for Running a Successful Focus Group
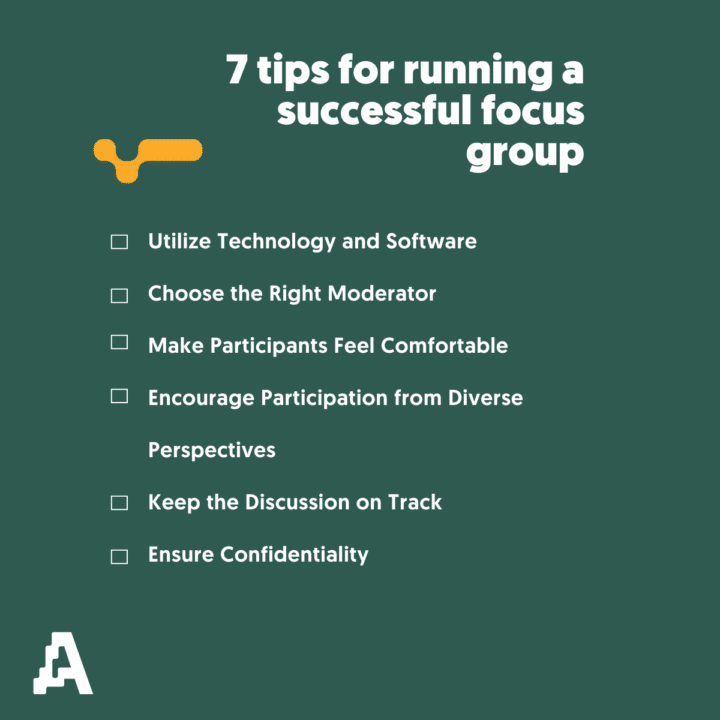
To ensure that your focus group is successful, here are some tips to keep in mind:
Utilize Technology and Software
Technology and software can make the focus group process more efficient and effective. For example, transcription software can save time and reduce the risk of errors, while video conferencing software can make it easier to conduct online/virtual focus groups.
Choose the Right Moderator
The moderator plays a crucial role in guiding the focus group discussion and ensuring that all participants have an opportunity to share their opinions. The moderator should be trained in focus group facilitation and have experience moderating discussions on the topic of interest.
Make Participants Feel Comfortable
Participants are more likely to share their opinions and experiences if they feel comfortable and at ease. The moderator should create a welcoming and inclusive environment that encourages open communication.
Encourage Participation from Diverse Perspectives
Diverse perspectives can provide a more comprehensive understanding of the topic being discussed. The moderator should encourage participation from individuals with different backgrounds, experiences, and opinions.
Keep the Discussion on Track
The moderator should ensure that the discussion stays focused on the research objectives and that all relevant topics are covered. They should also be prepared to redirect the discussion if it veers off track.
Ensure Confidentiality
Participants should feel comfortable sharing their opinions and experiences without fear of their information being shared without their consent. The moderator should ensure that all participants understand the confidentiality policies and procedures in place.
VII. Interview Transcription
Transcription is an essential part of analyzing focus group data, as it converts audio or video recordings of the discussion into a written transcript that can be analyzed and coded. We covered all information you need here at our interview transcription guideline.
There are two main methods of transcription: online and offline.
Online Transcription
Online transcription involves using software or websites to automatically transcribe the audio or video recordings. This method is often faster and more cost-effective than offline transcription, and it can be especially useful for researchers who are working with large amounts of data.
There are a variety of online transcription services available, with varying levels of accuracy and reliability. One such service is Amberscript, which uses advanced algorithms and machine learning to produce accurate and reliable transcripts of focus group discussions. The software also allows users to edit the transcript and add comments or tags to facilitate the analysis process.
Recording and Transcribing Video Calls Online transcription can be particularly useful for focus groups conducted via online platforms such as Zoom, Skype, and Google Meet. To record and transcribe video calls on these platforms, researchers can use software such as OBS Studio, which allows users to record their screen and audio. Once the video call is recorded, the audio can be uploaded to an online transcription service such as Amberscript for automatic transcription.

Offline Transcription
Offline transcription involves manually transcribing the audio or video recordings. This method can be more time-consuming and expensive than online transcription, but it may be necessary in cases where the audio quality is poor or the discussion is particularly complex.
Professional transcriptionists are often hired to transcribe focus group discussions offline. They are trained to accurately transcribe the discussion and may be able to identify nuances in the conversation that an automated transcription service would miss.
Conclusion
In conclusion, focus groups are a valuable tool for market research that provide businesses with valuable insights into their customers’ opinions, attitudes, and preferences. By following the outlined steps and utilizing technology, businesses can ensure a successful focus group and analyze the results accurately. As technology evolves, we can expect even more innovations in focus group research. Keeping up with the latest trends and best practices can help businesses get the most out of their focus group research efforts.
We hope that you are ready for your focus group now!
Best Digital Writing Tools and Creative Writing Techniques
Do you like writing? Well, we love it! Blogs, novels, fiction, academic publications – no matter what you’re writing, there is always a way to be more productive. That’s why we’ve compiled a list of the best digital writing tools and some creative writing techniques.
1. Visualize your thoughts – Mindmaps
Writing is, by all means, a creative process, however, keeping your ideas in line with each other and your story organized is definitely a “must”. A nice way to visualize your storyline and keep track of the macrostructure of your book is by creating a mindmap. Here’s how it looks like.

You can opt for an old-fashioned way and draw mind maps on paper, whiteboard or use a bunch of sticky notes. If you’re one of those geeky types, you can use Milanote, which is an app that allows you to create visual boards that include notes, images, and other files. Working in a team? Miro is another app, where you can share visual boards and work on the content together. Alternatively, you can always design mindmaps in PowerPoint.
2. Finding inspiration with digital writing tools
It’s 5 AM. You’re sitting at your desk for hours, staring at a blank paper sheet. Does this sound familiar to you? It surely does for most writers, we all know that feeling! Every piece of writing is different and thus requires a different approach.
However, if you’re searching for some ideas and inspiration, use Pinterest to your advantage. The best thing about Pinterest is that most content is visual. You don’t have to spend a lot of time, just skim through a dozen images to pick up some ideas on the go.
Other than that, you can use online tools, that generate random questions and topics, such as Portent and Conversation starter. Not all of the ideas suggested by these tools deserve a Nobel Prize, but at least you’ll have some fun in the process!
3. Making sure your text looks professional
Make sure to always double-check your grammar, spelling, punctuation, and language style. This makes a huge difference so make use of some of the best writing tools out there: Grammarly and Hemingway. Grammarly has an extension for Chrome and Word, which is a huge benefit! On the other hand, Hemingway is absolutely free and gives you solid writing advice. The only con is that you have to go to their website every time.
You probably know this one, but it’s still worth mentioning. Thesaurus is a great tool that you can use to search for synonyms, antonyms, and word suggestions. Besides, if you’re looking forward to expanding your vocabulary or learn new grammar rules – they have a blog, full of this kind of content!
Writing good headlines
If you are writing for marketing purposes, writing good headlines is vital. They are used to capture people’s attention, reflect the main point of the passage in 1 clear sentence or the opposite – create a mystery. Let’s review some examples just so you can have a clear picture of what we’re talking about.
| Good headline | Bad headline |
|---|---|
| 5 easy ways to learn Dutch | Learn Dutch easily |
| Learn the art behind killer headlines in 30 seconds or less | How to write killer headlines? |
| E-learning: a curse or a blessing? | How good is E-learning? |
From reviewing these examples you can already pick up some tips. First, it’s proven that including numbers helps to draw the reader’s attention. Not only that but also have a reference number already establishes expectations about the length of the article in the reader’s mind.
Furthermore, if your article touches upon 2 controversial viewpoints – it’s nice to already make it specific in the headline, so the reader can be prepared to hear arguments from 2 different perspectives.
Here’s Sharethrough, a nice website, that will help you to write great headlines. You can also use this tool to write compelling chapter names.
Beyond spell-checking
Also, if you’re writing for a large audience, you want to make sure that your text is easily readable and understandable for an average person. Online tools such as PrepostSeo rank your content based on common readability tests. The score ranges from 0 (completely unreadable) to 100 (easy-to-read even for children).
Take this figure seriously, only if you’re writing for the masses. If you’re writing something niche-based, keep your terminology and jargon the way they are.
4. Writing Faster
And now let’s talk about a huge game-changer for modern writers – speech recognition software. “Why not type the old-fashioned way?” – you may ask. Here’s why: professionals type at a rate of 65 words per minute, while the average person speaks at a pace of about 125 words a minute. You get the idea.
Recording audio and converting it to text saves a lot of valuable time! Also, do you know why so many writers have to wear glasses? You’ve guessed it because they type text and look at the computer screen the whole day! Doing a voice recording is less tiring, but also more demanding to external conditions (like noise).
You can opt for an old-fashioned way and draw mind maps on paper, whiteboard or use a bunch of sticky notes. If you’re one of those geeky types, you can use Milanote, which is an app that allows you to create visual boards that include notes, images, and other files. Working in a team? Miro is another app, where you can share visual boards and work on the content together. Alternatively, you can always design mindmaps in PowerPoint.

Currently, there are 2 ways you can transform your recordings to text – use the voice-typing feature in Google Docs (or other software packages) or upload your files to online transcription tools, like Amberscript. Voice-typing is quite convenient since it produces output immediately, but it also comes with a number of limitations.
First, Amberscript takes slightly longer to analyze your recording, but the reward is the higher accuracy of your transcription. Also, voice-typing tools usually don’t store your audio files, meaning that if something went wrong – you don’t have a backup.
Having an mp3 file separately is definitely nice since it allows you to go back and listen to your recordings manually if your recording conditions were poor.
Not only that, but you can take your collection of mp3 recordings and easily make an audio-book out of them!
Last, but not least, in our day and age we are surrounded by hundreds and thousands of distractions. If you find yourself distracted easily, check out this tool for writing (called “Calmly Writer”) – it offers basic functions and comes with a minimalistic layout to keep you concentrated!
Last… Staying Focused
Last, but not least, in our day and age we are surrounded by hundreds and thousands of distractions. If you find yourself distracted easily, check out this tool for writing (called “Calmly Writer”) – it offers basic functions and comes with a minimalistic layout to keep you concentrated!
Summary
Here’s a small infographic that summarizes the creative writing techniques that you’ve just read.

Here is a list of the best digital writing tools
Visualize your thoughts: Miro, Milanote
Finding inspiration: Portent, Pinterest, Conversation Starter
Making sure your text looks professional: Grammarly, Hemingway, Sharethrough, Thesaurus, PrepostSeo
Writing Faster (transcription tool): Amberscript
We hope that now you’ll be writing with greater efficiency without putting in any extra effort! For more interesting reads like this, check out our blog!
How to Add Open Captions with HandBrake
You just exported your subtitles and looking for a way to add open captions into your video? It’s actually super easy to do!
Today we’re going to show you how to add open captions with HandBrake, a simple and free online tool.
TIP – If you’re still looking for a way to create and download subtitles for your video file, you can use our online automatic subtitling tool. You can export your subtitles in SRT, JSON, VTT, and other formats.
Table of Contents
How to Add Open Captions with HandBrake – Where to start?
1. Prepare your video file and export it
HandBrake is a fantastic tool partly because it can be applied to any video, regardless of its format or editing software. It doesn’t matter if you use Filmora, Adobe Premiere or iMovie. Find the full video you want to add subtitles to and then export it.
Make sure the video is of good quality. While exporting can take a while, it’s a good idea to use to convert your audio to text , and then to subtitles.
2. Choose a subtitle file format
Order your 100% accurate human-made subtitle file from Amberscript and download it in SRT format (the recommended format for Handbrake).
3. Download the Handbrake application
Now that your video files and subtitles are ready, you’re ready to use Handbrake. If you don’t have it yet, download and install it on your computer.
With Handbrake , it’s easy to add subtitles, closed captions, or translated captions to your videos. In this guide we will show you how to do it on Mac.
4. Upload your video and SRT file to Handbrake
Once you open the tool, you will be prompted to add your video file.
Once your video is uploaded, add your SRT file.
Start by clicking on the “Subtitles” tab. Then click the “Tracks” drop-down menu, choose “Add External Subtitle Track”, find your SRT file and click “Open”.
Once entered, start considering whether you want your subtitles to be available in multiple languages. HandBrake allows you to add as many subtitle tracks as you like.

5. Choose “Burned-In” for subtitles and skip this step if you want CC subtitles
You can skip this process if you want your video to have CC subtitles. The viewer has the option to turn on or off the CC captions, which are encoded into the video file. Subtitles will appear over the video when a track is enabled. If they are disabled, subtitles are not displayed.
NOTE : Subtitles embedded in video are encoded directly on the video screen and cannot be turned on or off.

How are they different
Subtitles, Closed Captions, and SDH Subtitles
- What are subtitles?
- What are closed captions?
- What are subtitles for the deaf or hard-of-hearing (SDH)?
- How to create subtitles with Amberscript
6. Make sure the settings are correct
Make sure the video and audio settings match those of the source file or finished product for export. These parameters can be saved for future projects.
7. Export the final video
Once completed, you can export your video with subtitles. To select the destination to export the video file to, click on the “Browse” option in the lower right corner of the screen. Enter the name of the export next to the “Save As” tab.
The export will begin when you click the green “Start” button at the top of the screen.
How to add subtitles with Amberscript
There is an easy way to convert your videos to text and subtitles: Amberscript. Amberscript will allow you to get accurate and simple subtitles of your audios to help you better understand your data. Here’s how to create subtitles with Amberscript.
- Upload your video to our easy to use platform.
- Choose whether you want machine-made, human-made or translated subtitles to turn your video into text
- Edit the subtitles to make them more accurate. You can easily make any changes in our cloud-based editor.
- Export the file. Whatever format you need, we’ve got you covered: docx, .txt, .srt, .json, .vtt, or EBU.STL
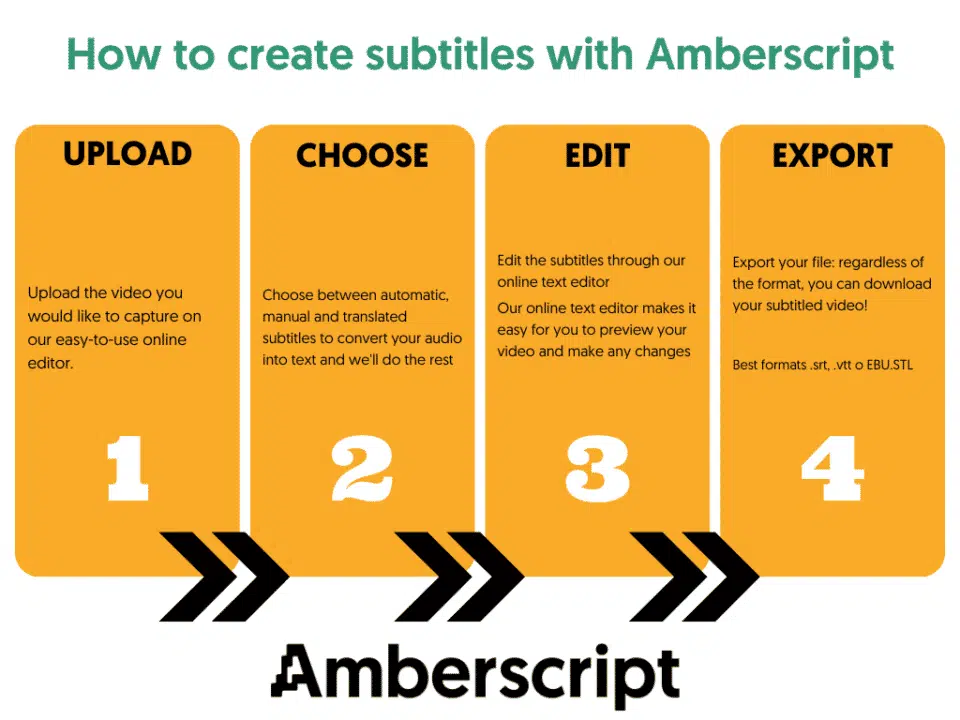

How to subtitle your videos
Find out more
Read our detailed guide on how to add subtitles to your videos.
Learn moreBenefits of using Amberscript
Amberscript’s subtitle services are:
Fast
Edit your own text within minutes or leave the work to our experienced subtitlers.
Accurate
Our experienced subtitlers and thorough quality controls ensure 100% accuracy of your transcriptions and subtitles.
Easy
Thanks to a variety of integrations and API interfaces, you can fully automate your workflows.
Secure
Your data is in safe hands. We are GDPR compliant + ISO27001 & ISO9001 certified.
Frequently asked questions
-
Can I burn the subtitles directly onto my video?
If you have exported the transcript as a SRT, EBU-STL or VTT file, you can easily burn them onto your video using video-editing software.
-
Can I change the position of the subtitles?
That needs to be done using a video editor like VLC. Go to Tools > Preferences [CTRL + P]. Under Show settings, select the option that says All to switch to the advanced preferences. Navigate to Input/Codecs > Subtitle codecs > Subtitles. Under Text subtitle decoder set, the Subtitle justification to left, right or center.
-
How do I add subtitles to a YouTube video?
To add subtitles to your Youtube video, simply add the file you have created using Amberscript to your video in the Youtube Studio. Click on “subtitles”, then “add” and finally “upload file” and select the SRT file.
-
How do I add subtitles to a video on Vimeo?
To add subtitles to your Vimeo video, simply add the file you have created using Amberscript to your video in the editing window on Vimeo. Click on “distribution”, then “subtitles” and finally click on the + symbol to upload the SRT file.
-
How do I order translated subtitles?
To order translated subtitles, you can upload your file like you would normally do. You can then select manual subtitling. Once you have selected this, an option will appear where you will be able to select the language the subtitles need to be translated to. If the language that you want is not one of the options you can contact us through our contact form.
-
To which languages can you translate subtitles?
For our human-made subtitling services we work with a network of language experts in 15 different languages. Find out which here. If the language you want is not on the list, please contact us through our contact form.
-
What subtitle file formats are supported?
Our software allows you to export the transcript from the video or audio file as an SRT, EBU-STL or VTT file.
How to get a transcript an audio file? 3 easy ways to convert speech to text
Whether you’re looking to transcribe your long audio files or just to easily transcribe your lecture, the whole process can move faster if you have the right tool on your side! In this article, we’ll discuss how to get a transcript of an audio file and what methods you should use to ensure that you get reliable text.
There are three different ways to transcribe audio:
- Transcribing your audio file yourself
- Have a company make your transcripts
- Use an automated transcription service such as Amberscript
Of course, some methods are faster than others to transcribe audio, while some are more cost effective – let’s dive in to see what one’s are right for you!
| Yourself | Manual transcription company | Amberscript Perfect | Amberscript Direct | |
| Time | 5 hours | 1 week No work yourself | 5 days or sooner No work yourself | 1 hour |
| Price | Free | $100 | ~ $30 | $3 |
How to transcribe your audio yourself?
Of course, it is possible to convert your audio to text yourself. This is completely free and very accurate. The disadvantage of making your own transcriptions is that transcribing audio to text is a very time-consuming and mentally demanding process.
For example, a beginner will spend about 8 to 10 minutes transcribing 1 minute of audio. This is not an ideal option when, for example, you are a journalist. As a journalist, you are often busy making sure that you release the news first.
Making a transcript yourself would is usually fine when you only have a few minutes of content to turn into text but it’s a long process.
But if you’re in a hurry, have a large volume of content to transcribe or simply just want to spend your time on other thing – making the transcript yourself probably isn’t for you!
Recruit the help of a transcription company
It is also possible to have your transcripts made by a company. This is usually 100% accurate and you don’t have to work on the transcription yourself! Though, the disadvantage of having a company make your transcriptions is that a higher price tag is attached.
If you choose to use a company to take over the process for you, you’ll usually have access to a platform where you can send your files. The companies team of transcribers will get to work and produce a transcript of your audio file.
The downside is that having a manual transcription made costs around $2,00 per audio minute and can take at least a week.
How Amberscript’s technology helps to reduce transcriptions time and costs
At Amberscript you can choose our Human-made services and let our team of professional transcribers handle the whole process for you. We use advance Automatic Speech Recognition (ASR) technology to speed up the process and reduces the costs. The technology listens to the audio and creates a rough draft that our team perfects to 100% accuracy.
Transform your audio and
video to text and subtitles
- High accurate, on demand service
- Competitive pricing with the fastest turnaround using AI
- Upload, search edit and export captions and transcripts with ease.
Transcribe an audio file using technology
It’s possible to have your transcripts made automatically using Amberscript.
Our speech to text software converts your audio into text in an average of 5 minutes. All you have to do is make improvements to make your transcription 100% correct.
This can be done very easily through our unique editor that ‘glues’ your audio to your transcription. This helps you easily make corrections.
The editor also makes it easy to find certain words in your transcript and play the corresponding piece of audio. Our software can convert speech to text in 39 languages! This includes English transcriptions. This is considerably faster than making a transcript yourself or having it made by a company.
Moreover, using an automated transcription service is a lot cheaper than having your transcript made by someone else. If you have an average amount of content to produce and don’t need to rely on 100% accurate text, this is the best option for you
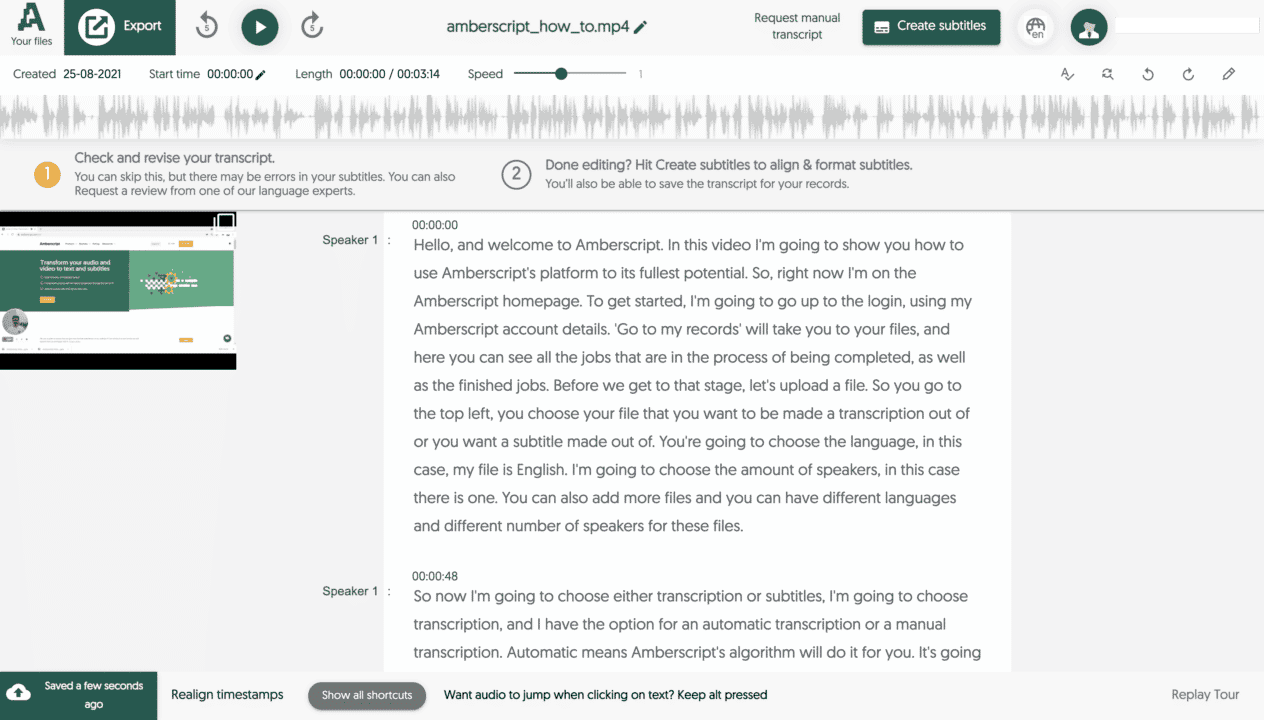
Conclusion
There are different ways to transcribe an audio file. Each method has its pros and cons.
As seen in the table above manual transcriptions are free, but cost a lot of time. Having a company make a transcription is easy, but a lot more expensive and slower. Automated transcription service is cheaper than having a transcription made by a company and is the fastest option, but you will have to make improvements yourself. The best option for you depends on your wishes and options. But what’s best is that you can get a taste of how ASR works by getting 10 minutes of free transcription time when you sign up for an Amberscript account!
How to Make Subtitles for a YouTube Video
Have you recorded a nice video that you want to share with millions? Thought of uploading it on YouTube? That’s great! But did you know that having subtitles or a transcript can seriously boost the potential reach of your videos?
This happens for a reason. Search engines – such as Google – use crawlers to find content online. These crawlers can only understand text, so providing your video with subtitles or a full transcript of your content can bring your work to light. In this blog post, there is everything you need to know about how to add subtitles to a YouTube video. Let’s start!
4 Ways to Add Subtitles to a YouTube Video
- Generate them automatically on YouTube
- Create subtitles manually, then upload an SRT file on YouTube
- Create them automatically with Amberscript, then upload them on YouTube
- Hardcode the existing subtitles into your video, then upload the video on YouTube
Let’s get started and discuss each of them.
1 YouTube Can Automatically Generate Subtitles for You.
- First, you need to upload a video on YouTube
- Log in to your account → Create a video or a post → Upload a video file

- Go to your channel (or YouTube Studio) → Select your video → Go to Advanced Settings
- Choose a video language
- By default the subtitles will be auto-generated, you just need to click on CC button to turn them on when you watch the video

P.s. if you click on properties, you can also edit those subtitles in Classic Studio, but their accuracy is far from perfect, so you’ll have to dedicate a lot of time to it.
2 You Can Create Subtitles Yourself and Upload Them on Youtube
- You can use any text editor for this, including notepad. Just be prepared to spend 4 minutes for captioning each minute of your video. (in other words, an hour-long movie will take 4 hours to caption). If you have a lot of time and patience to do it, check out this article on how to add subtitles to both the video and audio players for some tips.
- Go to your channel (or YouTube Studio) → Select your video → Go to Advanced Settings
- Upload your subtitles/cc → With timing
- Done

3 How to Create Subtitles with Amberscript in 5 minutes
- Learn how to create very accurate subtitles with our tool and make final -adjustments in our intuitive editor. Our engines can reach up to 90% accuracy, leaving you with small adjustments to make.
- After you have done that, export your document in SRT format
- Go to your channel (or YouTube Studio) → Select your video → Go to Advanced Settings
- Upload your subtitles/cc → With timing
- Voila!
P.s. all of your files exported from Amberscript include timestamps, so make sure to select “with timing”. If you select “without timing” your subtitles will lose their specific time codes and will be spread evenly across the whole video.
4 You Can Also “Burn in” Subtitles into Your Video and Then Upload it on YouTube.
That’s not something we’d recommend, but if it benefits your content – there is an easy way to do it.
- Create subtitles using any method described above (automatically or manually)
- Download a free video transcoder, such as HandBrake
- Install the software and open it
- Upload your video file

- Go to subtitles tab → Import SRT
- Choose the correct source → Press “Burn in”

- Click on “Save as” → Choose a location and a name for your file
- Press “Start Encode” and wait for your video to be exported
- There you have it, now subtitles are merged into your video
- Now you can upload it on YouTube
Here we are at the end! You should by now know how to add subtitles to a youtube video! We are certain that subtitles can be very beneficial for your video content.
If you want to know more about subtitles you might also want to read:
– How to Create Subtitles with Amberscript
– Subtitles, Closed Captions and SDH: How are they different?
Care about Privacy? Transcribe With Amberscript
Transcribing personal material? Afraid that your files might get in the wrong hands? We understand your precaution and take your privacy very seriously. Your security and your interests will always remain our primary concern, and we are committed to conducting business with our customers based on mutual trust.
Why should you trust us?
- We are fully compliant with the GDPR policies.
We implement all the security measures to protect, store and handle your data. - We guarantee full confidentiality:
- None of the employees of Amberscript has access to your transcripts
- If you delete a file from our website – it’s gone forever, there is no copy stored on our server. Your transcripts are kept for 6 months and then we have a right to delete them, but will always notify you beforehand.
- If you delete your account, all of your personal information and data we collected is removed from our servers forever.
- We have strong work ethics:
We require all of our human transcribers to sign a Non-Disclosure Agreement (NDA). In case you’ve requested a manual transcription, that has to be reviewed by a human – stay put, since we ensure that our transcribers don’t share or store your information. Moreover, they are obliged to delete all the original documents from their computers when they finalize the transcription. - Everything that we do is transparent:
Our privacy policy indicates the precise procedures that we use to handle your data. Needless to say, we would never force you to share your personal data with us! You’re allowed to request a file that contains the data we collected about you at any point in time. Furthermore, you can always withdraw your consent for the use of 3rd party cookies. - We use data exclusively for research purposes.
How do we handle data?
- Capturing market insights to come up with offers that are relevant to our target audience
- Optimization of our website performance through the use of cookies
- Better customer service
- Customer research & evaluation of our products

- We promise “Non-disturbance”
- We are committed to send you promotional offers, deals, and any marketing materials, ONLY if they possess relevance to you. We will never invade your personal space with random advertisements.
- Your engagement in our marketing communication is entirely voluntary. You can always unsubscribe from our email newsletter or social media groups without indicating the reason.
How to Transcribe Your Video with Amberscript
Are you curious to know what’s the easiest and fastest way for transcribing video? All video producers – take a notebook and follow along, as we’re about to transform your workflow!
What is Video Transcription?
Transcribing your video works in exactly the same fashion as transcribing audio. Speech recognition software analyzes the spoken words and converts them into text. Video transcripts can serve 2 purposes:
- You can use the transcript of your video to automatically generate subtitles.
- Alternatively, your transcript can serve as a summary or simply a written version of your content, that you can include as a description on YouTube or your website.
P.s. check out our article on the benefits associated with video transcription!
What Are the Ways to Transcribe a Video?
In general, it bounds up to 3 choices:
1. Transcribing yourself, which can be a pain and a huge time-investment. Not to mention, that if you need subtitles, inserting all the time codes (when subtitles are displayed) doubles the workload.
2. Hiring a transcription company. This way you don’t have to work hard yourself, but there is a downside to this…. these services are very expensive! Not to mention, that the turnaround is generally measured in days or even weeks.
3. Transcribing video automatically with Amberscript. We know you’ve been waiting for this – a cost-effective and quick method of video transcription. You’ll get a 95% accurate transcription of your video in minutes, and you can make final adjustments in our built-in text editor. Oh, and the best thing is… all the time codes are included by default, meaning that you can use your transcript as subtitles with no extra work involved!
How to Transcribe a Video with Amberscript?
We’re almost done! Luckily, transcribing video with us is a very simple process, that requires no prior knowledge. Here are the steps involved in transcribing your video content:
1. Upload your video file. We support the following video formats: m4a, mov, m4v and mp4. The maximum file size is 4gb, which is enough for most videos. In case you’re working with heavy video files like movies, you can compress your video to decrease its size. There are plenty of websites where you can compress your video for free. Don’t worry if the quality becomes worse, for transcript purposes we only care about the sound.
2. In a few minutes your file will be transcribed. You can quickly go through your text and make some final adjustments.
3. Export your freshly-made transcription in a format of your choice. SRT, VTT, EBU-STL are meant for subtitles. And for a regular transcript, choose either Word or Text formats.
4. In case you made subtitles, insert them into your video. You can do it using almost any video editing software, such as Adobe Premiere, Final Cut, or Sony Vegas. Most media players such as VLC or Windows Media player are also capable of integrating subtitles into a video, although you’ll have less control over the process. Alternatively, there are many online services, that will merge subtitles with your video.
And…. you’re done! Yes, transcribing your video with us is that easy, but adds tremendous value to your content. If you want to learn more tips & tricks on filmmaking, make sure to visit our blog!
Transcription Software for Journalists: Step Up Your Time Management
Modern journalists are constantly busy and have to follow strict, sometimes even unrealistic deadlines. Conducting interviews, preparing the material, editing, publishing – all of these processes are demanding. It is not surprising, that journalism is associated with high on-the-job stress and burnout rate.
As a journalist, you probably always try to optimize your workflow and work with greater efficiency. And we know that more than 50% of journalists are overwhelmed by the amount of information they have to process every day and are looking for practical solutions to this problem. But what if we tell you that there is one single thing that can quadruple your productivity with minimal input from you? That’s transcription software.
Let’s break it down piece by piece. Every journalist has gigabytes and perhaps even terabytes of recordings, that need to be transcribed and published in a magazine/ journal / newspaper.
So Why is Transcription Software Essential for a Modern Journalist?
1. Manual transcription takes way too much of your time. Outsourcing to agencies is not always reliable, secure and quick. Oh, and it’s definitely not cheap. Automatic transcription solves all of these issues by providing a quick result, that will be accessible only to you, for a small fraction of the cost that you’d pay for a manual transcription.

2. There are plenty of applications for automatic transcription in the field of journalism. For example, voice typing is probably the quickest way to write an article. And you don’t need to bring tons of equipment for that. In fact, all you need is a good voice recorder. If you travel or go out for some field research – simply record your thoughts and observations and transcribe them.

3. Not to mention, that journalists conduct interviews almost on a daily basis. And the logic is the same, the quicker the transcription is made, the quicker you can publish – the more things you can tell the world about.

4. Having a textual transcript immediately is simply convenient. What if you don’t need the whole transcript, but just a specific quote to back up claims in your article? Most interviews are audio recorded and you don’t want to waste time listening to the whole recording just to find a quote. With text, it’s much easier, just perform a quick search and there you have it.

What’s Next?
In our days’ digital solutions start to become an inseparable part of a journalist’s workflow. Don’t work the old-fashioned way, choose convenience and efficiency. Here at Amberscript, we developed a simple-to-use automatic transcription tool that will help you work more productively. Give it a try and you won’t be disappointed!
Are you interested in how you can transcribe your audio with Amberscript? Follow these three easy steps:
- Upload your file to the Amberscript platform
- Wait a few minutes until our software creates your transcript
- Edit your automatically generated transcripts in our platform
- Export your files
You also have the chance to have your audio transcribed by our professionals for maximum accuracy. Request a quote to receive a personalised offer.
Frequently asked questions
-
Can I add a glossary with specific words to the transcription job?
Yes, we also offer specialized transcription, which can include jargon or specific vocabulary. To learn more about this or discuss specifics, please contact us.
-
Can you also deliver transcriptions for other media formats?
We deliver data annotation for speech-to-text solutions. However, if you have a special request, please contact our sales team here.
-
Can I export my files with timestamps?
Yes, you can. The transcript always includes timestamps in our online editor and you can choose to export the file with or without timestamps.
-
Do you offer cloud transcription services?
Yes, our services are offered on the cloud.
- Do you offer transcription services of pre-recorded files?
What is Plagiarism? | Top 10 Tips on How to Avoid Plagiarism
Introduction
Martin Luther King Jr. (an American civil rights activist), Rene Diekstra (a Dutch psychologist), Karl-Theodor zu Guttenberg (a German politician) – what do these people have in common?
All 3 have been accused of committing plagiarism. Plagiarism is a form of fraud; a theft of intellectual property and an act of dishonesty in general. Unfortunately, even the brightest minds in our society are sometimes tempted to steal somebody else’s ideas.
Plagiarizing is not just unethical, but also prosecutable in various ways. The above mentioned Guttenberg is a great example of how stealing intellectual property can ruin a successful career. Not only Guttenberg has resigned from his role in the German government and his doctorate degree was declared invalid, but his hard-earned reputation was crushed.
People have a tendency of remembering bad events better than the good ones – no matter how great Guttenberg was at politics, he will be remembered as a cheater.
What are the 4 types of plagiarism?
Direct Plagiarism
Direct Plagiarism occurs when, for instance, a student copies a section of someone else’s work, without acknowledging that an external source has been used.
Self-Plagiarism
Self-plagiarism instead occurs when a student submits his/her own previous work, or a mix of previous works, without asking permission to the professors that are involved.
Mosaic Plagiarism
Mosaic plagiarism occurs when a student borrows phrases from a source without using quotation marks or finds synonyms for the author’s language while keeping to the same general language structure and meaning as found in the original.
Accidental Plagiarism
Accidental plagiarism occurs when a person neglects to cite their sources, or misquotes their sources, or unintentionally paraphrases a source by using similar words, groups of words, and/or sentence structure without attribution. It can happen particularly when the person does not know how to cite his/her sources properly.
Why is plagiarizing a problem?
– Legal prosecution. Plagiarism violates the intellectual property rights law and may require financial compensation. The person who plagiarized will have to pay an approximate amount, that the author could have potentially earned if it wasn’t for plagiarism.
– Lack of fairness. No one would want his or her work to be stolen. And as it happened many times in academia, some individuals do not get the credit and recognition that they genuinely deserve.
– Violation of academic standards. Besides the fact that your degree can be taken away if you take part in an intentional plagiarism attempt – your future career as a scholar is either harmed or finished.
– Violation of educational standards. The laws on this matter are only becoming tougher and tougher. Even if it’s not a thesis but a regular research paper, submitted by a student. Even then, if plagiarism is found, you may not only fail the course but, in extreme cases, you can also get expelled from your university.
– Public shame. This is a “soft” side of the problem. If you ever achieve success unfairly, the public will immediately forget all of your past accomplishments, but they will surely remember your mistakes.
How to Prevent it
In our day and age, advanced software can detect plagiarism quite easily. Even if there is no word-by-word copying, the algorithm may still detect plagiarism based on paraphrasing.
Luckily, if you pay attention and proofread your documents, preventing plagiarism becomes quite easy.
Our Top 10 Tips on How to Avoid Plagiarism:
1. Cite all sources that you use, including web pages. Not only academic journals and books, that you use have to be acknowledged, but media articles or blogs as well.
2. Don’t rush. Most of the time, students forget to cite a source, because they are in a rush. Take your time and validate every source that you use.
3. Learn the guidelines of your citation method. There are many citation styles, such as APA, Chicago, or MLA. All you need to do is adhere to the guidelines of your method. The citation managers can also help you with that.
4. When you quote someone – make it clear. Usually, you don’t want to quote word-by-word too often. However, if you need to do it – put quotation marks and include a page number of the source you used. This way, your supervisor or a potential reader knows where to look for this specific quote.
5. Make sure to organize your reference list in a proper way. Citation managers like Zotero or EndNote do it automatically. Alternatively, you can use one of the online citation generator tools. Don’t forget to double-check everything, just in case!
6. Do not pay anyone to write a research paper for you. There are many websites and agencies, that offer writing services. The only problem is… it would also be a complete fraud from you. The report that you will submit will have your name on it and if it’s going to be found that it was written by someone else – it may have consequences.
7. Whenever you translate a passage from a text, indicate it. In this case, referencing is not enough, but you should also make clear that the original text was translated. It is done to ensure that the author’s words won’t be misinterpreted.
8. Make sure to reference yourself as well. There is a thing called “self-plagiarism”. That might seem odd at first, but it makes perfect sense. If you use your own previous work – reference it as well.
9. Check your work before submitting it. As mentioned, there are many plagiarism-checking tools on the market. Tools such as Grammarly offer a free initial check. Other, more advanced paid offers also exist in the market. They offer advanced algorithms and an extensive database of publications. We recommend Scribbr’s plagiarism checker, which uses the same software and database as universities.
10. Don’t copy everything from others. Remember, that research is a combination of existing knowledge with new knowledge. Capitalize on the work of others, but don’t copy everything and propose your own ideas.
Are you attending classes or writing your thesis? With Amberscript you can convert your recordings into text in an easy and fast way.
What is speech to text software and how does it work?

TLDR: What’s speech to text and how does it work?
Speech-to-text, also called speech recognition, is the process of transcribing audio into text in almost real time.
It does this by using linguistic algorithms to sort auditory signals and convert them into words, which are then displayed as Unicode characters.
These characters can be consumed, displayed, and acted upon by external applications, tools, and devices.
- Definition: What is speech to text software?
- What is the current state of Speech Recognition?
- Why do we need speech to text software?
- How is voice to text software used in different industries?
- How does speech to text software work?
- What makes Amberscript’s speech to text model the best?
What is speech to text software?
Speech to text software that’s used for translating spoken words into a written format. This process is also known as speech recognition or computer speech recognition. There are many applications, tools, and devices that can transcribe audio in real-time so it can be displayed and acted upon accordingly.
What is the Current State of Speech Recognition?
Recent technological developments in the area of speech recognition not only made our life more convenient and our workflow more productive, but also open opportunities, that were deemed as “miraculous” back in the days.
Speech-to-text software has a wide variety of applications, and the list continues to grow on a yearly basis. Healthcare, improved customer service, qualitative research, journalism – these are just some of the industries, where voice-to-text conversion has already become a major game-changer.
Why Do We Need Speech to Text software?
1. It reduces the time to transcribe content
Professionals, students, and researchers in various industries use high-quality transcripts to perform their work-related activities. The technology behind the voice recognition advances at a fast pace, making it quicker, cheaper and more convenient than transcribing content manually.
Current speech to text software isn’t as accurate as professional transcriber, but depending on the audio quality – the software can be up to 85% accurate.
2. Speech to text software makes audio accessible
Why is Speech to Text Recognition currently booming here in Europe? The answer is quite simple – digital accessibility. As described in the EU Directive 2016/2102, governments must take measures to ensure that everyone has equal access to information. Podcasts, videos and audio recordings need to be supplied with captions or transcripts to be accessible by people with hearing disabilities.

How is speech to text software used in different industries?
Speech to text technology is no longer just a convenience for everyday people; it’s being adopted by major industries like marketing, banking, and healthcare. Voice recognition applications are changing the way people work by making simple tasks more efficient and complex tasks possible.
Customer Support call analytics
Machine-made transcription is a tool that helps you understand customer conversations, so you can make changes to improve customer engagement. This service also makes your customer service team more productive.
Media and broadcasting subtitling
Speech to text software helps to create subtitles for videos and allows them to be watched by people that are deaf or hard of hearing. Adding subtitles to videos makes them accessible to wider audiences.
Healthcare
With transcription, medical professionals can record clinical conversations into electronic health record systems for fast and simple analysis. In healthcare, this process also helps improve efficiency by providing immediate access to information and inputting data.
Legal
Speech to text software helps in the legal transcription process of automatically writing or typing out often lengthy legal documents from an audio and/or video recording. This involves transforming the recorded information into a written format that is easily navigated.
Education
Utilizing speech to text can be a beneficial way for students to take notes and interact with their lectures. With the ability to highlight and underline important parts of the lecture, they can easily go back and review information before exams. Students who are deaf or hard of hearing also find this software helpful as it caption online classes or seminars.
Transform your audio and
video to text and subtitles
- High accurate, on demand service
- Competitive pricing with the fastest turnaround using AI
- Upload, search edit and export with ease.
How Does Speech to Text Software Work?

The core of a speech to text service is the automatic speech recognition system. The systems are composed of acoustic and linguistic components running on one or several computers.
What is speech to text acoustic model?
The acoustic component is responsible of converting the audio in your file into a sequence of acoustic units – super small sound samples. Have you ever seen a waveform of the sound? That’s we call analogue sound or vibrations that you create when you speak – they are converted to digital signals, so that the software can analyze them. Then, mentioned acoustic units are matched to existing “phonemes” – those are the sounds that we use in our language to form meaningful expressions.
What is speech to text linguistic model?
Thereafter, the linguistic component is responsible of converting these sequence of acoustic units into words, phrases, and paragraphs. There are many words that sound similar, but mean entirely different things, such as peace and piece.
The linguistic component analyzes all the preceding words and their relationship to estimate the probability which word should be used next. Geeks call these “Hidden Markov Models” – they are widely used in all speech recognition software. That’s how speech recognition engines are able to determine parts of speech and word endings (with varied success).
Example: he listens to a podcast. Even if the sound “s” in the word “listens” is barely pronounced, the linguistic component can still determine that the word should be spelled with “s”, because it was preceded by “he”.
Before you are able to use an automatic transcription service, these components must be trained appropriately to understand a specific language. Both, the acoustic part of your content, that is, how it is being spoken and recorded, and the linguistic part, that is, what is being said, are critical for the resulting accuracy of the transcription.
Here at Amberscript, we are constantly improving our acoustic and linguistic components in order to perfect our speech recognition engine.
What is a speaker dependent speech to text model?
There is also something called a “speaker model”. Speech recognition software can be either speaker-dependent or speaker-independent.
Speaker-dependent model is trained for one particular voice, such as speech-to-text solution by Dragon. You can also train Siri, Google and Cortana to only recognize your own voice (in other words, you’re making the voice assistant speaker-dependent).
It usually results in a higher accuracy for your particular use case, but does require time to train the model to understand your voice. Furthermore, the speaker-dependent model is not flexible and can’t be used reliably in many settings, such as conferences.
You’ve probably guessed it – speaker-independent model can recognize many different voices without any training. That’s what we currently use in our software at Amberscript
What Makes Amberscript’s Speech to to Text Engine the best?

Our voice recognition engine is estimated to reach up to 95% accuracy – this level of quality was previously unknown to the Dutch market. We would be more than happy to share, where this unmatched performance comes from:
- Smart architecturing and modelling. We are proud to work with a team of talented speech scientists that developed a sophisticated language model, that is open for continuous improvement.
- Big amounts of training material. Speech-to-text software relies on machine learning. In other words, the more data you feed the system with – the better it performs. We’ve collected terabytes of data on the way to get to such a high quality level.
- Balanced data. In order to perfect our algorithm, we used various sorts of data. Our specialists obtained a sufficient sample size for both genders, as well as different accents and tones of voice.
- Scenario exploration. We have tested our model in various acoustic conditions to ensure stable performance in different recording settings.
Transform your audio and
video to text and subtitles
- High accurate, on demand service
- Competitive pricing with the fastest turnaround using AI
- Upload, search edit and export with ease.
Natural Language Understanding – The Next Big Thing in voice to text
Let’s discuss the next major step forward for the entire industry, that is – Natural Language Understanding (or NLU). It is a branch of Artificial Intelligence, that explores how machines can understand and interpret human language. Natural Language Understanding allows the speech recognition technology to not only transcribe human language but actually understand the meaning behind it. In other words, adding NLU algorithms is like adding a brain to a speech-to-text converter.
NLU aims to face the toughest challenge of speech recognition – understanding and working with unique context.
What Can You Do with Natural Language Understanding?
- Machine translation. That’s something that is already being used in Skype. You speak in one language, and your voice is automatically transcribed to text in a different language. You can treat it as the next level of Google Translate. This alone has enormous potential – just imagine how much easier it becomes to communicate with people who don’t speak your language.
- Document summarization. We live in a world full of data. Perhaps, there is too much information out there. Imagine having an instant summary of an article, essay, or email.
- Content categorization. Similar to a previous point, content can be brought down into distinctive themes or topics. This feature is already implemented in search engines, such as Google and YouTube.
- Sentiment analysis. This technique is aimed at identifying human perceptions and opinions through a systematic analysis of blogs, reviews, or even tweets. This practice is already implemented by many firms, particularly those that are active on social media.
Yes, we’re heading there! We don’t know whether we’re gonna end up in a world full of friendly robots or the one from Matrix, but machines can already understand basic human emotions.
- Plagiarism detection. Simple plagiarism tools only check whether a piece of content is a direct copy. Advanced software like Turnitin can already detect whether the same content was paraphrased, making plagiarism detection a lot more accurate.
Where is NLU Applied These Days?
There are many disciplines, in which NLU (as a subset of Natural Language Processing) already plays a huge role. Here are some examples:

What’s the future of Natural Language Processing?
We’re currently integrating NLU algorithms in our speech to text software to make our speech recognition software even smarter and applicable in a wider range of applications.
We hope that now you’re a bit more acquainted with the fascinating field of speech recognition!
3) The ultimate level of speech recognition is based on artificial neural networks – essentially it gives the engine a possibility to learn and self-improve. Google’s, Microsoft’s, as well as our engine is powered by machine learning.
About the Author
Peter-Paul is the founder and CEO of Amberscript, a scaleup based in Amsterdam that focuses on making all audio accessible by providing transcription and subtitling services and software.
Coding Interviews: Learn Coding Basics
Are you a student who’s doing a qualitative research? Already recorded and transcribed interviews for your thesis or project? Scared of coding interviews?
Luckily, it is much easier than it sounds. If you associate the word “coding” with HTML5 or similar tools – breathe out. Coding qualitative data is much more straightforward and in 10 minutes you’ll know your way around it, both theoretically and practically.
Start the countdown and let’s get started with coding interviews
Let’s begin by understanding what we mean by coding interviews in qualitative research, what’s the use of it and what types of coding are out there. Let’s start from coding basics: a code can be any label (number, figure, symbol, word, phrase), that you assign to a part of your text, that represents a certain theme. Generally, a code should be precise and summarize the main idea behind a certain theme. Let’s review a simple example, imagine we study an article about different views on American culture. Although this passage is quite broad and can be coded in many different ways, we opted for “American culture as “the American dream“ for the sake of keeping it simple.
Example: American culture is largely built on the notion of “American dream”. This concept entails a social ideal, in which everyone is able to achieve success through hard work.
Coding your data helps you to identify the main points of interest in your research documents. Additionally, coding interviews makes it easier to organize large chunks of information and share it with other people.
What types of coding exist?
There are 2 approaches to coding qualitative data: inductive and deductive. You’re probably familiar with these terms, but let’s do a quick recap. If you have a set of ideas and assumptions that guide your research – you can develop preliminary coding categories and search for them in your interview data. This way, you’re testing theory and thus using a deductive coding approach.
On the other hand, if you start your coding process from scratch and aim to identify themes to create a theory – you’re using inductive coding. No matter which approach you’re using, the coding procedure remains largely the same.
How to apply Qualitative Coding using software?
Before we proceed, there is an important point to be made. You don’t have to use the software to perform qualitative coding. All the steps mentioned below can be done the old-fashioned way of using pen and paper. The software provides additional convenience and potentially saves time, but it’s not essential.
Time to show you the step-by-step instructions on how coding interviews. In our example, we’re using a software package called QDA Miner Lite (can be downloaded for free).
However, these steps look very similar in other tools as well. If you want to look at other tools for analyzing qualitative data, check out this post on qualitative data coding tools for a nice overview.
First of all, open the QDA Miner, create a new project and select the file (s) you’re going to work with.


In our case, we are going to use a template of a job interview transcript, that we’ll use for coding. In this example, we’ve chosen a broad coding category called “Candidate Bio”. It is further split into more precise codes, such as “Personal Motivation”, “Qualification” and “Perseverance”.
Depending on the research method; you either search for text, that corresponds to your codes or you develop codes based on the patterns and correlations you found in the text.
- Go to Code → Add → Choose a code name and a category (“Under”)

- You can highlight your codes in different colors
When you’re done, your file should look like this.

Great job! If you’ve successfully coded all the themes you want to cover in your study – go ahead and start analyzing them. Look for correlations, patterns, and inconsistencies, and form a meaningful conclusion.
What else can I do to analyze my text? (Bonus Tips)
1) You might want to look for certain words and phrases and assign a specific code to them.
- Go to Retrieval → Text Retrieval → Type your word or phrase under “Search for text”
- Make sure the search unit is set to “sentence”

2) You can also do the opposite and search for sentences, that contain a specific code.
- Go to Retrieval → Coding Retrieval → Choose the code (s) of your choice
- Run the search
- You can also experiment with search conditions, but we’ll leave it for the time being

3) You can assess how often a specific code was used.
- Go to Analyze → Coding Frequency → Select the codes
QDA Miner will generate a simple table that shows you a number of times and % of cases, indicating the use of code(s).

What’s next?
If you’ve read this far, you should be ready for coding interviews! And if this topic has captured your interest and you want to become a real coding professional, the book “The Coding Manual for Qualitative Researchers” comes highly recommended.
In case you don’t have the transcription of your interview yet – make it automatically in a matter of minutes with Amberscript.
You might also be interested in reading these blog posts:
– The #1 tip to save time with your research interviews
How to Improve Audio Quality with Adobe Audition
If you are getting familiar with the use of Adobe Audiotion, this blog is for you! We will talk about How to Improve Audio Quality with Adobe Audition. Follow our step-by-step guide and take your audio quality to the next level.
Table of Contents
- How to Improve Audio Quality with Adobe Audition
- How to eliminate background noise?
- How to Remove Silences?
- How to Normalize and Amplify Volume?
- Amberscript’s transcription services
How to Improve Audio Quality with Adobe Audition
Today we’re not going to touch upon the recording part, but we’ll focus on the simple editing techniques in Adobe Audition. And if you use free software like Audacity – you can still follow along, since the procedures are almost the same. However, if something doesn’t match, take a look at this article on How to Improve Audio Quality with Audacity.
We assume that your recording is of decent quality with no major problems. And in case you’re just about to record something, be sure to skim through our post on how to improve your audio quality .
You might be wondering why it is important to have the highest quality of audio possible. Let us give you a few benefits:
- Better comprehension: Clear audio helps the understanding of the video, it increases comprehension, thus it creates a better experience for your audience. On the contrary, when the audio quality is poor, it might lead to the viewers not watching your it at all.
- Reach a wider audience: High audio quality is especially beneficial, when people with different native languages are watching your video. Providing a high audio quality will ensure that people from different backgrounds also understand and interact with your video.
- Makes transcription easier: Transcribing your video has several benefits, such as increased accessibility and better SEO performance. Did you know that a high audio quality results in more accurate transcription? Amberscript’s machine-made service for instance, can create up to 85% accurate transcripts, when the quality of the audio is high.

Amberscript’s transcription services
You might wonder why it’s important to improve the quality of your audio. By having high quality audio/video files you will be able to transcribe your files with a high accuracy. Amberscript offers two kinds of transcription services.
Machine-Made transcripts are beneficial as they can save up to 70% of your time compared to transcribing you audio by yourself. When a high quality audio is provided, Amberscript’s software can generate a transcript of up to 85% accuracy in more than 39 different languages. Due to the fast turnaround time, machine-made transcripts can scale up your businesses’ efficiency drastically.
Amberscript also works together with a large group pf freelancers, who are native speakers experienced in transcribing. They correct your automatically generated transcripts and ensure that the quality is perfect. Although the process generally takes more time, you will receive transcripts of up to 100% accuracy.
Who is Amberscript?
How to eliminate background noise?
Now that you are aware of the importance of high audio quality, let us teach you how to increase it in Adobe Audition. This is perhaps the most important step of the entire workflow. Luckily, nothing could be easier. First, you need your “room tone” for that. A room tone is a ‘natural’ sound of your room or location. Don’t confuse it with complete silence though, the room tone is a mixture of low-volume sounds, that take place within your environment and make up the background noise.
You might not necessarily hear all of these sounds, but your microphone does pick them up. Examples include noise coming from computer fans, air conditioning, or power sockets.
In order to improve audio quality, all you have to do is to record 5-10 seconds of silence – that will be your basis for noise elimination. If you forgot to do so deliberately – don’t worry, you probably have pauses where you don’t talk, we can also use those smaller samples.
Please note, that the position of the microphone in relation to your room plays a role, so if you record something in a different spot – you’ll likely have a different room tone.
Now, that the theory is covered, let’s get to practice.
- Select the audio fragment
- Go to Effects → Noise Reduction/ Restoration → Noise – Reduction (process)
- Press “capture noise print”
- Then select “entire file”
- Usually, the default settings produce nice results but feel free to play with the sliders.
- Apply


How to Remove Silences?
No matter what it is, an interview for your thesis, a podcast or a speech – every recording will have small or larger gaps of silence. You can easily find silent fragments of your audio by looking at the waveform (highlighted on the screenshot)- it is flat and static.

Depending on the length of your audio, you can either cut these parts manually or automate the software to do it for you. In both cases make sure not to delete the silence completely, but to shorten it. Otherwise, your audio will sound unnatural and rushed.
Manually:
- Look for silent fragments
- Right-click, then crop
Automatically:
- Go to Effects → Diagnostics → Delete Silence (process)
- Inside the Diagnostics tab go to Settings, then press “Find levels”
- Press fix by “shortening silence”
- The default setting is shortening silence by 100ms, and in most cases, it works well.
- Click the “Scan” button, click on Settings again, you’ll see a list of problems, just press “Delete all”


How to Normalize and Amplify Volume?
These terms might sound difficult, but they stand for very simple processes. In essence, normalizing is a relative volume adjustment, while amplifying is absolute: they are both a way to improve quality audio.
Normalizing audio means setting a peak or target volume for a certain part of the audio file, meaning that quiet areas will be raised to a certain volume, while the loud ones will be brought down or remain untouched.
For instance, if you’ve recorded an interview, normalizing your audio can bring all the voices to a certain level of volume, making sure that neither of them is too quiet nor too loud.
- Select the fragment you want to alter
- Go to Effects → Amplitude and Compression → Normalizing audio (process)
- Select a % or dB value and click Apply
- Make sure “Normalize all changes equally” box is checked


Amplifying means increasing/ decreasing the volume of the audio fragment by a certain amount. What it means is both quiet and loud values will be affected in the same way.
You can use this feature if the entire part of the recording is too quiet or too loud.
- Select the fragment you want to alter
- Go to Effects → Amplitude and Compression → Amplify
- Select a preset and choose “Apply”


And…. that’s it! Your audio should be nice and clean now thanks to our post on how to improve audio quality! The next step is transcribing your recording into text. Fortunately, with Amberscript it can be done automatically and in a few minutes. Check out our products.

Frequently asked questions
-
Can I burn the subtitles directly onto my video?
If you have exported the transcript as a SRT, EBU-STL or VTT file, you can easily burn them onto your video using video-editing software.
-
Can I change the position of the subtitles?
That needs to be done using a video editor like VLC. Go to Tools > Preferences [CTRL + P]. Under Show settings, select the option that says All to switch to the advanced preferences. Navigate to Input/Codecs > Subtitle codecs > Subtitles. Under Text subtitle decoder set, the Subtitle justification to left, right or center.
-
How do I add subtitles to a YouTube video?
To add subtitles to your Youtube video, simply add the file you have created using Amberscript to your video in the Youtube Studio. Click on “subtitles”, then “add” and finally “upload file” and select the SRT file.
-
How do I add subtitles to a video on Vimeo?
To add subtitles to your Vimeo video, simply add the file you have created using Amberscript to your video in the editing window on Vimeo. Click on “distribution”, then “subtitles” and finally click on the + symbol to upload the SRT file.
-
How do I order translated subtitles?
To order translated subtitles, you can upload your file like you would normally do. You can then select manual subtitling. Once you have selected this, an option will appear where you will be able to select the language the subtitles need to be translated to. If the language that you want is not one of the options you can contact us through our contact form.
-
To which languages can you translate subtitles?
For our human-made subtitling services we work with a network of language experts in 15 different languages. Find out which here. If the language you want is not on the list, please contact us through our contact form.
-
What subtitle file formats are supported?
Our software allows you to export the transcript from the video or audio file as an SRT, EBU-STL or VTT file.
Productivity hacks for students – A Complete Guide
If you are a student who fell into the trap of procrastination or someone who can’t concentrate on studies because something else always comes up, we have a solution. If you want to study in an efficient way, consistently obtain good grades and always meet the deadlines – follow along! We have compiled a list of productivity hacks, that will definitely aid you in your studies, as well as in daily life.

Productivity tips
Let’s dive straight into it and discuss how you can create an intellectually stimulating environment for your studies:
- Pick a suitable location for your studies. It can be anything: your room, a university library or a park around the corner. Just make sure that: the place is quiet; there are no distractions; you have enough comfort and space.
- Turn off notifications and sound on all of your devices. Sounds so obvious and simple to do, yet very few people do it. It is very tempting to check your Facebook feed or messages in WhatsApp, but it significantly harms your working atmosphere.
- Schedule your sessions (at least roughly). Find the best time of the day for your study sessions. Some people are more productive in the morning, some at night. Scheduling will help you to establish a study routine, which in turn improves your self-discipline and dedication.
- Make sure you have enough natural light at your location. This tip is not a “must”, but it has been proven by research, that natural light stimulates learning activities on an unconscious level.
- Avoid listening to music with lyrics. In most cases, it is advised not to listen to any kind of music while studying since it takes away your concentration. This point is certainly debatable, and some literature suggests that listening to, for example, classical music, can actually improve the quality of learning. However, one thing is certain – lyrics are distracting. When listening to music, you subconsciously analyze the lyrics, thus shifting your brain power in the wrong direction.
Get a customized offer
Request a quote for your transcription needs
Study tools
So far so good! Now you have optimal conditions for your studies. What’s next? Right, study tools! In our digital age study tools are software packages that do boring and repetitive work for you, saving you time for something more important. Let’s review some examples:
- Grammar checking software such as Grammarly is great at correcting typos/ grammar mistakes and may also give you advice regarding your language style & vocabulary. You still have to proofread the text yourself, but most of the work is done for you.
- Citation managers like Zotero and EndNote automatically convert your citations to the desired style (such as APA) and organize the bibliography. If you’re writing an academic paper, using one of these tools is almost a necessity.
- Cloud services such as OneDrive or Google Drive can be used to keep all of your study-related documents in one place. Besides the obvious benefit of organizing, you will have a backup copy of your files, in case something goes wrong.
- Automatic transcription software converts speech to text in a short amount of time. These tools come in handy when you need to interview someone for your thesis/ project and don’t want to spend hours doing manual transcription yourself. Luckily, Amberscript offers different product plans, such as cheap and reliable machine-made transcription and highly accurate human-made-transcription endorsed by thousands of students.
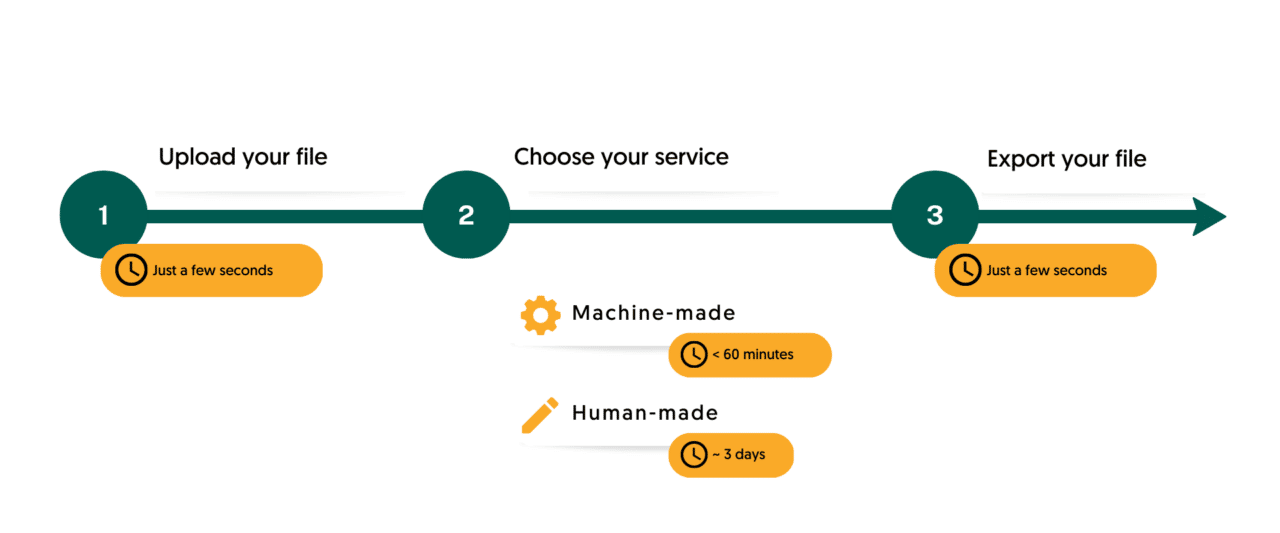
Study methods
Now that you have a suitable study setting, and are aware of the useful tools, let’s have a closer look at the study methods:
- Use the ¾ technique. It’s super simple, for every hour that you spend on studying, 45 minutes (or ¾) should be spent on reading/ writing or any other intellectual activities. Reserve the remaining 15 minutes for your break. Go for a short walk, drink some coffee, answer a few messages (but just a few!). Studying non-stop for hours without breaks is exhausting and in fact, may even lower your productivity. This technique is a good starting point, but you can also experiment by slightly changing the length and quantity of your breaks. See what works for you but remember: your study session should be 75% studying and 25% resting and not the other way around!
- Always summarize your readings. First, a solid summary is your best bet to recover important information, while studying for the exam. Second, by making a summary of an article/ a book you instantly filter and organize all the relevant information, that is going to remain in your long-term memory. Third, your personal summary will be tremendously more effective, than the ones students download online. Using your own language and style (visual cues, such as bullet points, graphs, simple drawings) will create a stronger anchor in your memory. Moreover, summaries of other people may be unreliable or incomplete. Just remember the old saying- “If you want something done right, do it yourself”.
- Integrate both handwriting and typing in your workflow. Remember the school days, when we’ve used to practice handwriting? Those good old times are gone, since now students mostly use their laptops to take notes or make summaries. However, don’t throw away your pen and paper just yet. It has been proven that students who write by hand remember significantly more information, that those who type. We highly recommend sticking to handwriting, when taking notes or summarizing information. When it comes to large volumes of text, that you don’t necessarily need to learn – typing is the way to go.
- Forget about multitasking. This advice applies to anyone, who’s not Julius Caesar. If you want to do a good job at something – concentrate and dedicate all of your attention. The more things you do at once – the easier it is to fail at all of them.
- Start your study sessions with a clear-cut goal in mind. Develop a few specific objectives, that you plan to accomplish by the end of the day. This can be a simple to-do list, such as read 50 pages of Marketing book, write 1 page for the assignment, learn a certain topic, etc. Keep in mind that goals follow the same principle as multitasking. The more goals you set the more likely it is that you won’t accomplish any of them. It’s much better to pick 2-3 realistic goals and stick to them.
- Find a group of study buddies. Generally, studying is your personal thing and you should be intrinsically motivated to do it. However, searching for a study group is not a bad idea at all. You can meet up occasionally to revise some topics or work on a project together. This way you not only have more viewpoints to work with, more feedback and (hopefully!) more motivation.
- When searching for the right literature, skim through the text first. If you’re working on a thesis or an academic assignment, you will probably have to look for a lot of literature to back up your claims. Every time you find an article for your topic – don’t read the whole text. First, look at the introduction and conclusion. If the information there makes sense to you and it’s something that can be used – you can start skimming through the body for specific details. And if a general idea is not enough and you need a complete understanding – only then you should read the whole text. There’s nothing wrong with reading a lot, but you don’t want to spend time reading a lengthy article and then realizing that it doesn’t suit your research.
- Diversify your learning style. There’s an infinite number of ways to learn something new. Say you want to obtain more insights on Behavioral Economics. You don’t have to limit yourself to solely reading textbooks and academic articles. Instead, you can also search for relevant podcasts, videos or presentations online. Having multiple sources of information makes your learning experience more interesting and flexible.
Amberscript’s Transcription services
- Fast and accurate machine-made services
- Human-made transcription by native speakers
See our pricing below!
Choose your planFrequently asked questions
-
Can I burn the subtitles directly onto my video?
If you have exported the transcript as a SRT, EBU-STL or VTT file, you can easily burn them onto your video using video-editing software.
-
Can I add a glossary with specific words to the transcription job?
Yes, we also offer specialized transcription, which can include jargon or specific vocabulary. To learn more about this or discuss specifics, please contact us.
-
Can I translate my subtitles and transcriptions via your app?
No, translation is not available in the automatic services but you can order translated manual subtitles services on our platform. Unfortunately, we do not offer translated manual transcriptions. Please check our prices here.
-
Can I adjust the formatting?
From your account, you can export the transcript in different formats. So if you require both a Word file and an SRT file, you can simply export the file twice.
-
Do you add timestamps?
Yes, timestamps are included in the transcript.
-
Do data remain within the European Union?
Amberscript’s IT infrastructure is designed to ensure full GDPR compliance and the highest levels of data protection. We store all data exclusively in Western Europe, adhering to stringent security measures to protect, store, and handle your data. All data that is processed by Amberscript will be stored and processed on highly secured servers with regular back-ups on the same infrastructure. For transcriptions that are performed in English, Dutch, Swedish, Danish, Norwegian, Finnish, German, Portuguese, Italian and Spanish data will never leave the EU. For other languages, Amberscript might use third-party providers for processing and the data might leave European Servers for processing. For all of our third-party providers, we made agreements that the data will be deleted directly after processing.
-
Do you have a minimum length per file?
No, we do not have a minimum length per file. However, for manual transcription services, we have a minimum order of 20 minutes of transcription, just so we are able to pay our language experts a fair wage. If you are requesting manual transcription for a file with less than 20 minutes, you are still able to do it, but you will be charged for the 20 minutes.
The Beginner‘s guide to Amberscript’s automated transcription
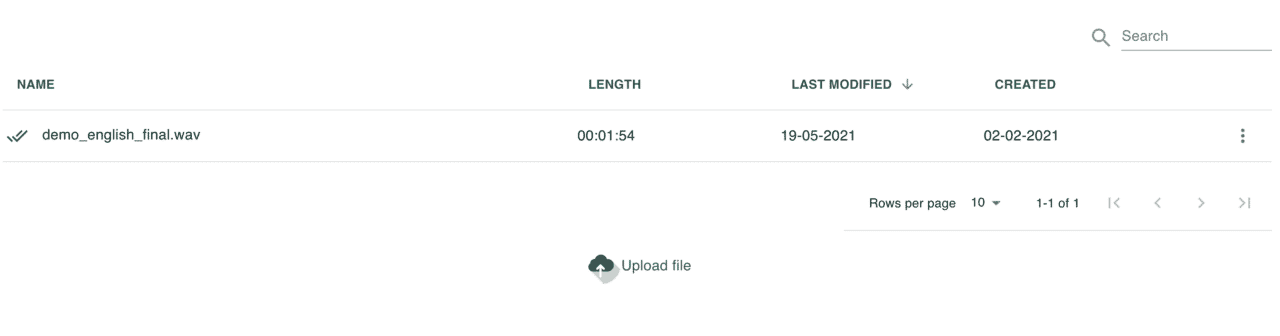
Transcription (converting speech to text) is a very time-consuming process. It takes 8 to 10 minutes to transcribe only one minute of audio. In addition, it is also a mentally very difficult job. You’d prefer to spend this time on something else, right? That is possible with our transcribing software! Our state of the art speech-to-text engines converts your speech into text at lightning speed. This saves you a lot of time. Here’s how you can use our software.
Uploading your file
First, you need to upload your audio file to Amberscript. You can do this by clicking the upload button at the top left or at the bottom of your screen. After clicking on Upload you have to select the file you wish to transcribe and click on Open. We support the following audio files: .mp3, .mp4, .aac, m4a and .wav.
Our software works best with files shorter than 120 minutes. Do you have a file longer than 120 minutes? In this case, you can cut this file into smaller files, more about this later.
Then, choose the desired transcription language and click on “Proceed”.
Our software is now transcribing your audio file. First, your file is queued. You’ll see a clock in front of the file name. Afterwards, it starts transcribing. Then you’ll see a pencil in front of the file name. Transcribing can take up to 40 minutes, but usually it takes about 10 minutes. Depending on the length of the audio file and the amount of traffic on our website, the time it takes to transcribe varies. So grab a cup of coffee and take a short break – you will receive an email from us when your file is ready!
Editing your file
When your file is transcribed you can find the transcription in your personal Amberscript environment under “Your Ambers”. You can open the editor that contains your transcription by clicking on the file name.

In the editor, the audio is tied to the transcription, so you can easily make corrections. Clicking the play button will play the audio file; a dash indicates the section of text associated with the audio. You can then make adjustments in the transcription. If you want to rewind, click the “Rewind” button. This will take you back 5 seconds. When you select a piece of text and click on “Highlight”, this piece will be marked. You will also see this highlight in your audio timeline.
If you want to start listening from a certain word, you can hold down the alt key and click on that word. 3 seconds after each change, the file is saved automatically. It is therefore important that you do not close the transcription immediately after an adjustment.
We have a number of shortcuts that allow you to edit your transcriptions even faster. Definitely try these out, making good use of these tools can help you finalize the transcription much faster:
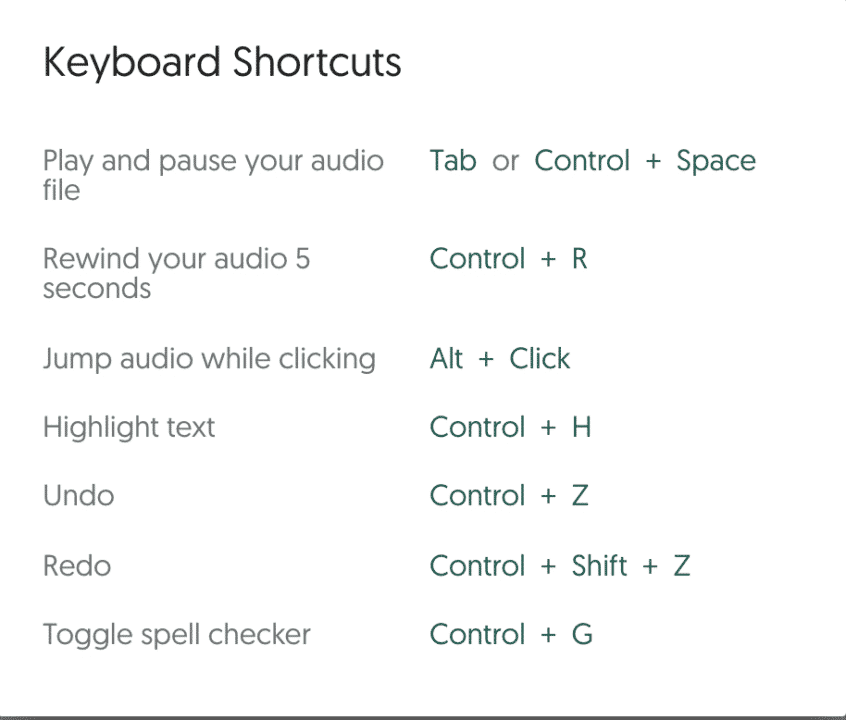
Exporting your transcription
When you have finished editing your file you can click on the ‘Export’ button. An overview will appear in which you have various options for exporting your file. Then click on the ‘Export’ button to download your file.
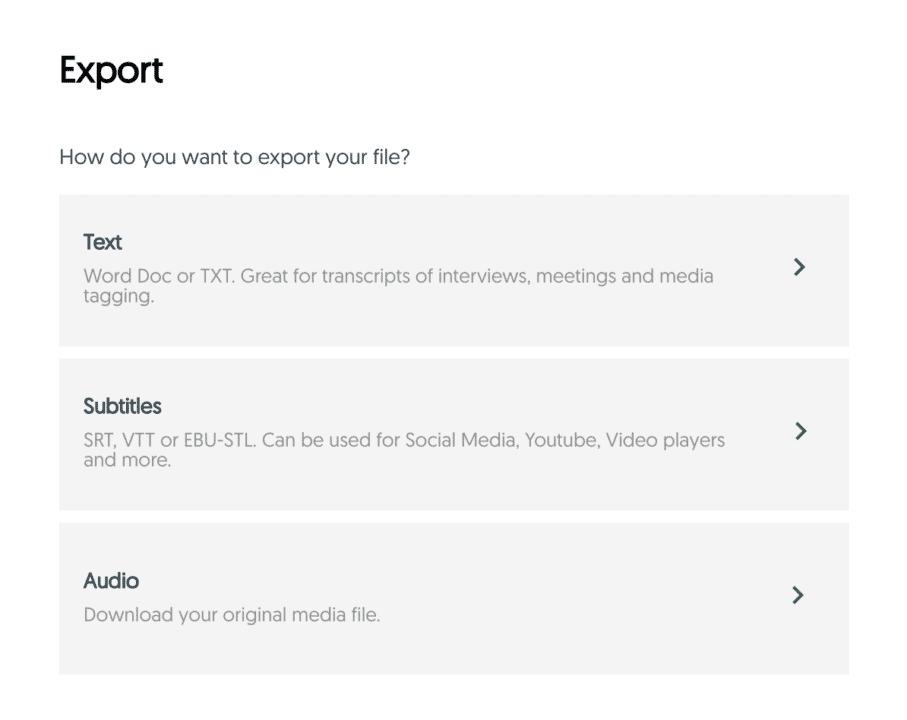
Cutting your file
If your audio file is longer than 120 minutes, it is better to cut it into several smaller files. You can easily do this with the program called Audacity. Download Audacity and open the program when the download is complete.
Open the audio file of your interview in Audacity. This is done by clicking on ‘File’, then on ‘Import’ and then selecting your interview. Select the ‘Selection Tool’. Select the audio you want to cut and press ctrl + x. Now click on ‘File’ and then on ‘Export …’. Choose the folder where you want to save the file and choose the desired file type. An additional program must be downloaded for some file types. We recommend the WAV file format. Then click on ‘Save’. It can often be useful to keep the original and complete version of your audio file, so do not replace or delete it.
Go back to Audacity, click on ‘File’ and then on ‘New’. This opens an empty Audacity file. Paste the previously cut piece and export this file. You have now created two short files from one long file.
Before you can cut your audio file, it is important that you stop your file in Audacity, and do not pause.
We hope that you can make the best use of Amberscript through this manual. We are always available for questions. Good luck!
How to use transcription to boost podcast engagement
1. Podcast transcript increases accessibility and convenience
Podcast transcription allows appealing to more people. Why? Information can be presented in multiple ways. For some people, it is the best absorbed when they see it written. Moreover, transcription makes podcast content available to those with hearing impairment as well as to non-native speakers.
And what about the people who are in noise-prohibitive environments? By reading the transcript, they can still get to know the podcast content! In addition, fragments of the transcript can be easily shared in social media, which provides one more way for people to discover content.
2. Podcast transcription benefits SEO
Transcription is very important for strengthening an online presence and increasing visibility. Search engines work exclusively through text, therefore transcripts enable listeners to locate content that interests them and can increase visibility and rank on a search engine. Moreover, transcripts are already inherently keyword-rich, which makes it easier to index.
3. Provides a better user experience
Transcription gives the users a lot of ways of finding what they are interested in. For instance, the interest of a potential listener can be piqued with a short synopsis that is possible with a podcast transcript. The listeners can also benefit from the possibility of scanning the transcript in order to choose the parts to further explore. Moreover, with access to notable keywords and general themes, the transcription helps the content to be more interactive.
4. Transcription helps to create other forms of engaging content
Why not create other forms of content, if a certain theme or topic is compelling for the audience? Podcast transcripts enable to change the text easily into SlideShare presentation, list of key takeaways, write a post, etc.
Transcription is the perfect mean to maximize the potential of the podcast, give an audience what is searching for and increase the engagement.
How to improve audio quality?
Our clients often ask us why the accuracy of their automatically generated transcripts varies. It can be a consequence of the audio quality. The extent to which your audio file can be automatically converted into text is directly related to the quality of your audio. Good audio quality will definitely speed up the transcription process! Do you want to save yourself time and guarantee better transcription results using transcription software?
How can you improve the quality of your audio? Read about the most important steps.
Table of contents
- The distance between the speaker and the microphone
- Eliminate background noise
- Quality of the microphone
- Transcribe audio recording with Amberscript
- Everything at a glance
Below we will discuss the above points in more detail.

1. The distance between the speaker and the microphone
Sound quality is greatly influenced by the distance between the speaker and the microphone. If the speaker is too far away, the microphone will not pick up all sounds properly and some parts may get lost. If the distance is too short, you will hear the speaker breathing into the microphone. The perfect distance depends on the microphone; often, the ideal distance is around 10 centimeters.
If you use your phone, holding it in front of the speaker’s mouth gives the best result. If that is not possible, the phone should be placed on the table right in front of the speaker. Moreover, take your phone case off so the microphone is uncovered. The transcription should go easily then!

2. Eliminate background noise
The audio quality improves enormously when most of the background noise is eliminated.
Technically it is never completely silent, even in the quietest environments there will be some sounds. It is therefore impossible to have complete silence anywhere, but we do have a few tips to make sure it is as quiet as possible at the moment of recording:
- Make sure everyone around you is quiet. Tell everyone around you that you are conducting an interview and that it is important there is silence. Put a sign on the door so nobody just enters without asking.
- Turn off all devices that may produce any sound. This could be the air conditioning, a fan, a printer or your computer. It is not enough to just turn off the sound on your computer as most computers have built-in fans that produce sounds. If you need your computer during the interview, it is important to keep it as far from the microphone as possible.

3. Quality of the microphone
Of course, the quality of the audio depends greatly on the quality of the microphone. With microphones, it is often true that more expensive microphones also have better quality. Fortunately, there are also cheap microphones for recording good quality audio, if only because they ensure that the speaker and the microphone are at the right distance from each other.
There are different types of microphones, these are:
1. A lavalier (clip-on microphone)
The lavalier is excellent for interviews. Lavaliers provides better recording quality than a telephone and ensures that there is an optimal distance between the speaker and the microphone. Another advantage is that lavaliers are often equipped with two heads, so you do not need to move the microphone for another speaker during an interview.

2. A table microphone
A table microphone is a microphone that can be placed on the table between the speakers. Most table microphones provide better recording quality than a telephone. A table microphone can be useful in a conversation with several speakers. If the speakers are in different directions of the microphone, it is important that the polar pattern of the microphone is Omni Directional (more on this later).
3. A telephone
Currently, there is voice recording software available for almost every smartphone. Because of this, the smartphone is the most accessible microphone in this list. The recording quality is pretty good for most smartphones, but it does improve the quality if you keep the phone close to the speaker and do not put it on the table.

4. A laptop
Most laptops have a built-in microphone, this microphone can also be used for recording interviews. The laptop and phone are both good options if you do not want to invest in a separate microphone. However, for recording interviews, we recommend using a smartphone over a laptop. This is because a smartphone is easier to use and records in better quality audio.

5. A voice recorder
A voice recorder, often called a dictaphone, is an excellent microphone to be used for recording interviews. The quality of the recordings is usually very high in a voice recorder. Also, with a voice recorder, the quality of the recording improves enormously when you keep the voice recorder near the speaker instead of putting it on the table.

There are different types of microphones that record sound from different directions (also called polar patterns).

For interviews, a Figure-of-Eight is the best choice, because it absorbs the same amount of sound on both sides of the microphone. A Figure-of-Eight also records less background noise than an Omni Directional. However, Figure-of-Eight microphones are often a lot more expensive
Research on the accuracy of our software with different microphones reveals major differences, as can be seen in the table below. Word Error Rate means the percentage of errors that our software makes. For example, a Word Error Rate of 10% means that there are on average 10 errors for every 100 words. Find the results of the research below:
| MICROPHONE | WORD ERROR RATE |
|---|---|
| Lavalier (a clip-on microphone) + telephone | 10% – 20% |
| Premium smartphone on the table | 20% – 30% |
| Premium smartphone in your hand | 15% – 25% |
| Budget smartphone on the table | 30% – 80% |
| Budget smartphone in your hand | 20% – 50% |
| Laptop | 30% – 50% |
| Table microphone | 10% – 40% |
As you can see above, there is already a significant difference between putting your phone on the table and holding it in your hand. Furthermore, the quality of your microphone is extremely important. With a lavalier, the quality of the audio can be significantly improved, and the Word Error Rate reduced.
We have selected lavalier and table microphone options with high sound quality for you, which you can use with your smartphone:
- Lavalier: Maono AU404
- Table microphone: Jabra 510
Get a customized offer
Request a quote for your transcription needs
4. Do not interrupt each other
Besides that, it is not quite correct to interrupt each other, this also confuses our transcription software. That is why it is important to let each other finish your sentences so our software can do its job as well as possible. Furthermore, our software has some trouble with heavy accents. Of course, it is difficult to do something about an accent, but it is an enormous help to try to talk as accent-free as possible. By following these tips, we can best convert your audio into text.

5. Transcribe audio recording with Amberscript
With Amberscript, it’s easy to transcribe your audio recordings. Here are the four steps you need to take to do this:
- Recording your audio file
- Upload the recording to the Amberscript platform
- Select the language in which you would like to transcribe
- Choose a professional or automatic transcription
- And voilà! We take care of the rest
First, record your audio such as a conference, interview, etc. Next, you can upload your recording to Amberscript and record the language of that audio or video file.
Decide if you want a machine-made or human-made transcription. Here it must be noted that our professional native speakers work with higher accuracy, but the AI is faster and cheaper.
Everything at a glance
As discussed above, it is actually very simple to improve the quality of your audio files. First, it is important to keep about 10 centimeters between the speaker and the microphone. Secondly, it is important to eliminate background noises, so unplug any devices that can produce sound and tell everyone near you that they should be quiet. Thirdly, it is important not to interrupt each other. Finally, the quality of the sound depends greatly on the quality of the microphone and the type of microphone.
If you follow these tips, the quality of your audio files will improve enormously, so we can better convert them to text and you have to make fewer adjustments to your automatically transcribed texts!
Now you know everything about improving your audio quality, you can discover the 2 best applications to record a phone call!
Benefits of using Amberscript
Amberscript’s subtitle services are:
Fast
Edit your own text within minutes or leave the work to our experienced subtitlers.
Accurate
Our experienced subtitlers and thorough quality controls ensure 100% accuracy of your transcriptions and subtitles.
Easy
Thanks to a variety of integrations and API interfaces, you can fully automate your workflows.
Secure
Your data is in safe hands. We are GDPR compliant + ISO27001 & ISO9001 certified.
Frequently asked questions
-
How do I order translated subtitles?
To order translated subtitles, you can upload your file like you would normally do. You can then select manual subtitling. Once you have selected this, an option will appear where you will be able to select the language the subtitles need to be translated to. If the language that you want is not one of the options you can contact us through our contact form.
-
To which languages can you translate subtitles?
For our human-made subtitling services we work with a network of language experts in 15 different languages. Find out which here. If the language you want is not on the list, please contact us through our contact form.
-
What subtitle file formats are supported?
Our software allows you to export the transcript from the video or audio file as an SRT, EBU-STL or VTT file.
-
Can I add a glossary with specific words to the transcription job?
Yes, we also offer specialized transcription, which can include jargon or specific vocabulary. To learn more about this or discuss specifics, please contact us.
-
Do you offer cloud transcription services?
Yes, our services are offered on the cloud.
-
Do you offer real-time transcription services?
Yes we do, we provide real-time transcription and subtitling services regularly in a variety of use cases. For more information please reach out to our sales team here.
-
Do you provide full verbatim or clean read transcripts?
In the manual transcription service, we provide both transcription types.
-
Do you transcribe files with multiple speakers?
Yes, our software can transcribe multi-speaker files and can also distinguish different speakers in the transcript. Different speakers will be indicated as “speaker 1”, “speaker 2”, etc. You can rename speakers in the online editor.
-
How can I improve my audio quality?
The accuracy of a transcript can be improved by ensuring that the quality of the audio in your file is the best it can possibly be. Want to know how to optimize your audio? Read it here!
How long does it take to transcribe 1 hour of audio?
A well-drafted interview transcript allows having always at hand all the information needed for the project. But how long does it take to transcribe 1 hour of audio and what are the options out there?
How long does it take to transcribe an interview? Here are some options:
An interview can be an extremely useful source for fresh and up-to-date information that is often hard to find. Especially for researchers, interviews are the cornerstone of their discoveries. However, referencing back to audio or video recordings is never easy and no researcher has time to listen over and over to interview recordings. To get the absolute most from your recorded information, interview transcription is the perfect solution!
No researcher has the time to work on the interview transcript manually. Many first-time researchers are, in fact, surprised by how long it can take to transcribe interview recordings by themselves. Manual Interview transcription is a time-consuming process that not only requires a lot of effort but also a great deal of concentration and focus. Moreover, the transcription process takes even longer when you don’t have the right tools at your disposal.
- Manual transcription: do the interview transcript yourself! How long does it take to transcribe 1 hour of audio manually? Making the interview transcription yourself takes approximately 5 – 6 hours for 1 audio hour. This option is the cheapest one but also the most time-consuming.
- Automatic Transcription Software (like Amberscript): our software, for example, takes up to 1 hour (usually only a few minutes) to transcribe your 1-hour long interview. It is a good balance between saving both time and money. The accuracy of the interview transcript varies from software to software. Amberscript has one of the highest accuracy rates in the market. Try it for free and see it for yourself.
- Hire a freelancer or a transcription agency: having a company make your interview transcription can take around 5 working days, depending on the provider chosen. Amberscript also offers a manual review of your transcripts, by one of our language experts, to be delivered with 99% accuracy. Learn more about our Perfect Manual Transcription service.
Let’s break down these three options in greater detail.
Manual interview transcription – Do it yourself
Manual transcription of one hour of audio-recording can easily take you 5-6 hours of work. Depending on how fast you type, how many speakers are involved in the dialogue, how fast they speak and how experienced you are in transcribing, you might be able to speed up the process (or take even longer!). Although many researchers value the fact that throughout the process of the interview transcription they become extremely familiar with the recordings and their content, it is a time-consuming process, especially when a deadline is getting closer!
Using an automatic transcription software for your interview transcription
Software is a key-element to save time when speaking of interview transcription. There are two types of transcription software:
- Softwares that aid you in the transcription process but without the option for automatic transcription
- Softwares equipped with Automatic Speech Recognition (ASR)
Software without the Automatic Speech Recognition technology can be used to play the audio faster, slower or to repeat the last seconds again so that you can grasp what was being said more easily. It allows you to define shortcuts that can play/pause the audio and insert timestamps or speaker-names. Don’t underestimate how many times you’ll hit play or pause if you are transcribing a group discussion. Speeding up that process with shortcuts can save a lot of time.
Software with Automatic Speech Recognition offers these handy functionalities as well as providing you with an automatic, machine-generated interview transcript. You upload the audio or video file and, after a few minutes, you’ll receive an automatically generated text. Of course, the interview transcript won’t be perfect (it’s still a machine, after all!), but with good audio-quality, the text can require minimal adjustments. If you use software like Amberscript, the text editor will make it easier to find and fix any mistakes.
With Amberscript you can have your interview transcript ready in up to 1 hour! That’s a huge time saving (50-70%) opportunity. I bet you have better things to do than transcribing all day long 😉
Learn more about how to use Amberscript and try it for free!
Outsourcing interview transcription to a specialized agency
If you want to outsource your interview transcription, you can either hire a freelancer or give the project to a specialized agency. There are great freelancers out there, but as it happens with freelancing work, it could be a bit challenging to evaluate the quality of the outcome or guarantee consistency.
Agencies usually work better for a tight deadline or a higher volume of transcriptions. If you work with a transcription agency, you can normally deliver the audio and wait a few days to receive your interview transcript completed and proofread. This option is a bit more costly, as there would be specialists working on your interview transcription. The market price of transcribing 1 hour of audio in Europe is somewhere between 78€ and 120€.
For those who need perfectly transcribed texts, Amberscript offers the option to have your automated interview transcript reviewed by experts in 29 languages, with a turnaround time up to 5 business days, at €1.90 per minute. Learn more.
Do you need an interview transcription?
Subtitles, Closed Captions, and SDH Subtitles: How are they different?
Subtitles are a text created from the transcript of a video. However, captions offer added value by describing what is happening in addition to the dialogue, such as any music or background noises. Finally, SDH are subtitles that replicate captions and are specifically designed for deaf or hard of hearing persons.
Table of contents
- What are subtitles?
- SDH Subtitles vs. Closed Captions
- Why should you create subtitles (SDH or CC)?
- Amberscript’s subtitling services
- How to create subtitles with Amberscript
- Learn more about what we do at Amberscript
What are subtitles?
Subtitles are text that are typically displayed at the bottom of the screen and are taken from a transcript or screenplay of the dialogue in movies, television shows, or videos. Oftentimes, translated subtitles are used when the original audio is in a different language than the viewer’s mother language. This allows a broader audience to enjoy your video content.
What are closed captions?
They not only provide the dialogue in written form but also supplement information about background noises, soundtracks, and other noises that are part of the scene. Closed captions are mostly written in the language that is set for the video. For instance, if you have Netflix and turn on subtitles, what you see is a good example of closed captions.
Good to know: In essence, subtitles are targeted towards people who can hear the audio but also need the dialogue in written form. Closed captions on the other hand are targeted to an audience that cannot hear the audio and need a text description of sounds.
What are subtitles for the deaf or hard-of-hearing (SDH)?
SDH captions are subtitles which combine the information of both captions and subtitles. While normal subtitles assume the viewer can hear the audio but doesn’t know the spoken language,
SDH assumes that the viewer cannot hear the audio (like with captions). In this case, SDH is intended to emulate closed captions on media that does not support closed captions, such as digital connections like HDMI. SDH can also be translated into foreign languages to make content accessible to the deaf and hard of hearing individuals who understand other languages.
SDH Subtitles vs. Closed Captions
Appearance
SDH captions differ from closed ones in a number of ways. The first difference is in appearance. Closed captions are typically displayed as white text on a black band, whereas SDH are usually displayed with the same proportional font of translated subtitles. More and more often, however, both subtitles and closed captions have user control options that allow the viewer to change the font, color, and size of the text.
Placement
SDH and closed captions also differ in terms of placement. Closed captions can usually be aligned to different parts of the screen which is helpful for speaker identification, overlapping conversation, and avoiding interference with important on-screen activity. SDH text is usually centered and locked in the lower bottom third of the screen.

Why should you create subtitles (SDH or CC)?
Adding subtitles, SDH or CC to your video has multiple advantages.
1) Your video content will be discovered by more people on social media/
As it turns out, 85% of Facebook videos are watched without sound. Adding subtitles to your videos will not only capture the attention of potential viewers but will also allow them to get your take-home message, even with no audio. Sometimes circumstances don’t allow viewers to watch videos with sound (e.g – count how many times you forgot your headphones and then had to travel by bus/ attend an event/ stand in the waiting line, etc). The true value of your subtitles lies in the additional convenience they provide to your audience.
2) Reach a potentially wider audience
There are over 400 million people worldwide who are deaf or have partial hearing disabilities. They either can’t or have a hard time consuming audio content. By creating subtitles, you ensure that your message is spread to those customer groups, who would otherwise be excluded. Improving the accessibility of your content will help you better serve your audience.
3) Improve SEO
Search Engines like Google can’t analyze video material, that’s why when you upload this type of content, only the title and the description are included in the keyword search. By adding a textual transcript to your video, search engines have much more data to work with, which helps to attract traffic to your content.
4) Attract more foreign viewers to your content
When your transcript is ready, it’s easy to translate it into many foreign languages. Having subtitles in multiple languages will not only expand your geographic reach but will also make your content more discoverable, again, because of improved SEO.
Well done! If you came this far it means that you now are an expert about subtitles and closed captions.
Amberscript’s subtitling services
Now that you understand the difference between subtitles, closed captions and SDH captions, you need to know how to create them. Using Amberscript’s services is one of the easiest and most accurate ways to create subtitles for your videos. At Amberscript, we offer three kinds of services:
- Machine-made captions
Machine-made captions are the fastest way of subtitling. Amberscript’s advanced speech recognition (ASR) software provide a convenient solution up to 85% accuracy in 39 different languages. By using Amberscript machine-made subtitling services, you only need to upload your video, then our software will provide you with a transcript, that you can edit yourself. After accepting the AI-generated transcript, the subtitles will be created for you.
- Human-made captions
If you need highly accurate subtitles you can benefit from our human-made subtitling services. Our professional team of native freelancers ensure that your subtitles are 100% accuracy in 15 different languages. By choosing this option, you only need to upload your file and we will do all the work for you.
- Translated subtitles
Your video content will often need to have subtitles in different languages to reach a broader international audience. With Amberscript’s translated subtitles our team of professional translators will provide you with subtitles in 15 different languages. In this case, you’ll not only make your video accessible to a wider audience, but you will also provide learning opportunities.
How to create subtitles with Amberscript
1. Upload your video file
Once you have the video you would like to subtitle, upload it onto the Amberscript platform. Once the video has been uploaded, select the language of the file and choose the service option most suitable for you (machine-made, human-made or translated subtitles).
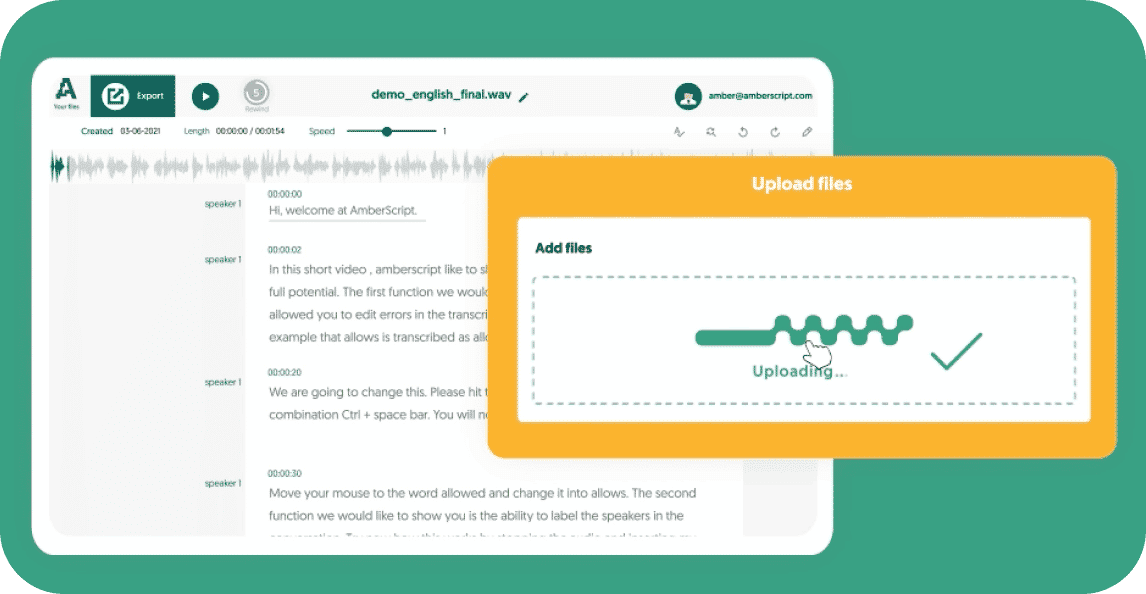
2. Edit your subtitles in the online text editor
If necessary, you can use the online text editor to make any adjustments to your subtitles. On our online text editor, you’re able to edit the generated transcript, align and format the subtitles to get them to the best file for your video. Get familiar with the editor by following the instructions in the demo video on the platform.
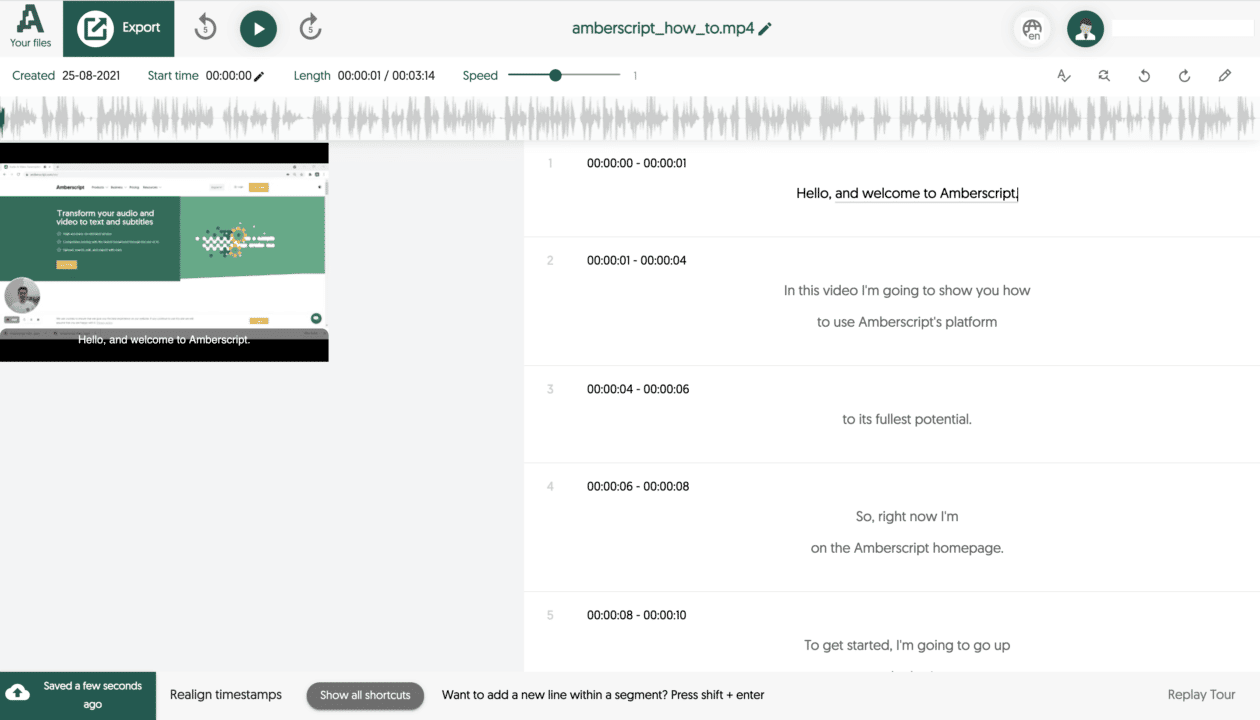
3. Export your file
Once you feel like your file is ready, it’s time to export and download. This is a simple process and only takes a few seconds. With Amberscript, you will be able to export your file in various formats, but we recommend you to choose between SRT, VTT and EBU-STL for subtitles. Choose the format and download it to your computer so you can access it at any time.
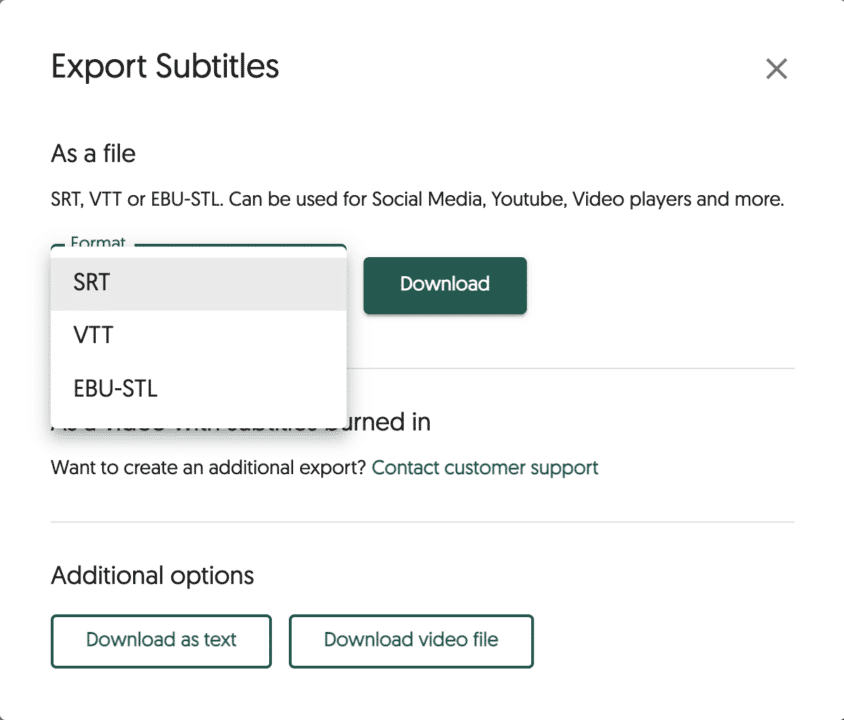
Learn more about what we do at Amberscript
Would you like to know more about how you can create subtitles with Amberscript? We have a detailed step-by-step guide explaining the process for you. If you need information on how to add subtitles to different platforms, click on the links to access our detailed guides.
- How to create subtitles in Premiere Rush
- How to create subtitles in iMovie
- How to create subtitles in Final Cut Pro
- How to create subtitles in DaVinci Resolve
- How to create subtitles for Skillshare
- How to create subtitles for Canvas
- How to create subtitles for Moodle
- How to create subtitles for Udemy
- How to create subtitles for Twitch (live streaming platform)
- How to create subtitles for Kaltura (SaaS platform)
- How to create subtitles for Vimeo (video hosting platform)
- How to create subtitles for Panopto (video platform)
Frequently asked questions
-
What is the difference between subtitles and closed captioning?
Subtitles are for viewers who are unable to understand the language spoken, whereas captions are for viewers who are not able to hear the audio.
Captions, which can be closed or open captions, incorporate both the conversation and any other relevant sounds. They are used to assist the deaf by showing all auditory sounds. That is, they include environmental sounds as well as changes in speaker and speaker tone.
Captions can also be used by hearing people who cannot hear the audio in a noisy place or who do not want to disturb the other people in their environment. Subtitles can also be used for this purpose if the viewer just wants to follow a conversation.
-
Why are they called closed captions?
The term “closed” in closed captions refers to the fact that the captions are not displayed until the viewer activates them, usually using the remote control or a menu option. The process of activating them is what is known as decoding.
-
What does closed captioning mean?
Closed captioning is text that appears on the screen to recreate the audio experience for people who may or may not understand the language being spoken, but cannot hear the audio for whatever reason.
They provide the dialogue in written form but also supplement information about background noises, soundtracks, and other noises that are part of the scene. Closed captions are mostly written in the language that is set for the video.
-
How to add subtitles to a video?
To add subtitles to a video:
- Import the video to be subtitled.
- Choose the clip in the movie or video to which you want to add subtitles.
- The viewer will then display a title sign at the top. Tap the Title sign.
- After clicking the title sign, select the title style you want.
- There are title variations for the bottom of the screen. Examples are lower, lower third, and reveal lower third. You may select any of them.
- To add a title (subtitle) style, double-click it.
- Go up to the observer. There is a text box at the top of the viewer where you may enter your text.
3 ways automated speech recognition (ASR) can foster digital inclusion
In the EU the directive on digital inclusion of the websites and mobile applications of public sector bodies’ (EU2016/2102) was put into place. This directive demands public organizations to become more inclusive by making all their openly published content accessible to people with disabilities. This group includes approximately 50 – 75 million citizens and represents 10-15% of the entire population of the 27 EU member states. What can Automated Speech Recognition do to help in that?
What is ASR?
Automated Speech Recognition (ASR) is a technology that enables computers to recognize and interpret spoken language. It involves converting spoken words into written text, which can then be analyzed, stored, and processed by machines. ASR is commonly used in voice assistants, transcription software, and speech-to-text tools.
What is digital inclusion?
Digital inclusion, on the other hand, refers to the process of ensuring that everyone, regardless of their background or circumstances, has equal access to digital technologies and services. This includes internet access, digital literacy, and the skills needed to use digital tools effectively.
How do these two concepts match?
ASR is relevant to digital inclusion because it has the potential to break down barriers and increase accessibility for people who may otherwise be excluded from digital technologies. By converting spoken words into written text, ASR can make digital content and services more accessible to people with hearing impairments, language barriers, or other disabilities.
The challenge of digital accessibility
The digital world has revolutionized the way we live, work and communicate. However, for millions of people with disabilities, accessing the digital realm is not always a straightforward task. Digital accessibility refers to the extent to which digital technology, including software, websites, and applications, is accessible to all individuals, regardless of their abilities. Despite progress in recent years, many websites and applications still present significant accessibility barriers for people with disabilities, hindering their participation in the digital society.
The problem of digital accessibility has far-reaching implications for individuals and society as a whole. For individuals with disabilities, it can limit their ability to access information, education, and employment opportunities, and reduce their overall quality of life. It also perpetuates a culture of exclusion, where people with disabilities are further marginalized and isolated from mainstream society.
Three ways ASR can foster digital inclusion
Automated Speech Recognition technology has the potential to break down barriers to digital inclusion and create a more accessible and inclusive digital world. Here are three ways that ASR can foster digital inclusion:
Improving accessibility for people with disabilities:
ASR technology can be an incredibly powerful tool for people who are deaf or hard of hearing, as well as those with limited mobility. By providing real-time captions or subtitles for audio and video content, ASR technology can make digital media more accessible to those who may have difficulty hearing or following along. Similarly, ASR-powered voice commands can allow people with limited mobility to control digital devices and access digital services more easily, empowering them to live more independently.
Enabling access for people with low literacy levels:
For people with low literacy levels, digital content and services can be incredibly difficult to access and navigate. However, ASR technology can help to bridge this gap by allowing users to interact with digital devices and services using their voice. This can be particularly helpful for people who struggle with reading or writing, allowing them to use the internet and access digital resources more easily.
Bridging the digital divide for non-native speakers:
In many regions and countries, the dominant language of the internet and digital services may not be the same as the primary language spoken by local residents. This can create a significant barrier to digital inclusion, as non-native speakers may struggle to access and understand digital content and services. However, ASR technology can help to bridge this divide by providing real-time translation and transcription services. By enabling users to interact with digital devices and services in their own language, ASR can empower non-native speakers to access digital resources and participate more fully in the digital world.
Case studies and examples
University Jena
In the case of the University of Jena, ASR technology was used to promote digital accessibility by making lectures and academic content more accessible to students with hearing impairments. The university used Amberscript’s ASR technology to automatically transcribe lectures and create captions for videos, making the content more accessible to students who may have difficulty following the spoken content.
This solution allowed students with hearing impairments to have equal access to academic content, enabling them to participate fully in lectures and discussions. It also helped to break down barriers to learning and promote inclusion within the university community.
By leveraging ASR technology, the University of Jena was able to improve digital accessibility and provide a more inclusive learning environment for all students.
Telecommunications corporation Orange
In this case study, ASR helped promote digital accessibility for a global audience by providing accurate and efficient transcription services. Orange, a global telecommunications company, needed to produce captions and transcripts for their digital content to make it accessible for people with hearing impairments or who speak different languages.
Using ASR technology provided by Amberscript, Orange was able to quickly and easily produce captions and transcripts for their content. This made their content more accessible and inclusive for a wider audience, including those who are deaf or hard of hearing, or those who speak different languages.
ASR technology also helped Orange save time and resources, as they were able to automate the transcription process and reduce the need for manual labor. This allowed Orange to produce content more efficiently and effectively, while still maintaining accuracy and quality.
Cheflix
ASR helped to promote digital accessibility in the partnership between Cheflix and Amberscript by providing accurate and efficient closed captioning for Cheflix’s cooking videos. The closed captions, generated through ASR technology, make the videos accessible to people who are deaf or hard of hearing, as well as those who prefer to watch videos with captions.
ASR technology also enables Cheflix to offer their content in multiple languages, making it accessible to a wider audience, regardless of their native language. This promotes digital inclusion by removing language barriers and allowing more people to access the content.
Additionally, the use of ASR technology in this partnership demonstrates how technology can be used to create more accessible and inclusive digital experiences, ultimately promoting greater inclusion and accessibility for all individuals in society.
Challenges with ASR
Automated Speech Recognition (ASR) has come a long way in recent years, but there are still several challenges and limitations that need to be addressed. Here are some of the key challenges and limitations:
- Accuracy: Despite advances in ASR technology, accuracy remains a significant challenge. ASR software can struggle to accurately transcribe speech in noisy environments or when there are multiple speakers. This can make it difficult for people who rely on ASR to access digital content or communicate with others.
- Dialects and accents: ASR can have difficulty recognizing different dialects and accents, particularly those that are less common. This can be a significant barrier for individuals who speak with non-standard accents or dialects.
- Limited language support: ASR software is often limited to specific languages or dialects, which can be a significant challenge for people who speak minority languages or dialects.
- Limited customization: ASR software may not be customizable for specific industries or use cases, which can limit its usefulness in certain contexts.
Amberscript: the best choice
Amberscript has several features that help address some of the challenges and limitations of ASR technology. Besides transcription and subtitling services, the company additionally offers audiodesciption, translations and dubbing.
- Multilingual support: Amberscript can transcribe audio in 39+ languages, which helps to address the language barrier challenge.
- Accuracy: Amberscript uses advanced algorithms to achieve high accuracy rates in speech-to-text transcription. Additionally, it offers an interactive editor for users to review and edit their transcriptions to further improve accuracy. For special occasions of specific accents and dialects, Ammberscript offers the a professional service that uses proofreading by native language speaking experts.
- Customization: Amberscript allows users to Integrate speech recognition capabilities into their software by using Amberscripts audio to text API. It is possible to connect to generic models or even collaborate with to create a customized speech recognition for your specific use-case. Users can also train the software on specific voices or accents, which can improve accuracy even further.
Transcriptions and subtitles with Amberscript in three simple steps
Accurate transcriptions in no time
Subtitling your conent has never been easier
Audio Transcription: How To Transcribe Audio to Text | Amberscript
From legal and medical to media and academia, transcription has become a vital tool for converting spoken language or audio into written form. It enhances accessibility for the hard of hearing, provides a written record of important conversations, and facilitates research analysis. In this guide, we’ll explore the many uses and benefits of transcription, giving you everything you need to know to get started.
Table of content
- What is ‘Transcription’?
- What types of transcription are there?
- The importance of transcriptions
- Use Cases for Transcription
- How long does it take to transcribe? And what does it cost?
- Transcription methods
- Transcription Technology
- Accuracy and Quality of Transcription
- Tips for an efficient and accurate transcription process
What is ‘Transcription’ and what exactly is audio transciption?
Transcribing or ‘transcription’ is a synonym for ‘writing out’ or ‘typing out’. It is the process of converting spoken language or recorded audio into written or digital text. The most common application of transcriptions is the transcription of audio and video files, by listening to an audio or video recording and transcribing or typing out the words spoken by the speaker(s).
Audio Transcription
In a nutshell, audio transcription is the conversion of the speech content of an audio file into written text, not video files. Often these audio files include; interviews, academic research, conversations, or even the recording of your father’s speech at your wedding.
Transcriptions can be done in three different ways. Either manually by yourself, manually by a professional transcriber, freelancer, or transcription agency, or automatically using speech recognition software.
Transcribe with Amberscript in 3 simple steps
Transcribing audio to text is important in various fields, including medical, legal, business, media and academic. It can help to improve accessibility, accuracy and comprehension of spoken content. Depending on what the transcription is to be used for, a different type of transcription can be applied.
What types of transcription are there?
There are 2 types of transcribing: verbatim and edited. Depending on the purpose of transcribing, one or the other is more suitable.
1. Clean read transcription
Clean read transcription, aims at the content of a conversation in a clearly legible form. Half sentences, aborted words, and interjections are ignored and the transcriptionist writes the conversation grammatically correct (as far as possible).
With an edited transcript, the content of a conversation is perfectly reproduced, while the way in which something is said is less important.
When is the clean read transcription used?
- For interviews that serve as a basis for articles or documentaries
- For qualitative research where the content of the conversation is in focus
- At meetings that have to be published
- Notes that you recorded just for yourself
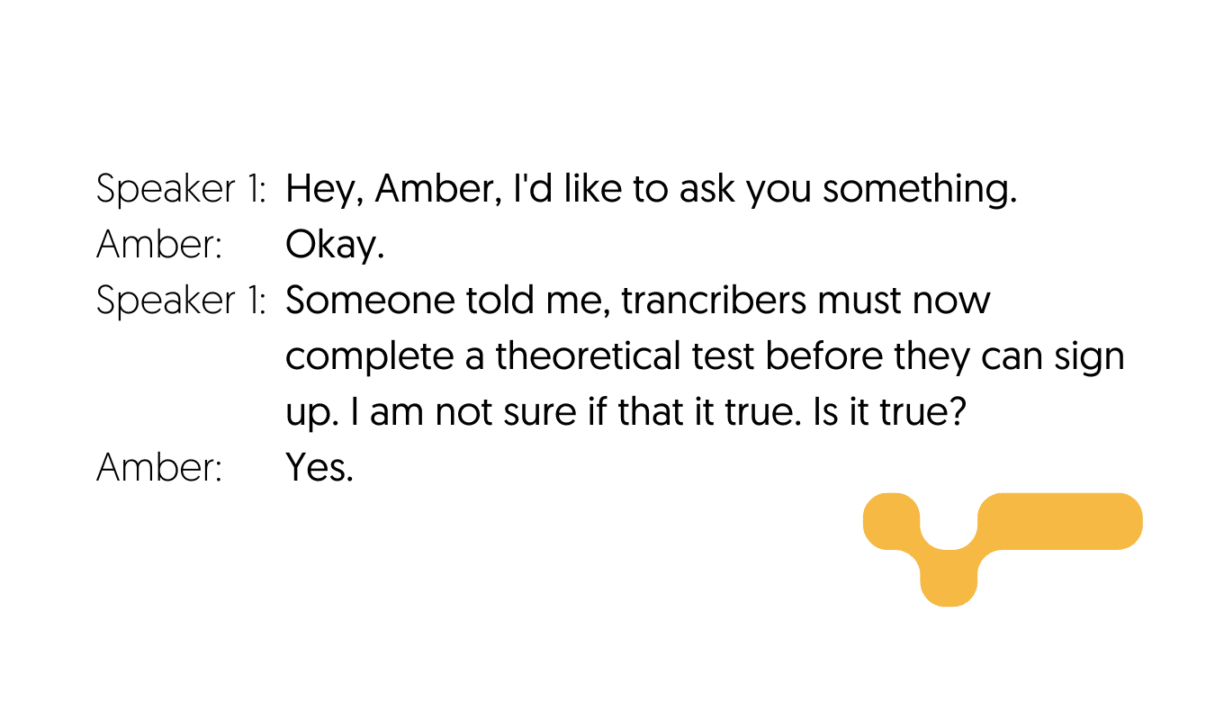
2. Verbatim transcription
Literal transcription, also called verbatim, aims to record the way “how something is said”. During literal transcribing a letter-by-letter transcript is written out which the speakers follow as accurately and completely as possible.
This also means that interjections, repetitions, stutters, interrupting words, and colloquial language is literally typed out, such as:
| Interjections | Euhms and aahs |
| Repetitions | “I’m just saying, the region … the Brabant region uh, that uh, that’s the focus” |
| Stutters | “It’s mainly about the the the region in Brabant.” |
| Interrupted words | “We will be back to the municipal meeting next wee-, what is the name? City council meeting together” |
| Colloquial language | “Here we are all together” |
When is it important to transcribe literally?
- In qualitative research where the intonation of respondents is important
- In research where the way in which something is said is crucial
- In psychological research
- In transcripts for legal purposes
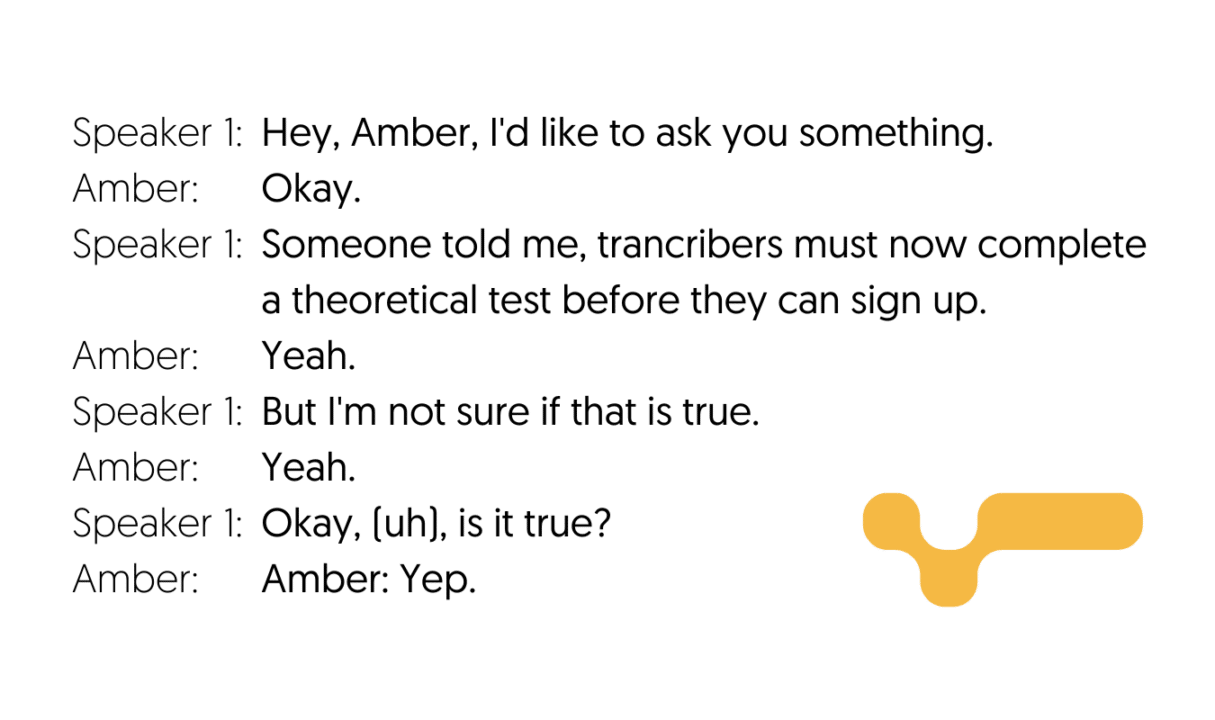
Learn more about the difference between Verbatim and Clean read transcription.
The importance of transcriptions
Transcription is important for various reasons, including improving accessibility, accuracy, and time saving.
Accessibility
Transcription is a powerful tool that can break down barriers and make information accessible to all. For those who are deaf or hard of hearing, or non-native speakers, transcription can provide a written version of spoken content, allowing them to fully participate in discussions, debates, and entertainment. By converting audio and video content into text, transcription enables people with hearing impairments or language barriers to access valuable information and enjoy content that might otherwise be inaccessible. This not only improves accessibility, but also promotes inclusion and diversity, ensuring that everyone can benefit from the wealth of knowledge and entertainment available today.
Examples
Accessibility powered by transcription
-
Captions for videos
Transcripts are used to create subtitles. Adding captions to videos is a common way to improve accessibility. Captions provide a written version of the spoken words in the video, allowing people with hearing impairments to follow along with the content. Learn more about video subtitles here.
-
Transcripts for webinars and online courses
Providing transcripts for webinars and online courses can help make the content more accessible. Transcripts provide a written version of the spoken content, allowing people to read and understand the material even if they are unable to listen to the audio. Learn more about transcripts for webinars and online courses.
-
Transcripts for podcasts
Providing transcripts for podcasts is another way to improve accessibility. Transcripts provide a written version of the spoken content in the podcast, allowing people to read the content if they are unable to listen to the audio. Learn more about podcast transcription here.
Accuracy
In a world where communication is everything, transcription is the key to unlocking accurate understanding. By converting spoken language into written form, transcription can help avoid misunderstandings, clarify key points, and capture every detail with precision. Whether dealing with technical jargon or complex terminology, transcription ensures that the meaning is accurately conveyed, so that nothing is lost in translation. In fields such as legal, medical, and journalism, accuracy is paramount, and transcription provides a vital tool for record-keeping and reporting. With transcription, we can be confident that the truth is preserved, and that our understanding of the world is as clear and accurate as possible.
Examples
Unlocking accurate understanding
-
Transcribing legal proceedings
Transcribing court proceedings, depositions, and other legal conversations can help ensure that all details are captured accurately, which can be important for future reference or for use in legal cases. Learn more about legal transcription.
-
Transcribing medical reports
Transcribing medical reports, such as doctor-patient conversations, can help ensure that all details are captured accurately, which can be important for future reference and for providing continuity of care.
-
Transcribing interviews for journalism
Transcribing interviews can help avoid misunderstandings and clarify important points, ensuring that the final article is as accurate as possible. Learn more about the importance of transcriptions in journalism.
Time savings
By converting audio and video content into text, transcription allows us to read and review information more quickly than we could by listening to it. This is especially useful in academic and research settings, where sifting through hours of recorded material can be a daunting task. With transcription, researchers can easily scan through the text and extract relevant information, without wasting time listening to the entire recording. Transcription can also help people save time when taking notes during meetings, lectures, or interviews. By transcribing the conversation, they can focus on active listening and engaging in the discussion, while knowing that they have an accurate written record of everything that was said. Ultimately, transcription can help us be more productive, efficient, and effective in all areas of our lives.
Examples
Saving time with transcription
-
Transcribing meeting notes
In a business setting, transcribing meeting notes can save time by allowing participants to quickly review what was discussed and decided without having to listen to an entire recording. This can help ensure that everyone is on the same page and can prevent misunderstandings or mistakes.
-
Transcribing interviews for research
In academic or research settings, transcribing interviews can save time by allowing researchers to quickly locate relevant information without having to listen to the entire recording. This can be particularly useful when conducting research that involves a large number of interviews or when time is limited. Learn more about the use of transcriptions for research purposes.
-
Transcribing lectures for students
In educational settings, transcribing lectures can save time for students who may have difficulty keeping up with the spoken content. By providing a written transcript of the lecture, students can quickly review the material and locate important information without having to re-listen to the entire lecture. Learn more about how transcriptions and subtitles can enhance academic achievement.
Use Cases for Transcription
Transcription is used in various fields, including journalism, legal proceedings, medical documentation, market research, and academic research.
Market Research
Transcription is a powerful tool for businesses conducting market research. By transcribing focus group sessions and customer feedback, businesses gain a detailed record of customer opinions and feedback, helping them understand customer needs and preferences. Transcription also allows businesses to identify patterns and trends in customer feedback, making it easier to spot common issues and concerns. By analyzing transcribed customer feedback, businesses can respond to customer needs more effectively and develop targeted solutions that address specific issues. Ultimately, transcription is essential in helping businesses make data-driven decisions and improve their products or services. Learn more about how transcriptions can help you and your business here.
Legal Proceedings
In legal proceedings such as court hearings, depositions, and interviews, transcription is a crucial tool that helps ensure justice is served. Transcription creates an accurate record of events, providing lawyers, judges, and other legal professionals with an unambiguous reference for future use. The importance of accuracy in legal documentation cannot be overstated, as even the smallest detail can make a significant difference in the outcome of a case. With transcription, legal professionals can review exact statements made during proceedings, ensuring all details are captured accurately. Furthermore, transcription can also help legal teams prepare for future proceedings by analyzing previous testimony and identifying potential areas for further questioning. All in all, transcription is an essential tool for legal professionals, enabling them to conduct proceedings accurately and effectively, and ensuring that the principles of justice are upheld. Learn more about legal transcriptions here.
Academic Research
Transcription is a vital tool in academic research, and its uses go far beyond just interviews, lectures, and focus groups. For example, in linguistics research, transcription can help analyze speech patterns and identify unique linguistic features. In medical research, transcription can aid in analyzing patient interviews or medical history for research purposes. Additionally, transcribing research team meetings can provide researchers with a clear and accurate record of discussions, making it easier to recall decisions or ideas generated during meetings. By transcribing their research, academics can quickly and easily analyze data, identify patterns, and draw insights that may have been missed otherwise. This can help to streamline the research process, making it more efficient and effective. Ultimately, transcription plays a crucial role in the academic research process, providing a valuable resource for researchers to draw upon when conducting their work. Learn everything you need to know about interview transcription.
Other Industries
Transcription isn’t just for academics and legal professionals anymore! Industries like journalism, podcasting, and media production can also reap the benefits. With accurate transcriptions, journalists can quickly capture and record interviews, leading to more detailed and accurate articles. Podcasters can improve accessibility for their audience by providing show notes and transcripts, while media producers can use transcription to locate specific content and create closed captions and subtitles. And let’s not forget about search engine optimization! By providing written content for search engines to index, transcription can make your content more discoverable than ever before. So whether you’re a journalist, podcaster, or media producer, don’t underestimate the power of transcription!
How long does it take to transcribe? And what does it cost?
Transcribing is a process that requires a lot of concentration and time. So how much time should you allow for transcribing? This depends on the type of transcription you choose. Manually on your own, manually by a freelancer or a transcription agency, or automatically using automatic speech recognition. You can find an overview in the following table.
| Type | Time | Costs |
|---|---|---|
| Independent transcribing | 5-10 times the duration of your audio | 0 Euro |
| Freelancer or transcription company | 4-5 working days (with accuracy of 100%) | 1,90 – 5,00 Euro/minute |
| Automatic transcription software | 1-2 hours (with accuracy of up to 85%) | > 0.25 Euro/minute |
Transcription methods
You have four options for creating transcripts. Either you transcribe yourself, you outsource the transcription process to a professional agency or transcriber, or you use automatic transcription software that does the transcription for you. The question of whether you transcribe yourself or outsource the process is ultimately a matter of your available time, budget or other preferences.
The following table gives you a brief overview of the individual transcription methods and their features. This way you can decide in no time which type of transcription is best for you. All methods are subsequently described in more detail in this chapter.
| Feature | Independent transcription | Transcription agency | Transcription software | Freelancer |
|---|---|---|---|---|
| Speed | ~ 5-10 times the audio length | ~ 4-5 days | ~ 1-2 hours | ~ 1-5 days |
| Costs | ~ 0€ | > 1.50€/ Audiominute | > 0.25€/ Audiominute | > 1.90/ Audiominute |
| Accuracy | 100% | 100% | 85% | 100% |
| Security | high | mostly high | ~ medium | mostly low |
| Usability | 0% | 100% | 85% | 100% |
Transcription by an agency
There are agencies that specialise in transcribing interviews and group discussions. The advantages of this are:
| Speed | Agencies have more capacity and can deliver faster. |
| Reliability | Professional service providers such as Amberscript transcribe hundreds of hours per day – you can be sure that your transcript will be reliably delivered according to scientific transcription standards |
| Quality guarantee | Agencies follow the 4-eyes principle and can therefore guarantee high quality standards. |
| Data security | Make sure that the agency of your choice attaches importance to data protection and does not, for example, simply share your confidential recordings with unqualified third parties by e-mail. |
Agencies are experts who specialise in the secure and reliable transcription of interviews. So if you can afford the budget, it is advisable to have the tedious transcription done by specialists.
Transcription by freelance transcribers
In principle, it can be a good idea to bring in some extra help. If you do not want to hire a professional agency, you can still turn to freelance writers as another option. However, you need to pay attention to the following things:
| Qualifications | Frelance transcriptionists often have no experience with scientific transcription. As a result, you risk that your transcription does not meet the required quality standards |
| Reliability | Are you paying per minute? Then the transcriptionist will try to finish your transcript as quickly as possible. This can lead to poorer quality. Do you pay per working hour? Then there is a risk that you will end up paying more than you would with a professional agency. |
| Data protection | Freelancers often do not have a secure IT environment and therefore find it difficult to ensure that your data is processed confidentially and in accordance with the GDPR. Many freelancers use external transcription tools that may be located on unsecure servers. |
Transcribe content yourself
Transcribing audio or video content yourself takes a lot of time. Transcribing an hour of interview or group discussion usually takes a long time. However, transcribing yourself also has its advantages. For example, you can go deeper into your own research. Every time you listen to the audio recordings, you are already subconsciously doing a lot of your analysis. You understand exactly what the speakers mean and how something is said, saving valuable time in the analysis itself.
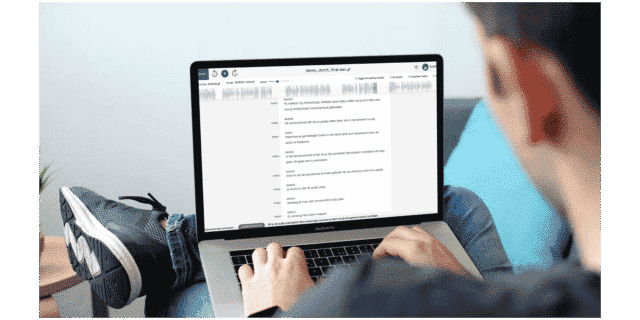
Transcribe with a transcription software
Transcription software is a valuable tool that simplifies the process of transcribing audio files. With transcription software, you can upload audio files in a variety of formats, such as MP4, MP3, and FLAC, which the software can transcribe into text.
Process is made much easier with features such as shortcuts that automatically insert time codes or speakers’ names, as well as easy playback controls. One of the biggest advantages of transcription software is the option to choose between software with or without automatic speech recognition. With automatic speech recognition, the software will attempt to transcribe the audio file automatically, saving you time and effort, software without automatic speech recognition may provide better accuracy and allow for more customization during the transcription process.
Transcription Technology
Automatic Speech Recognition
From virtual assistants to call centers, Automatic Speech Recognition (ASR) is revolutionizing the way we transcribe audio. ASR uses advanced algorithms and AI to break down speech patterns into smaller units, allowing it to transcribe spoken language quickly and accurately. With lightning-fast transcription speed and lower costs compared to human transcription services, ASR is becoming an attractive option for various industries.
Its ability to transcribe large volumes of content quickly and efficiently allows businesses that need to transcribe vast amounts of audio and video content regularly, to save both time and money compared to hiring human transcribers. Additionally, ASR can help improve accessibility for those with hearing impairments, as it can provide captions and transcripts for audio and video content.
Despite its many advantages, ASR does have some limitations to consider. Its accuracy can suffer when it comes to non-standard accents or noisy environments. Imagine a news report on a crowded street with honking cars in the background, ASR may struggle to pick up every word when transcribing the audio of that news report. Moreover, errors can occur when identifying specific words or phrases, which can lead to inaccuracies in the final transcript.
However, as technology continues to advance, these limitations are gradually being overcome. Overall, ASR is a powerful tool that has transformed the transcription industry, making it more accessible, cost-effective, and efficient for businesses and individuals alike. However, it is important to be mindful of its limitations and use it in conjunction with human transcription services when accuracy is critical.
| Advantages | Disadvantages |
|---|---|
| Speed: ASR can transcribe audio in real-time, allowing for fast and efficient transcription of spoken content. | Accuracy: ASR can struggle with understanding accents, background noise, and speech patterns that deviate from the norm, leading to errors and inaccuracies in the final transcript. |
| Cost-effective: ASR can be more cost-effective than hiring human transcribers, as it requires less manual labor. | Contextual understanding: ASR may not always accurately capture the context of spoken content, leading to misinterpretation of certain phrases or meanings. |
| Scalability: ASR can easily handle large volumes of audio content, making it ideal for businesses and organizations that need to transcribe large amounts of audio data. | Editing: ASR-generated transcripts may require more editing and proofreading than those generated by human transcribers to ensure accuracy and clarity. |
| Automation: ASR can automate the transcription process, freeing up time for human transcribers to focus on other tasks. |
Natural Language Processing
Natural Language Processing (NLP) is a subfield of artificial intelligence that focuses on the interaction between computers and human language. It’s used to improve the accuracy of transcription by helping the computer recognize the nuances of human language, such as grammar, syntax, and context. NLP uses techniques such as language modeling, which helps predict the most likely word or phrase based on the surrounding words, and named entity recognition, which identifies and categorizes proper nouns like names of people, places, and organizations. These techniques help improve the accuracy and efficiency of transcription by identifying and correcting errors in the transcription and making it easier for the computer to understand the spoken content.

How Amberscript Works
Amberscript is a transcription service that uses both ASR and NLP to deliver accurate and high-quality transcripts. ASR is used to automatically transcribe the spoken content, while NLP techniques are employed to improve the accuracy of the transcription.
Amberscript utilizes advanced language models that are specifically trained to recognize and transcribe different accents and languages accurately. This is accomplished through the use of custom models that are tailored to the specific needs of each client. The custom models help to improve the accuracy of the transcription by reducing errors caused by accents or technical jargon.
In addition to ASR and NLP, Amberscript also employs human editing to ensure the accuracy and quality of its transcriptions. The transcriptions are reviewed by professional editors who correct any errors and ensure that the final transcript is accurate and readable.
One unique feature of Amberscript is its ability to transcribe content in multiple languages, including languages with complex grammar and syntax. The service also offers a range of customizable options, such as formatting and time coding, to meet the specific needs of its clients.
Overall, Amberscript provides accurate and high-quality transcripts by combining the power of ASR and NLP with human intelligence and custom models. Its unique features and customizable options make it a valuable tool for businesses, researchers, and individuals seeking reliable transcription services.
Accuracy and Quality of Transcription
Challenges in achieving accurate transcriptions
Transcription can be a tricky business, with various challenges that can hinder accuracy. Background noise, accents, and technical terminology are just a few examples of obstacles that transcribers may face. But fear not! With some tips and best practices, these challenges can be overcome.
Background noise
Background noise can make it hard to hear the speakers or distinguish between different voices. To tackle this, it’s important to make sure that the audio recording is of good quality and to use noise-cancellation software or headphones to help reduce unwanted sounds. For example, a journalist conducting an interview in a busy coffee shop can use a directional microphone to pick up the interviewee’s voice and minimize background noise.
Strong accents
Strong accents can make certain words or phrases difficult to understand. A transcription service that offers language-specific models or employs transcribers who are familiar with the accent can be a big help. For instance, a podcaster interviewing a guest from another country with a thick accent can use a transcription service that has expertise in that language or accent.
Technical terminology
Technical terminology can also be a headache for transcriptionists, particularly in fields such as law or medicine. Providing the transcriber with a list of technical terms or using a transcription service that offers custom models for specific industries can help ensure accuracy. For example, a lawyer dictating legal briefs can use a transcription service that specializes in legal transcription and has a team of legal experts who are familiar with legal terminology.
In conclusion, accurate transcription can be challenging, but with the right tools and strategies, it can be done effectively. By using noise-cancellation software, language-specific models, and custom models, transcriptionists and clients alike can overcome common challenges and achieve high-quality transcriptions.
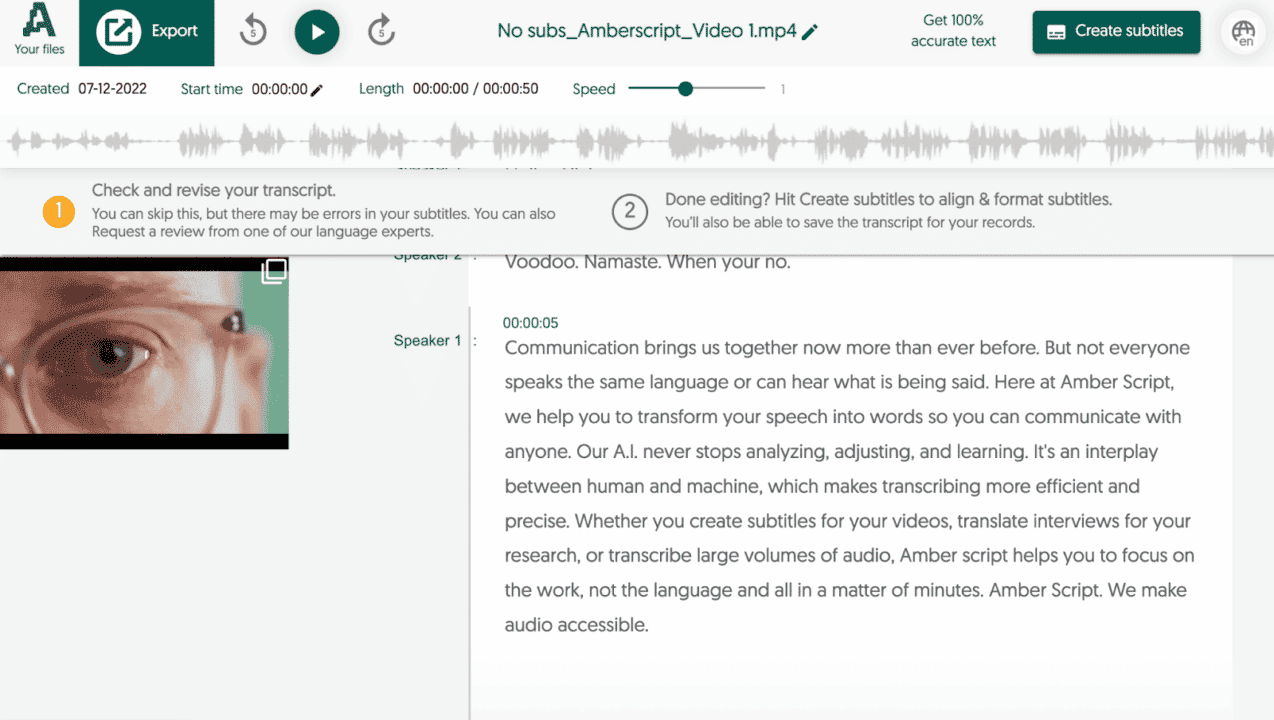
How Amberscript ensures high-quality transcriptions
When it comes to delivering high-quality transcriptions, Amberscript doesn’t cut corners. The company employs a unique approach that combines advanced technology with human expertise, ensuring that its customers receive accurate and polished transcriptions every time.
Using state-of-the-art ASR and NLP algorithms, Amberscript can transcribe audio into text at lightning speed. But it doesn’t stop there. The company knows that language is complex and nuanced, and that technology alone can’t always capture all the subtleties of spoken words. That’s why it also employs a team of skilled language experts and proofreaders to review and refine the transcriptions, guaranteeing accuracy and quality.
Take the example of a medical conference, where doctors are discussing the latest breakthroughs in cancer treatment. The language used is highly technical, with a multitude of jargon and acronyms. ASR and NLP tools may struggle to accurately capture all of this specialized vocabulary, but with Amberscript’s professional transcribers, every term is carefully scrutinized and double-checked for accuracy.
With its focus on combining human and artificial intelligence, Amberscript not only delivers accurate and polished transcriptions, but also saves its customers time and effort. Instead of spending hours reviewing and correcting transcriptions, customers can simply rely on Amberscript’s team of experts to deliver high-quality results.
Amberscript’s transcription software is:
Fast
Edit your own text within minutes or leave the work to our experienced transcribers.
Accurate
Our experienced transcribers & thorough quality controls ensure 100% accuracy of your transcriptions.
Easy
Thanks to a variety of integrations and API interfaces, you can fully automate your workflows.
Safe
Your data is in safe hands. We are GDPR compliant + ISO27001 & ISO9001 certified.
Tips for an efficient and accurate transcription process
Want accurate and high-quality transcriptions? The first step is ensuring you have high-quality audio recordings. Position your microphone correctly, adjust recording settings, and choose the right file format to capture crystal-clear audio. Don’t let background noise or low-quality equipment ruin your transcription!
- Use a quality microphone: The quality of the microphone can greatly impact the clarity of the audio. Invest in a good quality microphone that is suitable for the recording environment.
- Check the recording settings: Ensure that the recording settings are appropriate for the situation. This includes adjusting the levels, bit rate, and file format.
- Minimize background noise: Try to record in a quiet environment to minimize any background noise that could interfere with the recording.
- Place the microphone properly: Proper microphone placement is key to capturing clear audio. Ensure that the microphone is close to the speaker and positioned at a 45-degree angle.

Conclusion
In conclusion, transcriptions are an essential tool for improving accessibility, accuracy, and saving time in various fields. With the right tools and techniques, such as Amberscript’s advanced ASR and NLP technology combined with human language experts, accurate and high-quality transcriptions can be achieved. We hope the information in this guideline can help ensure your transcription process is efficient and accurate. Don’t let transcription challenges hold you back, trust Amberscript to provide top-notch quality transcriptions for all your needs.
Transcription technology has made significant progress lately, thanks to the advancements in ASR and NLP. This technology’s continuous evolution presents a vast potential for even more efficient, accurate, and accessible transcription services.
Amberscript is well-positioned to stay at the forefront of these developments. With a dedicated team of experts in the fields of ASR and NLP, Amberscript is constantly working to improve its technology and enhance the accuracy and quality of its transcriptions. The company places a strong emphasis on customer feedback and satisfaction, using this information to continually refine and improve its services.
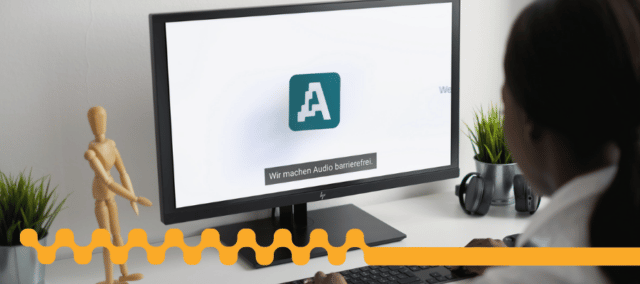
Frequently asked questions
-
How do you keep my files secure and confidential?
Amberscript’s IT infrastructure is built on the server infrastructure of Amazon Web Services located in Frankfurt, Germany. All data that is processed by Amberscript will be stored and processed on highly secured servers with regular back-ups on the same infrastructure.
-
What is the price?
For our prices, please refer to our pricing page.
-
What is the turnaround time?
Our state-of-the-art speech AI delivers results in less than an hour (depending on the size of the file, it can take only takes a few minutes). Just upload your audio into our system and we will notify you as soon as the file is ready! if you would like to learn about turnaround times for our manual subtitling services, click here.
-
Are you ISO27001 certified or do you have any other ISO certifications?
Amberscript’s IT infrastructure is built on data-servers provided by Google Cloud Platform, which are certified to the highest standards (including ISO27001). Amberscript as a company is also ISO27001 certified and has relevant processes in place to assure quality management and integrity of data.
-
Can I add a glossary with specific words to the transcription job?
Yes, we also offer specialized transcription, which can include jargon or specific vocabulary. To learn more about this or discuss specifics, please contact us.
-
Can I upload pre-recorded audio or video?
Yes, you can upload pre-recorded audio or video directly from your phone into the Amberscript app.
-
Can you also deliver transcriptions for other media formats?
We deliver data annotation for speech-to-text solutions. However, if you have a special request, please contact our sales team here.
-
Can you automatically detect the language of an audio file?
No, our standard API does not support language detection, however please reach out to our sales team here in order to find the perfect solution for your situation as we do have access to this technology.
-
Do you edit words (e.g. umm, uhh)?
We can, but this depends on the type of transcription you have ordered with us, “clean” or “verbatim”. To learn more about the difference between the two, read our blog.
What does Verbatim mean?
Do you want to have an audio file transcribed? You will probably be offered a choice between verbatim and edited (clean) transcription. Below is explained what verbatim transcription means and the difference between the three different options between verbatim transcription. This guide will also assist you in deciding which form of transcription best suits your needs.
Try to imagine what it would look like if you put a conversation on paper word for word. A conversation that is written out this way looks strange for those who are used to normal written language. This is because during a conversation speakers often stutter and repeat words. Therefore, speaking language is very different from the written language in certain aspects. This is also where the difference lies between verbatim transcription and edited or clean transcription.
First thing first – What is the Verbatim meaning?
A verbatim transcript captures every single spoken word in the recording and puts it into text. This means that it will include all false starts, grammatical errors, interjections, and stutters. It is the most comprehensive form of transcribing and ensures a transcription that is 100% faithful and complete. These verbal cues provide insightful information about the recording and give a sense of the scenario in which the conversation took place. The advantage of a verbatim transcription is that the context is also exposed. From this context, additional information can be deducted.
What’s the difference between verbatim transcription and edited (clean)?
There are two main types of transcription:
Verbatim Transcription
Verbatim means that the transcriptionist will type out each and every word heard in the audio file. This includes false starts, self-corrections, filler words, grammatical errors, interjections, and signs of active listening, repetitions, and stutters.
Edited or Clean transcription
An edited transcription is instead a form of edited transcription in which the transcriptionist cleans up stammers and repetitions, corrects grammatical errors and ensures that the core message of what is being said in the conversation is clear. In this case, the transcriptionist’s objective is not only to report the dialogue but also to ensure the transcript is flowing and easy to read. A clear transcription reads more pleasantly than a verbatim transcription. Incidentally, dialogues in books are also edited transcriptions most of the time.
Here’s how two sentences would be transcribed in non-verbatim and verbatim form:
Example 1
Clean: I saw Josh yesterday. He seemed really tired, he must have been working very hard lately.
Verbatim: And so, I saw Josh yesterday and ehm… he seemed, like, really tired. Uhm, he must, like, he must have been working very hard or I don’t know…Yeah, I guess.

Example 2
Clean: I think she just left to go grocery shopping.
Verbatim: Oh well, you know, I guess… I think she uhm, she left to go grocery shopping.
Pros and Cons for Verbatim vs Edited Transcription
Verbatim Transcription
Advantages:
- Highly accurate record of the original content
- Useful for legal and medical transcription
- Provides context, including tone and emotion
Disadvantages:
- Difficult to read with filler words, repetitions, and hesitations
- May not be the best choice for all types of content
Edited Transcription
Advantages:
- Easier to read with non-essential elements removed
- More concise and effective for conveying the message
Disadvantages:
- May sacrifice some accuracy for readability
- May require interpretation, introducing errors or inconsistencies
Which one suits my needs more?
Verbatim transcripts allow the reader to deduce the context of the conversation from the transcribed text. Because verbatim transcription also includes non-speech sounds like “mm-hmm (affirmative)” or “mm-mm (negative)”.
A few examples for when a verbatim transcription can be the best choice:
Market research, where it is important for the researcher to know if the interviewee is telling the truth and to capture as many verbal and non-verbal cues as possible.
In the legal environment where it is extremely important in what context the speaker tells something. The court often requires verbatim transcriptions.
A focus group interview where the emotions of the interviewee play an important role.
The automatic transcription service provided by Amberscript generates verbatim transcriptions. Our software transcribes all audio to text, this includes all repetitions, stutters, and interjections.
In the manual transcription services, you can choose between the two types of transcriptions.
Learn more about Amberscript’s transcription services and choose the option that most suits your needs.
Finding the Perfect Transcription Provider
While on the market to find yourself a transcription provider, it’s important to follow a few tips to ensure a smooth and successful collaboration.
First, you need to make sure you choose a reputable and reliable transcription provider. Look for a provider with experience in your industry or subject matter to ensure they have the necessary knowledge to accurately transcribe the recording.
Second, communicate your expectations clearly from the start. This can include turnaround time, specific formatting requirements, and any other special instructions or preferences.
Third, provide any necessary background information or terminology to help the transcriptionist understand the context of the recording. This can be especially important for technical or specialized content.
Finally, be prepared to review and provide feedback on the finished transcript. This can help ensure that the transcript is accurate and meets your expectations. By following these tips, you can help ensure a successful collaboration with your transcription provider, whether you choose edited or verbatim transcription. However, since you are on our blog right now, you’ve found the perfect choice!
Learn more about Amberscript’s transcription services and choose the option that most suits your needs.
Why do I hate my recorded voice?
If sometimes you ask yourself ,”Why do I hate my recorded voice?”, you’re not alone. This blogpost will explain why the sound of your own recorded voice makes you cringe.
Why do I hate my recorded voice? Explained
When you listen to your own voice on a recording, it usually sounds odd. When you transcribe an interview, for example, you have to listen to your voice for long amounts of time. Sometimes your voice gets so annoying you start wondering how anyone can ever be in the same room as you.
The famous lines by literally everyone: “I hate my recorded voice”. Kind of weird right? Before you listened to a recording of yourself you always thought you had a voice like Morgan Freeman. Unfortunately everybody else hears your voice the same way you hear your voice when listening to a recording. Below we will explain why you hate the sound of your own voice.

So how does this difference arise?
Sound are vibrations that go through the air, when these vibrations vibrate in your eardrum you hear something. This is the way others hear your voice, this is also the way you hear your voice when listening to a recording.
When we talk your vocal cords vibrate, these vibrations also cause your skull to vibrate. The vibrations travel through your skull and into your eardrums, but as the vibrations travel through the skull the tone becomes lower.
If you speak then you hear your voice in two ways: via the air and through your bones. When you transcribe an interview you only hear your voice through the air, the same way everybody hears you.

Why does this irritate me?
Because 99% of the time you hear your voice through your bones and the air you get used to it. This is the way you have heard your voice all of your life. Now that you suddenly hear your voice the same way others hear it, it sounds completely different.
Your brain can not explain this difference properly and that is why you get annoyed by hearing your own voice on a sound recorder.
For a more detailed explanation, watch Rébecca Kleinberger’s talk at TED, “Why you don’t like the sound of your own voice“.
What can I do about this?
So now you know what causes this phenomenon, but what can you actually do about this? Of course it is not very nice that you get irritated to death by your own voice every time you transcribe an interview.
One option is listening to your own voice so much you get used to the sound, but of course it is not really nice to torture yourself with your own voice so much, you finally get used to it.
The second option is having your audio automatically transcribed to text with the help of our transcription software. We automatically convert your speech to text using our transcription software. This means you do not have to listen to your voice as much and you can also save a lot of time. Here’s our #1 tip on How to save time when Transcribing an Interview.
Top 10 things that make or break a qualitative interview
Are you a student and you have to do a qualitative interview or a focus group interview for your thesis or study project? Feeling nervous and don’t know where to start? In this short article, we’ll give you the best tips & tricks to get the best out of your interviewees.
What is a qualitative interview?
Compared to questionnaires, a qualitative interview is a more personal method of interaction. The purpose of a quantitative (quant) interview is to better comprehend one’s way of thinking and to collect information about their skills and experience. A minimum of two people participate in an interview, one of whom is in charge of posing the questions. Interviews are a great approach to gain a person’s subjective opinion on a subject and are frequently used in the following fields:
- Research
- Media
- Legal
- Medical
1. Before the interview
- Use an automatic transcription software. Hours and hours wasted transcribing text? Not anymore! We have developed a powerful transcription software, that will do the job for you with 95% accuracy! Learn more about our transcription services.
2. Find a suitable indoor location for the interview.
Make sure the place is quiet and private. Otherwise, your interviewee won’t feel comfortable and you run the risk of having a poor audio recording.
3. Test your equipment beforehand.
No matter what you use, a phone, a recorder or a microphone – give it a solid quality test before bringing it to the interview. “Nothing can go wrong”, “It was working just fine” – are phrases we commonly hear from students, who are frustrated with their own gear on the day of the interview. You don’t want to lose your professionalism in the eyes of the interviewee, so prepare well.
P.s – don’t have a good voice recorder yet? Check out this guide on the best voice recorder for interviews for some recommendations.
4. Briefly describe how are you going
to treat the data collected from the interview. If you’re recording the interview, make sure to ask the interviewee’s permission!
5. Quickly describe the structure and key topics
that are going to be addressed during the interview. Also, don’t forget to mention its duration and try not to go past that time limit.
2. During the interview
- Human memory isn’t that great.
If possible, record the entire interview and take useful notes along the way. - You want to obtain rich, saturated information
about a subject you’re investigating. That’s why you should avoid asking “yes/ no” questions. - ALWAYS remain calm and neutral.
You’re the researcher, who’s just collecting the data. Avoid your personal judgments, criticism or strong emotional reactions, despite what the interviewee says. - Keep your questions simple and precise.
Adapt your language style to one of the interviewees and forget all the jargon. - Avoid double-barreled questions –
questions that raise 2 topics, but allow for only 1 answer. For example: How satisfied are you with the quality of education and on-campus facilities in your university?
Get a customized offer
Request a quote for your transcription needs
3. After the interview
- Make sure to thank the interviewee for his time and input.
If he/she has any questions or is interested in learning outcomes of your project, leave some of your contact details.

Frequently asked questions
-
Can I burn the subtitles directly onto my video?
If you have exported the transcript as a SRT, EBU-STL or VTT file, you can easily burn them onto your video using video-editing software.
-
Can I add a glossary with specific words to the transcription job?
Yes, we also offer specialized transcription, which can include jargon or specific vocabulary. To learn more about this or discuss specifics, please contact us.
-
Can you also deliver transcriptions for other media formats?
We deliver data annotation for speech-to-text solutions. However, if you have a special request, please contact our sales team here.
-
Can you transcribe audio with foreign accents?
Yes, our software is constantly being trained to pick up on accents and know how to understand them. Want to know more about how this works? Read it here!
-
Can I adjust the formatting?
From your account, you can export the transcript in different formats. So if you require both a Word file and an SRT file, you can simply export the file twice.
-
Can I export my files with timestamps?
Yes, you can. The transcript always includes timestamps in our online editor and you can choose to export the file with or without timestamps.
Transcripción de entrevistas: Explicación de los 3 tipos de transcripción
¿Hace muchas entrevistas hoy en día? ¿Te preguntas por qué tipo de transcripción deberías optar? Hoy hablaremos de los tres tipos más comunes de transcripción de entrevistas: verbatim limpio, verbatim suave y verbatim completo.
Primero describiremos cada uno de ellos por separado, luego los compararemos entre sí y finalmente concluiremos en qué circunstancias es más apropiado cada uno de ellos. ¡Vamos directamente al grano!
Nota: Si todavía no has entrevistado a nadie y estás buscando algunos consejos útiles, echa un vistazo a nuestra publicación en el blog sobre cómo realizar una entrevista.
Verbatim Limpio
La transcripción limpia (también conocida como “inteligente”) sirve para representar bien el contenido de la entrevista en sí. Entre todos los demás tipos de transcripción, suele tener un aspecto más formal y menos molesto, por lo que se denomina “limpia”. Estas son las características del método verbatim limpio:
- Se omiten las palabras de relleno (uhms, mhhm)
- Se excluyen o ajustan las palabras repetitivas (como, tipo de)
- También se excluyen los tartamudeos y las interjecciones.
- Se mejora la legibilidad corrigiendo pequeños errores gramaticales y de redacción (por ejemplo, eliminando palabras de jerga).
Sin embargo, no hay que ajustar demasiado el contenido de la entrevista. Cuando revise la transcripción, asegúrese de excluir sólo las palabras innecesarias y repetitivas, pero no las que contribuyen al significado de la discusión. Esta técnica de transcripción requiere un ajuste manual, pero la comprensión del contexto no es esencial.
Dónde utilizarlo: conferencias y reuniones formales, transcripción médica.
Texto original: Sí … hay algunas grandes ciudades en los Países Bajos, como mhm…. Amsterdam y Rotterdam.
Transcripción limpia: Hay algunas ciudades grandes en los Países Bajos, como Ámsterdam y Rotterdam.
Transform your audio and
video to text and subtitles
- High accurate, on demand service
- Competitive pricing with the fastest turnaround using AI
- Upload, search edit and export captions and transcripts with ease.
¿Qué es verbatim suave?
Este método de transcripción no sólo recoge el contenido de la entrevista (¿qué?), sino también la forma en que se realizó (¿cómo?). Verbatim suave sin problemas debe incluir:
- Todas las palabras de relleno
- Interjecciones, tartamudeos
- Contenido original sin paráfrasis
- Sin corrección gramatical
Es el tipo de transcripción que producen los programas de reconocimiento automático del habla, como Amberscript. Este método es ciertamente más preciso que la transcripción limpia. Aquí se hace hincapié en el contenido original de la entrevista, pero tampoco hasta el punto de registrar cada pequeño detalle.
Dónde utilizarlo: investigación de gestión, periodismo.
Texto original: Sí … hay algunas grandes ciudades en los Países Bajos, como mhm…. Amsterdam y Rotterdam.
Suave verbatim: Sí … hay algunas grandes ciudades en los Países Bajos, como mhm…. Amsterdam y Rotterdam.
Nota: es el mismo que el texto original.
¿Qué es un verbatim completo?
La transcripción completa (también conocida como “estricta”) va un paso más allá, que la literalidad lisa, al considerar:
- Señales no verbales
- Reacciones emocionales
- Sonidos del entorno exterior
- Pausas
Las risas, los carraspeos, el lenguaje corporal… todo eso lo anota el entrevistador. El verbatim completo se refiere a detalles menores que conforman el contexto de la entrevista y los patrones de comportamiento expresados por el entrevistado.
Dónde utilizarlo: investigación de marketing, investigación jurídica, entrevistas de trabajo.
Texto original: Sí … hay algunas grandes ciudades en los Países Bajos, como mhm…. Amsterdam y Rotterdam.
Transcripción verbatim completo: Sí… hay algunas ciudades grandes en los Países Bajos (aclara la garganta), como mhm…. Ámsterdam y …. (pausa) Rotterdam.
| TIPO DE TRANSCRIPCIÓN | NIVEL DE DETALLE | APLICACIONES | PRIORIDAD |
| Verbatim limpio | Sólo palabras significativas | Conferencias, reuniones, asistencia sanitaria | Legibilidad |
| Verbatim suave | Todas las palabras | Periodismo, investigación empresarial | Autenticidad del diálogo |
| Verbatim completo | Todas las palabras + el comportamiento no verbal y el contexto | Investigación de mercado, procedimientos legales, entrevistas | Autenticidad del diálogo + contexto que lo rodea |
Ahora ya conoces los tipos de transcripción más comunes, ¡buen trabajo! Eso no significa que debas pasar horas transcribiendo tú mismo. Elija la forma más eficaz y utilice la herramienta de transcripción en línea de Amberscript.
Tal vez te interesa leer también:
How to grow podcast audience in 2024? Try this tactic to make your podcasts more accessible!
If you are reading this you’re probably a podcaster looking for some new ways of attracting as many listeners as possible and grow your podcast. You have probably read all those blog posts and articles, where the authors explain to you point by point all the secret ingredients on successful podcast growth, right?
But now you’re here, which means you would like to grow your podcast audience a bit more. Did you consider transcribing your podcast? That’s right – believe me or not, but some of your listeners might actually be readers!
Actionable growth plan
For the sake of this article let’s assume you went through all those nicely prepared podcast growth plans, tips, and tricks. In general, they contain a lot of valuable information and ideas. Let’s try to quickly recap on the most interesting ideas from various sources:
The top 10 ideas on growing your podcast audience:
- Know your audience
- Communicate with your listeners
- Go for the quality, not quantity
- Promote your podcast on different social media channels
- Don’t neglect SEO in promoting your content
- Network with other podcasters
- Run some contests and giveaways
- Make your content easily shareable
- Promote your podcast on YouTube
- Measure your results and adjust your actions accordingly
All of the mentioned ideas are great when it comes to growing your podcast audience. I strongly encourage you to google them up if you haven’t tried them yet.
The secret ingredient to growing your podcast – Transcription!
Believe it or not, but there’s a way to double the reach of your podcast with little effort involved. Have you ever heard of converting speech to text services, known as audio transcription? In other words: Audio to text conversion is the process of turning spoken words into written form. Amberscript uses ASR (automatic speech recognition) technology to automatically convert speech into text. Here are the top 5 reasons why transcribing podcasts can make a huge difference.
Transform your audio and
video to text and subtitles
- High accurate, on demand service
- Competitive pricing with the fastest turnaround using AI
- Upload, search edit and export with ease.
Top 5 reasons for transcribing podcasts
1. Different experience
Podcasts are great to listen to in the background, while you’re walking or sitting on public transport. However, sometimes you just want to sit and read and that’s where the true value of your transcription comes into play. By transcribing podcasts and making a text out of them, you give your fans more options to follow your content.
2. Wider audience
Let’s face it: some people don’t like podcasts. Moreover, there are many others who just can’t listen to it. For example, people with hearing disabilities or those that don’t understand the language that well. Have you ever asked yourself “how to grow podcast audience”? Well, this might be a solution! Thanks to transcribing your podcast, you will have the opportunity to spread your knowledge around a broader audience, who’d otherwise be excluded.
3. More presence on Social Media
Besides promoting the podcast itself, through transcribing podcasts, you can easily take quotes out of it and share them through social networks, like YouTube, Twitter, Instagram and even Spotify!
4. Effective SEO
Textual information is much more discoverable by search engines – audio files cannot be found by Google and others unless you write down what the audio is about. Transcribing podcasts increases the chance of your content being found on the web.
5. It’s effortless through a podcast transcription service!
Don’t want to bother wasting hours on manual transcription? Are you looking for podcast transcription software? At Amberscript, you can have a solid transcript of your podcast done in 5 minutes, brought to you by our latest speech recognition technology. Transcribing podcasts has never been so easy!
Transcription at university – Interview with a marketing student
For many students transcription at university is becoming as normal as drinking coffee in the morning. Particularly in study programs that involve a lot of qualitative research, transcription is necessary. During exams, this can become very stressful as it takes a lot of time.
An Interview with Katja
Katja is 22 years old and is studying International Communication & Media in Germany. She knows quite a bit about interview transcription at university. We asked her why there is so much transcription work to be done in her studies, and how she found a way around it.
Katja, tell us who you are and what you do
Katja: Sure. As you already mentioned, I am 22 years old and I am studying marketing and communication.
What do you especially like about that field of study? And what are typical tasks there like?
Katja: Instead of exams, we often work individually or in groups on projects and papers that require a lot of qualitative and quantitative research. And exactly because of that I chose this study program, as I really like doing research. I also enjoy conducting interviews because, in my opinion, you get the most honest answers during a personal conversation.
But to just attach audio files of these interviews to your project is not enough for the lecturers, right?
Katja: Unfortunately not. And for the analysis of an interview, writing it down is necessary anyway. I had never heard of the word ‘transcription’ before going to university and was quite shocked when I realized how much work it actually takes to write down an interview. A ten minute interview can easily take one hour to transcribe, so you lose a lot of valuable time. Especially since I have a part-time job on the weekends, transcription at university is just really annoying.
Why do you think that the transcription of interviews is so important in your study program?
Katja: I think there are several reasons. Especially with topics that deal with consumer behavior, personal opinions of the target group are very important. It’s worth it to have a closer look and not just have questionnaires be filled in. Marketing is about understanding what your target group wants and needs, so interviews just make a lot of sense. However, transcription is necessary for students from all kinds of study programs nowadays. Luckily I found a great solution.
How did you get to know Amberscript?
Katja: It was actually just by chance through a fellow student. I knew that he had four interviews to transcribe for the next day and by knowing that alone, I was like man, how in the world is he going to do that? And still, I met him at the bar that evening. When I asked him how he manages to transcribe everything until tomorrow, he told me he was using Amberscript’s transcription software. With that, transcripts are automatically created in a few minutes and you only have to correct them afterward. I got very curious and took a closer look at Amberscript.
And what was your first impression of Amberscript and what is your experience so far?
Katja: I was a bit skeptical at first, how well that really works. However, if you realize that the step of typing everything out is done by the software and that you only have to correct those transcripts afterward, you understand in what way it saves so much time. However, with the perfect service of Amberscript, where these additional corrections are taken over by transcribers, I was not sure if that might be considered to be ghostwriting. That’s of course forbidden at most universities.
After taking a look at my first automatically generated transcript and after being assured by my lecturer that perfect transcription is not seen as ghostwriting, my skepticism was blown away.
So in the end, you have the option to just use the software and adjust everything yourself or to outsource the entire transcription process which is of course more expensive. Either way, you save a lot of time. It’s crazy that, on average, one hour of audio takes around six hours to transcribe. Thanks to Amberscript’s software I get the same result after one to two hours. Of course you have to pay for the service, but if you think about it, you actually even save money. Instead of transcribing for hours you can work and earn more money than the transcription costs in the first place. Or you just start analysing your interviews.
At the moment, exams are coming up again and after that I have to look for an internship in the summer. The right organisation, while you are studying, is incredibly important, and thanks to Amberscript, I have one less thing to worry about. Of course, everyone is different in that regard, but for me personally, it is very hard to focus on one thing while having all the other things I also have to do in the back of my mind. Planning is key!
In the end, using transcription software like Amberscript will be helpful to any student, so I’m sure more and more will use this service in the future. I’m already a convinced user!
Great! Good luck and thank you for the interview.
Transcribe Research Interviews: Top 5 Tips
Are you working on research interviews? Do you find it difficult, because you do not know where to start, or maybe you have already started but it looks like you are not going to meet your deadlines?
How much time a research takes, varies a lot. Some researches can take years upon years while some researches only take a week. One thing is almost always the same though: the production of the interview transcript takes up a majority of the time. It does not matter how long your research takes, it is always a good choice to save time. This allows you to focus on things that are truly important, like analyzing the data and drawing conclusions.
Table of Contents
- The Research
- How to conduct a research interview?
- How to structure an interview
- What is the best way of transcribing my research interviews?
The Research
Your research is the core of every dissertation, thesis or market research. When conducting research it is important not to deviate from your research question too much. You will probably use desk and field research. Field research can take the form of qualitative research or quantitative research. Most researches require qualitative research. You have multiple types of qualitative research. Research though qualitative research usually takes the form of interviews. You will need an interview transcript for your report, and it will also help you to better analyze data. We are going to talk about:
- Conducting the research interviews
- Creating your interview’s transcript
Get a customized offer
Request a quote for your transcription needs
How to conduct a research interview?
The purpose of an interview is to get the right and enough information from the interviewee. It is important that the information contributes to your research, and that you get enough information. To gain the right information from an interview you will have to prepare good questions. You will also have to question the interviewee in the right way. 5 tips that will allow you to get the most out of your interview:
1) Prepare a questionnaire or a list of the topics you wish to discuss.
This creates a kind of shopping list, so you are ensured you will not forget anything during the interview. A questionnaire or topic list also ensures you don’t lose the thread and do not deviate from the main topic too much.
2) Do not influence the interviewee in his answers.
By not influencing the interviewee you get more honest and reliable answers. For example do not ask the question: ‘What do you like about Los Angeles?’ (perhaps the interviewee does not like Los Angeles at all), but ask: ‘What is your opinion about Los Angeles?’
3) Act in a professional manner during the entire interview.
Show appreciation and understanding for the interviewee, but do not exaggerate. Behave in a way that shows the interviewee you are genuinely interested in what he/she has to say. If you stick to these points the interviewee will me more open and honest. This will allow you to gain more information from the interview.
4) Before asking personal or controversial questions, warm them up with easier questions first.
Remember this person has probably never met you, if you start asking personal questions right away the interviewee will probably go in defensive mode. It is important that you warm the interviewee up first with easy questions, this will build trust. Later on in the interview, you can start asking harder questions.
5) The most important tip of all: practice.
The best way to get better at interviewing is to practice. That is why you should practice your interview first. You can practice your interview on a classmate or on an acquaintance first. Ask this person to give you feedback on how the interview went. Pay extra notice to your posture, your questions, your introduction, the structure, how you ask supplementary questions and whether you are polite. You can also record this practice interview and listen to it later. This way you can find ways you improve yourself.
Benefits of using Amberscript
Amberscript’s subtitle services are:
Fast
Edit your own text within minutes or leave the work to our experienced subtitlers.
Accurate
Our experienced subtitlers and thorough quality controls ensure 100% accuracy of your transcriptions and subtitles.
Easy
Thanks to a variety of integrations and API interfaces, you can fully automate your workflows.
Secure
Your data is in safe hands. We are GDPR compliant + ISO27001 & ISO9001 certified.
How to structure an interview
Now that you know what to do and what not to do during your interview it is time to go and conduct your interviews. A research interview usually consists of three parts it is important that you walk through these points chronologically:
- Opening: In the opening of your interview you first explain your goal. You explain what you are hoping to find out. You will also tell how long the interview will probably take and the topic that will be discussed. Then you start the real interview with an open-ended question.
- Middle section: In the middle section of the interview the interviewee has the chance to share their story. It is important that you listen carefully during this phase. In this phase of the conversation you have to ask good questions and make sure the interviewee doesn’t deviate too much from the main topic.
- Final: When you have gotten enough information from the interview, you propose to end the interview. Walkthrough the most important points together and give the interviewee the possibility to add extra information. If something is unclear, this is your time to ask questions.
When conducting the real interview it is important that you make recordings as well. Do not think you can remember everything said. In the opening of the interview ask if the interviewee has any problems with being recorded, they usually do not, but if they do make notes. By making audio recordings you can fully focus on the interview itself instead of making notes. Afterward, you can listen back to your recordings and analyze everything. Preparing well for your research interview takes a lot of time, but it costs even more time to convert your audio to text. To analyze your interviews and to include your interviews in your report, you need to transcribe your interviews. This is an extremely time-consuming and mentally demanding process. Fortunately we have thought of a solution which can save you a lot of time and pain. You can read about this below.
You might also be interested in reading:
– Coding Interviews: Learn Coding Basics in 10 Minutes or Less
What is the best way of transcribing my research interviews?
If you want to analyze your interviews and include them in your research, it is necessary to transcribe your interviews. Transcribing is an extremely time-consuming process to do manually. Every minute of audio takes about 8 to 10 minutes to transcribe. Having a human create a transcription of an hour-long interview can easily set you back €100. If you have conducted multiple research interviews this can quickly get very expensive. Fortunately, with our transcription software it is possible to have your interview transcript in a cheap and fast way. The only thing left for you to do is make small improvements to make the transcription 100% correct.
Deadlines for researches can be really tight and can have a disheartening effect on you. But by using our transcription software you have the ability to save a lot of time. You can spend this extra time on the things that are truly important in your research, like analyzing the information and drawing conclusions. This will ultimately improve the quality of your research.
How to transcribe with Amberscript?
- Create an account
- Upload your file
- Inform the number of speakers and the language in the audio
- Select the transcription type (Amberscript offers human-made and machine-made transcriptions).
- If you selected the machine-made transcriptions, your file will be ready in a few minutes. If you prefer 100% accurate transcripts, select the manual service and your text will be ready in up to 5 business days.
- You can now edit the file if you want, fixing minor mistakes, highlighting the most important parts, and changing the name of the speakers. This step is important to adjust your content to the reading experience. If you are using the automatic transcription service, you can remove the repetitions and shutters yourself. If you prefer to outsource it, you can hire our manual transcription services and order the “clean read” style. Learn more.
- Export your file in a text format. You can choose to include the timestamps or omit it.
- Done!

How to transcribe an interview?
Learn moreFrequently asked questions
-
Can you also deliver transcriptions for other media formats?
We deliver data annotation for speech-to-text solutions. However, if you have a special request, please contact our sales team here.
-
Can I burn the subtitles directly onto my video?
If you have exported the transcript as a SRT, EBU-STL or VTT file, you can easily burn them onto your video using video-editing software.
-
Do you offer cloud transcription services?
Yes, our services are offered on the cloud.
-
What is transcription used for?
Transcriptions can make data recorded in audio (interviews, meetings, phone calls etc.) readable and easier to analyze. Transcripts and subtitles also make audio and video content accessible for the deaf and hard of hearing, and allows video content to be indexed for SEO.
-
Can you transcribe audio with foreign accents?
Yes, our software is constantly being trained to pick up on accents and know how to understand them. Want to know more about how this works? Read it here!
-
Do you transcribe files with multiple speakers?
Yes, our software can transcribe multi-speaker files and can also distinguish different speakers in the transcript. Different speakers will be indicated as “speaker 1”, “speaker 2”, etc. You can rename speakers in the online editor.
-
How do I transcribe a Zoom meeting?
To transcribe a Zoom meeting, you will first need to record the meeting. Read more about how to record and transform a Zoom meeting into an audio or video file on our blog. Once you generate the audio file, you can simply create an account, upload the file and transcribe automatically or order a manual transcription.
-
How do I transcribe a Skype meeting?
To transcribe a Skype meeting, you will first need to record the meeting. Read more about how to record and transform a Skype meeting into an audio or video file on our blog. Once you generate the audio file, you can simply create an account, upload the file and transcribe automatically or order a manual transcription.
-
How do I transcribe a Google Hangouts meeting?
To transcribe a Google Hangouts meeting, you will first need to record the meeting. Read more about how to record and transform a Google Hangouts meeting into an audio or video file on our blog. Once you generate the audio file, you can simply create an account, upload the file and transcribe automatically or order a manual transcription.