Transcription
How to Add Subtitles In Premiere Rush in 5 Easy Steps
3 Mar 2022
6 minute read
Table of contents
With more people viewing video content today, there’s no better way to make it more accessible to a wider audience than by adding subtitles. Premiere Rush is an incredible video editing app. The only downside is that it doesn’t offer a subtitle feature. If you’re willing to target a broader audience through your video content, perhaps you’ll wonder, “How to add subtitles in Premiere Rush?” Stick with us to find out!
How to Add Subtitles In Premiere Rush
Fortunately, there’s no secret sauce to adding subtitles in Premiere Rush. Although the tool does not contain the subtitle feature, there is a reliable and practical way to add subtitles. Below, we’ve shared a few steps to help you include subtitles in your video content seamlessly.
Create and Import an SRT Subtitle File
To begin with, you need to create an SRT file. Also known as the SubRip Subtitle file, SRT is a plan-text file that includes crucial information about subtitles. From start and end timecodes to subtitle sequence, the SRT file ensures to match your subtitles to your audio.
This helps you to import everything into Premiere Rush with minimal effort. The best part? You do not need to create the SRT file manually. Instead, you can use Amberscript for that purpose.
The tool helps automate audio and video into subtitles using speech recognition. How cool is that? This way, you get to create the SRT file in the blink of an eye.
Auto Generate an SRT File with Amberscript
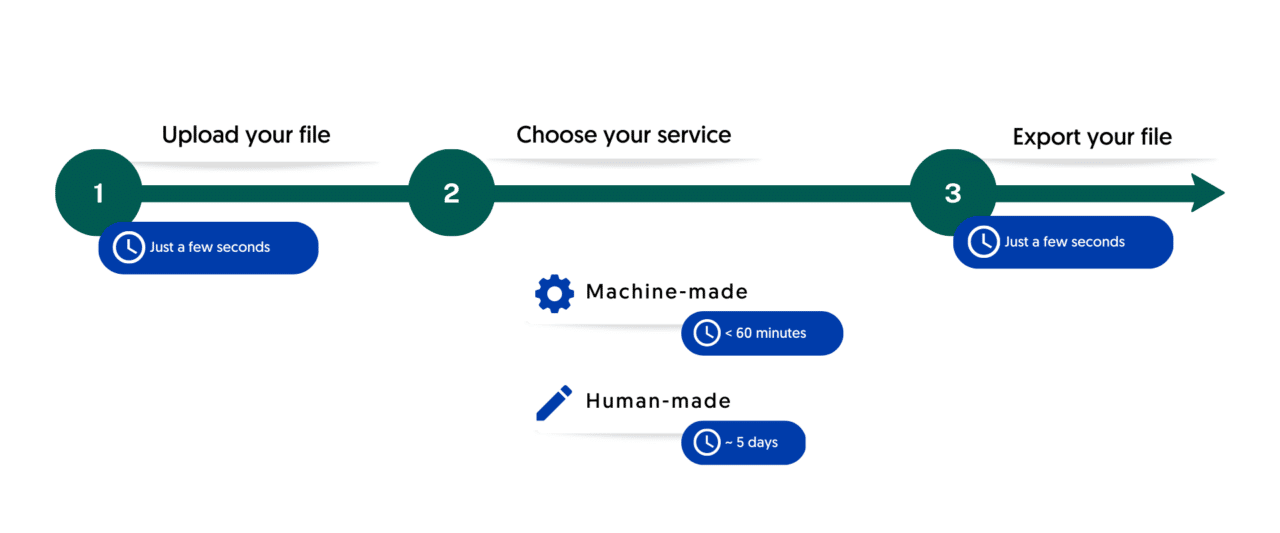
Amberscript auto generates an SRT file which is great. The question is, how do you do that? Begin by uploading the video and audio you want to include the subtitles into.
As the video gets uploaded, the AI tool will create the transcript for you. In the next step, you can edit the file using our user friendly platform. Generally, editing involves fixing the grammar, adding punctuation, and so on.
Once you’ve edited the video to your satisfaction, you can export it to your PC. What’s more, you can use a preferred format for the video subtitles.
Additionally, if you are in need of subtitles of the highest quality, you can opt for our human-made services: Human-made subtitles and translated subtitles.
How To Add Your Subtitles Into Premiere Rush
Unfortunately, there isn’t a feature that allows you to upload SRT files into Premier Rush, however we’ve found a hack that can help you get around it. Thought the hack is manual, it may be worth upgrading to Adobe Premier Pro, which allows you to upload SRT files automatically, or another tool such as iMovie or Final Cut Pro X.
After auto-generating the SRT file, it’s time to upload it into Premiere Rush. Here’s how you can do it:
- Open the video
- Add an unformatted Title and move it to where you want it on your screen.
- Open the SRT file
- Check the time code and make sure it correlates to the title on the video
- Copy the text from the STR file
- Paste it into the Title
Fix the Subtitles
After adding the subtitles to Premiere Rush, you’d need to make some adjustments. When you see the text and title in your video, make sure you set the timing. Otherwise, the content might not align properly.
You can trim the subtitles by grabbing the block and cropping it to the desired length. Next, drag the titles and place them on the top. However, do it with extra care; otherwise, you may end up overwriting the existing captions.
Format Your File
You’ve uploaded the file and the subtitles and adjusted them per your preferences; what’s next? You can style the text or customize the video format per your liking.
Because your goal is to make it more engaging and reach a wider audience, here’s your chance to make your video impeccable. If you’re willing to make it more understandable to the viewers, you can change the text color and the font and even underline a few parts to make them more prominent.
Export the Video
Finally, you have to export the video, and luckily, it’s pretty simple. Follow the steps below to ensure you export your video properly.
- Choose the caption icon and click Burn in the captions
- As you hit enter, the window will close.
- Now, select the file and export it.
- Do not forget to save your file, and you’re good to go!
Benefits of using Amberscript
Amberscript’s subtitle services are:

Fast
Edit your own text within minutes or leave the work to our experienced subtitlers.

Accurate
Our experienced subtitlers and thorough quality controls ensure 100% accuracy of your transcriptions and subtitles.

Easy
Thanks to a variety of integrations and API interfaces, you can fully automate your workflows.

Secure
Your data is in safe hands. We are GDPR compliant + ISO27001 & ISO9001 certified.
Why Add Subtitles to Premiere Rush Anyway?
Now that you know how to add subtitles in Premiere Rush, it is imperative to understand why including subtitles is essential. Although Premiere Rush offers a seamless way to create and edit videos, on top of that, if you’re a beginner, the tool has plenty of features for video formatting.
The only shortcoming is: It doesn’t include a subtitle feature. Luckily, adding subtitles to Premiere Rush is not a hard row to hoe. In fact, it’s pretty straightforward. However, you might wonder, “What’s the purpose of adding subtitles to a video?”
The answer is simple: It offers you several tangible benefits:
- Adding subtitles to your video boosts engagement. People get to view and read the video’s message regardless of their native language.
- Viewers on varying social platforms can easily interact with your video content. What else would you want as a content generator?
- More people would prefer watching your videos because, indeed, you have enhanced your visual content through subtitles.
- You are enabling deaf or otherwise hard-of-hearing individuals to understand your content better.
- There are around 6,500 languages in the world. Simply put, not everyone speaks the same language as yours. You’re restricting your content to your native speakers only by not adding subtitles to your video.
- More people viewing your quality content will certainly refer it to others. As such, you have a chance to target the audience regardless of their geographical area.
For more details on how to create subtitles, you can use our detailed step-by-step guide.
Captions vs. Subtitles: Do You Know the Difference?
Although the terms captions and subtitles are often used interchangeably, they are both distinct. The only similarity captions and subtitles share is that they are text versions of the audio in any video.
Closed captions are essentially the words spoken in the video. Simply put, if you cannot hear the information or want to turn off the volume for some reason, you can know what’s going on in the video through captions.
On the other hand, subtitles are the translation of the words spoken in a video. For example, consider you’re a US national who only knows English. If you want to stream a Korean film, you’d need a translation of the dialogue at the bottom of your screen.
The actors in the film are speaking Korean, but you’re watching English subtitles on your screen – these are subtitles. Generally, subtitles are developed before releasing a movie or a TV show.

Subtitles, Closed Captions, and SDH Subtitles: How are they different?
- Subtitles: text created from a transcript
- Closed captions: describe what is happening in addition to the dialogue
- SDH captions: Subtitles designed for deaf and hard of hearing
About Amberscript
Amberscript is an online AI voice recognition software that specializes for video and audio transcription and subtitling. We offer machine-made and human-made transcriptions alongside machine-made, human-made and translated subtitles.
Amberscript is the smartest solution for creating and editing subtitles for a variety of reasons, including speed, accuracy and security. Just a few minutes pass during the entire process.
Frequently asked questions
-
What Is Premiere Rush?
Premiere Rush is a desktop and mobile video editing app. You can shoot, edit, format, and share HD-quality videos with the tool no matter where you are.
The good news is the tool is free and suitable for all skill levels. So, whether you’re a newbie or a pro video editor, it comes in handy.
-
How Do I Add Subtitles to Premiere Rush?
First, you need to create and import an SRT file. If you do not want to create the SRT file manually, you can use Amberscript to auto-generate the file for you. Once the file is generated, you can upload it to Premiere Rush, adjust the subtitles, format your video content, and export it.
-
Can I Import SRT Files Into Premiere Rush?
Because there’s no way to add subtitles in Premiere Rush, you’d perhaps need to create an SRT file for that purpose and proceed. So, yes, you can import SRT files into Premiere Rush and adjust your video content per your liking.
-
Can I Import VTT Files Into Premiere Rush?
VTT file is also a plain text file containing video information like subtitles, captions, and descriptions. If you want to create and import a VTT file into Premiere Rush, you can do so. Regardless of what file format you choose, we recommend you automate file generation to ease the process for yourself.