Transcription
How to add subtitles & captions in iMovie?
29 Mar 2021
11 minute read
If you are stuck and don’t know how to add subtitles to your video or you are curious about how to add auto-generated subtitles to your movie with iMovie, then this article is for you!
Have you ever wanted to subtitle a video on your iMovie and don’t know how to do it? This comprehensive guide will explain to you the whole process as well as describe what subtitles and iMovie are, how to add subtitles to your videos, and how to get SRT files with Amberscript.
Table of Contents
- What are Subtitles?
- Is it possible to add subtitles to videos using iMovie on your Apple products?
- How to add subtitles to videos using iMovie on Mac?
- How to edit and customise subtitles on iMovie on Mac?
- How to add subtitles to videos using iMovie on iPhone and iPad?
- How to edit and customise subtitles on iMovie on iPhone and iPad?
- How to get SRT files
- How to burn closed captions in iMovie
- How Amberscript can help in creating subtitles for iMovie
What are subtitles?
Subtitles are texts created either on the basis of the transcript or the script of the dialogue or commentary of films, television programmes, video games, etc. They are also called captions. They are usually displayed at the bottom of the screen in a pyramid-like manner. Subtitles have various advantages, the biggest being that they make content accessible to people who are deaf or hard of hearing. To find out more about subtitles and their advantages, check out our step-by-step subtitling guide.

Is it possible to add subtitles to videos using iMovie on your Apple products?
Definitely! Subtitles can be added to videos using the title tool. This process is a manual one, and it works this way; you add the individual block of texts into the iMovie timeline, edit it and tweak it to resemble the subtitle you want it to be.
You should note that the subtitles are open captions and would always appear on the video, which means they can’t be turned off.
Tip: What are open captions? They are an essential component of a video and cannot be turned off. As a result, their quality is closely related to the calibre of the video (e.g if the video file is pixelated, this will also apply to the subtitles).
How to add subtitles in iMovie?
Firstly, as it applies to every other thing, you have to open iMovie.
- Now that you are in the software, import the video you wish to subtitle.
- Select the clip in the movie or video you wish to add the subtitles to.
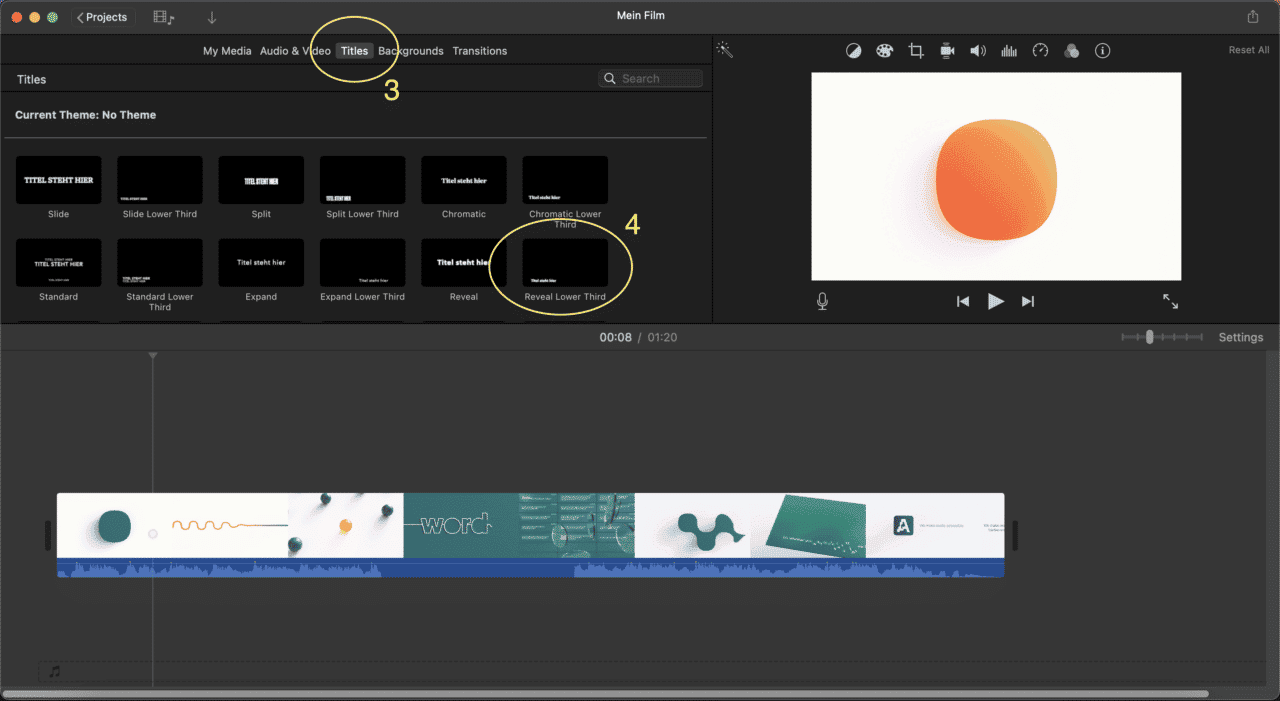
- Next, you will see a title sign on the viewer at the top. Click the Title sign.
- After you have clicked the title sign, pick the title style you desire. Since you are looking towards having a subtitle, there are title options for the screen’s bottom. They include lower, lower third, or reveal lower third. You can pick any of them.
- Since your clip is selected on the timeline, double click the preferred title (subtitle) style to add it. However, you can do it alternatively by dragging the option chosen to your desired location on the clip.
- Now it is time to add your text. To do this, go up to the viewer. At the top of the viewer, there is a text box and that is where you enter your text. You can simply copy and paste.

Tip: If you want to see how the option would look on the video. You would drag the option onto the clip. For example, if you want a lower third, you will click the option and drag it left to right. The program will present a preview to you.
How to edit and customise subtitles on iMovie?
You might want to adjust the duration of the shown subtitles (title), add more captions or subtitles or customise the look of the text that you are adding. For example, if you have a one-minute video clip and want to add about seven subtitles within that one minute, you can do that.
5.1 How to adjust the duration of your subtitles in iMovie?
If you want to either extend or shorten how the subtitles would appear on the screen, all you have to do is select the subtitle (title) in the timeline and do any of the following:
1. Drag any of the edges
To lengthen or shorten the duration, drag one of the edges. As you do this, the duration will start to change.
2. Click the Clip information
The clip information is an “i” icon above the viewer. When you have clicked this, you can enter the number of seconds you want the duration to be.

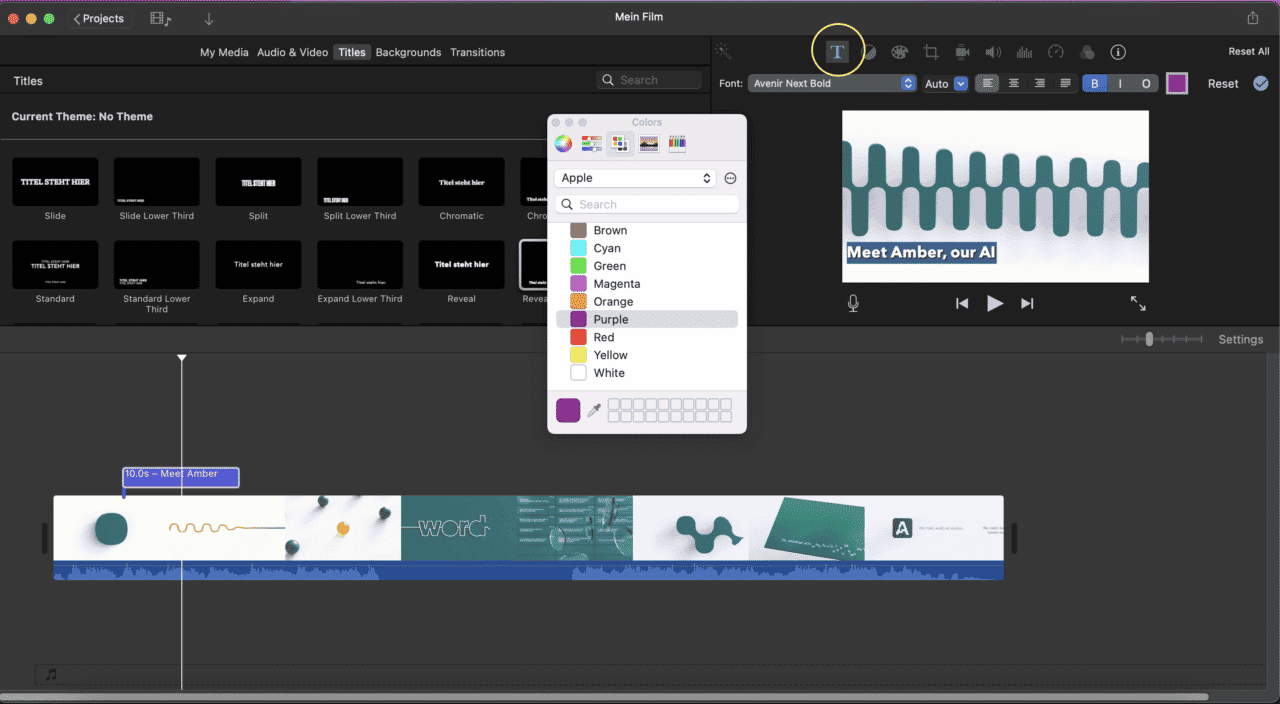
5.2 How to change the text style of your subtitles in iMovie?
With iMovie on a Macbook, you can also change the text style of your subtitles (title). The colour, font, style, and even alignment of your auto-generated subtitle can be adapted. All you need to do is:
- click the title clip in your timeline
- click the title setting icon at the top of your viewer
After you have done that, all the options that allow you to adapt your text will appear and you can pick the one you want.
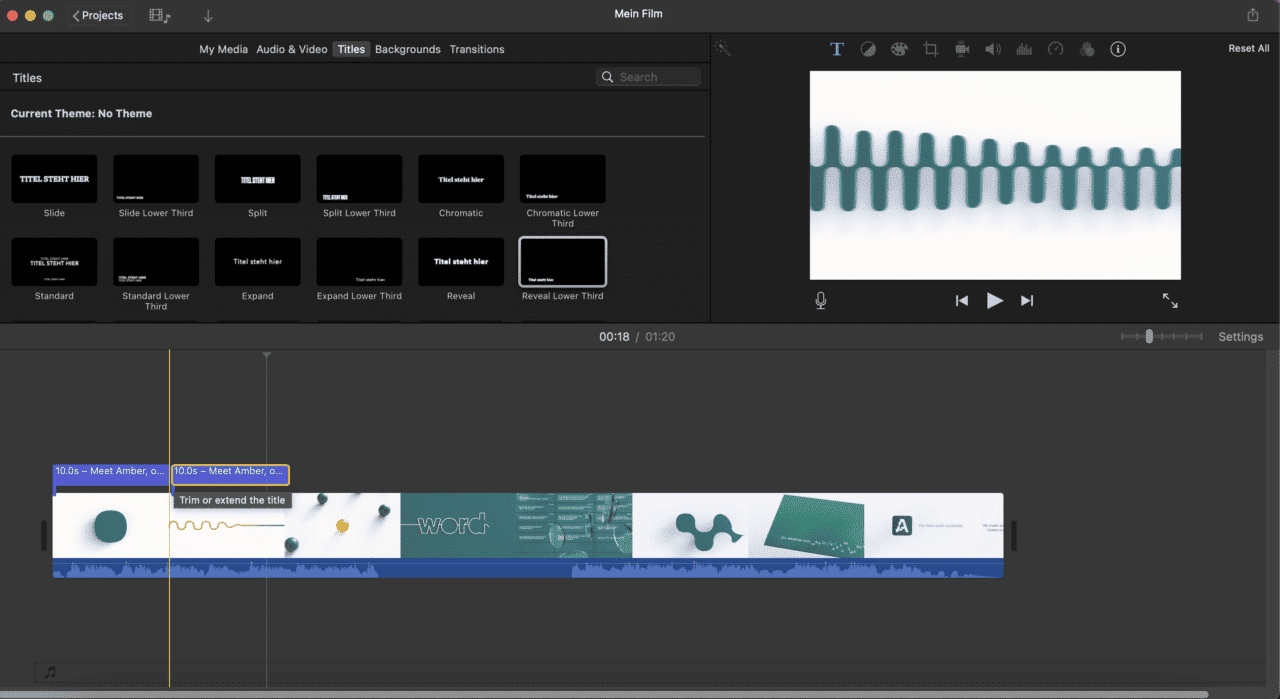
5.3 How do you trim your subtitles to the audio’s dialogue?
After you have inputted the subtitles (titles) using all the tips above, flow is also an important aspect to consider. You will have to listen to the dialogue to type the corresponding text in each correct segment of the video. This is rather simple. All you have to do is:
- Drag and drop the subtitle (title) to the frame that starts the dialogue you are working on
- Trim this subtitle (title) to end with the end of the dialogue
If the sound isn’t dialogue but is somehow meaningful to the video, you can put it in brackets within the subtitle. This way it will become similar to closed captions, describing the scenery of the video.
In order to start your next clip, all you have to do is copy and paste your current subtitle to the new clip to start. This helps you retain the text style and saves you the stress of having to start editing every time you begin a new clip.
5.4 How do you align your subtitles to the audio’s dialogue?
To prevent subtitles (titles) from going on top of each other, you will have to align them. This can be done by moving the play head that is shown to you to the part in the timeline where the title doesn’t exist.
5.5 Export your file from iMovie
After you have typed in all the subtitles and edited the fonts, style, and everything aligns with what you propose your subtitle to be, you can now share the file you have made. You can decide to export it as a file or send it into the iMovie theatre, share it on Facebook, Vimeo, iTunes, or YouTube. There is a small share icon at the top right corner of the app. Click on it, then share the file.
Fortunately, iMovie does not need or require any special settings for you to be able to export your videos with the open subtitles you have. As a matter of fact, they are titles rendered onto the video. Note, however, for the best experience, export at the best resolution, quality, and compression.
After you export the file, open it. Now, you would be able to see all your captions during playbacks.
6. How to Add Subtitles or Captions in iMovie on iPhone or iPad?
Not everyone has a Mac, but you can still add subtitles or captions to your video using an iPhone or iPad. Follow these steps to get started:
Step 1: Launch iMovie
First, launch iMovie on your iOS device. If you don’t have the app, download it from the App Store. Tap the iMovie icon on your screen to open the app. You’ll see a bar labeled “Start New Project” with options below it. Select the “Movie” option.
Step 2: Import the Video
Next, import the video you want to add subtitles to. Ensure you have the video saved on your iPhone or iPad. After selecting the “Movie” option, the app will display the videos stored on your device. Choose the video by tapping it, then press the “Create Movie” button.
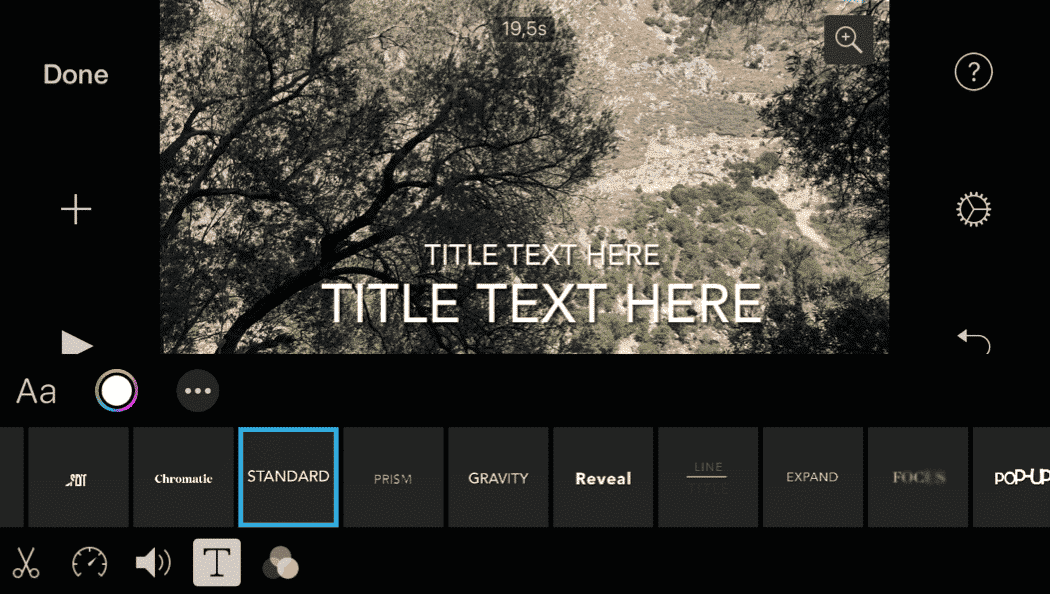
Step 3: Add the Text
Now, click the video clip in the timeline and select the “T” button at the bottom of the screen. A range of Title styles will appear beneath the timeline. Pick a style that suits your needs and position the timeline to the point where you want the text to appear.
Step 4: Type Out Your Captions
The text will overlay on the video at the top of the screen. Tap on the text and select “Edit.” Type your desired text into the box. When you press “Play,” the text will display on the video clip at your chosen point.
Step 5: Repeat the Process
To add multiple captions, repeat the above steps for each segment. You can use the same Title style or choose different ones for variety.
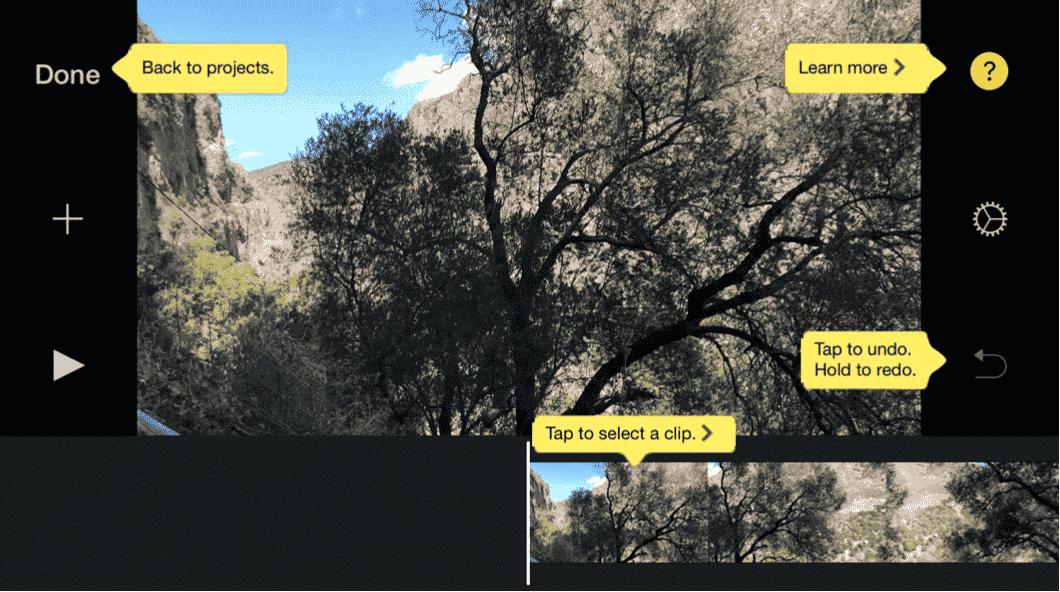
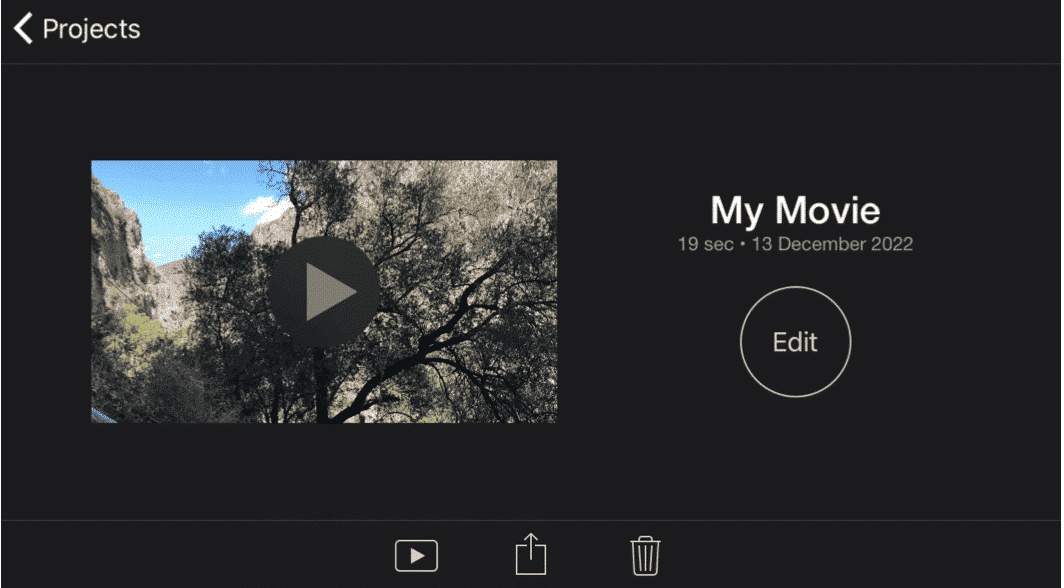
Step 6: Save the Video
Once you’re satisfied with your captions, tap the “Done” button in the top left corner of the screen. To save your video, tap the “Share” icon at the bottom of the screen. You can share the video via apps like WhatsApp or Messenger, transfer it using AirDrop, or click “Save Video” to store it on your device.
By following these steps, you can easily add subtitles or captions to your videos on an iPhone or iPad using iMovie.
7. How to edit subtitles in iMovie on iPhone and iPad?
7.1. How to adjust the duration of your subtitles in iMovie?
If you are editing your video on your phone or iPad, the process of editing the subtitle duration is relatively easy. Just like in case of iMovie on your Macbook, it is possible to edit the duration of your subtitles.
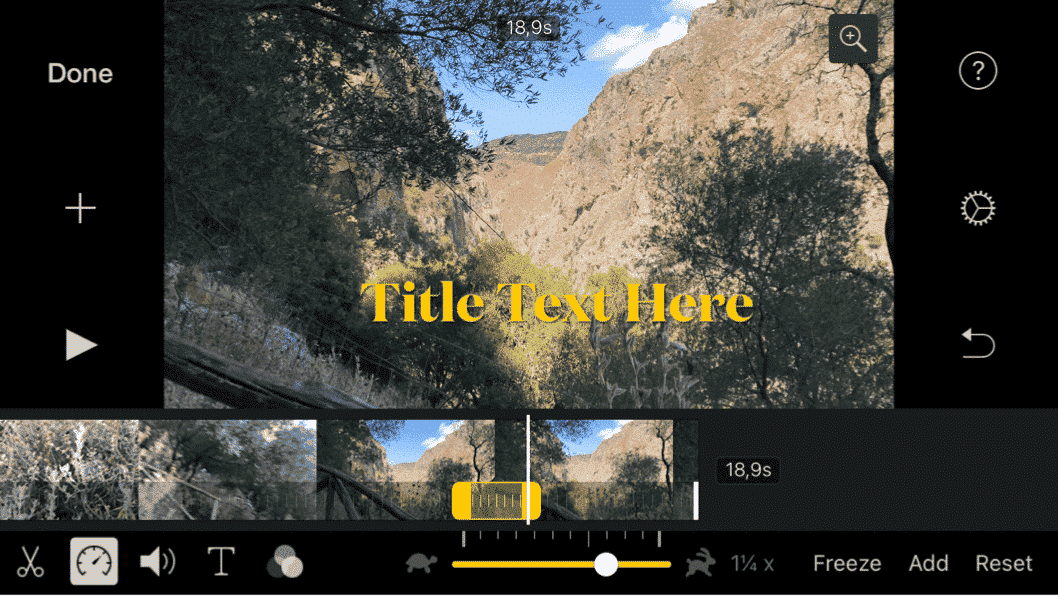
1. Find the ‘ timer’ icon
First, you need to click on the ‘timer’ icon, next to the previously mentioned ‘Title’ icon. This will allow you to select a clip in your video that you’d like to add subtitles to.
2. Select the preferred duration
At this point, you have two choices to edit the duration:
- You can either drag the yellow bar manually or
- You can select the preferred speed of you subtitles by clicking on a point on the scale at the bottom
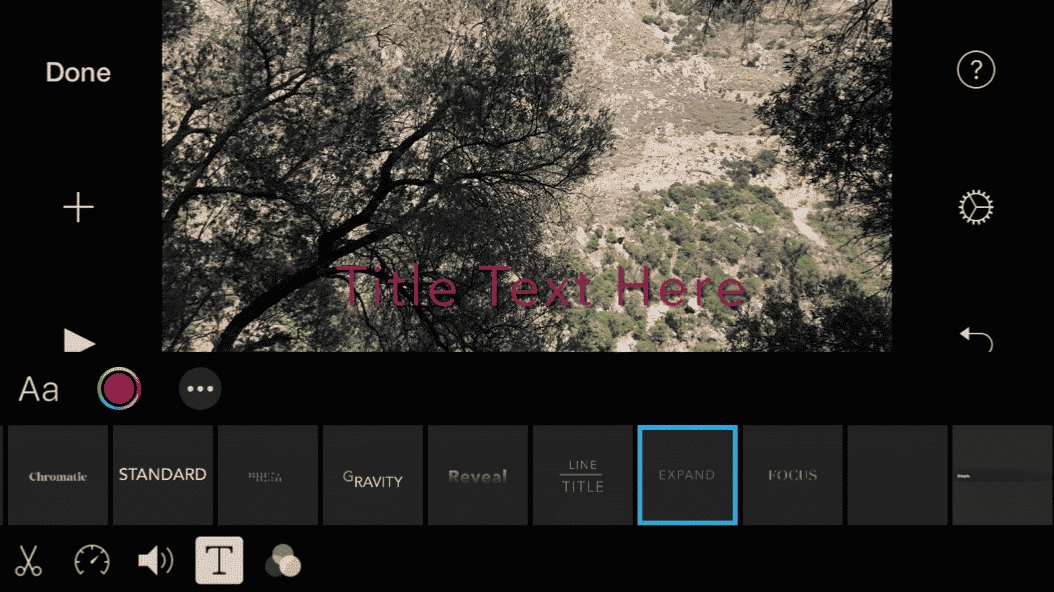
7.2 How to change the text style of your subtitles in iMovie?
On iPad and iPhone, the style of your subtitles can be changed similarly to how you would do it on your Macbook.
- You need to select the ‘Options’ (icon showing three dots) under the ‘ Titles” icon. By doing this, the app will allow you to change the following settings:

You can also change the colour and the font of your subtitles, by selecting the corresponding icons under the ‘Titles’.
7.3 Export your file
Exporting your subtitled video is really easy on iPhones and iPads. After clicking ‘Done’, you simply need to click on the ‘Export’ icon just like in case of any other image, video or other file type. This will allow you to share your video with your friends, on social media or save your masterpiece for later.
8. How to get SRT-files
Though you can use open captioning to make subtitles (titles) in iMovie as explained above, you can do the same with SRT files, and in fact, it proves to be a more time-efficient alternative.
Nevertheless, you would have to get an SRT file for your video before you can do this.
There are several ways you can get SRT files, from using a manual process, hiring a freelancer, to using software. However, over the years, a means has proved more effective in the regard of creating subtitles (.srt file), and the means is using Amberscript.
9. How to burn closed captions in iMovie
Closed captions are an important accessibility feature for videos, as they provide a text-based alternative for viewers who are deaf or hard-of-hearing. iMovie makes it easy to create closed captions for your videos, and the process is quite similar to adding regular subtitles.
To create closed captions in iMovie, start by opening your project and selecting the video clip that you want to add captions to. Then, go to the menu bar and click on Window > Show Closed Captioning. This will bring up the Closed Captioning window.
Next, type out the caption text in the text box provided. You can also adjust the timing and duration of the captions by dragging the blue markers in the timeline. Once you’ve added all of your captions, click on the Export button to save your video with closed captions.
It’s important to note that iMovie supports several different closed caption formats, including CEA-608, CEA-708, and iTT. Before exporting your video, be sure to select the appropriate format in the Closed Captioning window.
Overall, creating closed captions in iMovie is a straightforward process that can greatly improve the accessibility of your videos. By taking the time to add captions, you can ensure that your content is accessible to a wider audience and meets accessibility standards. If you wanna learn more about what closed captions are and how they work you can view our explanatory blogpost about it.
10. How Amberscript can help in creating subtitles for iMovie
Amberscript is a reliable AI-based transcription service and tool that creates subtitle files using the audio transcription. It also possesses the machine-made subtitle generator that helps it get the best subtitle files you want in the quickest time possible. So here is how you get your SRT files using Amberscript.
To get SRT files, the very first step is to create a free account at Amberscript and upload the video you wish to create subtitles for.
2. Let the AI generate your transcript for you
After you have uploaded the video, Amberscript starts to transcribe for you. With the help of their machine-made subtitle generator, this process doesn’t take long, and within minutes you will get your draft. You will then be able to download the first draft which has gone through its online text generator. If needed, you can edit the first draft of your subtitle on the online text editor. The editing includes things like correcting grammar structures and punctuations. As a plus, you even get the chance to annotate and highlight parts of the text (subtitle edit).
3. Export your file
Afterward, if you are happy with the edited subtitles, you can download them into an SRT file. Although you can’t necessarily upload your SRT file onto iMovie, you can copy and paste the formatted texts onto your video to ease the editing process.
Benefits of using Amberscript
Amberscript’s subtitle services are:

Fast
Edit your own text within minutes or leave the work to our experienced subtitlers.

Accurate
Our experienced subtitlers and thorough quality controls ensure 100% accuracy of your transcriptions and subtitles.

Easy
Thanks to a variety of integrations and API interfaces, you can fully automate your workflows.

Secure
Your data is in safe hands. We are GDPR compliant + ISO27001 & ISO9001 certified.
Conclusion
Tersely, all of what is above is how to add subtitles in iMovie. The process of adding subtitles to iMovie videos is not easy and it involves a lot of effort. However, the effort pays off and you can create nice subtitles that look good in your video and that flow very well with the video’s audio. iMovie is not particular about subtitling. However, it is really convenient to be able to use the title feature and create subtitles directly on your MacBook or other Apple products.
Hopefully down the road, Apple will bring in a better option that makes creating and adding subtitles to your content way easier than this. But for now, using the title feature works just fine. Not to forget, when partnered with Amberscript, it works best. Amberscript is a reliable AI-based transcription service and tool that creates subtitle SRT-files. It’s easy, fast and you can even edit your subtitles.
Frequently asked questions
-
Can I burn the subtitles directly onto my video?
If you have exported the transcript as a SRT, EBU-STL or VTT file, you can easily burn them onto your video using video-editing software.
-
Can I change the position of the subtitles?
That needs to be done using a video editor like VLC. Go to Tools > Preferences [CTRL + P]. Under Show settings, select the option that says All to switch to the advanced preferences. Navigate to Input/Codecs > Subtitle codecs > Subtitles. Under Text subtitle decoder set, the Subtitle justification to left, right or center.
-
How do I add subtitles to a YouTube video?
To add subtitles to your Youtube video, simply add the file you have created using Amberscript to your video in the Youtube Studio. Click on “subtitles”, then “add” and finally “upload file” and select the SRT file.
-
How do I add subtitles to a video on Vimeo?
To add subtitles to your Vimeo video, simply add the file you have created using Amberscript to your video in the editing window on Vimeo. Click on “distribution”, then “subtitles” and finally click on the + symbol to upload the SRT file.
-
How do I order translated subtitles?
To order translated subtitles, you can upload your file like you would normally do. You can then select manual subtitling. Once you have selected this, an option will appear where you will be able to select the language the subtitles need to be translated to. If the language that you want is not one of the options you can contact us through our contact form.
-
To which languages can you translate subtitles?
For our human-made subtitling services we work with a network of language experts in 15 different languages. Find out which here. If the language you want is not on the list, please contact us through our contact form.
-
What subtitle file formats are supported?
Our software allows you to export the transcript from the video or audio file as an SRT, EBU-STL or VTT file.
Can I add SRT files to videos in iMovie?
No. You cannot import SRT files directly into iMovie.
However, you can copy and paste the text from the SRT file – this is much faster than typing directly into the text box.
Tip:
You can also retrieve your SRT file from iMovie. After opening subtitles, you can request the subtitle file. How to do it:
- First, export a QuickTime file of your project to a video file on your computer.
- Next, arrange the subtitle files along with your export.