Transcription
Ultimate Guide to Adding Subtitles in Davinci Resolve
2 Mar 2022
8 minute read
If you’d like to edit programs and videos, Davinci Resolve is the perfect software to use. It’s equipped with the latest tech tools that help video editors easily integrate graphics, render images, customize colors, optimize sound features, and add audio subtitles to videos. As a result, it’s a perfect solution for professional video editors. In this step-by-step guide, we will tell you how to add subtitles to Davinci Resolve.
Table of Contents
What are subtitles?
The definition of subtitles
Subtitles are text that is usually positioned at the bottom of your video and are created from the dialogue of videos or movies. Thanks to the subtitles, members of the Deaf and Hard of Hearing community or users who don’t want to turn up the volume can understand what’s happening and what’s being said in the video.
The benefits of subtitles
- Your video content will be discovered by more people on social media
- Reach a potentially wider audience
- Improve SEO
- Attract more foreign viewers to your content
Adding Subtitles with Davinci Resolve
Subtitles are one of the primary requirements from video makers these days. Whether a short video or a full-length program, content creators like to target a wider audience by providing video subtitles for non-native language speakers.
So, you can communicate with those who are deaf or hard of hearing, or the ones unable to understand the language used in the video. As a result, tools like Davinci Resolve let you target a global audience, enhancing your brand outreach.
Working with Davinci Resolve makes adding subtitles to your videos more straightforward and quicker. Therefore, this tool adds to your efficiency as a video editor. Whether creating video subtitles or exporting them for other videos, it’s all possible through Davinci Resolve.
How to Add Subtitles
Davinci Resolve offers several ways to add subtitles to your videos. There are both manual and automatic methods to do it. So, let’s find out more.
Manual Creation of Subtitles
Let’s say that you have completed your video editing and you are only left with the subtitles. In this case, you can add the subtitles manually by following these steps:
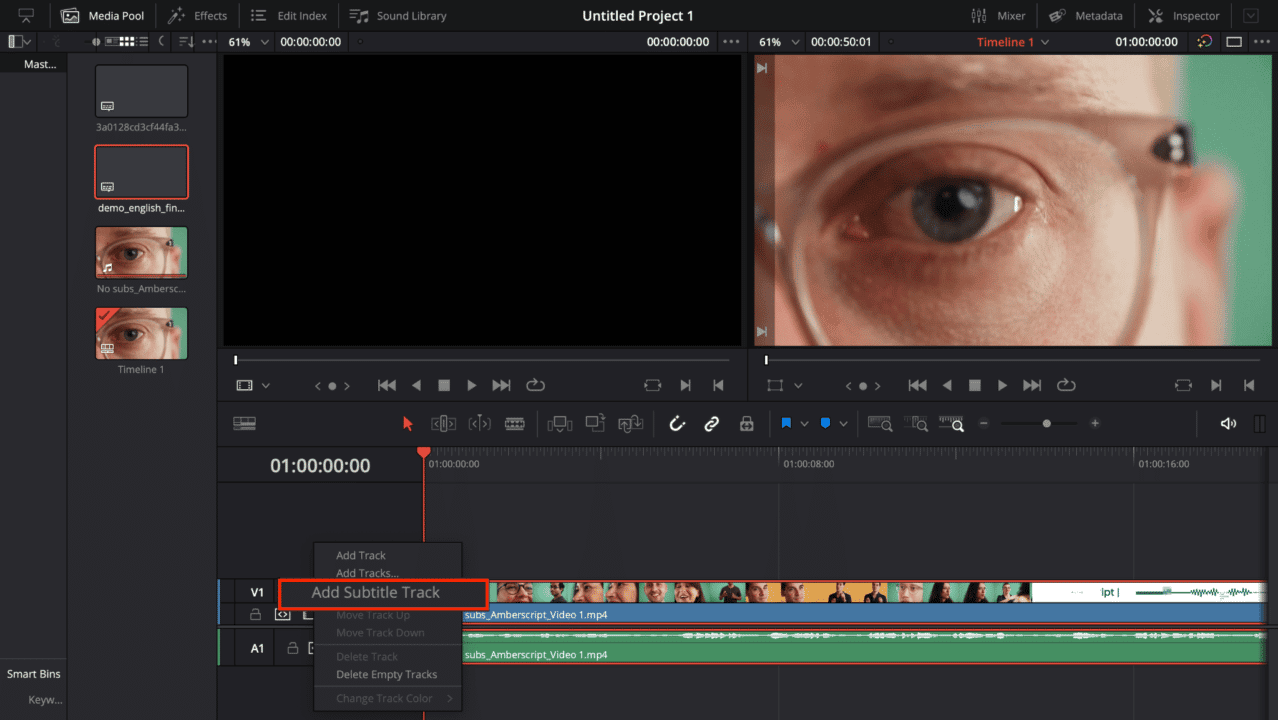
1. Select Subtitle Track
Go to your video track timeline in the Davinci Resolve software and click the ‘Add Subtitle Track’ option. Doing this will add the track containing your video subtitles.
2. Add Subtitle Track
Now, move your cursor to the point where a dialog starts. Next, right-click on the subtitle track. Then, select the ‘Add Subtitle’ option.
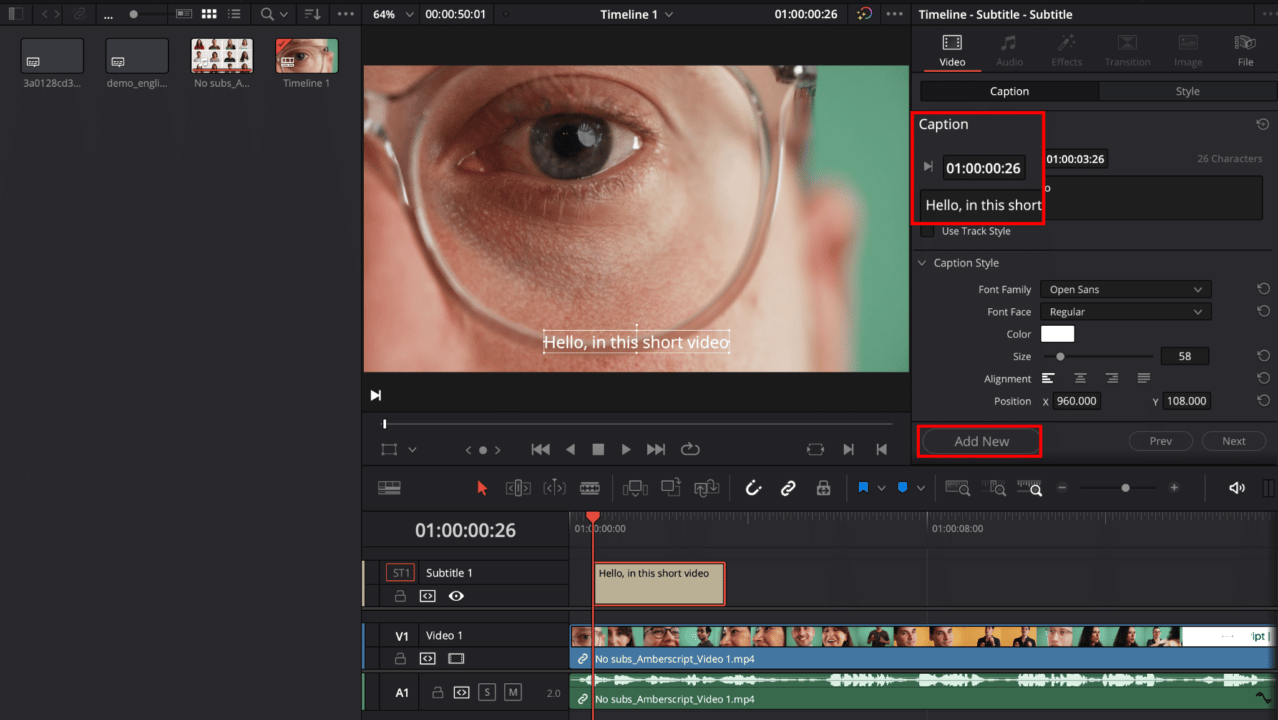
3. Type In the Caption
Once you have selected the subtitle, you can now type your caption in the new panel. Next, fill in the caption in the Inspector.
4. Adjust Subtitle Length
Match the section of the audio to your subtitle and adjust its length.
5. Listen to the Audio
Listen to the audio section and type it into the caption space. This will add the subtitle and start appearing in the video.
6. Styling Subtitle Font
In the inspector window, you can also see the Style tab. Use this tab to modify how your caption appears in the video. You can customize the font, size, color, background, etc. Moreover, you can keep the same style for all your subtitles by clicking the ‘Use Track Style’ checkbox. Make sure to use an easily readable font to make it easier to read at a faster pace.
7. Add Next Subtitle
Now, move the cursor to the point where the following audio line begins. Then, in the inspector window, click ‘Add New .’ Alternatively, you can right-click on the subtitle track and add another title. Now, repeat the process to add subtitles throughout the video.
Add SRT Subtitles to Davinci Resolve
While manual addition of subtitles is a simplified process, it is quite laborious. Therefore, there must be a much faster option to shift the subtitles to the video quickly. There are a couple of ways to do it if you want to import the subtitles to your video.
Getting SRT Subtitles with Amberscript
Platforms like Amberscript, are an easy way to get subtitles for your videos. All you need to do is upload your video content and then choose to get machine-made subtitles, have our team of professional subtitlers take the lead or reach a wider audience by using our human-made or translated subtitling services.
After you have uploaded the video, Amberscript starts to transcribe your video. With the help of their machine-made subtitle generator, this process doesn’t take long, and within minutes you would get your text draft. Then you will be able to download the first draft which has gone through its online text generator.
You can edit the first draft of your subtitle on their online text editor to suit anything you want. The editing includes correcting grammar structures, such as punctuations and align them to your video perfectly. As a plus, you even get the chance to annotate and highlight parts of the text (subtitle edit).
Afterwards, if you are happy with the edited subtitles, you can download them in Text, SRT, VTT or EBU-STL and many other formats, with optional timestamps and speaker distinction. You even have the chance to download your video together with your subtitles.
Alternatively, if you have more complex, or a large amount of video content, you can have our team of professional subtitlers manually edit the text. The added value is that it’s 99.9% accurate and you can convert speech to text in over 15 languages. As our team of freelancers are from different part sof the world, we make sure to transcribe jargon or accents accurately.
For more details on our subtitling services, start your free trial now.
Once you have the .srt file, it will be imported to your video. Here’s how to add your capions to Davinci Resolve.
Add your subtitles to Davinci Resolve
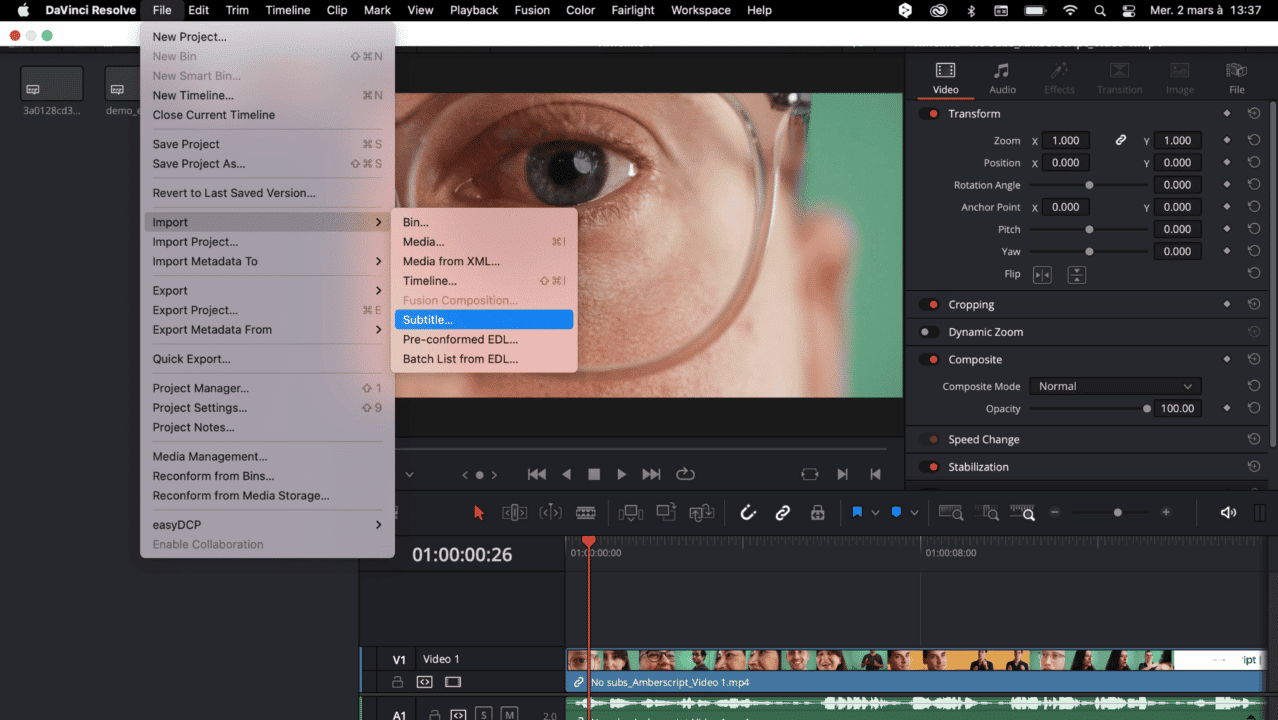
1. Import and Select
Go to the ‘File’ menu in your Davinci Resolve software and click on ‘Import.” Next, click “Subtitle.’ Then, navigate to your .srt file and select it to import. Once imported, the .srt file should appear in the media pool on your Davinci Resolve software.
2. Drag and Drop
Once the .srt file is in the media pool, you can drag and drop the files to your current timeline. Just place the file where your dialogues start and make minor syncing adjustments.
3. Stylize Subtitles
The subtitles do not retain the styles, so you must restyle them. However, it can be done in the same way as mentioned earlier.
4. Modifying Subtitles
Generally, the subtitles are correct, but YouTube automatic transcriptions may have a few mistakes. Make sure to correct the errors and finalize your subtitles. You can do it in the Captions section in the Inspector.
Export Subtitles
Once you have your subtitles in place, you can export the entire video along with the subtitles. First, go to the delivery page in the Davinci Resolve software. You can find this option in the ‘Subtitle Settings’ option. There are three ways to export your subtitles.
- Exporting as a Separate File
When you export the subtitles file as a separate file, it is more convenient for the users to turn the subtitles on or off. Especially when they are watching it on YouTube, the users can view or block the subtitles. If you want to use this option, you must upload the subtitles file separately on YouTube.
- Burn Subtitles into the Video
This option permanently places the subtitles into your video, and you cannot remove them. Moreover, the viewers don’t have the opportunity to turn them off either. This option suits specific platforms like Facebook or Instagram, where the videos autoplay on mute.
However, if you are putting the video on YouTube, it’s always a great option to let the users decide whether they want the subtitles or not.
- Video Embedding
The embed option is mainly for broadcast use. Moreover, it only works if there is a supported file format. To export the subtitles, follow these steps:
Step 1- Selecting the Export Format: Go to the delivery page and choose your export format. Also, configure all the settings you want before starting the export process. Check the bottom left of the window, and you should see the Subtitle Settings option. The dropdown menu should have the Export Subtitles option. Click it and proceed to selection.
Step 2– Pick Your Export Method: Now, select your export method. For instance, if you want to export as a separate file, choose your file and then check the ‘include the following subtitle tracks in the export’ option. Next, start rendering the video, and it will export your subtitles according to your preference
Benefits of using Amberscript
Amberscript’s subtitle services are:

Fast
Edit your own text within minutes or leave the work to our experienced subtitlers.

Accurate
Our experienced subtitlers and thorough quality controls ensure 100% accuracy of your transcriptions and subtitles.

Easy
Thanks to a variety of integrations and API interfaces, you can fully automate your workflows.

Secure
Your data is in safe hands. We are GDPR compliant + ISO27001 & ISO9001 certified.
How to Burn Closed Captions in DaVinci Resolve
DaVinci Resolve is a professional video editing software that offers robust features for creating closed captions for accessibility purposes. To create closed captions in DaVinci Resolve, follow these steps:
- Import your video: Start by importing the video you want to add closed captions to into DaVinci Resolve.
- Create a new subtitle track: In the timeline, right-click and select “New Track > Subtitle” to create a new subtitle track.
- Add subtitles: On the new subtitle track, click on the “Add Subtitle” button and enter the subtitle text for each line. You can also adjust the timing of each subtitle by dragging the subtitle marker on the timeline.
- Customize subtitle appearance: DaVinci Resolve allows you to customize the appearance of your subtitles, such as font style, size, and color. You can do this by selecting the subtitle track and opening the “Inspector” panel.
- Export your video with closed captions: When you’re done creating your closed captions, you can export your video with closed captions by selecting the “Deliver” tab, choosing your desired export format, and selecting the “Burn In” option for subtitles.
By following these steps, you can create closed captions in DaVinci Resolve for accessibility purposes, ensuring that your video content is accessible to all viewers. If you want to learn more about what closed captions are, and how closed captions are different from subtitles, you can read our extensive blogpost about it.
A Couple of Tips to Consider
While you’re adding subtitles to your video with Davinci Resolve, here are a couple of considerations to make your work smoother.
- Make sure that you add the subtitles at the very end of your video rendering. If you do it earlier, new video edits would mean shuffling the subtitles. Hence, you’re doing the same thing from the start.
- Use the industry standards for the number of characters per line. The standard duration of the title depends on the number of characters in it. Generally, it’s around 12 to 17 seconds.
Conclusion
Working with Davinci Resolve to add subtitles to your videos is a seamless process, and it can give you high-quality results within no time. Besides subtitling, Davinci Resolve is a comprehensive software offering tools for color enhancement, rendering, and audio processing. Therefore, it can be a standalone software for all your professional video editing needs.
As you deploy Davinci Resolve for subtitling, it gives you a better chance to export quality content to your social media platforms. Moreover, your video content gets an international appeal, allowing you to showcase your art to a global audience.
Frequently asked questions
-
Can I burn the subtitles directly onto my video?
If you have exported the transcript as a SRT, EBU-STL or VTT file, you can easily burn them onto your video using video-editing software.
-
Can I change the position of the subtitles?
That needs to be done using a video editor like VLC. Go to Tools > Preferences [CTRL + P]. Under Show settings, select the option that says All to switch to the advanced preferences. Navigate to Input/Codecs > Subtitle codecs > Subtitles. Under Text subtitle decoder set, the Subtitle justification to left, right or center.
-
How do I order translated subtitles?
To order translated subtitles, you can upload your file like you would normally do. You can then select manual subtitling. Once you have selected this, an option will appear where you will be able to select the language the subtitles need to be translated to. If the language that you want is not one of the options you can contact us through our contact form.
-
What subtitle file formats are supported?
Our software allows you to export the transcript from the video or audio file as an SRT, EBU-STL or VTT file.
-
How do I generate captions?
You can generate captions automatically using Amberscript. Our software allows you to export transcription based on audio/video files as SRT, EBU-STL or VTT files, which can easily be inserted into a video-editor. Want to know more? Here is a step-by-step guide.
-
How do you keep my files secure and confidential?
Amberscript’s IT infrastructure is built on the server infrastructure of Amazon Web Services located in Frankfurt, Germany. All data that is processed by Amberscript will be stored and processed on highly secured servers with regular back-ups on the same infrastructure.
-
In which formats can I export my subtitles?
Our software allows you to export the transcript from the video or audio file as an SRT, EBU-STL or VTT file.
-
What is the price?
For our prices, please refer to our pricing page.
-
What is the turnaround time?
Our state-of-the-art speech AI delivers results in less than an hour (depending on the size of the file, it can take only takes a few minutes). Just upload your audio into our system and we will notify you as soon as the file is ready! if you would like to learn about turnaround times for our manual subtitling services, click here.