

Transcription
How To Add Subtitles In ShotCut
8 Mar 2022
7 minute read
If you’re a pro content creator and editor, you may already be familiar with ShotCut. It is a free, open-source, and cross-platform especially designed for editing video on Linux, macOS, Windows, and FreeBSD. You may be wondering how to add subtitles in the program. The easiest way is manually entering the transcript in the input box. But how to do it properly? Let’s find out in this guide.
Table of Contents
Subtitles vs. Captions: What Do You Actually Want to Add?
Before moving further, you have to find out whether you want to add subtitles to the video or the captions.If you think they both might be the same, allow us to burst your bubble and tell you the difference between subtitles and captions.
Although both appear in the same position and help you understand the audio much better, they actually have contrasting goals.
Subtitles intend to translate the dialogues in the written text to help the viewers understand the video’s message. The text appears in the video and is available in a wide range of languages.
Typically, video creators add subtitles, thinking that the person viewing the videos can hear audio but doesn’t know the video’s language.
On the other hand, captions also translate the dialogue of a video into written texts.
However, they are specifically created for people who can’t hear or understand at all. This is why captions also include a detailed description of sound effects, music, exclamations, etc.
This means captions help you understand all the expressions and music genres even if your video’s sound is off.
So, what do you actually want to add in ShotCut? If it’s the subtitles, you have the green signal to move forward to the step-by-step guide for doing so.
Would you like to know more about the difference between Subtitles, Closed Captions, and SDH Subtitles? Read our detailed guideline and learn more.

How are they different?
Subtitles, Closed Captions, and SDH Subtitles
- What are subtitles?
- What are closed captions?
- What are SDH captions?
- How to create subtitles with Amberscript?
Amberscript’s subtitling services
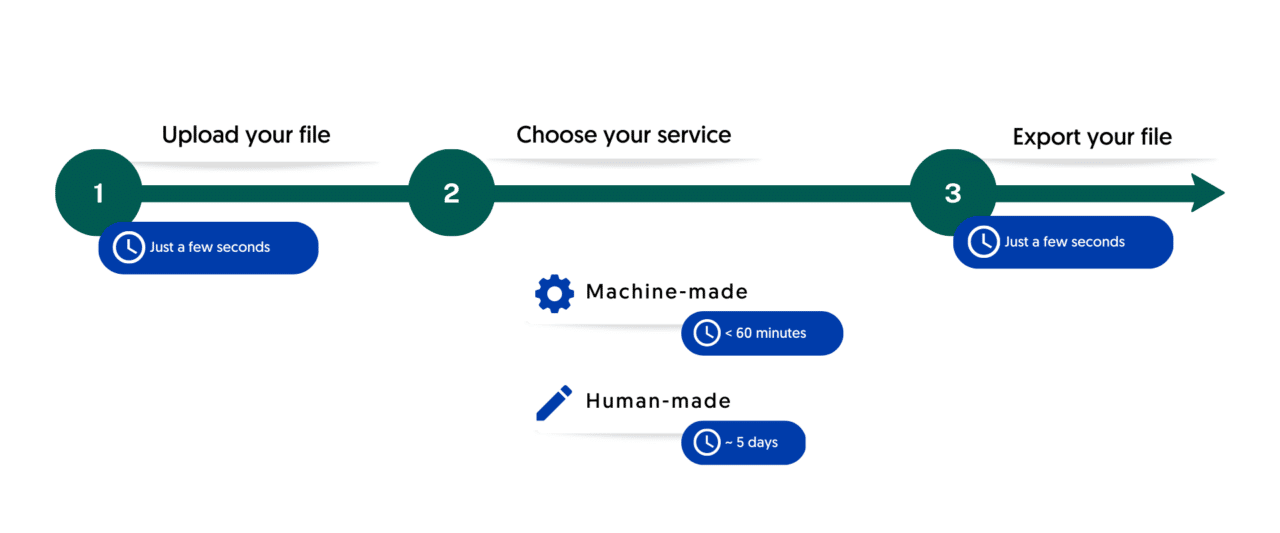
Do you know how much time it takes to transcribe audio manually? In one of our previous posts, we deep dived into how this process can be pretty much time-consuming, and you may end up giving up the entire idea of adding subtitles to your video. So, what’s the easy way out? A subtitle-generation platform like Amberscript!
We offer both machine-made and human-made services for the different needs of our users. Our machine-made services can save up to 70% of your time and are offered in more than 39 languages. On the other hand, if you need subtitles of 100% accuracy, you have the chance to trust our professional subtitles to help you. To reach a wider, international audience, we also offer translated subtitles.
Would you like to try our services? Start your free trial now!
You might be wondering how to generate subtitles that you can later add in ShotCut. If you would like to know the details, we suggest you continue reading for our step-by-step guide on how to do that.
Generating Subtitles for ShotCut
If you want to increase the visibility and upgrade the ranking of your video on the search engine, you should add subtitles to it. Here is how you can create .SRT files easily:
1. Create an SRT File using a subtitling software
You can’t add or import subtitles to ShotCut without having an .SRT file, obviously.
This is a file type containing a time-coded transcript (text form of the audio) for the video so that you can directly import the subtitles into any app without tiring yourself.
If you want to create a transcript manually, you can do so by listening to the audio and noting it down. On the other hand, using an automatic subtitle generator, like Amberscript is so much easier.
- To get started, you need to upload the video in the software and press upload once it gets uploaded.
2. Once done, artificial intelligence (AI) begins to show its magic and create your transcript.
3. As soon as the step completes, you’re now free to edit the .SRT file, add punctuations or adjust the spellings according to your locale. Once you feel satisfied with the end result, you can then finally export it to your device.
Pro tip: Alternatively, if you totally want to sit back and relax, Amberscripts team of professionals can create the subtitles for you in over 15 languages. The text is 99.9% accurate and will be synchronized correctly.
The best part is that you can export the subtitles file in any format you like. For instance, it could be either SRT, VTT, or EBU-STL. Just pick the file format in the software and receive it within minutes.
Burning Closed Captions in ShotCut
- Create a new project in Shotcut and import the video you want to add closed captions to.
- Click on the “Filters” button in the top menu and then click on the “Text” filter.
- In the Text filter window, enter the text for the first caption and customize the font, size, and color as desired. You can also position the caption by dragging it around the preview window.
- Once you’ve created the first caption, click on the “Keyframes” tab in the Text filter window.
- In the Keyframes tab, click on the “+” button to add a new keyframe for the caption.
- Move the playhead to the point in the video where you want the caption to appear and position the caption in the preview window.
- Click on the “Fade” tab in the Text filter window and adjust the “Fade in duration” and “Fade out duration” to your desired settings.
- Repeat steps 3-7 for each caption you want to add to the video.
- Once you’ve added all the captions, click on the “Export” button in the top menu to export the video with closed captions.
- In the Export window, select the desired file format and encoding settings and then click on the “Export File” button.
That’s it! Your video now has closed captions that can be turned on or off by the viewer. Remember to preview your video to ensure that the captions are synced properly with the audio and adjust the timing if necessary.
Adding Subtitles in ShotCut
Now, let’s see how to add subtitles in ShotCut the right way. Until now, you most probably have the .SRT file or transcriptions on your hand, right? If so, you need to follow the below three steps to add subtitles in ShotCut:
Editing Video Frames
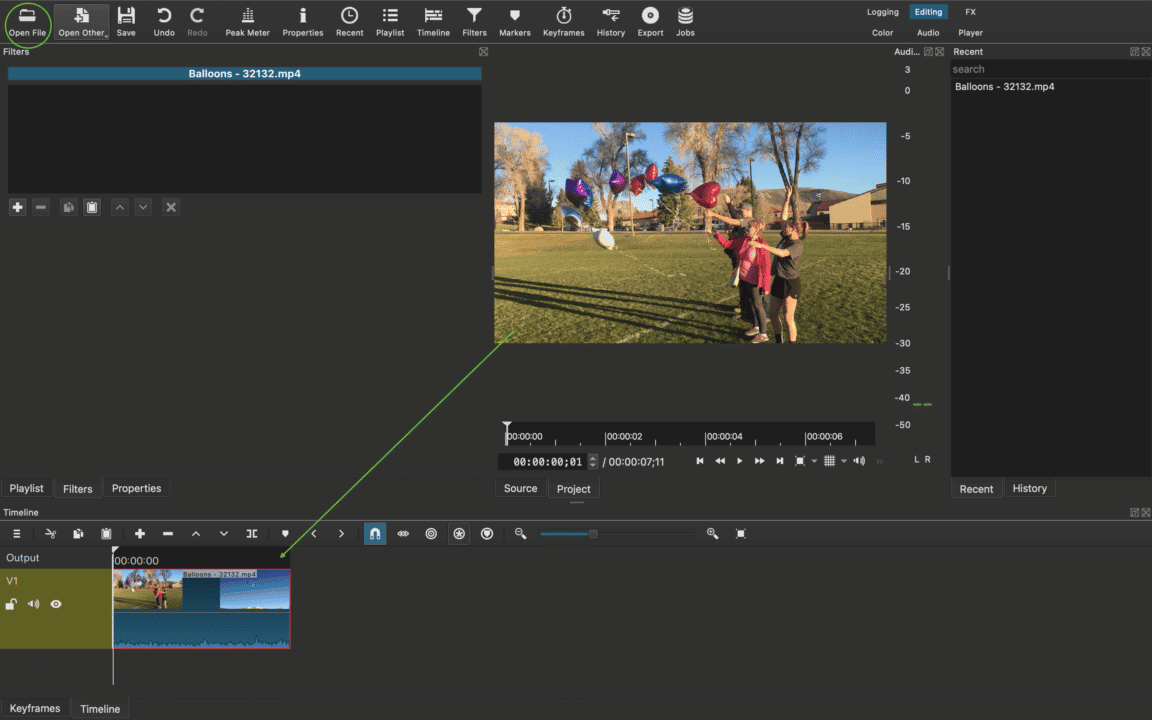
Open ShotCut and load the video. You can do so by opening the “File” in the upper left corner of the program. Once the video completes loading, it will appear on the preview screen.
You can put the previewed video on the timeline by either dragging it and dropping it on the timeline or clicking the down arrow on the top.
On the other hand, if you have already generated a video clip in the timeline, you have to edit the video frames or cuts.
However, this step might be a little exhausting as you may feel trouble finding the shortcuts for the crop feature. This is because they are usually different for different programs.
In ShotCut, you can most easily find the crop function by right-clicking on the video clip.
You’ll see that the ShotCut is “Cut at the playhead position.” Select this to cut the video or simply press the shortcut key “S” on your keyboard to edit the video.
Adding Subtitles
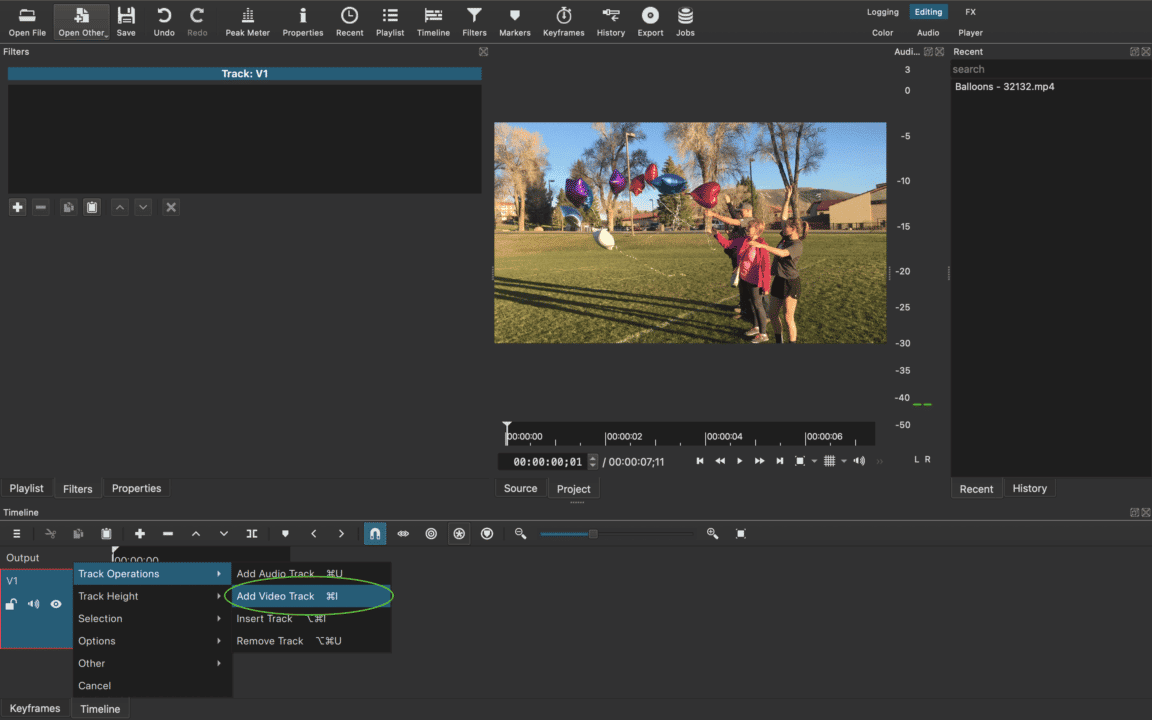
After editing the cut, you can add subtitles. But for that, you need to first add a track by right-clicking the V1 section. It will give you several options for the track. You can add a track by “adding a video track” or “inserting a track.”
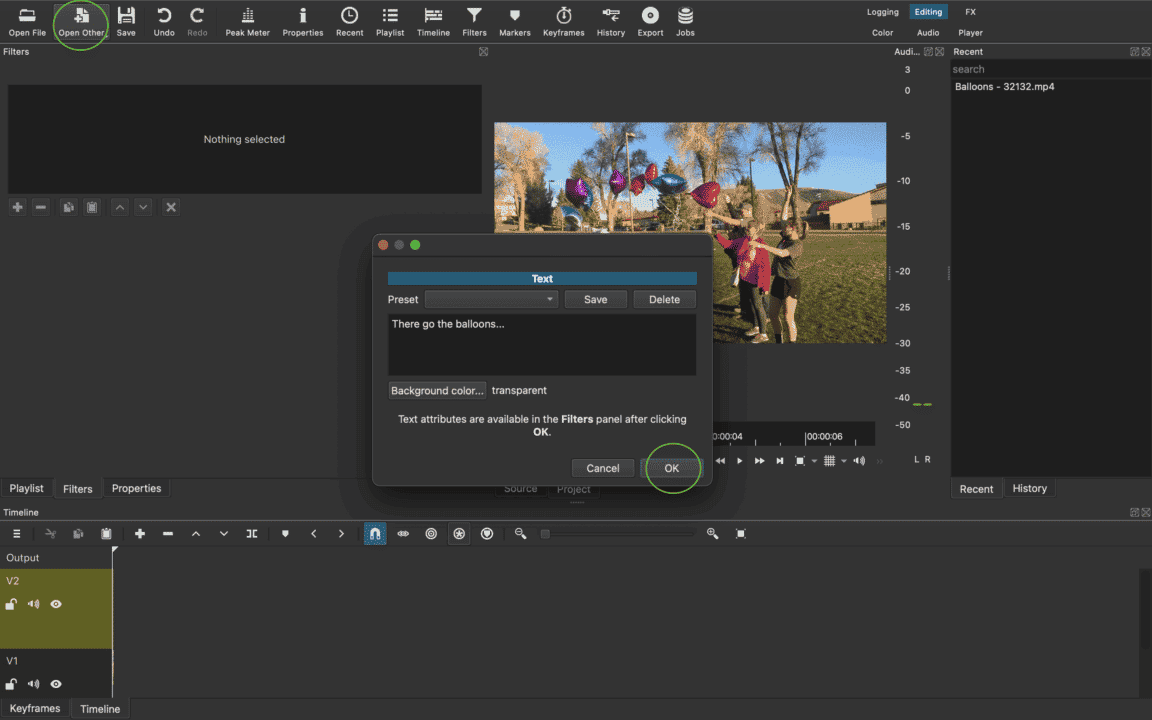
Once you add a track, go to the “More” option on the top left to add a text. Now, select the text, and it will open the input window. Then, all you have to do is enter the subtitle in the input window and click OK.
The process doesn’t end here; you need to ensure that the video and the subtitles appear in sync. Typically, when subtitles are loaded in ShotCut, they appear on a black, plain background. To solve that, you need to add the timeline.
Select the subtitle, drag, and drop it on the added track. The video clip will start appearing in the background.
Editing Subtitles
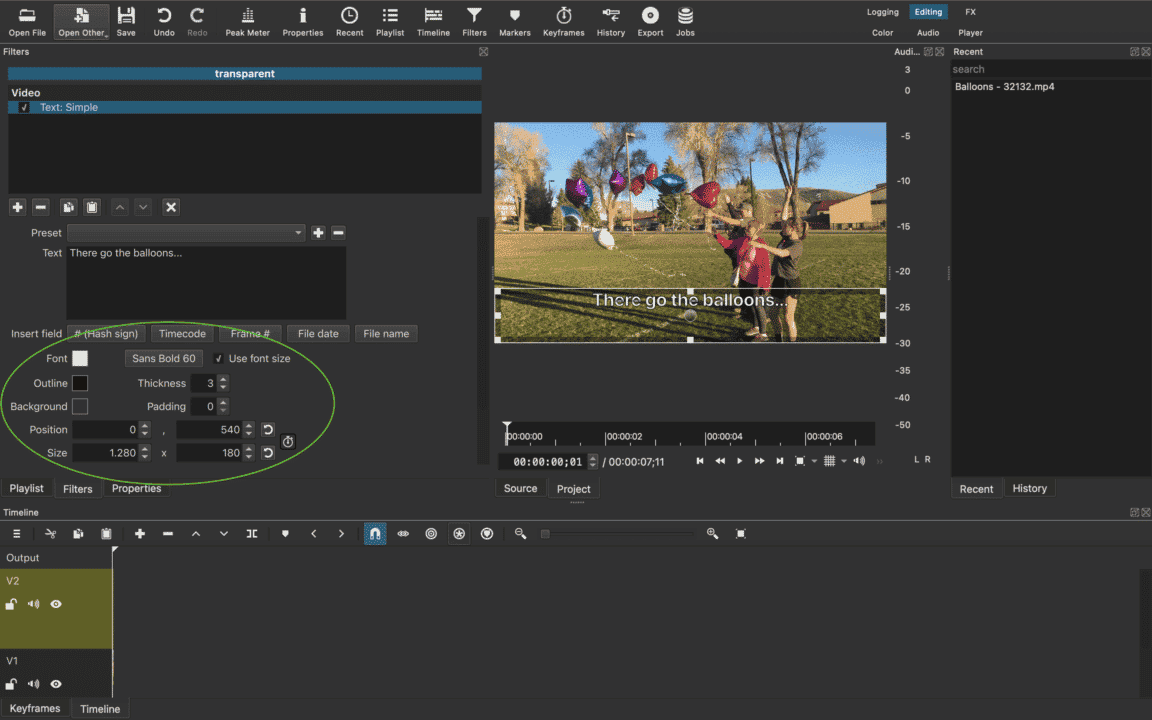
In the subtitles option, you’ll come across a field called “Insertion.” It includes a hash sign, frame, timecode, and file date, allowing you to edit the subtitles as you like.
You can change the font, set the outline, adjust the thickness and background color, and the alignment of the subtitles.
Keep in mind that the sizes in ShotCut are quite different from other programs in resolution. Thus, you may not know it at first; however, you can adjust the resolution or size directly on the preview screen if you aren’t comfortable with the default size.
To relocate the subtitles, you can click on the transparent circle icon in the center.
And you’re done!
Frequently asked questions
-
What is ShotCut?
ShotCut is an open-source and free app used for editing videos. It offers various features to the users, which is why beginners prefer it for basic editing, and professionals use it for advanced modifications as well as adding subtitles to the videos.
-
Can I import SRT Files into ShotCut?
Yes, you can. VTT files are another common type of subtitles file that you can easily import into ShotCut. To save your time and energy, it’s better that you use an automatic subtitles generator that supports VTT files.
-
How do I add subtitles to ShotCut?
You can manually add subtitles to ShotCut easily. But before that, you need to extract an .SRT or .VTT file of your video transcript. If you have a strict deadline, you can use an automatic subtitles generator platform like Amberscript and get a well-designed transcript within a few minutes. You can then add this file with the steps mentioned above.
-
What is the difference between subtitles and closed captioning?
Subtitles are for viewers who are unable to understand the language spoken, whereas captions are for viewers who are not able to hear the audio.
Captions, which can be closed or open captions, incorporate both the conversation and any other relevant sounds. They are used to assist the deaf by showing all auditory sounds. That is, they include environmental sounds as well as changes in speaker and speaker tone.
Captions can also be used by hearing people who cannot hear the audio in a noisy place or who do not want to disturb the other people in their environment. Subtitles can also be used for this purpose if the viewer just wants to follow a conversation.